The goal of this article is to explain how to use Apache Hop on AWS.
In our example, we will install Apache Hop on an EC2 instance and create a simple pipeline to read data from S3 and store it in Redshift. Of course Hop is not limited to reading data from S3 and writing data to Redshift - this is just one out of the many possibilities.
We will spend most time on setting up the AWS environment: We will go beyond setting up a minimum AWS environment so that you get some ideas for further use-cases as well.
I must admit that I could have started this (potential) blog series with running Apache Hop in a Docker Container on AWS Beanstalk, which would have been the easier option (quite likely), however, the steps outlined in this article should be an interesting adventure for someone trying to explore AWS.
Topics like running Apache Hop in a container, using Hop with AWS Lambda and automation will be covered another time (potentially).
We will set up our environment via the AWS console. I will not explain everything in detail here: I assume that you have some experience with AWS and that you’ve played around with Apache Hop.
Creating the AWS Environment
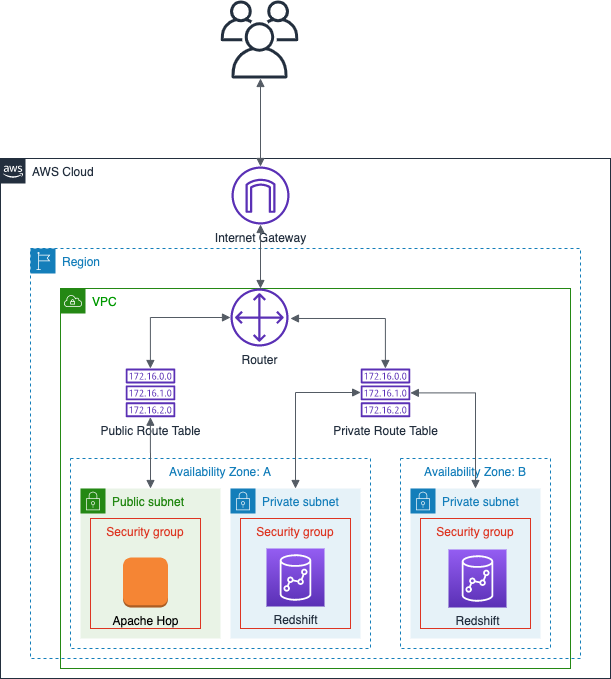
We will create a dedicated VPC with:
- one public subnet
- two private subnets: The private subnets will span two Availability Zones (AZ) and host our analystic database, Redshift in this case.
- Apache Hop will be running on an EC2 instance in the public subnet.
As you can see our analytic database is on fairly stable “feet” (if one EC2 instance in one AZ goes down the other instance in the other AZ will take over), however, Hop in this setup is a single point of failure - something we can live with in the development environment.
Simplified resources diagram:
For each of the resources that we create, we add an extra tag named project with the value hop-tutorial so that we can later on easily search for all the resources we stood up for this project (and hence can easily delete them). I will not necessarily mention this step again later on.
Important: Creating resources on AWS will incur costs, so be mindful of this. I guess that you could get away with using the free-trial option (if you haven’t made use of it already). Keep an eye on the AWS billing page.
We will create the resources via the AWS console (Web UI) in the following order:
| Order | Area | Component | Optional | Justification/Purpose |
|---|---|---|---|---|
| 1 | Network | VPC | No | We need our own network. |
| 2 | Network | Subnet | No | We divide our network into smaller controlled zones. |
| 3 | Network | Elastic IP address | Yes | Persistent IP address. Might be useful if you are making Hop functionality available via REST endpoints (via Carte/Hop-Server) or if you use WebHop (Web-based GUI). |
| 4 | Network | Internet Gateway | No | Access to the internet. |
| 5 | Network | Route Table | No | For routing the traffic/creating private and public subnets. |
| 6 | Network | Security Group | No | Firewall for our EC2 instance(s) to only allow certain traffic (SSH, HTTP, HTTPS). |
| 7 | Network | Endpoint | Yes | To access S3 over a private “line” instead of going via the internet. Definitely optional - I didn’t do this for this tutorial. |
| 8 | Storage | S3 bucket | No | To store our input file(s). |
| 9 | Analytics | Subnet Group | No | Required to run the Redshift cluster across AZs. |
| 10 | Analytics | Amazon Redshift Cluster | No | To store our processed data and have it ready for consumption by front end tools. |
| 11 | Authorisation | IAMs role | No | To grant access from our EC2 instance to S3 and Redshift. |
| 12 | Compute | EC2 instance | No | To install and run Hop. |
The following steps are all executed via the AWS console (Web UI):
Settings below are my own preference for a dev environment - adjust as required.
Naming Conventions: You will realise that I follow a certain convention when assigning names to AWS resources. The first part of the name is the component name, the second part the project acronym and the third part the AWS region. The rest of the pattern varies by AWS component.
<aws-component>-<project-acroynm>-<environment>-<region>-*
Our project acronym will be hat , short for hop aws tutorial.
Networking
Create VPC
AWS Console: Network > VPC > Your VPCs > Create VPC
| VPC Name | Region |
|---|---|
vpc-hat-dev-ew2 |
eu-west-2 |
First let’s create our own virtual private network in the cloud:

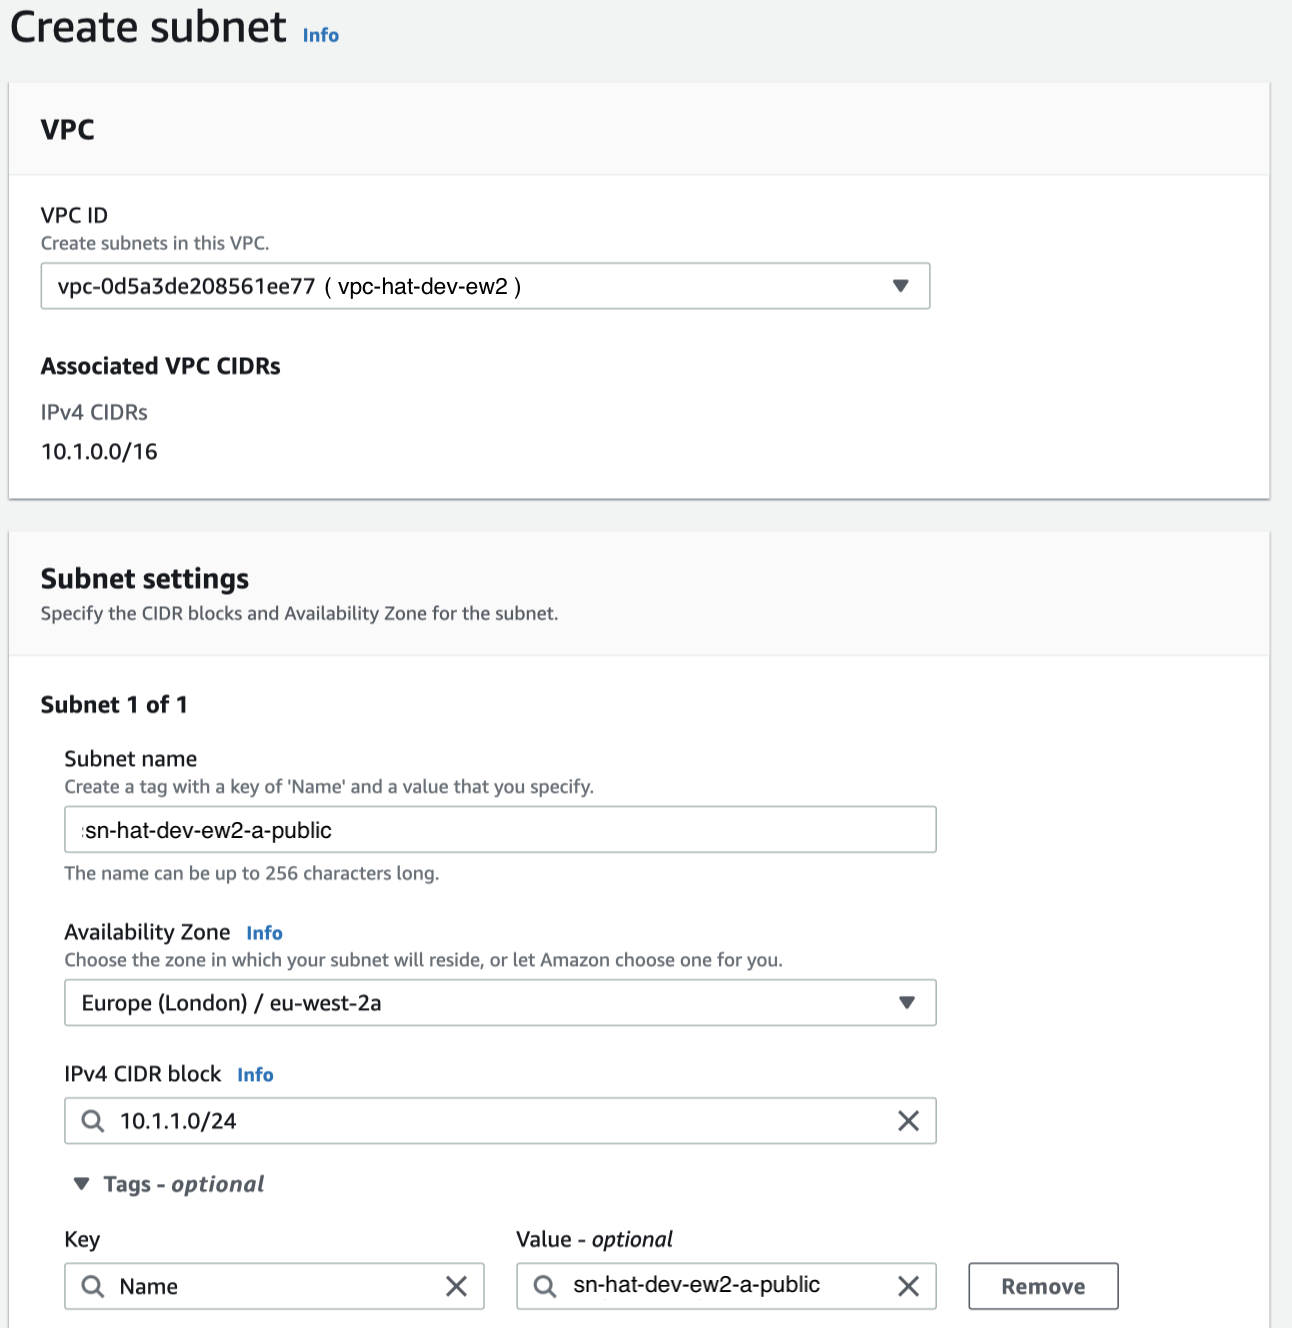
Create Subnet
We will create three different subnets in our VPC, which will serve two distinct purposes:
- 1 Public subnet
- 2 Private subnets
As the experienced reader you might already point out that a subnet by itself can neither be public nor private and you are quite right in thinking so - we will create dedicated route tables later on.
| Subnet Name | Scope | Region | AZ | CIDR Block |
|---|---|---|---|---|
sn-hat-dev-ew2-a-public |
Public | eu-west-2 | a | 10.1.1.0/24 |
sn-hat-dev-ew2-a-private |
Private | eu-west-2 | a | 10.1.2.0/24 |
sn-hat-dev-ew2-b-private |
Private | eu-west-2 | b | 10.1.10.0/24 |
AZ = Availability Zone
Public Subnet
AWS Console: Network > VPC > Subnets > Create subnet
The first subnet we will create will eventually be the public one (once we create the route table for it):
- Name:
sn-hat-dev-ew2-a-public - AZ (Availability Zone):
a - IPv4 CIDR block:
10.1.1.0/24
Set it up as shown below:
Private Subnets
Next create another subnet (which we will declare a private subnet later on):
- Name:
sn-hat-dev-ew2-a-private - AZ (Availability Zone):
a - IPv4 CIDR block of
10.1.2.0/24
Finally create yet another subnet (which we will declare a private subnet later on):
- Name:
sn-hat-dev-ew2-b-private - AZ (Availability Zone):
b - IPv4 CIDR block of
10.1.10.0/24
Create Elastic IP address
Optional - we will not cover this here.
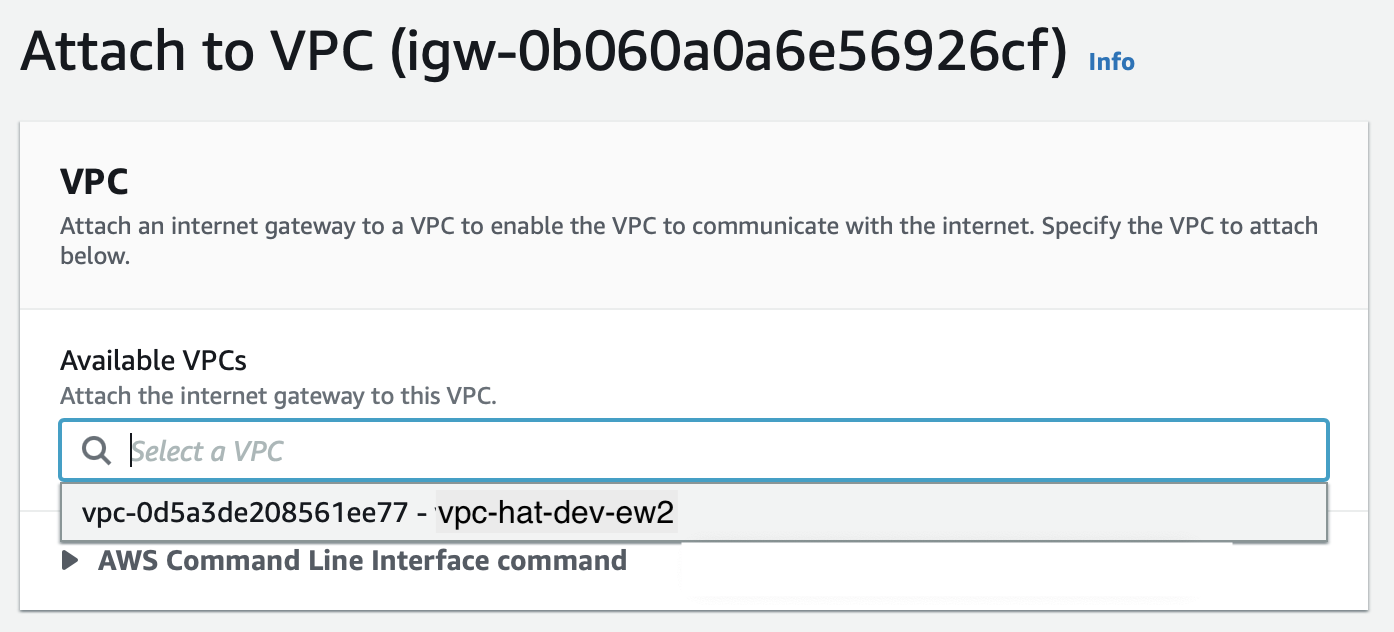
Create Internet Gateway
AWS Console: Network > VPC > Internet Gateway > Create internet gateway
| Internet Gateway Name | Region |
|---|---|
igw-hat-dev-ew2 |
eu-west-2 |
As the name inclines, this component will enable access to the internet for EC2 instances within our public subnet. This component has to be in place before we set up the route table, which regulates the traffic.

Once created, attach it to our VPC:
Create Route Table
In this section we will create the dedicated route table for each subnet so that they fulfil their purpose correctly (being either a private or public subnet).
| Route Table Name | Scope | Region |
|---|---|---|
rt-hat-dev-ew2-public |
Public | eu-west-2 |
rt-hat-dev-ew2-private |
Private | eu-west-2 |
Route Table for Public Subnet
AWS Console: Network > VPC > Route Tables > Create route table
Name it rt-hat-dev-ew2-public and make sure you link it with the VPC we created earlier on (vpc-hat-dev-ew2).
Once created, click on the ID to bring up the route table settings page: Click on the Routes tab at the bottom of this page and click on Edit routes, then click on Add route:
- Destination:
0.0.0.0/0(any communication to the internet) - Target: pick the internet gateway we created earlier on.
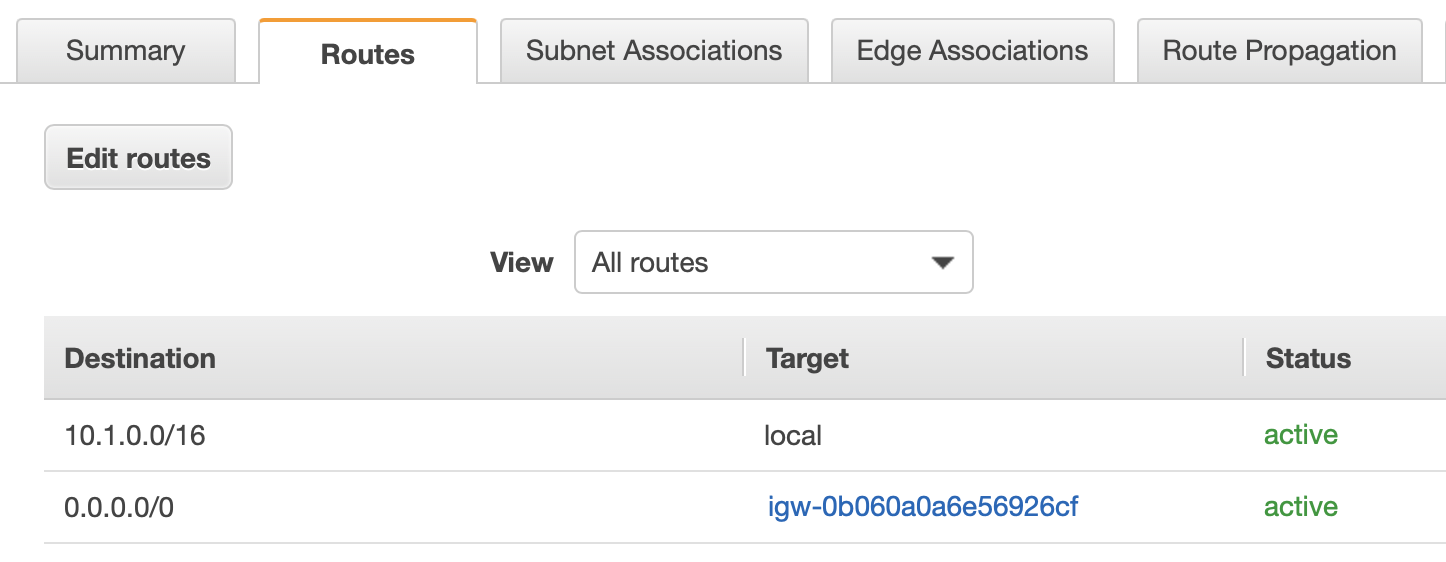
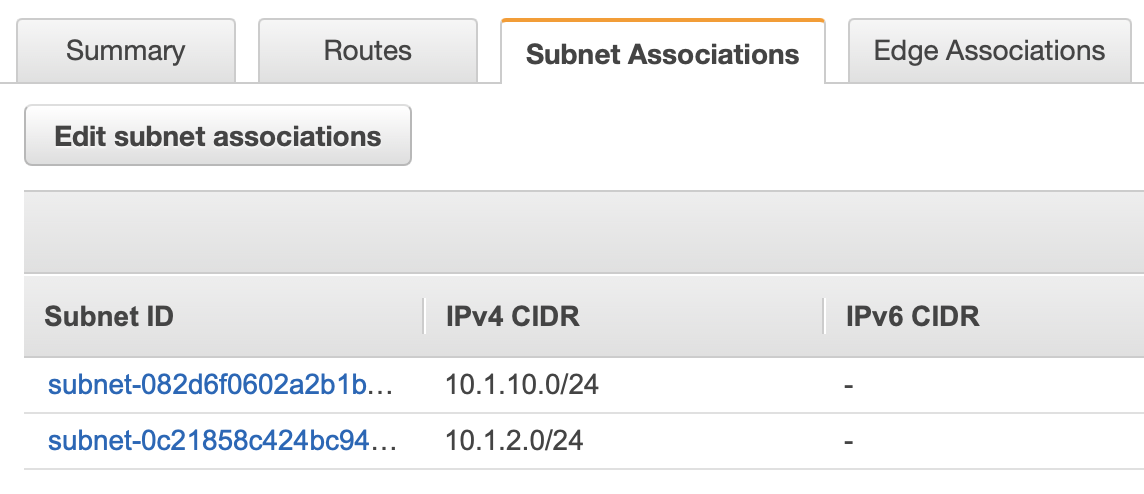
Next we have to link this route table to our subnet: Click on the Subnet Associations and then Edit Subnet associations. Pick the public subnet we created earlier on and click Save.
Route Table for Private Subnets
Although we have several subnets, we only create one route table for them.
Name it rt-hat-dev-ew2-private and make sure you link it with the VPC we created earlier on (vpc-hat-dev-ew2).
The default route that allows internal traffic is sufficient in this case, so no additional routes to add.
Next we have to link this route table to our subnet: Click on the Subnet Associations and then Edit Subnet associations. Pick the private subnets we created earlier on and click Save.
Create Security Group
A security group sets the firewall rules for an EC2 instance. Since we want to allow different kind of traffic for instances within the public subnet (Hop more specifically) and private subnet (the DB to be precise), we will create two different security groups.
| Security Group Name | Region | Application |
|---|---|---|
secgroup-hat-dev-ew2-hop |
eu-west-2 | Hop |
secgroup-hat-dev-ew2-db |
eu-west-2 | Redshift |
For EC2 instances in the Public Subnet
AWS Console: Network > VPC > Security Group > Create security group
We know that we want to SSH into the EC2 instance(s) in the public subnet. We also want to allow HTTP and HTTPS traffic (e.g. for when we start Hop Server).
Create a security group called secgroup-hat-dev-ew2-hop:
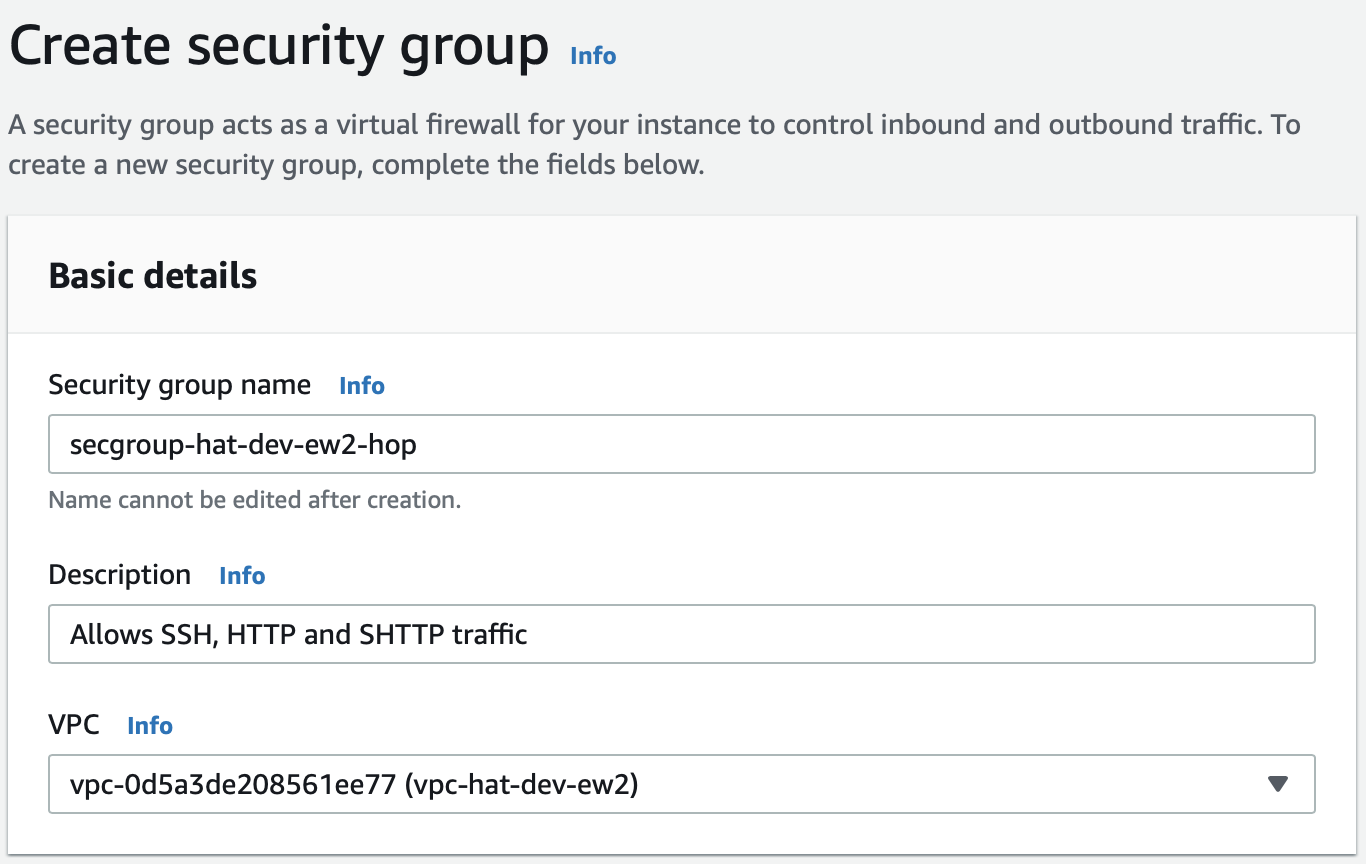
Important: Make sure your pick the VPC we created earlier on.
Add the following Inbound rules:
| Type | Source |
|---|---|
| SSH | 0.0.0.0/0 or better your own IP address / limited range of IP addresses |
| HTTP | 0.0.0.0/0 |
| HTTPS | 0.0.0.0/0 |
Note: For security reasons you might want to constrain SSH to your workstation instead of opening it up to everyone.
The JDBC connection to the Redshift cluster will always be initiated by Apache Hop. The security secgroup-hat-dev-ew2-hop (in which the EC2 instance resides that Apache Hop runs on) allows any outbound traffic by default and is also stateful (it remembers when a package was sent via port 5439, so automatically it will allow any inbound traffic on port 5439 without requiring any inbound rule for the same port). Keeping this in mind, there is no need to create an inbound rule for port 5439 (for the secgroup-hat-dev-ew2-hop security group).
For EC2 instances in the Private Subnet
Create a security group called secgroup-hat-dev-ew2-redshift and create an inbound rule with type Redshift and set the Source to secgroup-hat-dev-ew2-hop.
Storage
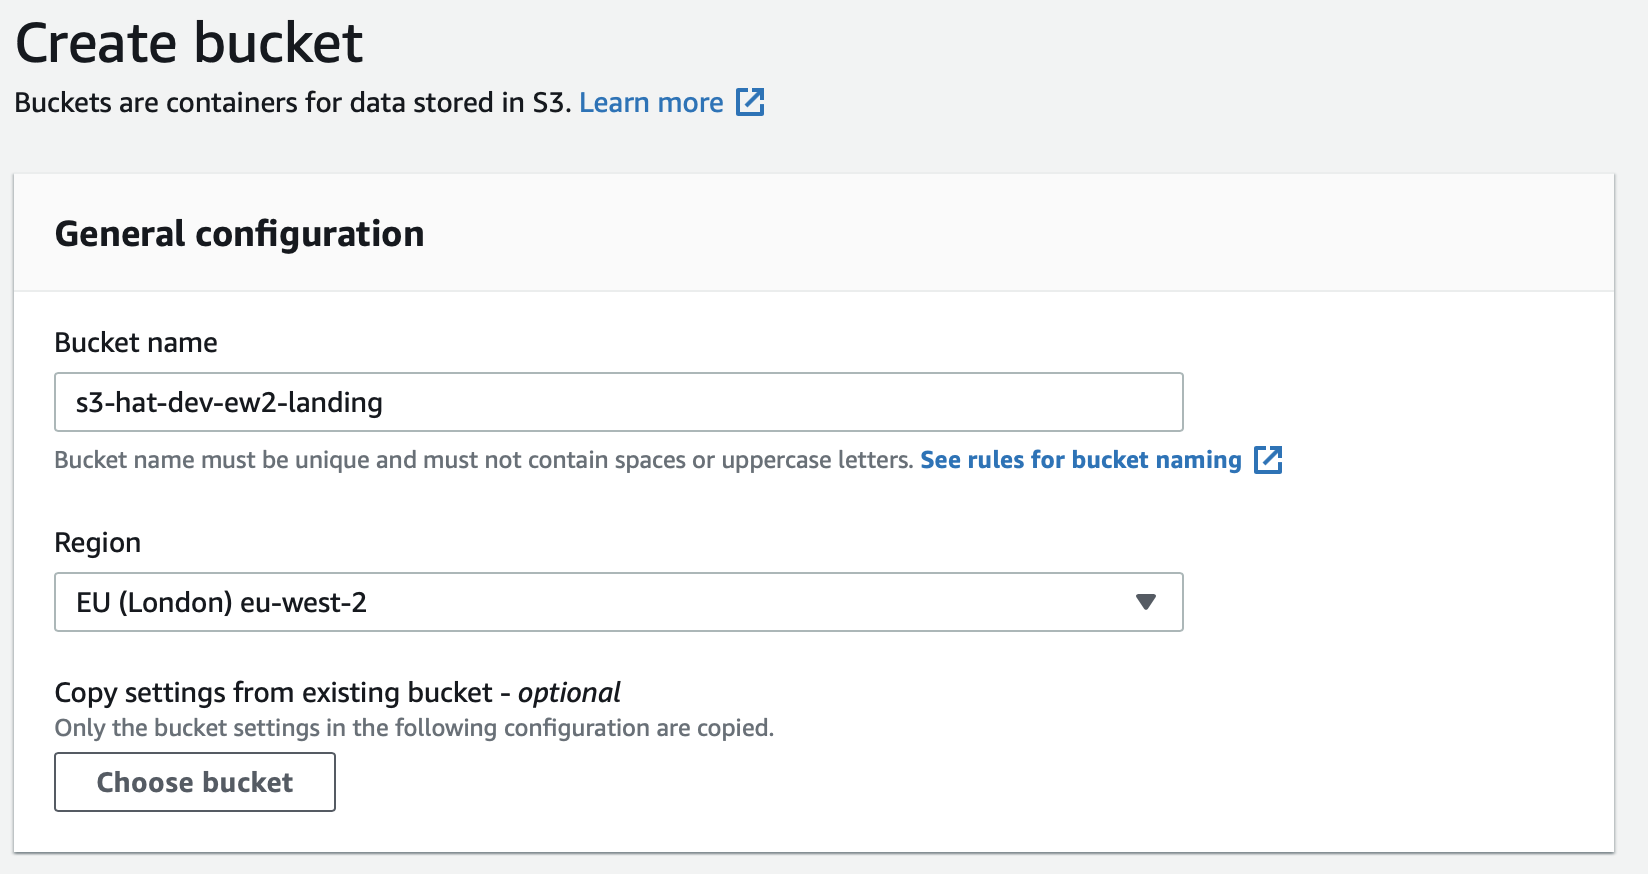
Create S3 Bucket
AWS Console: Storage > S3 > Create bucket
| S3 Bucket Name | Region |
|---|---|
s3-hat-dev-ew2-landing |
eu-west-2 |
Analytics
Subnet Group
AWS Console: Analytics > Amazon Redshift > Config(uration) > Subnet Groups
| Subnet Group | Region |
|---|---|
subnetgroup-hat-dev-ew2-redshift |
eu-west-2 |
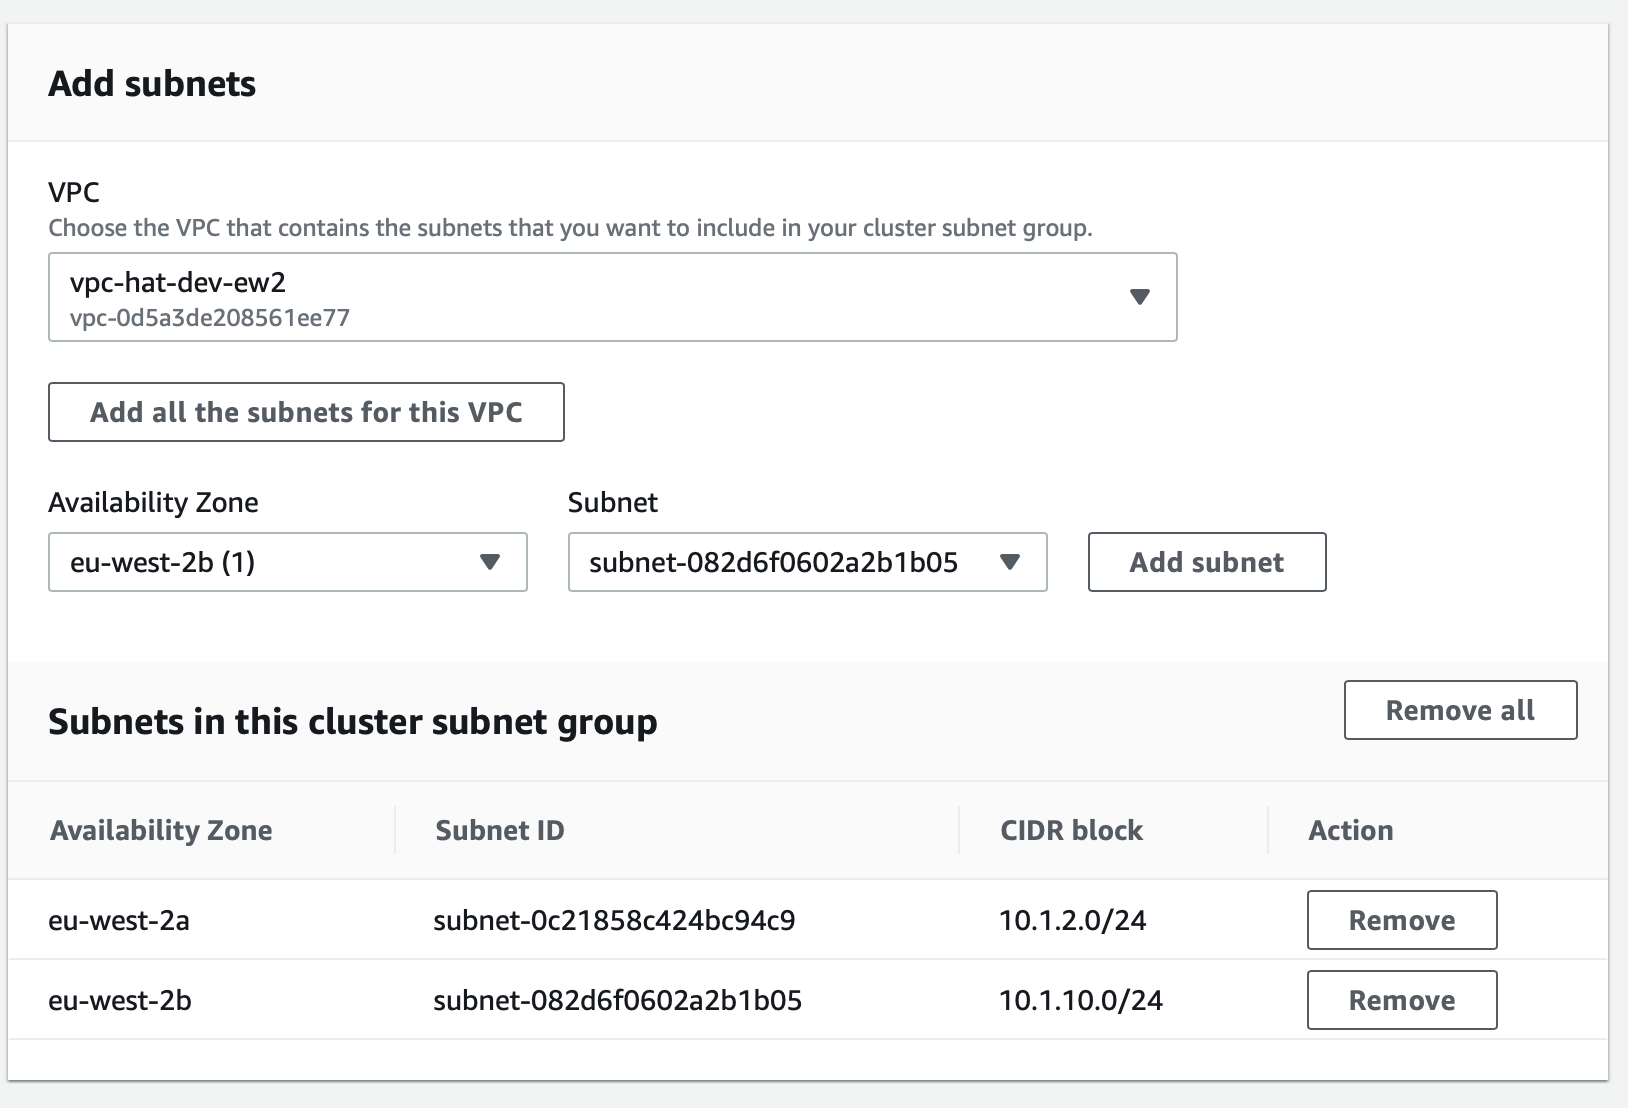
To create a Redshift cluster, a subnet group spanning at least two availability zones is required.
Create the subnet group with the name shown above and assign our two private subnets to it:
Amazon Redshift
AWS Console: Analytics > Amazon Redshift > Clusters > Create Cluster
| Redshift Cluster Name | Region |
|---|---|
redshift-hat-dev-ew2 |
eu-west-2 |
Provide a name for the cluster and then choose the Free Trial option. If that’s not avaialble to you, create a very basic setup yourself.
The free trial option covers 1 dc2.large node.
Then just provide out the Database Configurations details, in my case:
- Database: hat-target
- Port: 5439
- User name: awsuser
- Password: Hoptutorial1
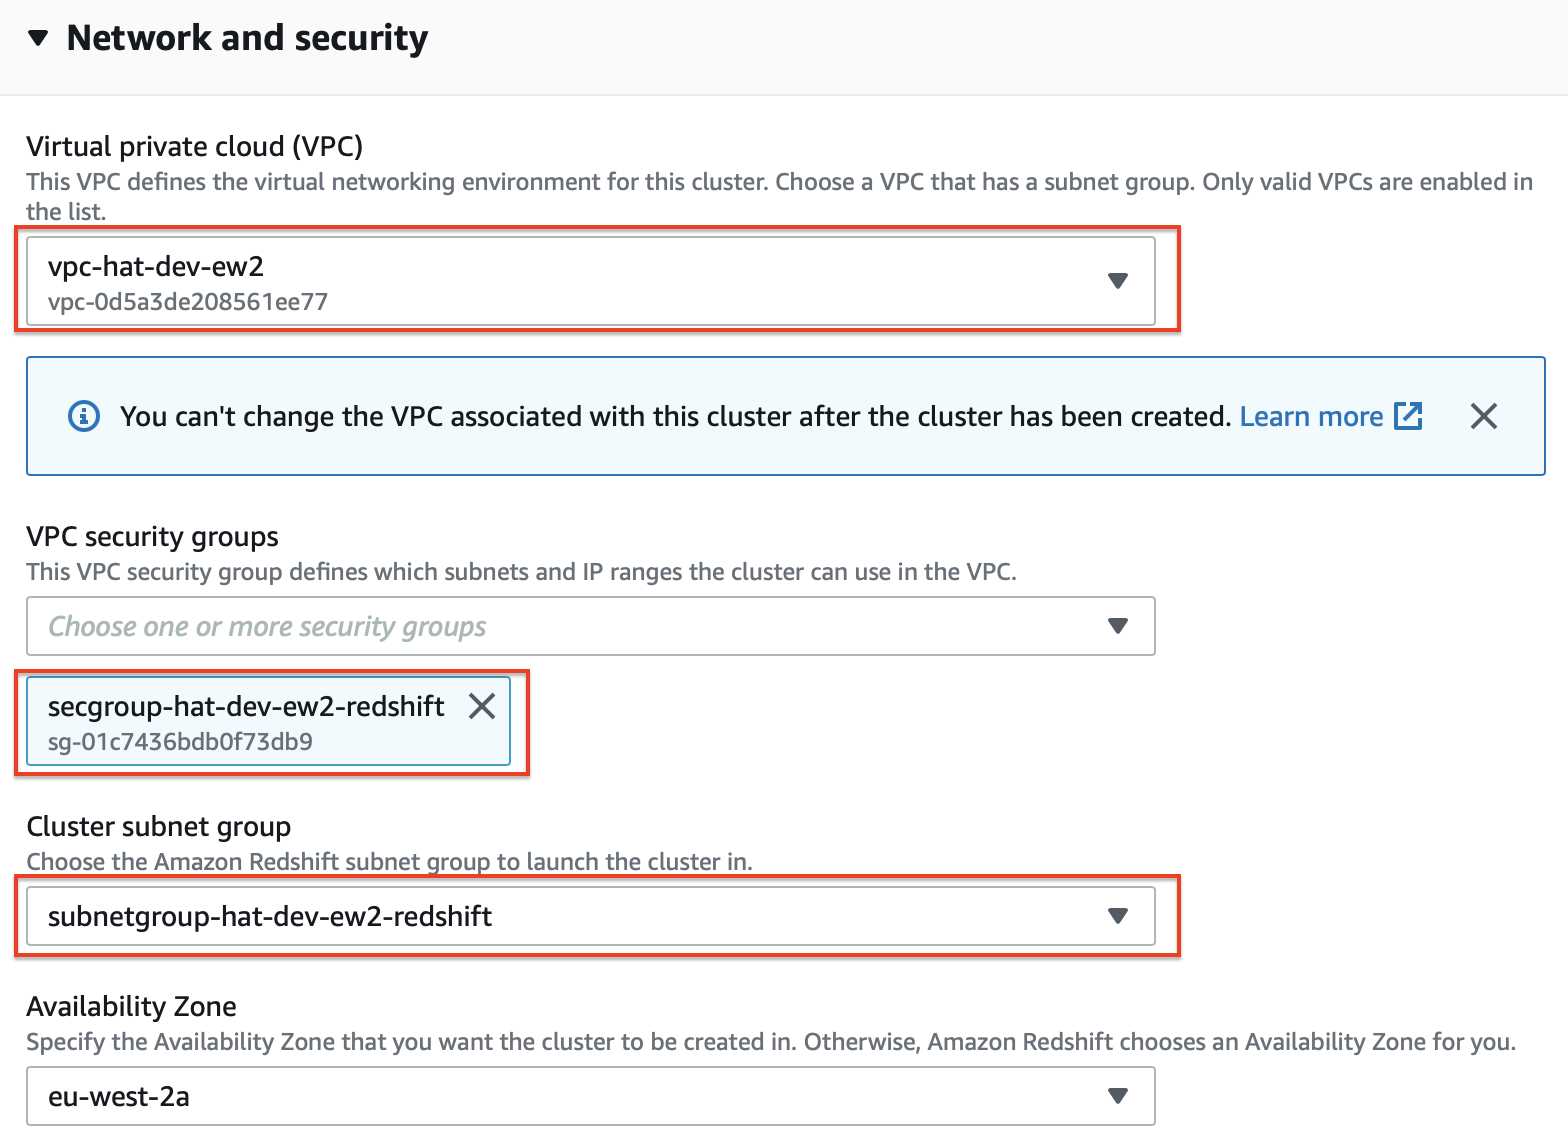
In the Additional Configurations section disable Use defaults and under Network and Security choose the VPN, security group and subnet group we created earlier on:
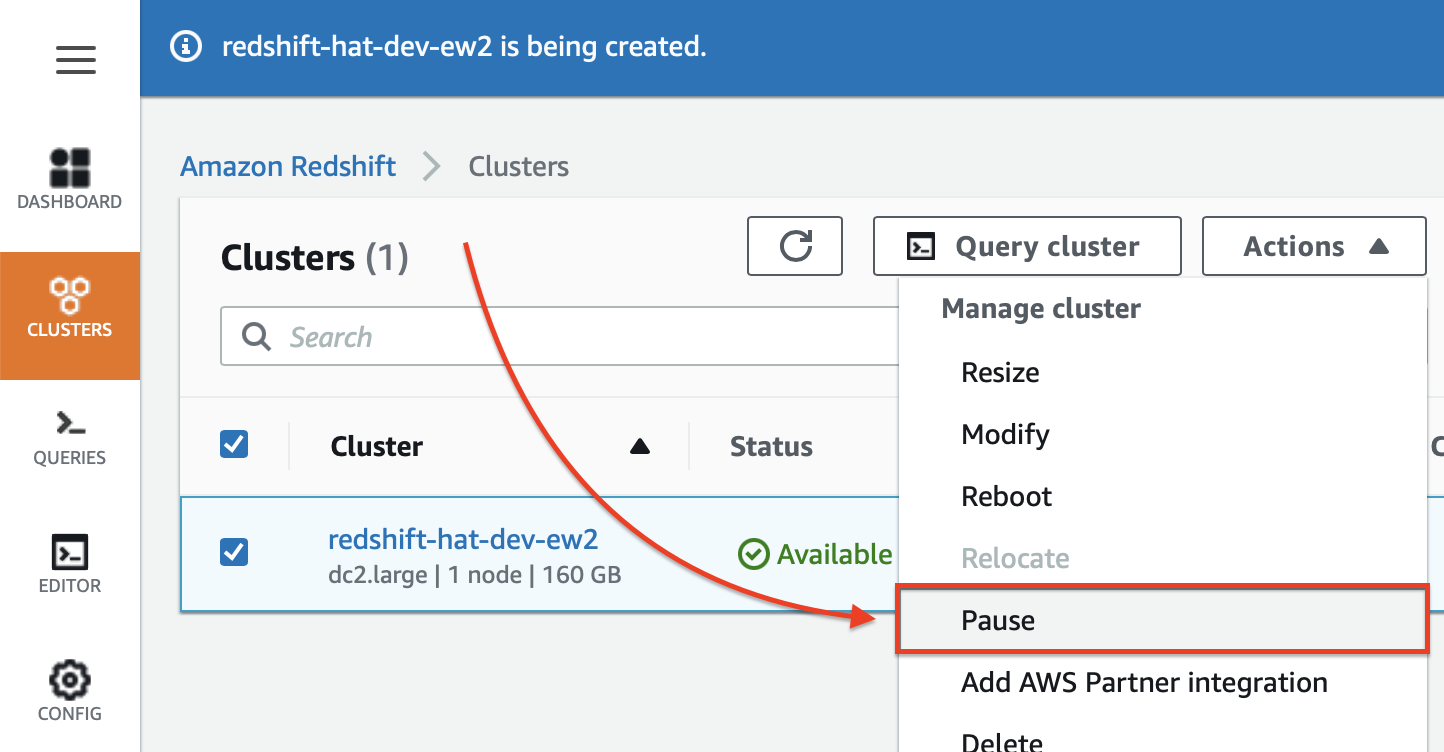
Important: If you don’t have time to complete this tutorial in one go, it is best you pause the Redshift cluster to save costs. Just reboot it later on again when you really need it:
Authorisation
Create IAMs Role
| IAM Role Name | Region |
|---|---|
role-hat-d-s3redshift |
n/a - global |
Required to access the S3 bucket and Redshift database from the EC2 instance that Apache Hop will reside on.
AWS Console: Security, Identity & Compliance > IAM > Create role
Type: Choose AWS service
Choose a user case: Choose EC2 - Allows EC2 instances to call AWS services on your behalf.
Click: Next: Permissions. One the Attach permissions policies screen, search for S3. Then tick AmazonS3FullAccess:
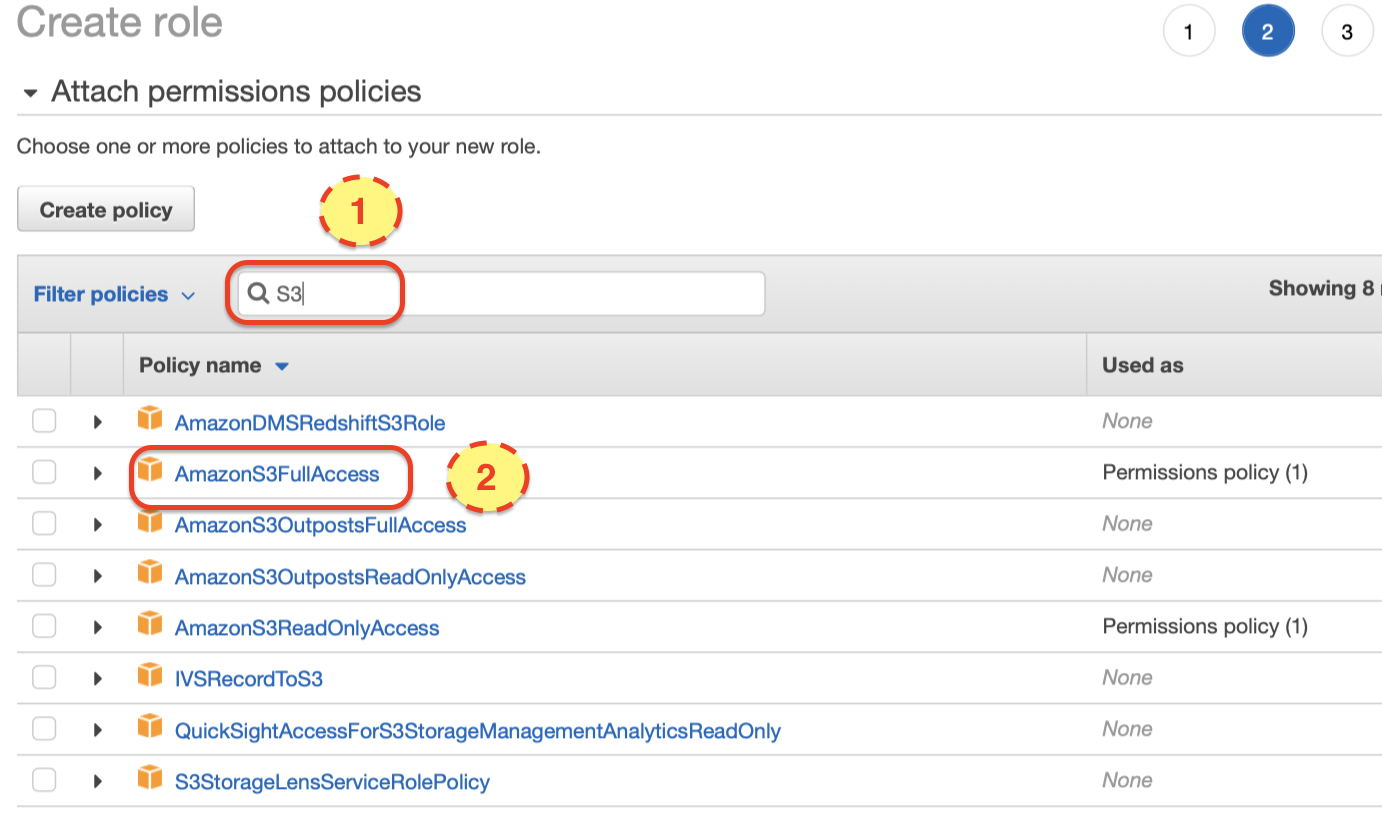
Next search for Redshift and tick AmazonRedshiftDataFullAccess.
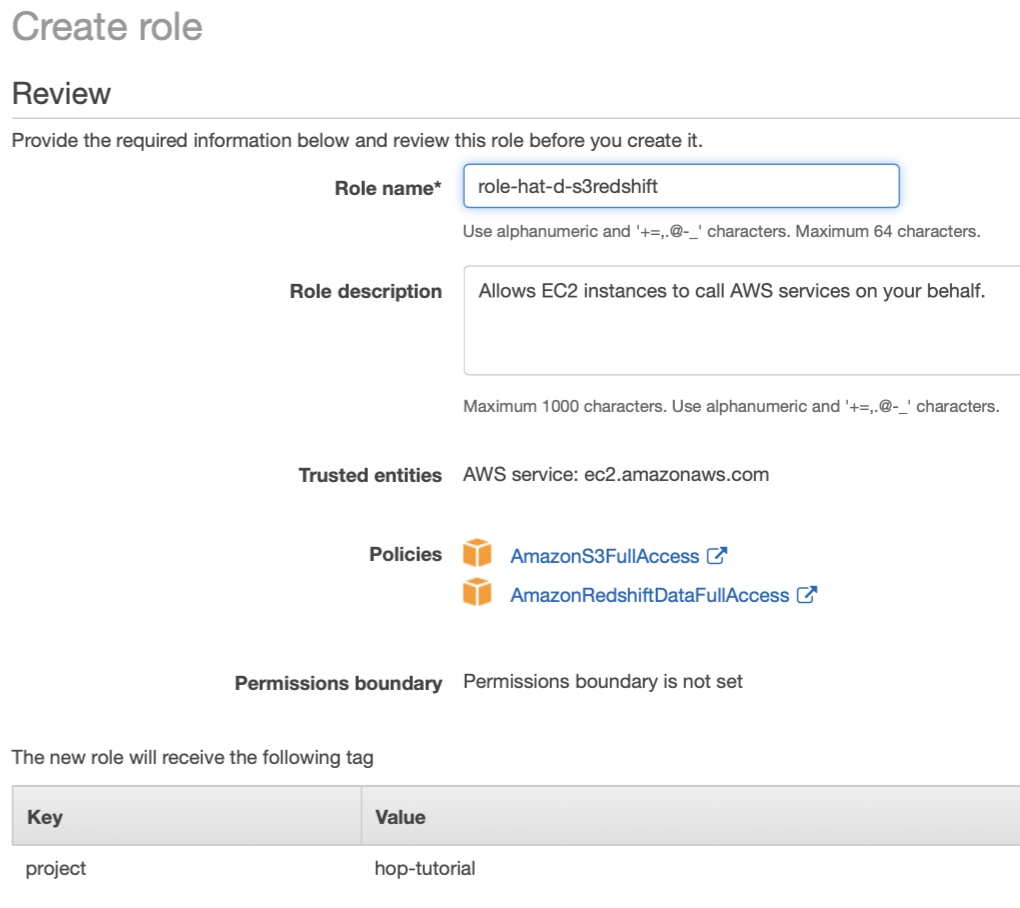
Click Next: Tags.
As always, let’s add our default tag: Project: Hop Tutorial.
Click Next: Review.
Provide a Role name, something like role-hat-d-s3redshift.
Finally click on Create role.
Compute
Create EC2 Instance
AWS Console: Compute > EC2 > Intances > Launch Instances
| EC2 Instance Name | Region | AZ |
|---|---|---|
instance-hat-dev-ew2-a-hop |
eu-west-2 | a |
Based on your requirements, pick a suitable AMI. I just went with this one:
Amazon Linux 2 AMI (HVM), SSD Volume Type - ami-08b993f76f42c3e2f (64-bit x86).
Choose a suitable instance type. For this simple experiment here t2.small should be more than sufficient.
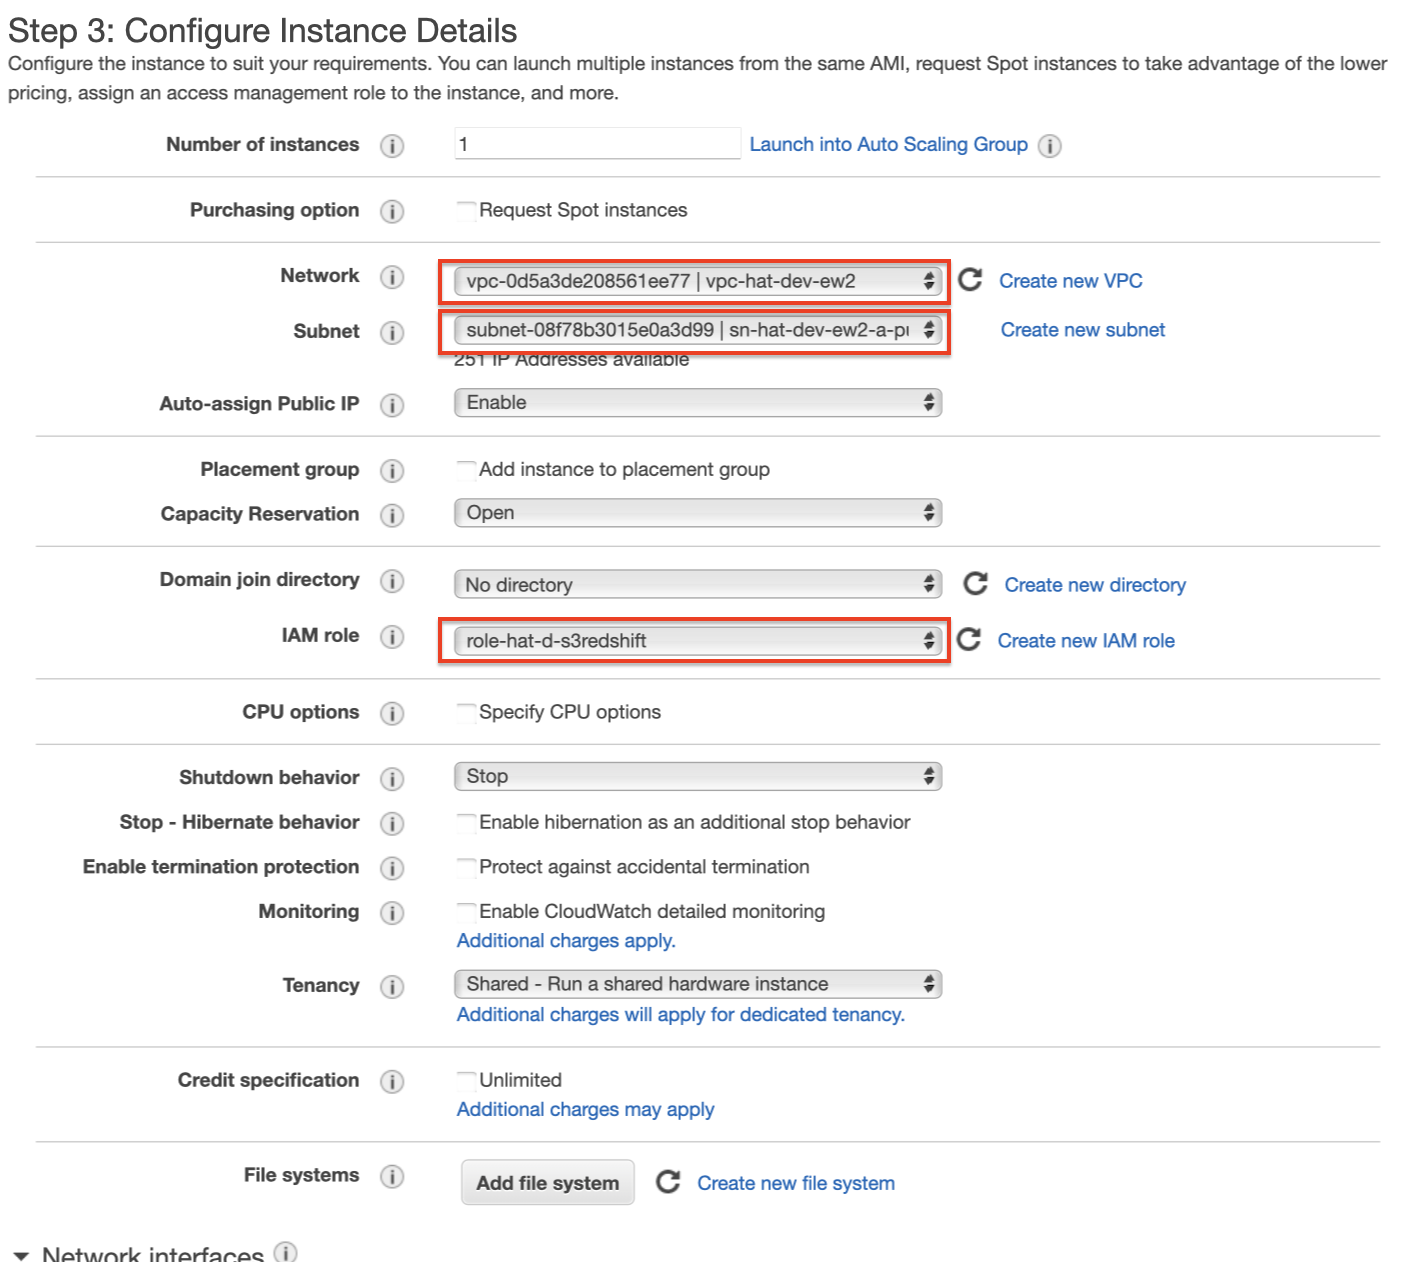
On the Configure Instance Details screen make sure you set:
- the VPC
vpc-hat-dev-ew2we created earlier on as the Network - the subnet
sn-hat-dev-ew2-a-publicas the Subnet - set Auto-assign Public IP to Enable
- set IAM role to
role-hat-d-s3redshift
On the Step 4: Add Storage page add the default storage.
On the Step 5: Add Tags page define our default tag (project = hop-tutorial).
On the Step 6: Configure Security Group tick Select an existing security group and choose the one we created earlier on: secgroup-hat-dev-ew2-hop.
Finalise the setup. One of the last steps should be Select an existing key pair or create a new key pair: If you’ve got already a key pair set up, then you might as well choose this one, otherwise just create a new one. If you create a new one, download the key to a convenient location - you will need it in a bit to connect to the EC2 instance via your local Terminal.
Note: You can stop the EC2 instance at any point via the EC2 dashboard and restart it later on again to safe costs.
Provisioning the EC2 Instance
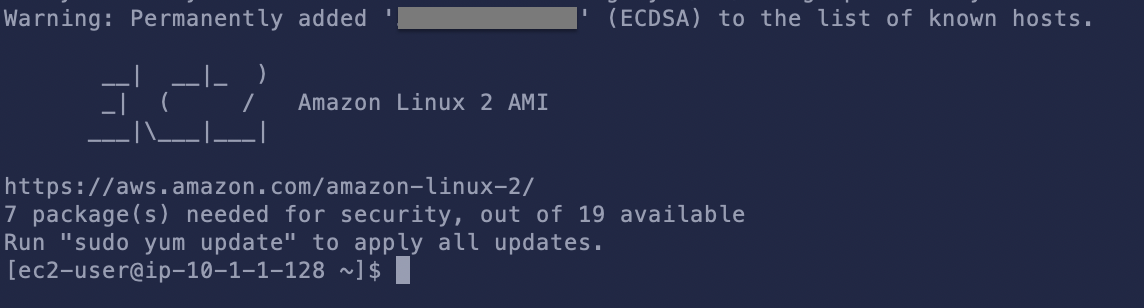
Now that we’ve got our environment up and running, let’s connect to our EC2 instance:
In the AWS console, go to Compute > EC2 > Intances. Select the instance we just created and then click on the Actions button. Pick Connect. This will bring up detailed instructions on how to connect, in my case:
ssh -i "hop-tutorial.pem" ec2-user@52.56.xxx.xxx
Adjust the command so it matches your setup and the run this command in your local Terminal:
Check Connections
Once connected, let’s make sure we can access it from the EC2 instance:
$ aws s3 ls <bucket-name>
$ aws s3 ls s3://s3-hat-dev-ew2-landing
This shouldn’t return anything since we don’t have anything in the bucket. At this stage, as long as there is no error message, all is good! We proved we can connect to the S3 bucket from our EC2 instance.
Next let’s establish that we can connect to Redshift:
First let’s get the hostname/endpoint name for our database. On the Redshift Clusters page click on the name of your cluster:
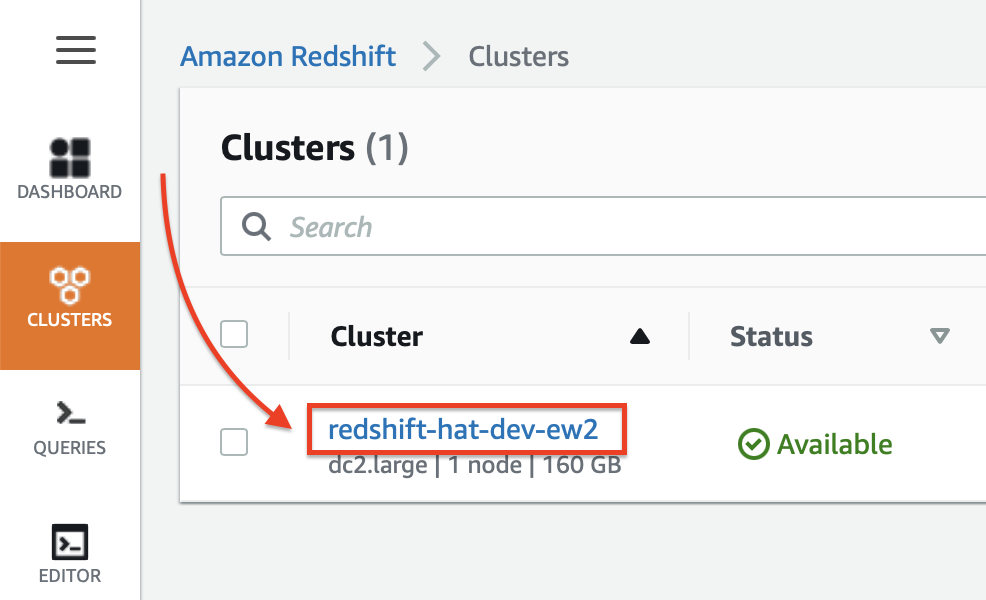
And then click on the Copy icon next to the JDBC URL:
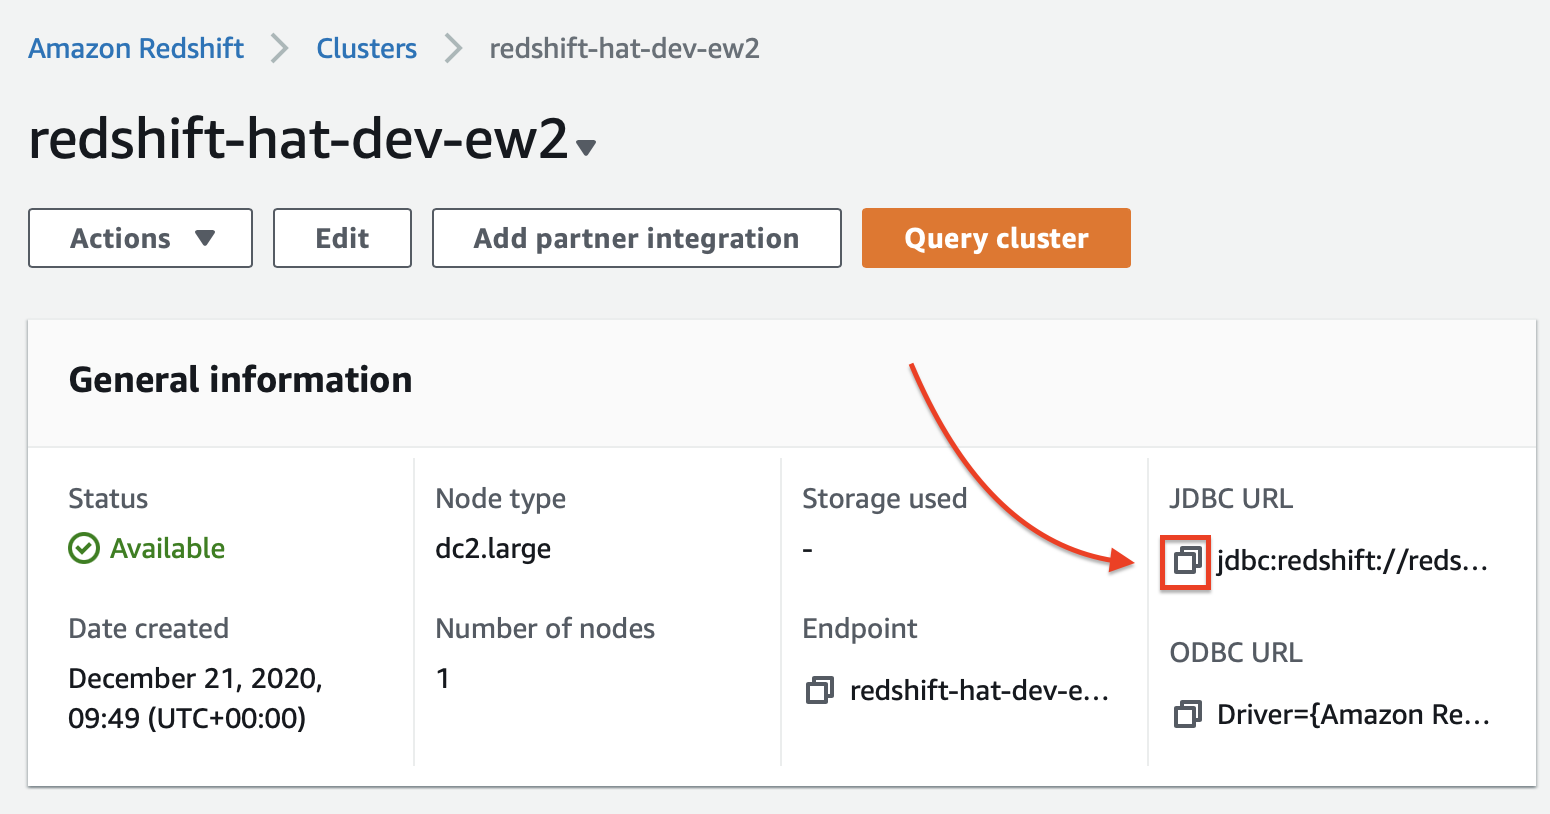
Paste this into a text editor - my connection URL looks like this one:
jdbc:redshift://redshift-hat-dev-ew2.cblhnyysixg1.eu-west-2.redshift.amazonaws.com:5439/hat-target
Replace redshift with postgresql and add the username and password. The pattern is the following (note we also dropped the jdbc: prefix):
postgresql://<DBUSER>:<PASSWORD>@<HOST>:<PORT>/<DATABASE>
In my example, the final connection string looked like this one:
postgresql://awsuser:Hoptutorial1@redshift-hat-dev-ew2.cblhnyysixg1.eu-west-2.redshift.amazonaws.com:5439/hat-target
Next let’s install PostgreSQL on our EC2 instance:
sudo yum install postgresql.x86_64
And the try to connect to Redshift using the psql utility:
psql "postgresql://awsuser:Hoptutorial1@redshift-hat-dev-ew2.cblhnyysixg1.eu-west-2.redshift.amazonaws.com:5439/hat-target"
If this is successful, it should look something like this:
[ec2-user@ip-10-1-1-191 ~]$ psql "postgresql://awsuser:Hoptutorial1@redshift-hat-dev-ew2.cblhnyysixg1.eu-west-2.redshift.amazonaws.com:5439/hat-target"
psql (9.2.24, server 8.0.2)
WARNING: psql version 9.2, server version 8.0.
         Some psql features might not work.
SSL connection (cipher: ECDHE-RSA-AES256-GCM-SHA384, bits: 256)
Type "help" for help.

hat-target=#
All is good, so exit the psql mode with \q and hit Enter.
Install Apache Hop
Next let’s install Java. Hop requires Java 8 to be compiled but should run fine on Java 11 (Thanks Bart for clarifying!). So let’s install Java 11:
sudo amazon-linux-extras install java-openjdk11
Ok, now it’s time to install Apache Hop! Here we go! Are you fully excited?!
Let’s copy the download link from the Apache Hop Website if you are after a more stable version or alternatively check here if you want the latest version and then run in our Terminal window (adjust the download link so you get the latest version):
cd ~
wget -O hop.zip https://artifactory.project-hop.org/artifactory/hop-snapshots-local/org/hop/hop-assemblies-client/0.40-SNAPSHOT/hop-assemblies-client-0.40-20201028.102851-81.zip
unzip hop.zip
You should have a hop folder now:
$ ls -l hop
total 80
drwxr-xr-x 3 ec2-user ec2-user    23 Oct 28 10:29 audit
drwxr-xr-x 2 ec2-user ec2-user    29 Oct 28 10:29 config
drwxr-xr-x 3 ec2-user ec2-user    18 Oct 28 11:20 demo
drwxr-xr-x 3 ec2-user ec2-user    39 Oct 28 10:29 docs
-rw-r--r-- 1 ec2-user ec2-user  2024 Oct 28 10:29 hop-conf.bat
-rwxr-xr-x 1 ec2-user ec2-user  1506 Oct 28 10:29 hop-conf.sh
-rw-r--r-- 1 ec2-user ec2-user  2042 Oct 28 10:29 hop-encrypt.bat
-rwxr-xr-x 1 ec2-user ec2-user  1011 Oct 28 10:29 hop-encrypt.sh
-rwxr-xr-x 1 ec2-user ec2-user  2492 Oct 28 10:29 hop-gui.bat
-rwxr-xr-x 1 ec2-user ec2-user  1415 Oct 28 10:29 hop-gui.sh
-rwxr-xr-x 1 ec2-user ec2-user  3072 Oct 28 10:29 hop-run.bat
-rwxr-xr-x 1 ec2-user ec2-user  1500 Oct 28 10:29 hop-run.sh
-rw-r--r-- 1 ec2-user ec2-user  2028 Oct 28 10:29 hop-server.bat
-rwxr-xr-x 1 ec2-user ec2-user  1790 Oct 28 10:29 hop-server.sh
-rw-r--r-- 1 ec2-user ec2-user  2054 Oct 28 10:29 hop-translator.bat
-rwxr-xr-x 1 ec2-user ec2-user  1103 Oct 28 10:29 hop-translator.sh
drwxr-xr-x 2 ec2-user ec2-user  4096 Oct 28 11:20 lib
drwxr-xr-x 5 ec2-user ec2-user    45 Oct 28 11:20 libswt
-rw-r--r-- 1 ec2-user ec2-user 13366 Oct 28 10:29 LICENSE.txt
drwxr-xr-x 8 ec2-user ec2-user    94 Oct 28 11:02 plugins
drwxr-xr-x 2 ec2-user ec2-user    51 Oct 28 10:29 pwd
-rw-r--r-- 1 ec2-user ec2-user  1113 Oct 28 10:29 README.txt
drwxr-xr-x 4 ec2-user ec2-user    31 Oct 28 10:29 static
-rw-r--r-- 1 ec2-user ec2-user   960 Oct 28 10:29 translator.xml
drwxr-xr-x 3 ec2-user ec2-user    20 Oct 28 10:29 ui
Next we will add the Redshift JDBC Driver to Hop:
Hop seems to require the older v4.0 driver version:
cd ~/hop/lib
wget https://s3.amazonaws.com/redshift-downloads/drivers/jdbc/1.2.43.1067/RedshiftJDBC4-no-awssdk-1.2.43.1067.jar
And that’s it - we are ready to go!
Example Apache Hop Data Pipeline
Overview
Our simple example data pipeline will read data from a CSV file stored in S3, print out a limited number of records to the console and finally load them into Amazon Redshift:
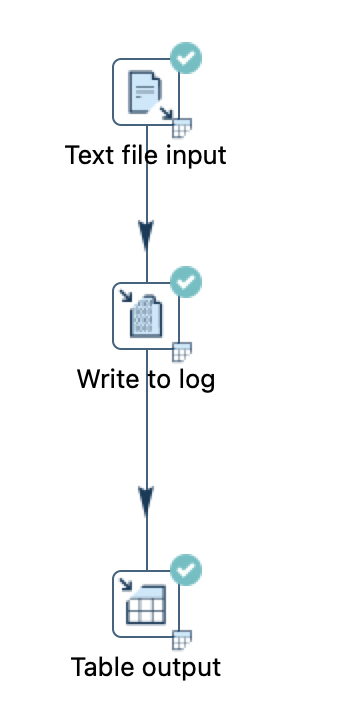
Note: It is not recommended to use the Table output transform for loading data into Redshift because it will be quite slow compared to bulk loading. Since this is a simple demo, we can ignore this here only.
I’d like the point out (this is just background info - no action required): To read a text/CSV file from S3, you have to use the Text File Input transform - the CSV Input transform only supports reading from local fiels.
Create Sample Input Data
Let’s generate the sample input data and upload it to our S3 bucket:
echo "2020-12-25,23030" > /tmp/sales.csv
echo "2020-12-26,24089" >> /tmp/sales.csv
echo "2020-12-27,29231" >> /tmp/sales.csv
aws s3 cp /tmp/sales.csv s3://s3-hat-dev-ew2-landing/in/sales.csv
Let’s check if the file is in the bucket:
$ aws s3 ls s3://s3-hat-dev-ew2-landing/in/
2020-12-15 08:59:02         51 sales.csv
Create Target Table
Next let’s create the target database table (we could do this automatically via Hop as well, however, for the purpose of this tutorial we will use this approach):
In the AWS console go to Analytics > Amazon Redshift > Editor and then create a new connection:
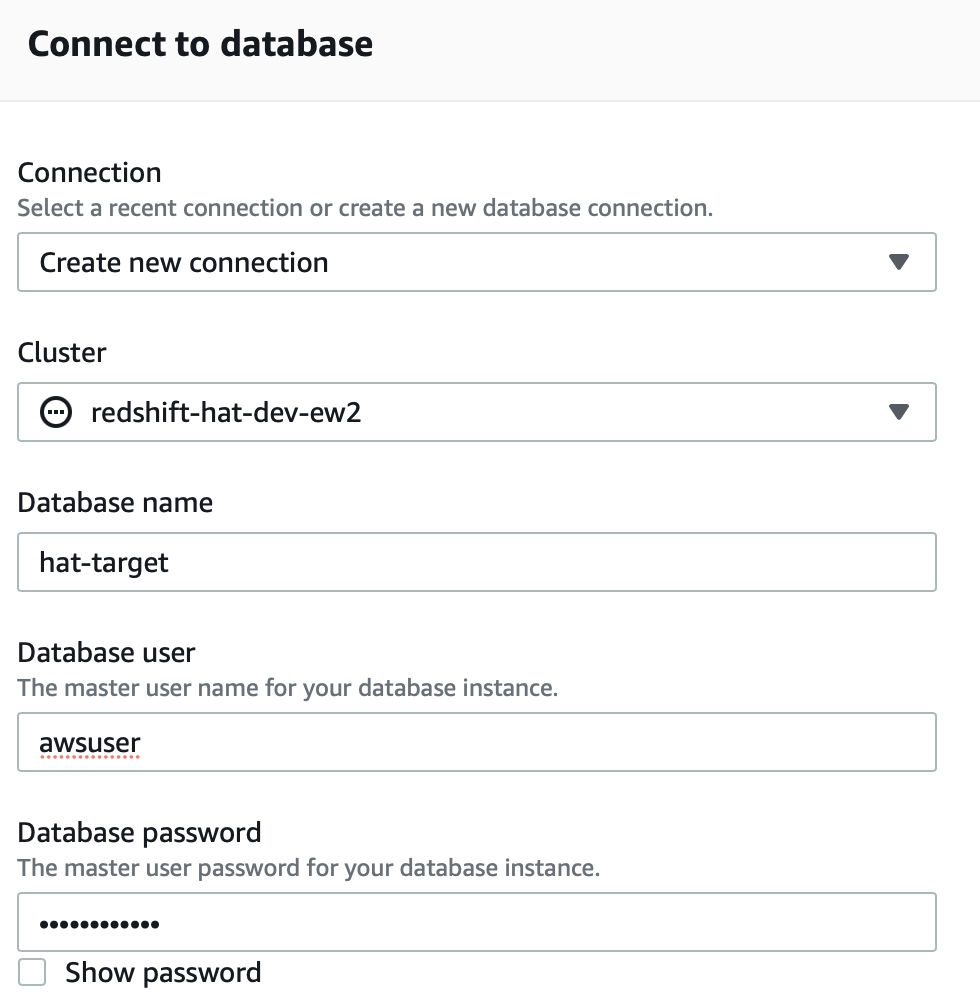
Once done, a nice web-based Query Editor will show up.
Copy and paste following query:
CREATE TABLE public.sales (
  sale_date DATE
  , amount INT
)
;
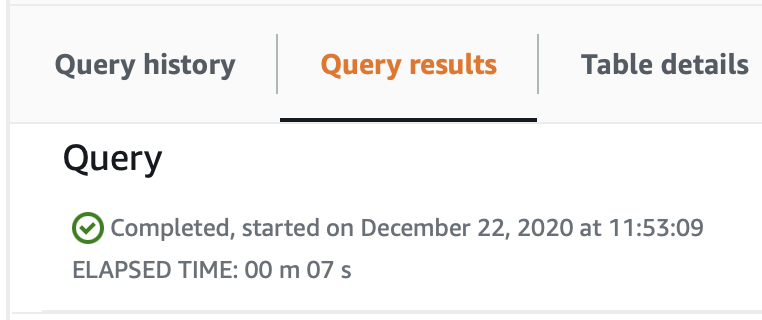
Then execute it.

Check the Query results tab at the bottom of the page to make sure the query executed successfully:
Upload Hop Sample Project Files
Since this is already a very long tutorial … we won’t go through creating a data pipeline in Apache Hop but just use an example that I provide:
Download the example Apache Hop pipeline from here and add it to your S3 bucket via the AWS console: Storage > S3 > click on your bucket. Click on Create folder and call it code. Once created, click on this folder and then click on Upload: Click on Add files and choose the example zip file you just downloaded. Finally click Upload.
Next let’s copy the pipeline file to our EC2 instance:
cd ~
mkdir code
cd code
aws s3 cp s3://s3-hat-dev-ew2-landing/code/aws-hop-part-1.zip .
unzip aws-hop-part-1.zip
## Create Hop Configuration
Let’s register the project with Apache Hop:
cd ~/hop
# Create Hop project
./hop-conf.sh \
--project=aws-hop-part-1 \
--project-create \
--project-home="/home/ec2-user/code/aws-hop-part-1" \
--project-config-file=project-config.json \
--project-metadata-base='${PROJECT_HOME}/metadata' \
--project-datasets-base='${PROJECT_HOME}/datasets' \
--project-unit-tests-base='${PROJECT_HOME}' \
--project-enforce-execution=true
Let’s define a Hop environment:
# Create Hop environment
./hop-conf.sh \
--environment=dev \
--environment-create \
--environment-project=aws-hop-part-1 \
--environment-purpose=development \
--environment-config-files="/home/ec2-user/code/aws-hop-part-1/config-dev.json"
And finally add our required variables and values (If your S3 bucket has a different name adjust accordingly).
Following variables are required:
| Variable | Description |
|---|---|
VAR_TARGET_DB_HOST |
Redshift Host/Endpoint |
VAR_TARGET_DB_PORT |
Redshift Port number |
VAR_TARGET_DB_NAME |
Redshift Database name |
VAR_TARGET_DB_USERNAME |
Username |
VAR_TARGET_DB_PASSWORD |
Password |
With the command below we add these variables to our config file. Note that the variables are defined at the end of the command:
./hop-conf.sh \
--config-file="/home/ec2-user/code/aws-hop-part-1/config-dev.json" \
--config-file-set-variables=VAR_INPUT_FILE_PATH=s3://s3-hat-dev-ew2-landing/in/sales.csv,VAR_TARGET_DB_HOST=redshift-hat-dev-ew2.cblhnyysixg1.eu-west-2.redshift.amazonaws.com,VAR_TARGET_DB_PORT=5439,VAR_TARGET_DB_NAME=hat-target,VAR_TARGET_DB_USERNAME=awsuser,VAR_TARGET_DB_PASSWORD=Hoptutorial1
Note: Hop environments and related variables do not have to be created dynamically - they can also be created upfront.
Note: The way we pass the username and password here is quite likely ok for the dev environment but not for other environments.
Execute Hop Sample Process
Next let’s execute our pipeline:
cd ~/hop
./hop-run.sh --file=example.hpl \
  --project=aws-hop-part-1 \
  --environment=dev \
  --runconfig=local
Our simple pipeline also logs out the records it read - this is just useful for our demo since we can actually see what’s going on:
...
2020/12/22 17:48:39 - HopRun - Referencing environment 'dev' for project aws-hop-part-1' in development
2020/12/22 17:48:39 - HopRun - Enabling project 'aws-hop-part-1'
2020/12/22 17:48:40 - HopRun - Relative path filename specified: /home/ec2-user/code/aws-hop-part-1/example.hpl
2020/12/22 17:48:40 - example - Executing this pipeline using the Local Pipeline Engine with run configuration 'local'
2020/12/22 17:48:40 - example - Execution started for pipeline [example]
2020/12/22 17:48:42 - Table output.0 - Connected to database [target_db] (commit=1000)
2020/12/22 17:48:43 - Text file input.0 - Opening file: s3:///s3-hat-dev-ew2-landing/in/sales.csv
2020/12/22 17:48:43 - Write to log.0 -
2020/12/22 17:48:43 - Write to log.0 - ------------> Linenr 1------------------------------
2020/12/22 17:48:43 - Write to log.0 - date = 2020-12-25
2020/12/22 17:48:43 - Write to log.0 - amount = 23030
2020/12/22 17:48:43 - Write to log.0 -
2020/12/22 17:48:43 - Write to log.0 - ====================
2020/12/22 17:48:43 - Text file input.0 - Finished processing (I=3, O=0, R=0, W=3, U=1, E=0)
2020/12/22 17:48:43 - Write to log.0 -
2020/12/22 17:48:43 - Write to log.0 - ------------> Linenr 2------------------------------
2020/12/22 17:48:43 - Write to log.0 - date = 2020-12-26
2020/12/22 17:48:43 - Write to log.0 - amount = 24089
2020/12/22 17:48:43 - Write to log.0 -
2020/12/22 17:48:43 - Write to log.0 - ====================
2020/12/22 17:48:43 - Write to log.0 -
2020/12/22 17:48:43 - Write to log.0 - ------------> Linenr 3------------------------------
2020/12/22 17:48:43 - Write to log.0 - date = 2020-12-27
2020/12/22 17:48:43 - Write to log.0 - amount = 29231
2020/12/22 17:48:43 - Write to log.0 -
2020/12/22 17:48:43 - Write to log.0 - ====================
2020/12/22 17:48:43 - Write to log.0 - Finished processing (I=0, O=0, R=3, W=3, U=0, E=0)
2020/12/22 17:48:44 - Table output.0 - Finished processing (I=0, O=3, R=3, W=3, U=0, E=0)
2020/12/22 17:48:44 - example - Pipeline duration : 3.502 seconds [  3.501" ]
2020/12/22 17:48:44 - example - Execution finished on a local pipeline engine with run configuration 'local'
Let’s check that our data is present in the target table:
[ec2-user@ip-10-1-1-191 hop]$ psql "postgresql://awsuser:Hoptutorial1@redshift-hat-dev-ew2.cblhnyysixg1.eu-west-2.redshift.amazonaws.com:5439/hat-target"
psql (9.2.24, server 8.0.2)
WARNING: psql version 9.2, server version 8.0.
         Some psql features might not work.
SSL connection (cipher: ECDHE-RSA-AES256-GCM-SHA384, bits: 256)
Type "help" for help.

hat-target=# SELECT * FROM sales;
 sale_date  | amount
------------+--------
 2020-12-25 |  23030
 2020-12-26 |  24089
 2020-12-27 |  29231
(3 rows)
As you can see the data go successfully loaded into Redshift.
This concludes our tutorial. I hope you enjoyed the journey!