Resources:
- Projet Hop. Make sure you download the latest version. At the time of this writing (2020-06-01) this link provided the latest version, but it’s likely to change, so refer to the main page if in doubt.
- Git repo with the examples discussed in this article
Introduction
Hop is one of the first tools to offer a graphical interface for building Apache Beam pipelines (without writing any code). It hence opens up the amazing functionality of Apache Beam to a wider audience.
Project Hop is currently (2020-05-17) in the early stages and a stable release is targeted for mid-2020, however, this doesn’t stop us from already exploring the functionality.
Setup
Hop
Installation
Download Hop from here, extract it and grant execute permissions to the shell scripts.
Environment Configuration
Create a dedicated directory to hold all our project artefacts. This directory should have following structure (this structure is not enforced, it is just a suggestion - it is a simplified structure for this example project):
.
├── README.md
├── config
│   ├── hop
│   └── project
├── datasets
└── pipelines-and-workflows
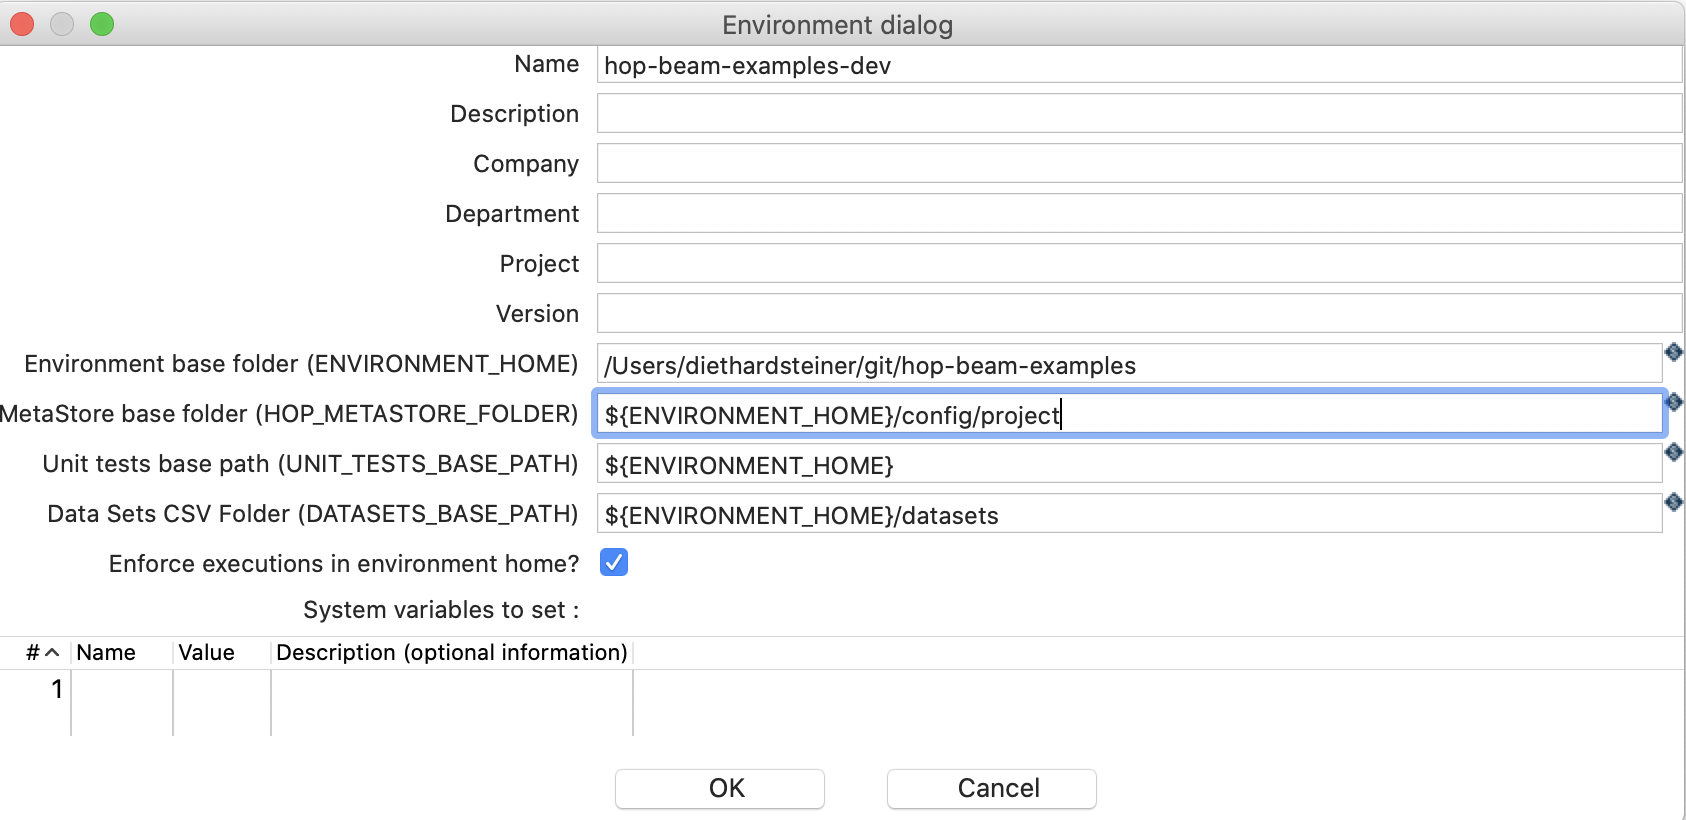
To keep everything nice and tidy, we will create a Hop Environment Config upfront, which will define all the essential settings and variables for our - in this case - development environment:
Choose File > New and then pick Environment. We will just define the minimum for now: In the Environment dialog set:
- Name to
hop-beam-examples-dev - Environment base folder to the directory where you plan to store the Hop pipelines and workflows.
- Set the Metastore base folder to
${ENVIRONMENT_HOME}/config/project
For now this will do. If you’d like to know more about the various environment settings, please have a look at my dedicated article: Project Hop: Create Environment Definitions
If you ever have to change these settings, you can do so via File > Edit Metastore element.
Creating a Beam Pipeline in Hop
Now you are ready to go! Just start the GUI client like so (adjust path to your setup):
export HOP_CONFIG_DIRECTORY=~/git/hop-beam-examples/config/hop
./hop-gui.sh
With the HOP GUI client running, make sure that the environment is set to the one we created earlier on:

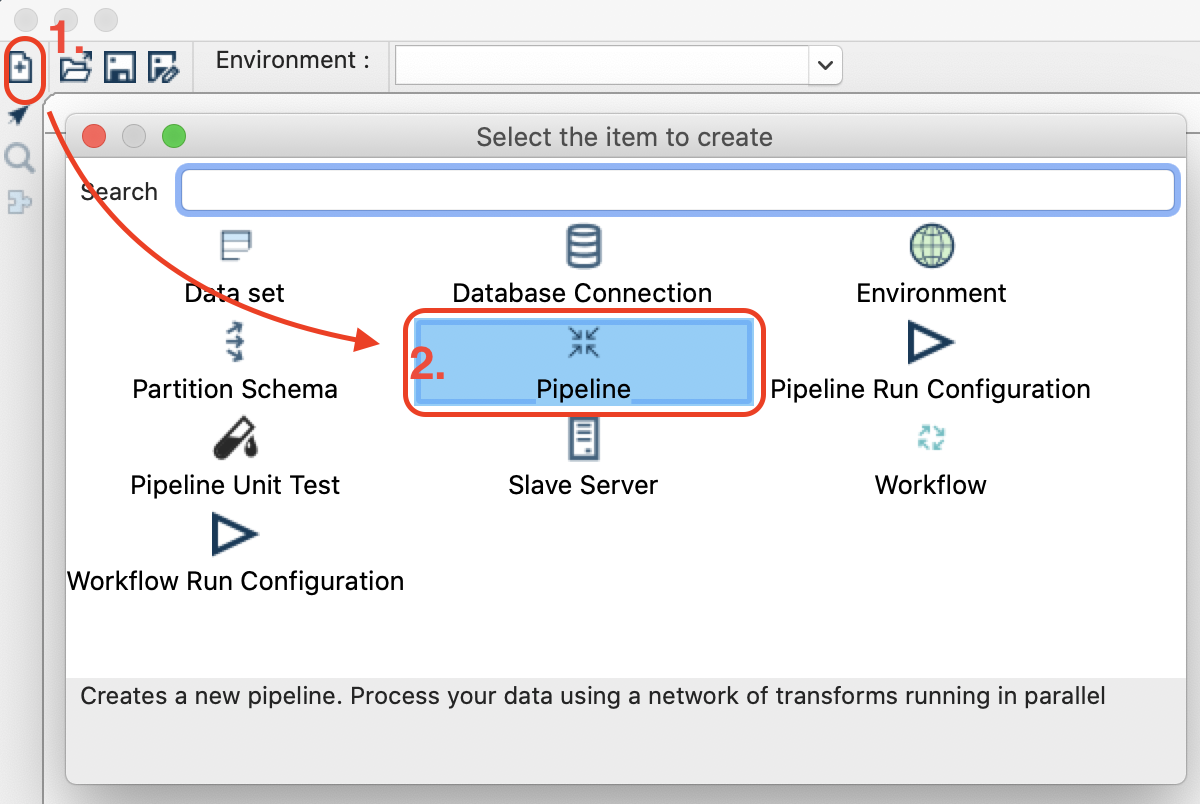
Create a new pipeline via the main menu: File > New > Pipeline:
Next save the pipeline (File > Save) as ${ENVIRONMENT_HOME}/pipelines-and-workflows/transform-event-data-to-json.hpl
At the moment Project Hop only supports a subset of the Apache Beam API: Built-in I/O Transforms.
In our first example we will be working with this dataset:
2019-02-05 21:49:53.431,AACB154,-498417153
2019-02-05 21:50:03.431,AACB154,638463838
2019-02-05 21:50:13.431,AACB154,-1327801866
2019-02-05 21:50:23.431,AACB154,574696160
2019-02-05 21:50:33.431,AACB154,-1090833477
2019-02-05 21:50:43.431,AACB154,-1154470347
2019-02-05 21:50:53.431,AACB154,1039105976
2019-02-05 21:51:03.431,AACB154,-572779944
2019-02-05 21:51:13.431,AACB154,-14504949
2019-02-05 21:51:23.431,AACB154,-2102898307
The first column is the event_time, followed by sensor_id and amount.
Create a file called event-data.csv within ${ENVIRONMENT_HOME}/datasets and add the data (shown above) - note that we save this dataset without a header.
The purpose of this file is two-folder:
- We will use it for unit testing. We stored the file in the location that is defined in the Hop environments definition as
DATASETS_BASE_PATH. - We will aslo use it to run the pipeline via GCP in lack of a proper full dataset.
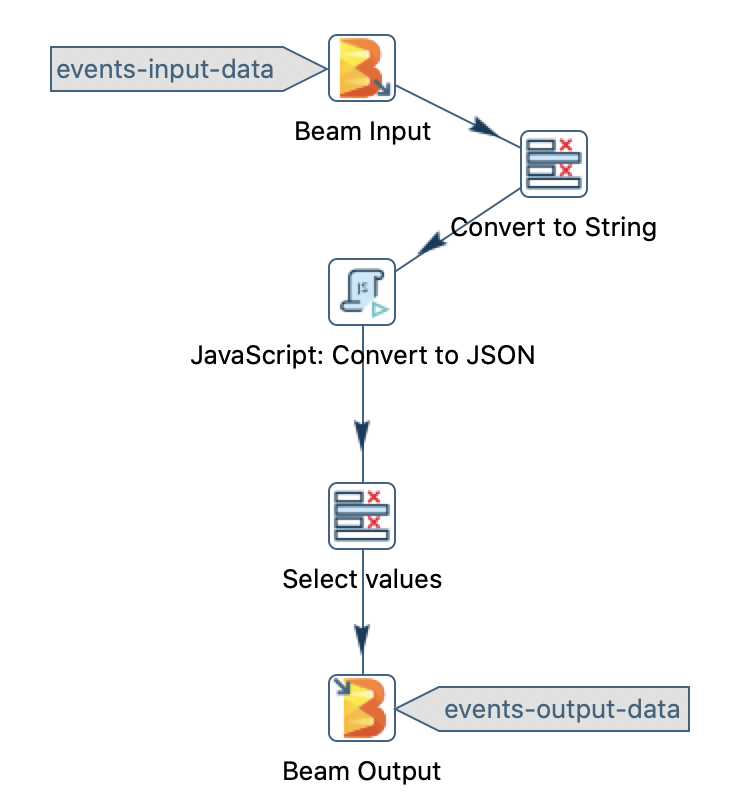
Adding Beam Input
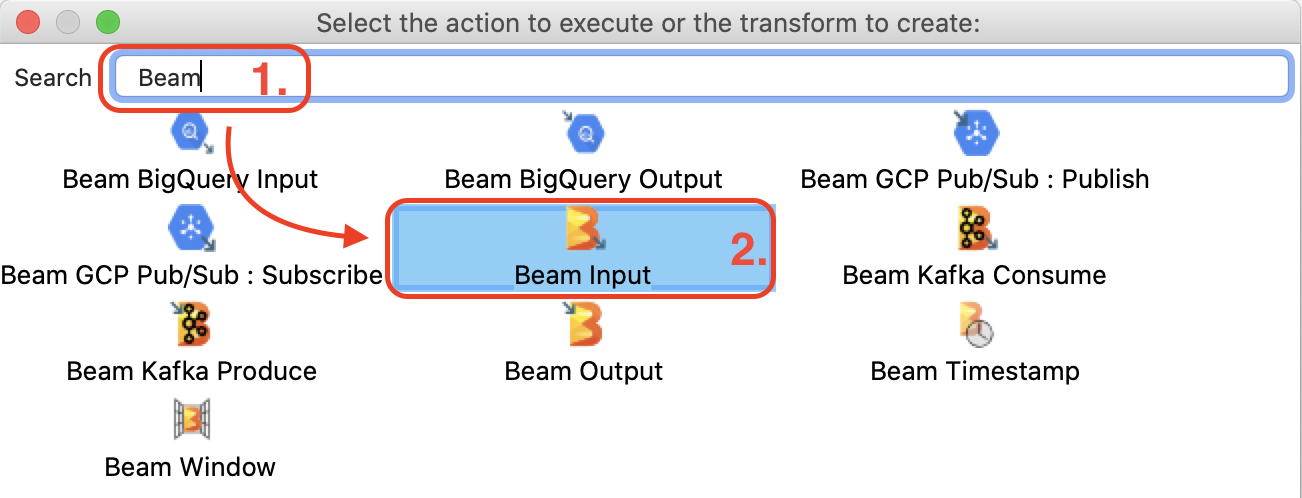
In the Hop Gui, single-click on the main canvas which will bring up the Action dialog: Type Beam into the search field and then pick the Beam Input:
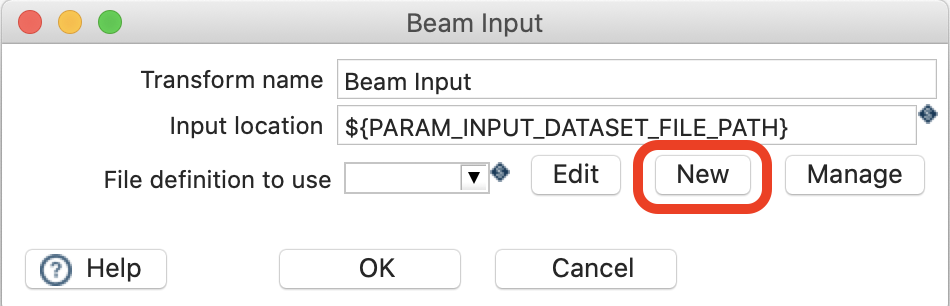
The Beam Input transform should be placed on the canvas now - double click on it to fill out the settings:
- Input location: The directory where your input files are stored. This could be a directory on HDFS or any other file storage. Ideally parameterise this:
${PARAM_INPUT_DATASET_FILE_PATH} - File definitoin to use: Click on New:
This will bring up the File Definition dialog. The goal here is to describe the structure of the input files, which could reside in a HDFS folder or other file stores. You define which fields the file contains, of which type they are etc and also what the separator and enclosure for these fields is: all pretty standard metadata/schema. Provide all this required metadata now:
- Name:
events-input-schema - Description:
events input dataset- or just leave it empty - Field Separator:
${PARAM_INPUT_DATASET_FIELD_SEPARATOR} - Field Enclosure:
${PARAM_INPUT_DATASET_FIELD_ENCLOSURE} - Field definitions: Provide as shown below in the screenshot:
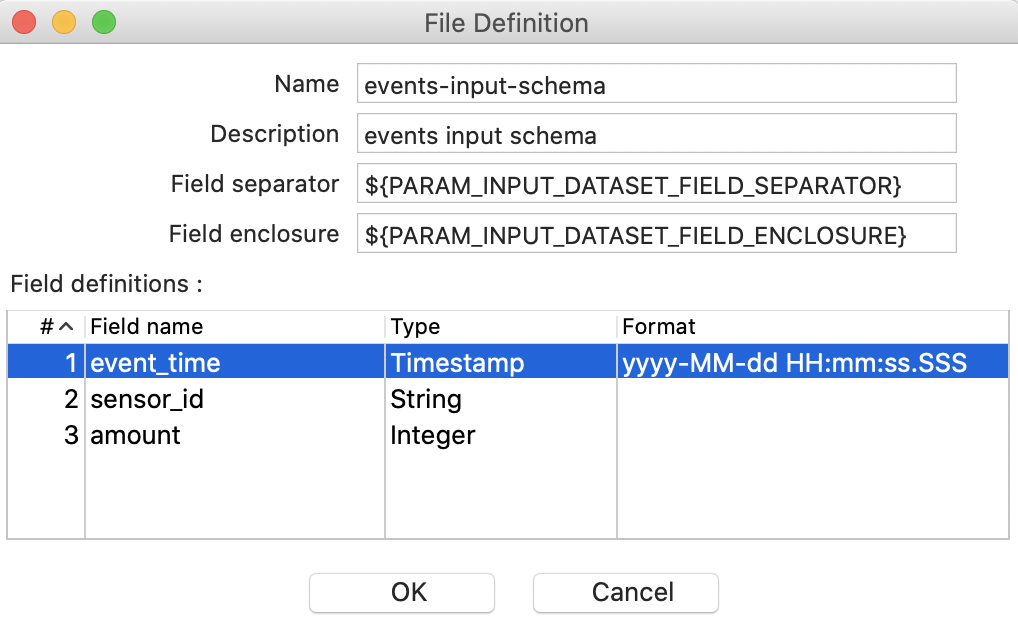
Click Ok.
Note: The Beam Input step uses the Beam API (TextIO) to read the data. See also Beam I/O Transforms.
Note: Wildcards are allowed as part of the Input location, e.g.
/path/to/my/file*. This way you can source multiple files at once.
Important: The input dataset must not have a header!
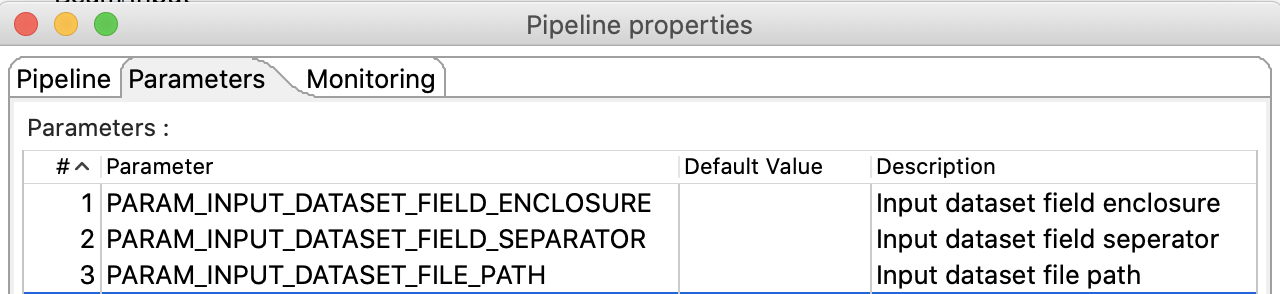
Next we have to define the parameters we used earlier on as input parameters for this pipeline. Single-click on the canvas and choose Edit pipeline. Click on the Parameters tab and add
PARAM_OUTPUT_DATASET_FILE_PATHPARAM_INPUT_DATASET_FIELD_SEPARATORPARAM_INPUT_DATASET_FIELD_ENCLOSURE
We can check which output fields the input has (this feature is available for any transform that we add to the pipeline): Single click on the Beam Input and choose Show the fields exiting this transform:
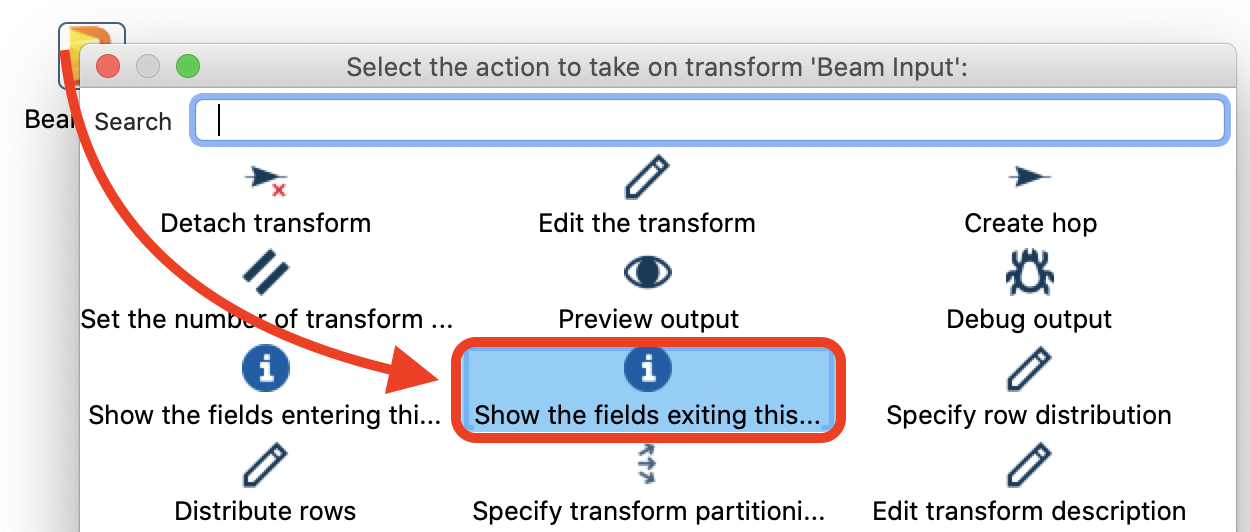
The result is what we would expect:
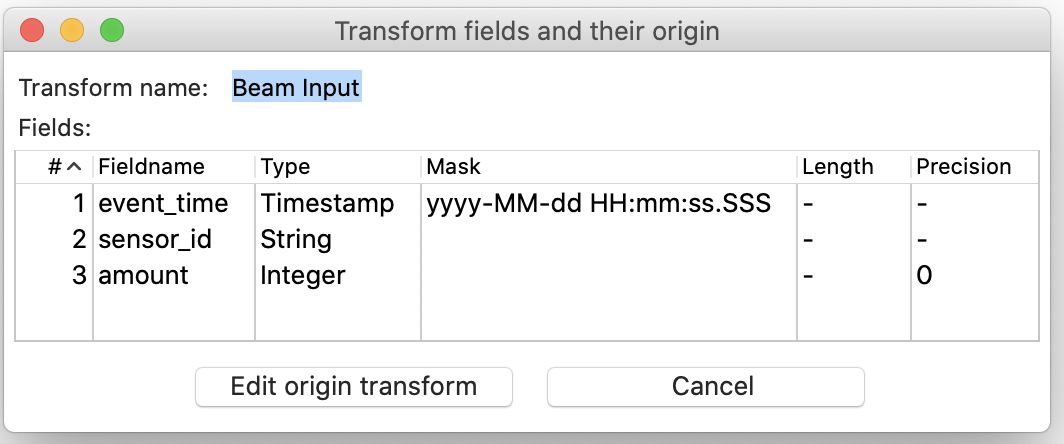
OPEN: I HAD TO CHANGE THIS HERE TO DATE!
At this point you could just add a few other transforms, but wouldn’t it be great if we could actually test our pipeline (as we build it) with some sample data?
Defining a Unit Test
Creating a Unit Test in Hop consists of three steps:
- Register the CSV sample datasets
- Create one or more unit test definitions
- Link the CSV datasets to the Hop transforms (usally input and output)
Register the CSV sample dataset
Click on the New icon and choose Dataset:
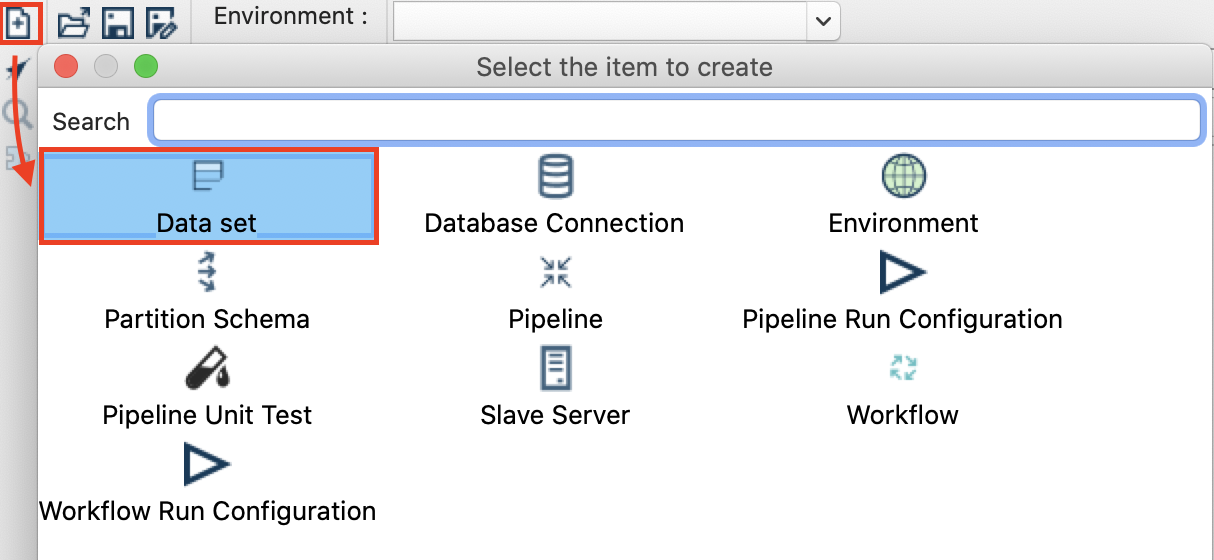
Fill out the Data Set dialog as shown below (this is fairly similar to what we did before):
- Name:
events-input-data - Base file name:
event-data.csv - The data set fields: See screenshot below …
If you followed the instructions from the start correctly, you should have a event-data.csv file available in the ${ENVIRONMENT_HOME}/datasets folder. Please note that in the Data Set dialog (shown above) we don’t mention the extension for this file.
Create the Unit Test Definition
Next let’s define a Unit Test:
File > New > Pipeline unit test
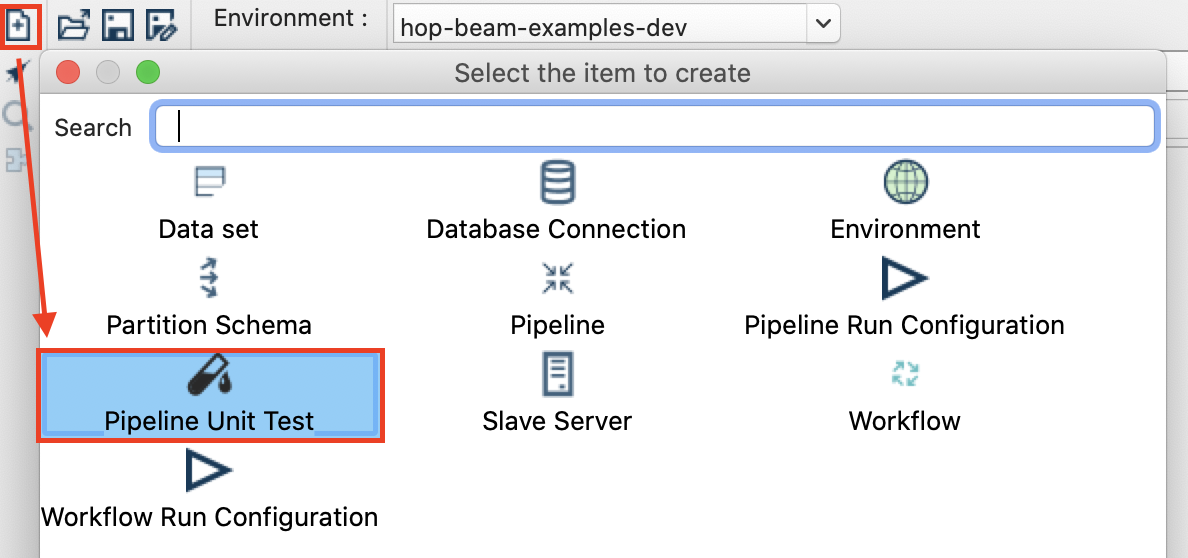
Or alternatively via the icon bar:

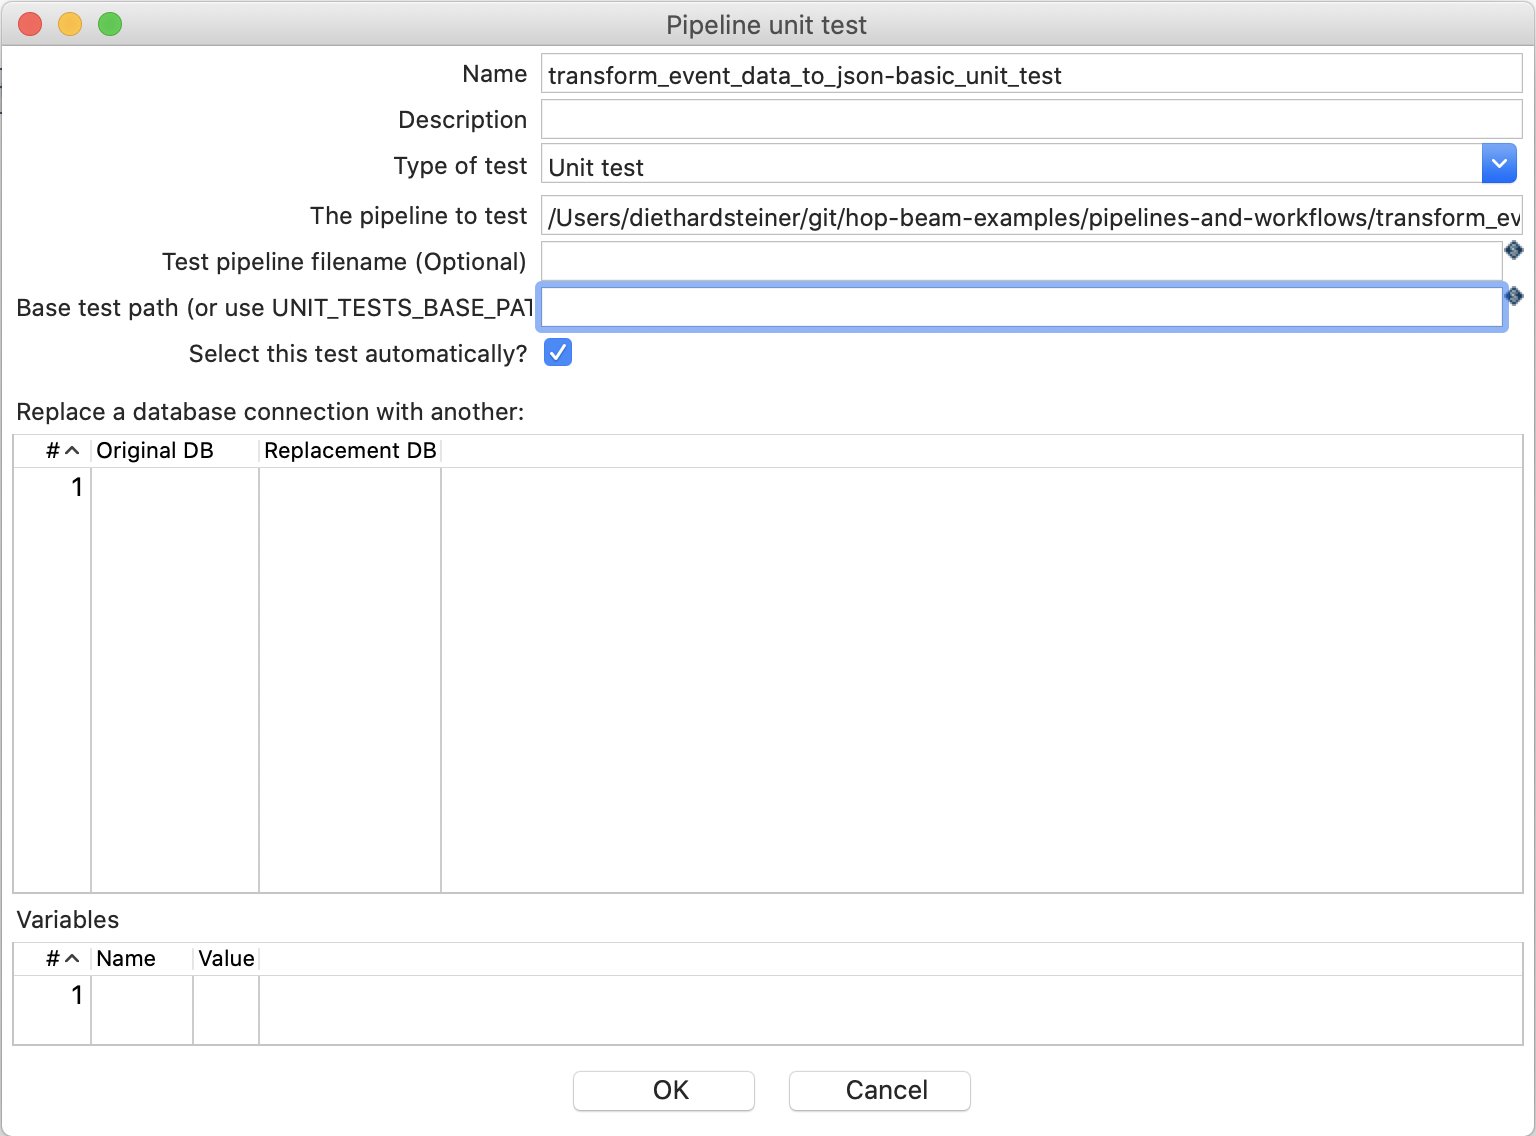
Provide the following settings in the Pipeline unit test dialog:
Link the CSV Sample Dataset to the Hop Transforms
Next let’s link this data set to the Beam Input. Single-click on the Beam Input, type data set into the search and then pick Set input data set:
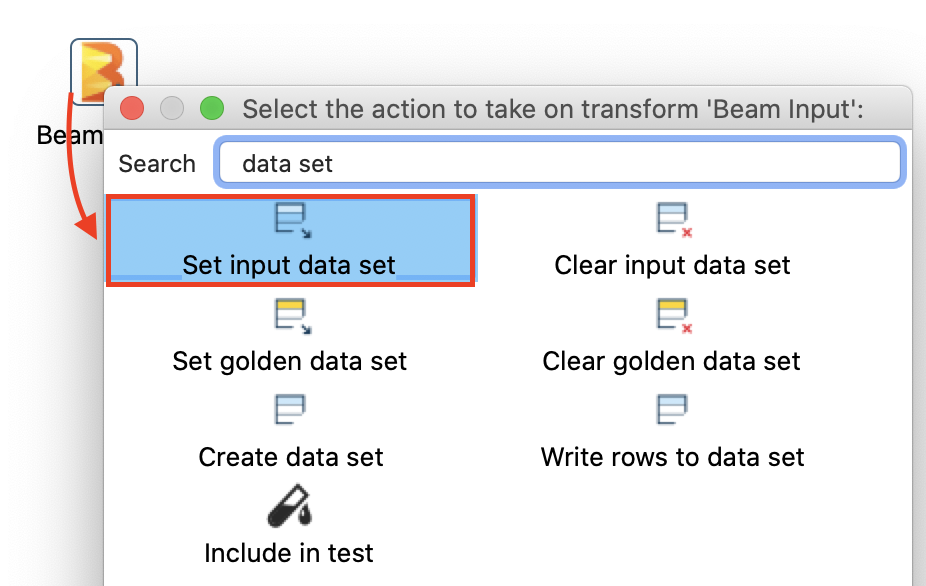
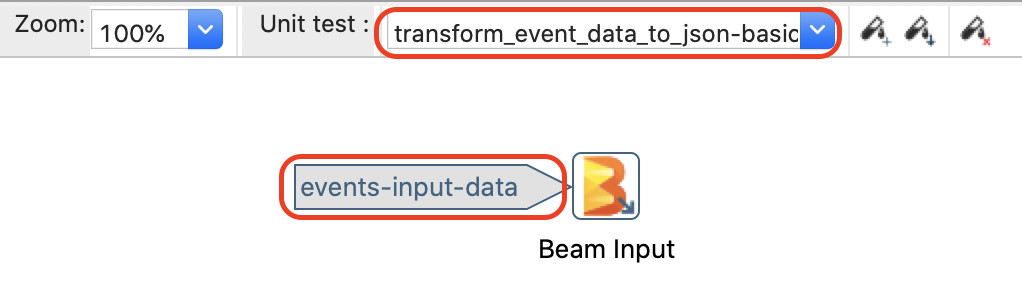
From the mini dialog pick events-input-data. The next dialog allows you to map the fields from the dataset to the Beam Input file definition. Just click on the Guess button, double check the result and then click Ok. Finally, in the Sort Order dialog remove the last entry (amount): right click and choose Deleted selected lines - then click Ok. The UI should look like this now (note the label left to the Beam Input):
Preview Sample Data
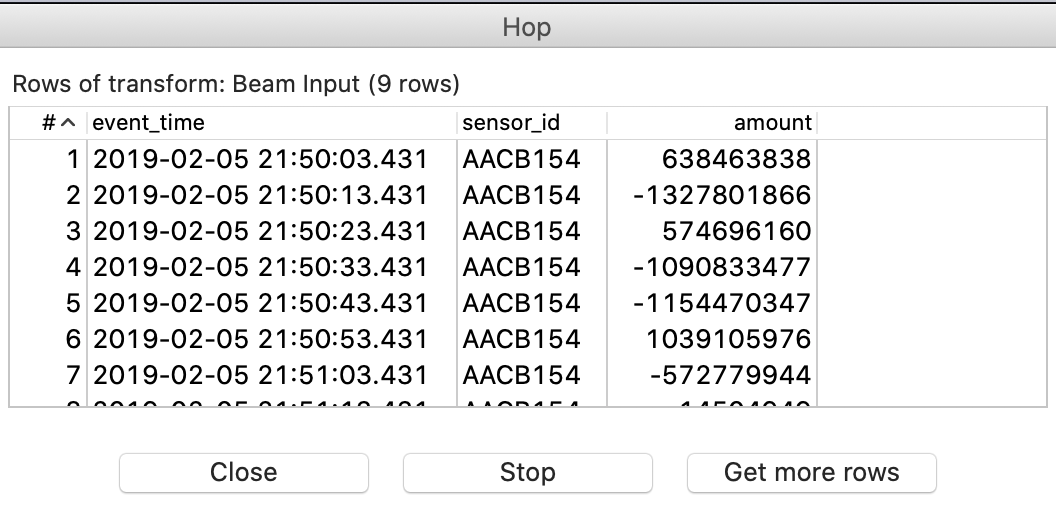
Single-click on the Beam Input and choose Preview output:
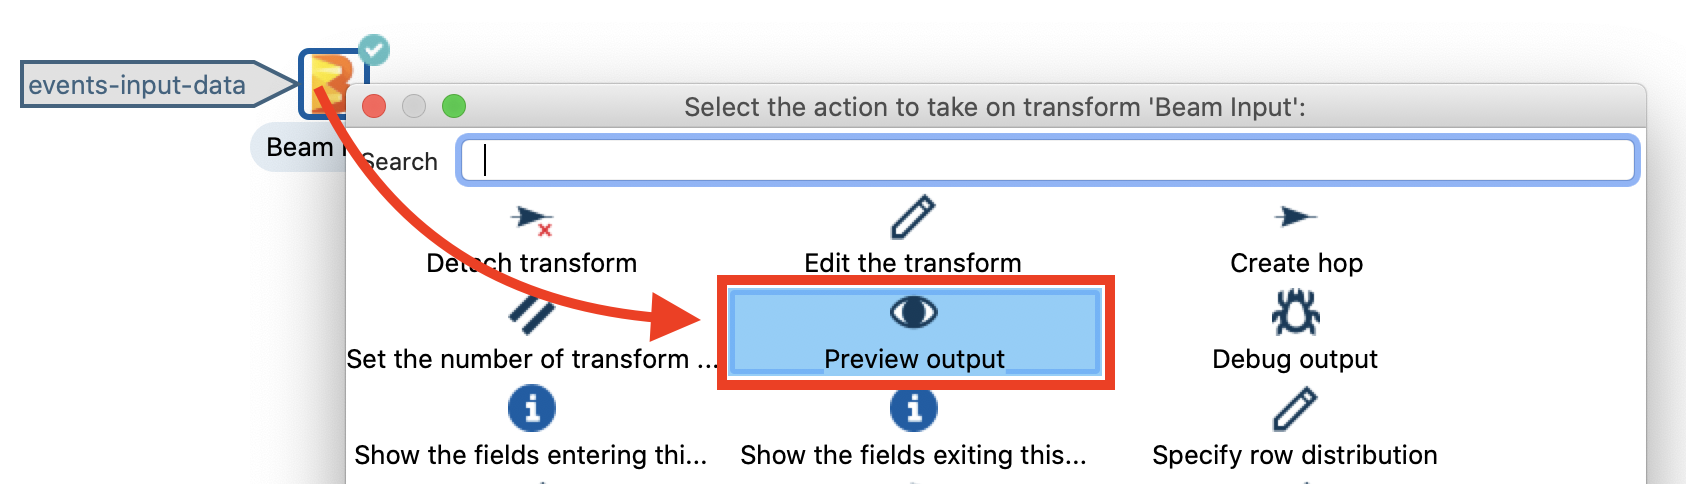
And then a small preview window should show up:
How to create a Hop Between Transforms
To create a hop/link between the transforms there are the following options:
- Hold down the Shift key while dragging (using your primary mouse button) from the source to the target transform. On MacOS, use the three finger gesture on your trackpad.
- Single-click on the source transform and choose Create hop, then point the arrow to the target transform.
Transforming the data
Single-click on the canvas and pick the Select Values transform.
Single-click on the Beam Input transform and choose Create hop. Point the hop to the Select Values transform. Next double click on the Select Values transform and then click on the Meta-data tab. Fill it out the dialog as shown below:

Click OK.
Note: We could have avoided using this transform if we had declared
event_timeasStringin the Beam Input transform.
Single-click on the Select Values transform and choose Preview output to make sure the output is as expected.
Next single-click on the canvas and choose the JavaScript transform.
Single-click on the Select Values transform and choose Create hop. Point the hop to the JavaScript transform.
Double click on the JavaScript transform and define the settings as shown below:
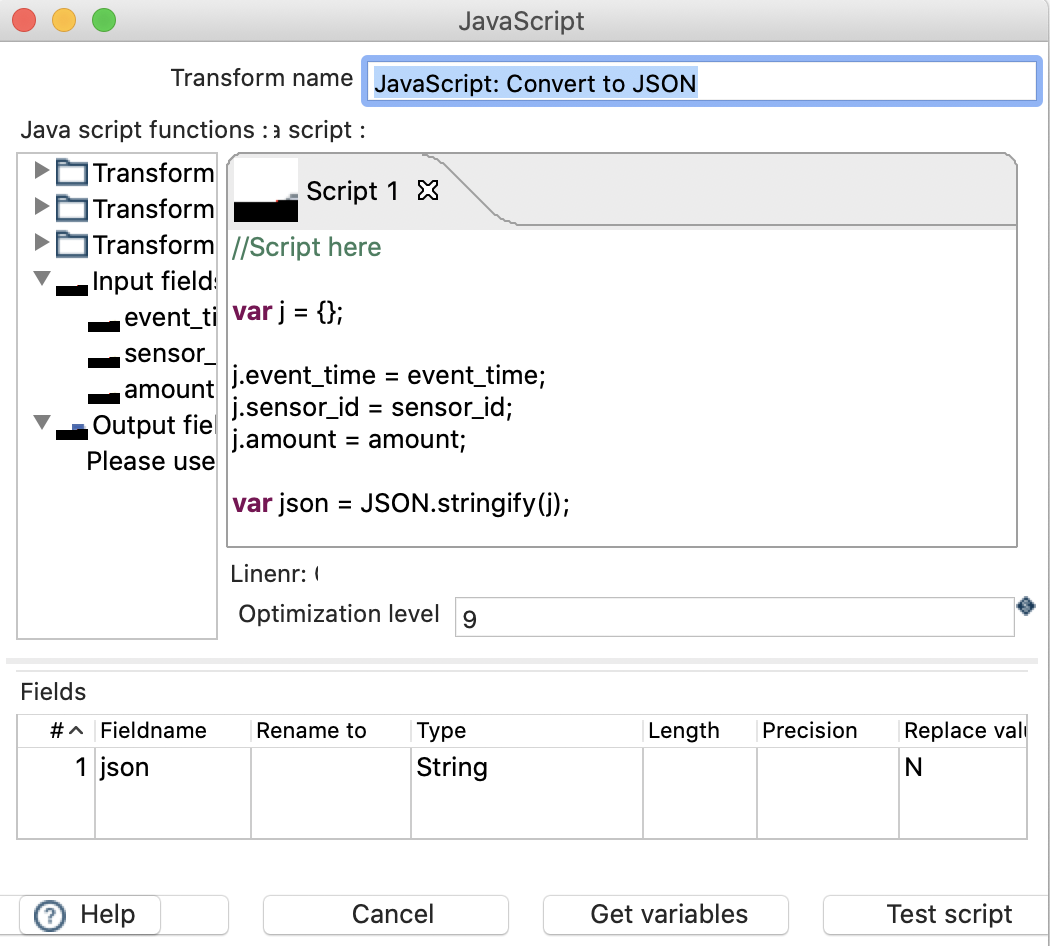
Finally click OK.
Single click on the JavaScript transform and choose Preview output, again, to make sure that everything is working as expected.
Next we only want to keep the json field in our stream. Single-click on the canvas and choose Select Values.
Create a hop from the JavaScript transform to the Select Values one.
Double click on the Select Values transform and configure it as shown below:
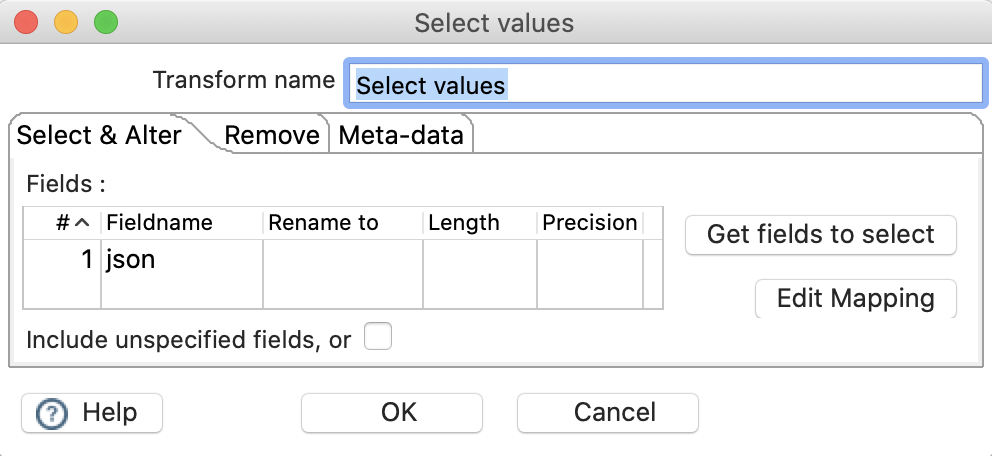
Click OK, then preview the output.
Adding Beam Output
Single-click on the canvas and choose Edit pipeline. Click on the Parameters tab and add as a parameter:
PARAM_OUTPUT_DATASET_FILE_PATHPARAM_OUTPUT_DATASET_FILE_PREFIXPARAM_OUTPUT_DATASET_FILE_SUFFIXPARAM_OUTPUT_DATASET_FIELD_SEPARATOR
Single-click on the canvas and pick Beam Output. Create a hop from the previous transform to this one.
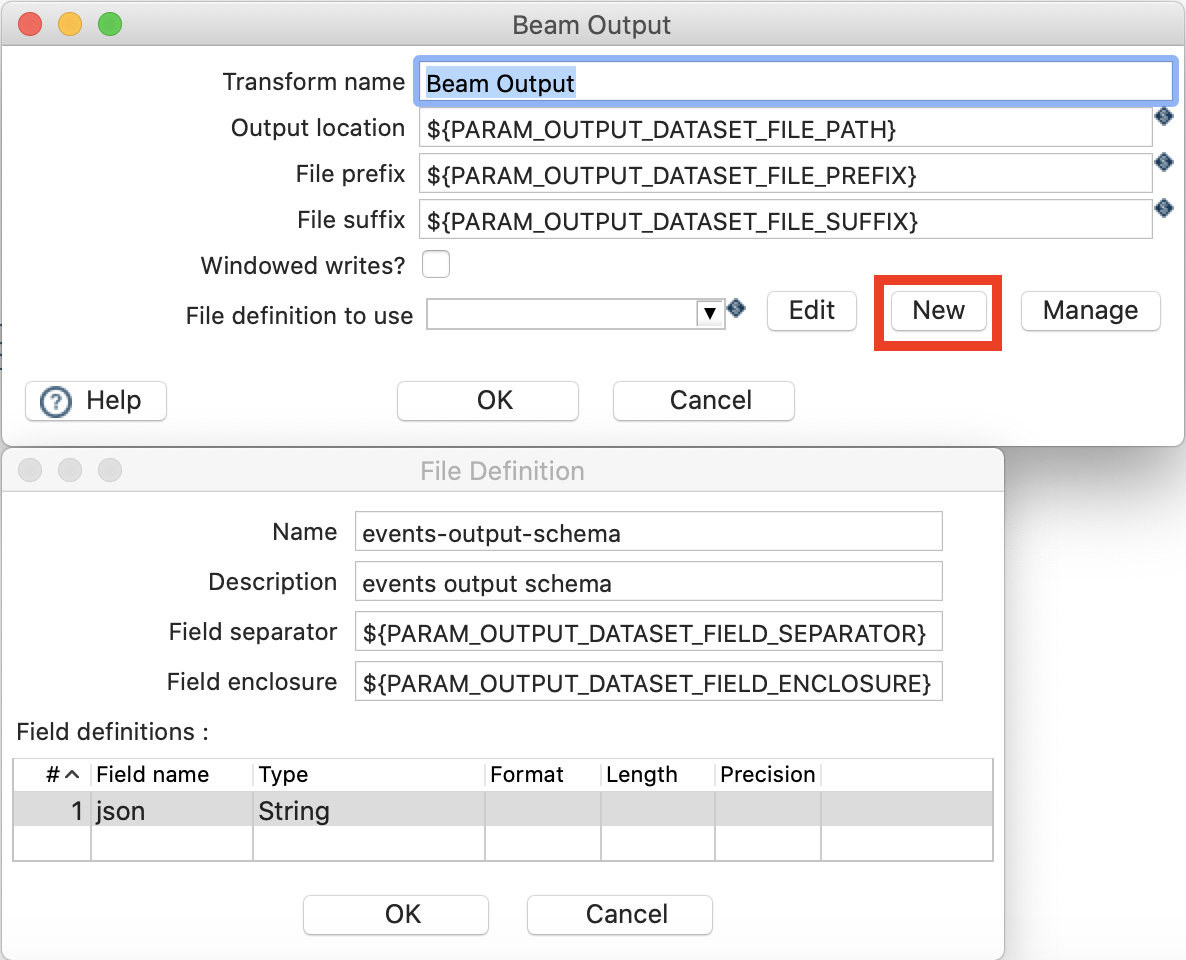
Sinlge-click on the Beam Output transform. Let’s configure it:
- Output location:
${PARAM_OUTPUT_DATASET_FILE_PATH} - File prefix:
PARAM_OUTPUT_DATASET_FILE_PREFIX - File suffix: Can be used in example to add a file extension, e.g.
.csv. We will use:PARAM_OUTPUT_DATASET_FILE_SUFFIX - Windowed writes: Use this in conjunction with the Beam Window step. Leave unticked for this exercise.
- File definition to use: Pick the output schema/definition you created earlier on. Fill it out as shown in the screenshot below.
Note: It’s not necessary any more the create a File definition for the Beam Output transform since now Hop can determine the schema from the incoming stream.
The reason why we only define the main part of the filename will become apparent when you check the created output files later on:
$ ls /tmp/
event-data-00000-of-00005.csv
event-data-00001-of-00005.csv
event-data-00002-of-00005.csv
event-data-00003-of-00005.csv
event-data-00004-of-00005.csv
As you can see, because of the multithreaded nature of Beam more than one output file gets created.
Unit Test: Adding the Golden Output Dataset
To complete our unit test setup, we also have to specify a golden output dataset.
Create a new file called event-data-json.csv in ``${ENVIRONMENT_HOME}/datasets` with following content (this is how we expect the output to look like):
json
"{""event_time"":""2019-02-05 21:50:03.431"",""sensor_id"":""AACB154"",""amount"":638463838}"
"{""event_time"":""2019-02-05 21:50:13.431"",""sensor_id"":""AACB154"",""amount"":-1327801866}"
"{""event_time"":""2019-02-05 21:50:23.431"",""sensor_id"":""AACB154"",""amount"":574696160}"
"{""event_time"":""2019-02-05 21:50:33.431"",""sensor_id"":""AACB154"",""amount"":-1090833477}"
"{""event_time"":""2019-02-05 21:50:43.431"",""sensor_id"":""AACB154"",""amount"":-1154470347}"
"{""event_time"":""2019-02-05 21:50:53.431"",""sensor_id"":""AACB154"",""amount"":1039105976}"
"{""event_time"":""2019-02-05 21:51:03.431"",""sensor_id"":""AACB154"",""amount"":-572779944}"
"{""event_time"":""2019-02-05 21:51:13.431"",""sensor_id"":""AACB154"",""amount"":-14504949}"
"{""event_time"":""2019-02-05 21:51:23.431"",""sensor_id"":""AACB154"",""amount"":-2102898307}"
Note: The raw data contains
"(double quotation marks). Because the whole json object is enclosed in a quotation mark as part of the CSV setup, we have to escape these quotation marks with yet another quatation mark.
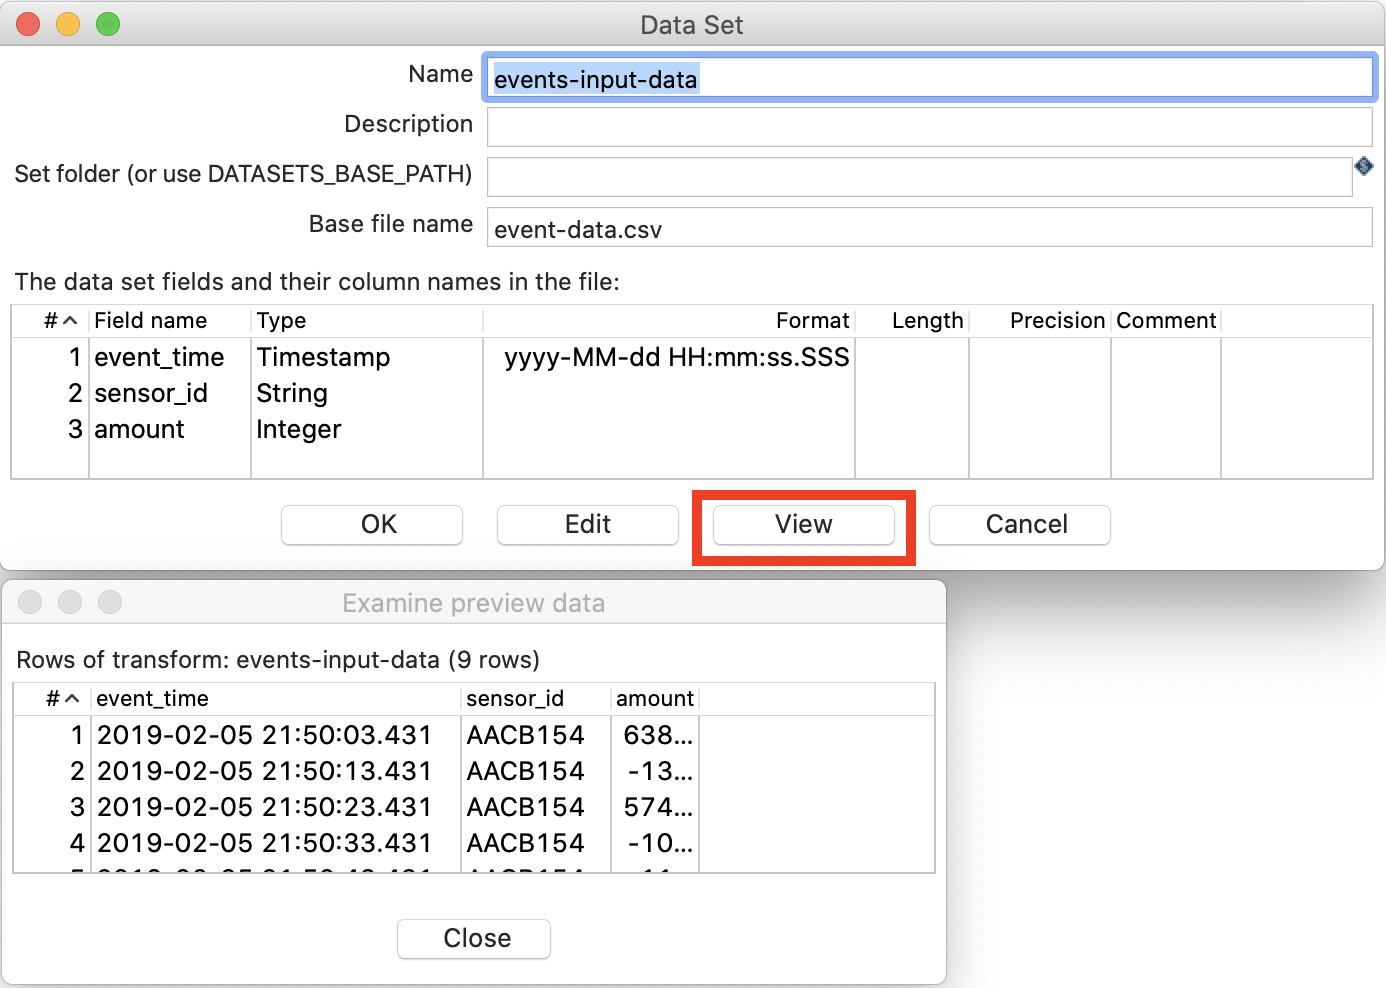
Click on the New icon and choose Dataset. Fill out the Data Set form as shown below, then click View to make sure the data gets fetched correctly:
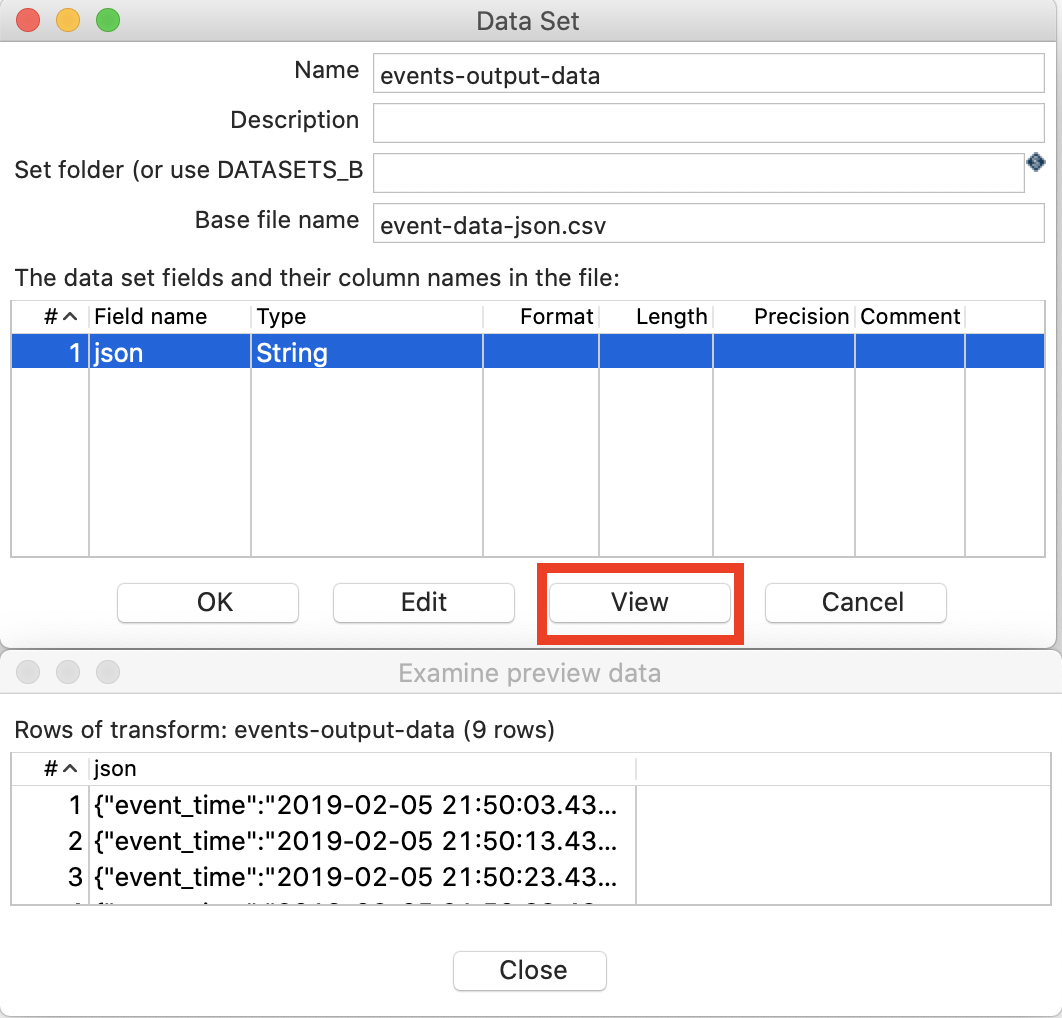
Finally Close the data preview dialog and click OK within the Data Set dialog.
Next single-click on the Beam Output transform and choose Set Golden Data Set. The next few steps should be pretty familiar, so I won’t explain them again.
Executing the Unit Test
To execute the unit test we have have to create a run configuration for the local engine.
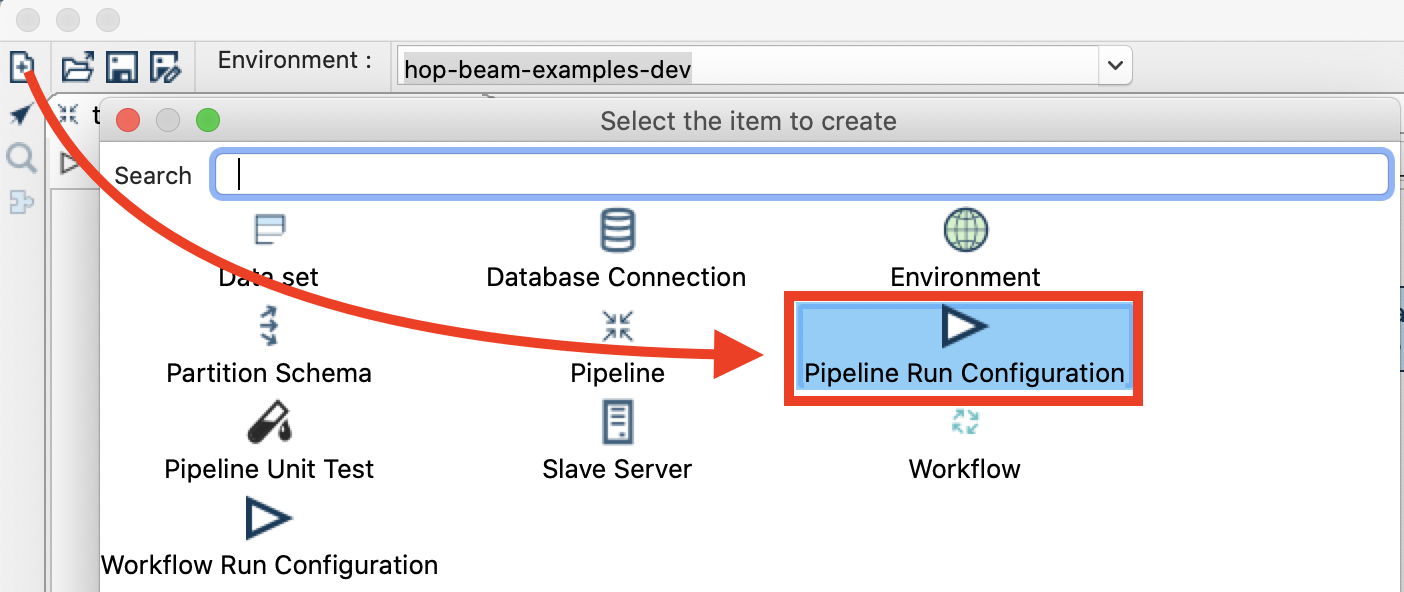
Click on the New icon and choose Pipeline Run Configuration:
Fill the dialog out as shown below:

Click OK.
Next click on the Run icon on the top left hand corner just above the canvas (or alternatively Run > Start execution).
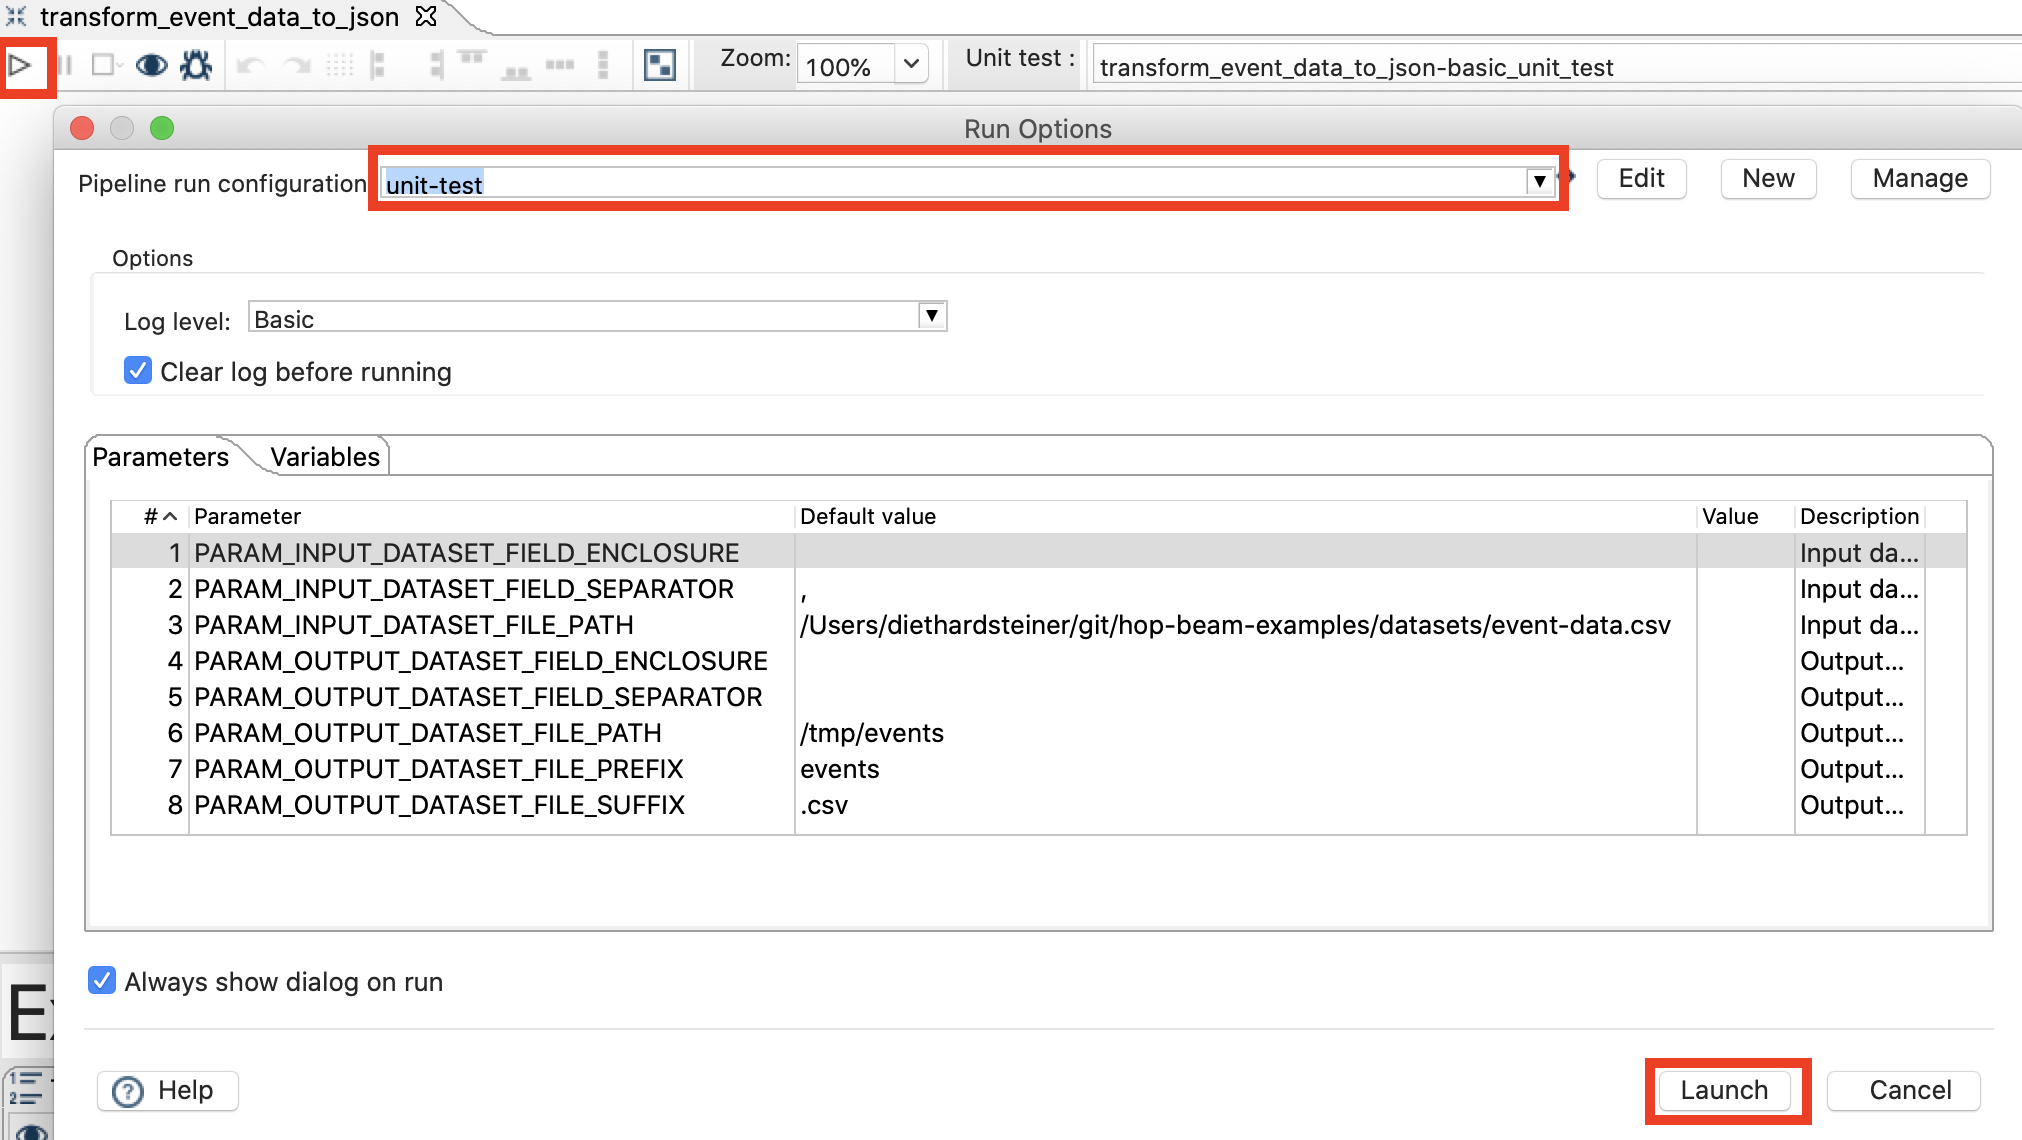
Finally click Launch.
In the log panel (at the bottom of the screen) you should see something like this then:
2020/05/25 09:18:43 - transform_event_data_to_json - Unit test 'transform_event_data_to_json-basic_unit_test' passed succesfully
2020/05/25 09:18:43 - transform_event_data_to_json - ----------------------------------------------
2020/05/25 09:18:43 - transform_event_data_to_json - Beam Output - events-output-data : Test passed succesfully against golden data set
2020/05/25 09:18:43 - transform_event_data_to_json - Test passed succesfully against unit test
2020/05/25 09:18:43 - transform_event_data_to_json - ----------------------------------------------
2020/05/25 09:18:43 - transform_event_data_to_json - Pipeline duration : 0.063 seconds [  0.063" ]
2020/05/25 09:18:43 - transform_event_data_to_json - Execution finished on a local pipeline engine with run configuration 'local'
Executing unit tests this way only works via the GUI.
Executing your Hop Beam Pipeline
Before we can execute any Hop Beam Pipeline we have to create a Pipeline Run Configuration, which allows you specify which execution engine you’d like to use:
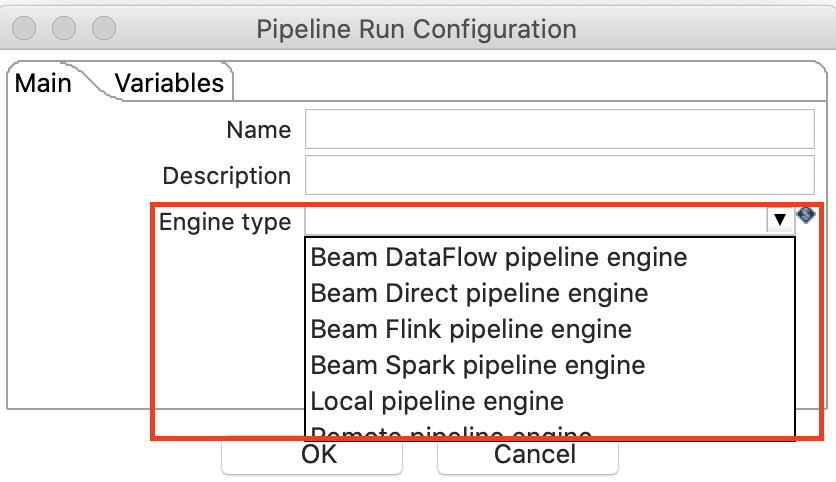
Engine: Direct
The Beam Direct pipeline engine enables you to test your PDI Beam Pipeline locally.
Choose File > New and then pick Pipeline Run Configuration. Provide a Name and set:
- Engine type to Beam Direct pipeline engine.
- Temp location to
file:///tmpor any other suitable directory.
Finally click OK.
Click the Run button on the top left hand side (just above the canvas) or alternatively choose Run > Start execution.
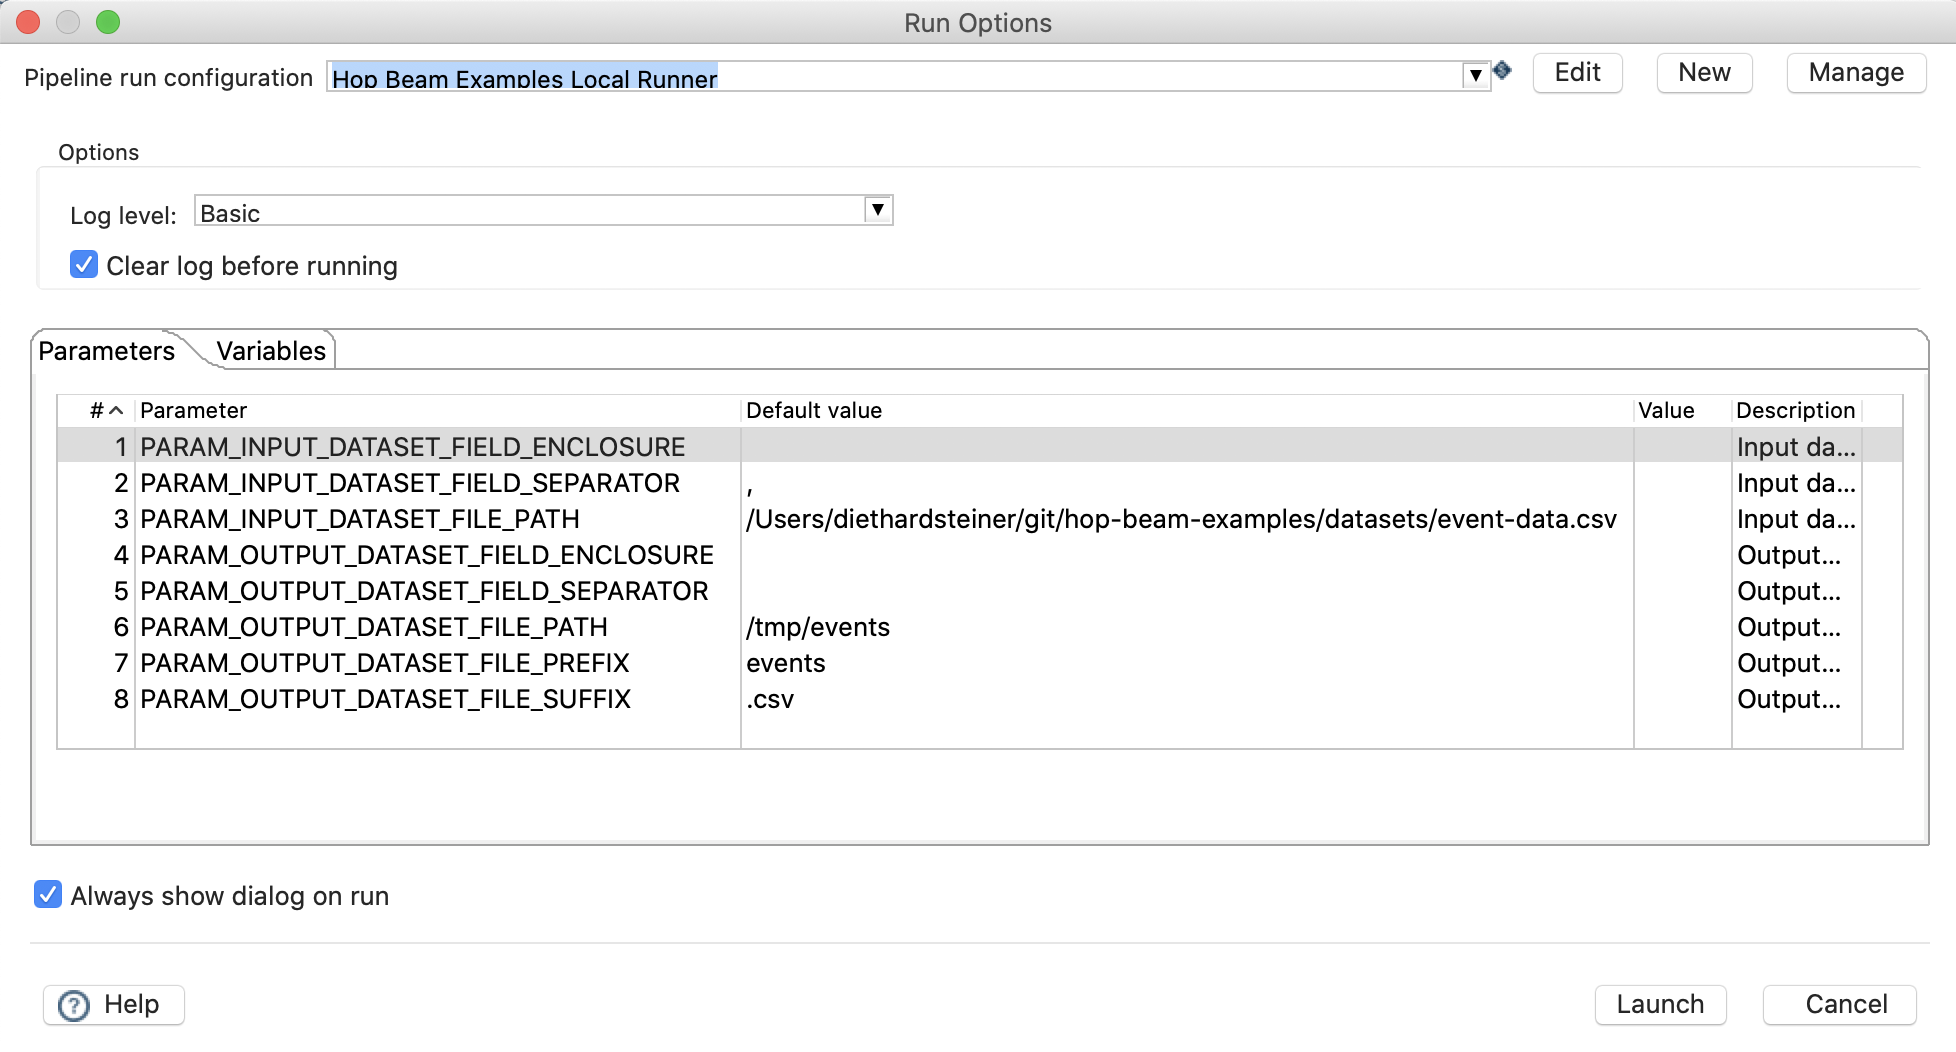
Make sure that the parameter values are correctly set (in my case the Default values were ok, if they are not, specify the correct value in the Value field). Next click Launch.
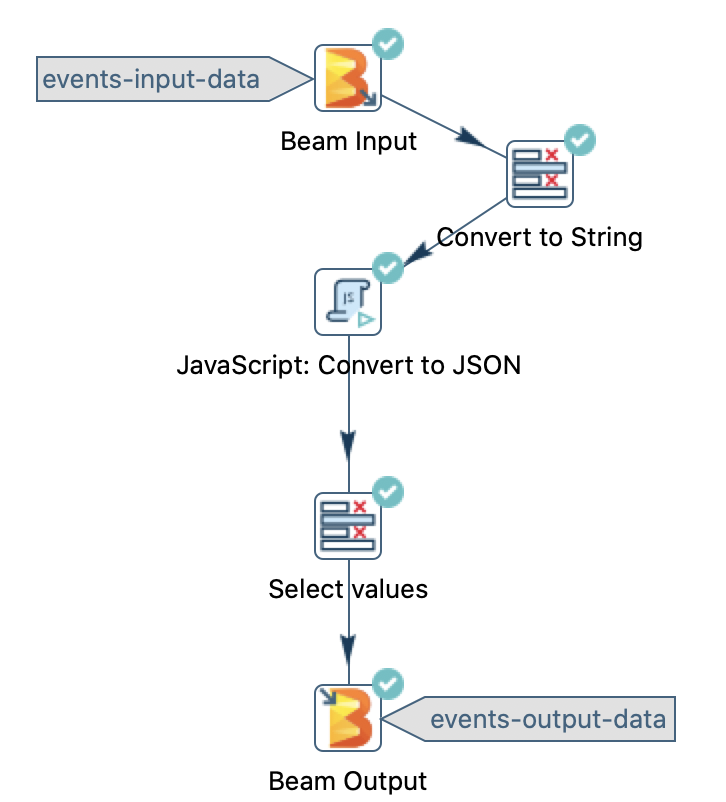
Once the process is finished, all the transform icons should have a green tick mark:
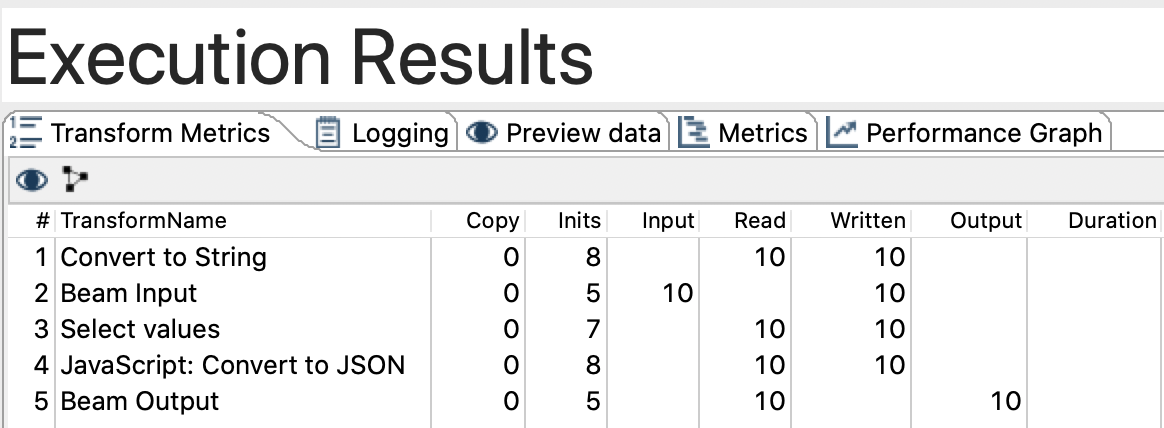
By attention to the messages in the Logging tab. Once the process is finished, also check the Transform Metrics:
Check for the output files:
% ls -l /tmp/events
total 24
-rw-r--r--  1 diethardsteiner  wheel  167 25 May 09:04 events-00000-of-00003.csv
-rw-r--r--  1 diethardsteiner  wheel  250 25 May 09:04 events-00001-of-00003.csv
-rw-r--r--  1 diethardsteiner  wheel  414 25 May 09:04 events-00002-of-00003.csv
Check the content of the files:
% cat /tmp/events/events-00000-of-00003.csv                                                                                                                     (master)hop-beam-examples
{"event_time":"2019-02-05 21:49:53.431","sensor_id":"AACB154","amount":-498417153}
{"event_time":"2019-02-05 21:50:13.431","sensor_id":"AACB154","amount":-1327801866}
Executing from the command line
You can also execute the pipeline via the command line like so (adjust parameter values):
export HOP_CONFIG_DIRECTORY=~/git/hop-beam-examples/config/hop
./hop-run.sh \
    --file=/Users/diethardsteiner/git/hop-beam-examples/pipelines-and-workflows/transform_event_data_to_json.hpl \
    --environment=hop-beam-examples-dev \
    --runconfig="Hop Beam Examples Local Runner" \
    --level=Basic \
    --parameters=PARAM_INPUT_DATASET_FIELD_ENCLOSURE=,PARAM_INPUT_DATASET_FIELD_SEPARATOR=",",PARAM_INPUT_DATASET_FILE_PATH=/Users/diethardsteiner/git/hop-beam-examples/datasets/event-data.csv,PARAM_OUTPUT_DATASET_FIELD_ENCLOSURE=,PARAM_OUTPUT_DATASET_FIELD_SEPARATOR=,PARAM_OUTPUT_DATASET_FILE_PATH=/tmp/events,PARAM_OUTPUT_DATASET_FILE_PREFIX=events,PARAM_OUTPUT_DATASET_SUFFIX=.csv
Engine: Google Cloud Platform DataFlow
Google Cloud Platform
For the samples here we will work on GCP. Project Hop is by no means restricted to GCP - you can use it with any cloud provider of your liking.
As you might know by now, Google initially donated the Beam abstraction layer code to the open source community. GCP Dataflow is more than just this abstraction layer: It is a managed service which apart from the engine/runtime also provisions worker nodes and does some clever stuff under the hood to optimise the dataflow. So this is pretty impressive: You don’t have to include any logic in your setup to provision nodes and to scale your process.
Setting up a Service Account
Background info:
- Deploying a Pipeline
- Getting started with authentication
- Google Cloud Dataflow Security and Permissions
Before getting started make sure you have a GCP account set up and you have the required credentials file:
- Log on to the GCP Console and pick the correct project or create a new one.
- Create a new service account via the GCP IAM - Service Accounts page. Further info: Getting started with authentication. Make sure to tick the Create key (optional) option at the end. This is the key (JSON file) that we require to authenticate from our local machine (and also to set
GOOGLE_APPLICATION_CREDENTIALS). Note: If you created the service account a longer time ago and just want to retrieve the key again, just click on the 3 dots action icon on the right hand side to get an option to create a new key.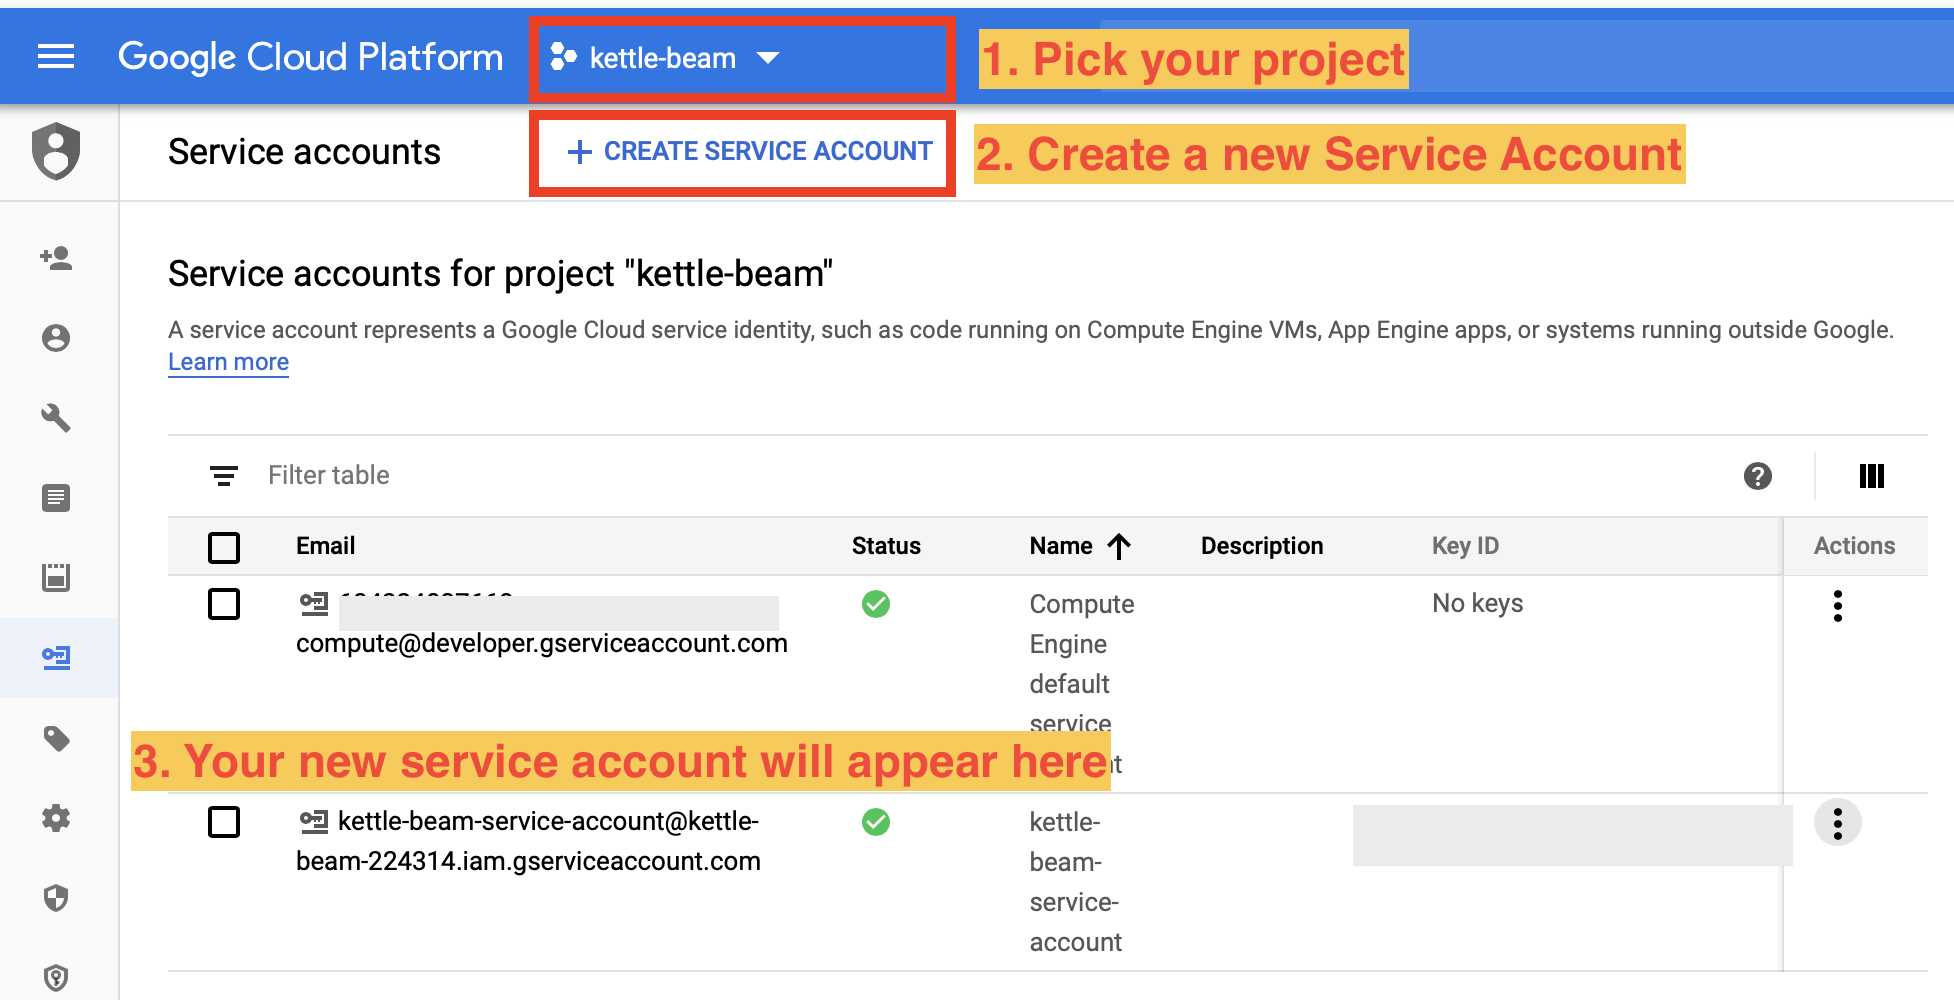
- Define the
GOOGLE_APPLICATION_CREDENTIALSenvironment variable:export GOOGLE_APPLICATION_CREDENTIALS=/path/to/your/credentials.json(ideally in your.bashrcor.zprofileor whatever shell you use). - Create a custom role called
kettle-beam-rolevia the GCP Roles page. Find further instructions here. Assign to this role everything you can find related to API, Storage, Dataflow. Not complete list of required permissions:compute.machineTypes.get,dataflow.*,storage.*,firebase.projects.get,resourcemanager.projects.get. - Assign your service account to the custom role: Go back to the IAM page, click on the pencil icon left next to the service account and click on the Role pull-down menu. Type
beaminto the filter and then select ourkettle-beam-role. - Create a storage bucket: Go to the GCP Storage page and click on the Create bucket icon. Name it
hop-beam-storage. Once created, you should be automatically forwarded to the Bucket Details page: Click on Create folder and name itinput. Create two other ones:binaries,output. - Still on the Bucket Details page, click on the
inputfolder and click on Upload files. Upload the input file for your PDI Beam pipeline. - Grant service account permissions on your storage bucket: Still on the Bucket Details page, click on the Permissions tab. Here your service account should be listed.
- Enable the Compute Engine API for your project from the APIs Library page in the Google Cloud Platform Console. Pick your project and search for
Compute Engine API. After a few clicks you come to the full info page. Give it a minute or so to show the Manage etc buttons. In my case the API enabled status was already shown: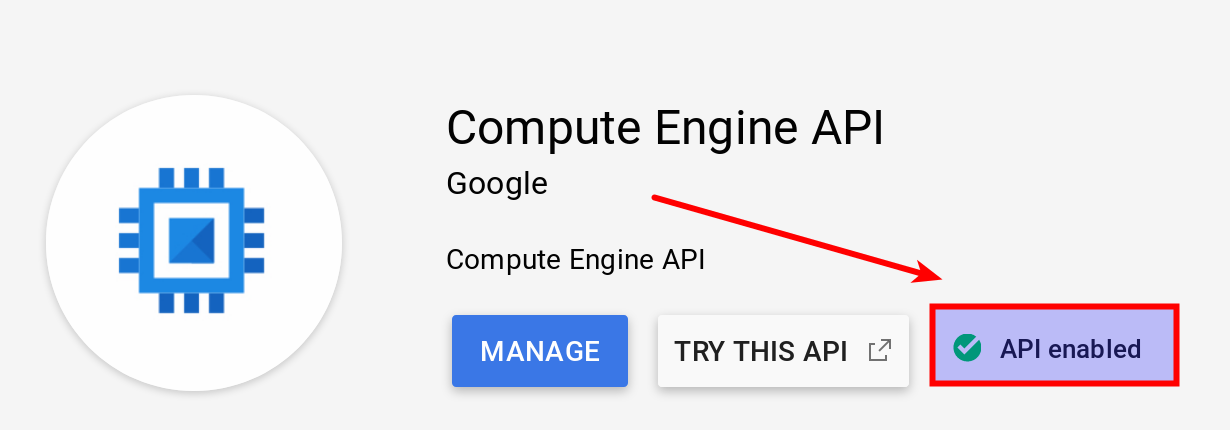 Following APIs are required (most of them are enabled by default):
- BigQuery API (if using BigQuery only)
- BigQuery Data Transfer API (if using BigQuery only)
- Cloud Datastore API
- Cloud Filestore API: used for creating and managing cloud file servers.
- Cloud Firestore API (NoSQL document database) - not enabled by default
- Firebase Rules API
- Cloud OS Login API
- Cloud Resource Manager API
- Compute Engine API
- Compute Engine Instance Group API
- Dataflow API
- Google Cloud APIs
- Google Cloud Deployment Manager v2 API
- Google Cloud Storage
- Google Cloud Storage JSON API
- Google Compute Engine Instance Group Updater API
- Service Management API
- Service Usage API
- Stackdriver Debugger API
- Stackdriver Logging API
- Stackdriver Monitoring API
- Stackdriver Trace API
- Grant service account permissions on DataFlow: Go to the GCP Dataflow page and ?? [OPEN] I didn’t see any options here. See also Google Cloud Dataflow Security and Permissions for more info. Two accounts required: Cloud Dataflow Service Account and Controller Service Account. By default, workers use your project’s Compute Engine service account as the controller service account. This service account (
<project-number>-compute@developer.gserviceaccount.com) is automatically created when you enable the Compute Engine API for your project from the APIs page in the Google Cloud Platform Console.
Additional info:
These are the roles required on Google Storage for this to work (Source):
- Storage Admin
- Storage Object Admin
- Storage Object Creator
- Storage Object Viewer
Then locally on your machine set following environment variables so that Hop can pick up the credentials:
GOOGLE_APPLICATION_CREDENTIALS=/path/to/google-key.json
Working with the Google Cloud SDK Command Line Tools
Install the Cloud SDK command line tools.
On macOS, you can also install it via Homebrew:
brew cask install google-cloud-sdk
Follow the install instructions on the GCP website. Once done your local environment should be properly configured. Validate the config:
gcloud config list
In case you are wondering with which user you are running the commands, execute this:
$ gcloud auth list
            Credentialed Accounts
ACTIVE  ACCOUNT
*       diethard.steiner@bissolconsulting.com

To set the active account, run:
    $ gcloud config set account `ACCOUNT`
If you created the project earlier on, you can list all projects like so:
$ gcloud projects list
You can switch to the kettle-beam project run:
$ gcloud config set project kettle-beam-224314
# Check which project is active
$ gcloud config list project
[core]
project = kettle-beam

Your active configuration is: [default]
Note:
GOOGLE_APPLICATION_CREDENTIALSare not used by the gcloud client tools and there is no way to set this. See also here. It is used for service accounts only.
There are many command options available which you can explore by yourself easily.
Setting up the Storage Bucket
From the main menu pick Storage and then click on Create bucket.
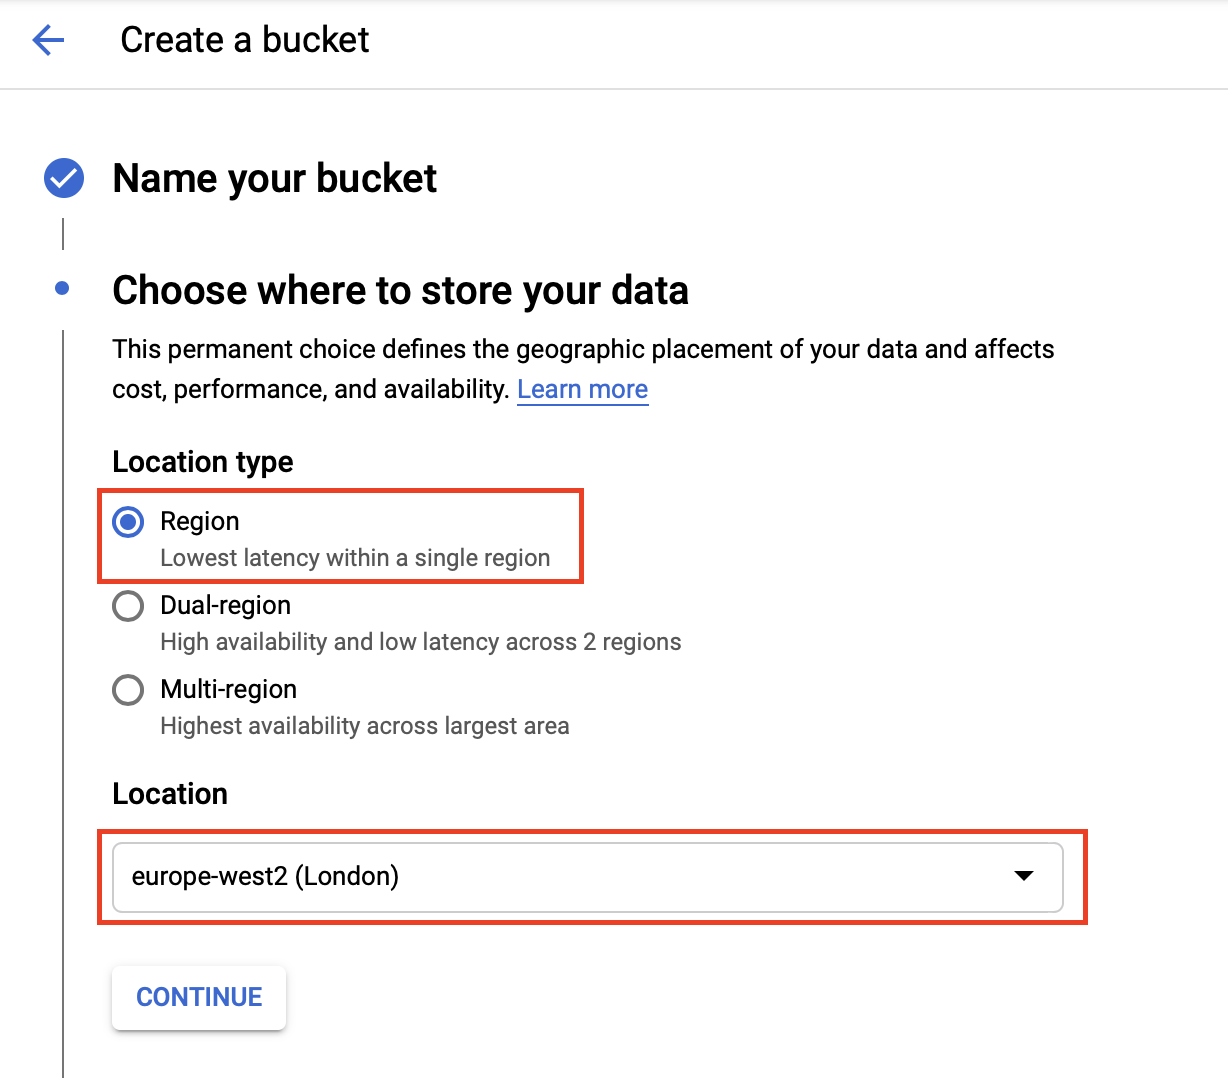
For my setup I picked a regional bucket in europe-west2 (London). You should also be able to use a multi-region bucket.
Important: Your beam process must run in the same region as your bucket is in.
In my case I set Access Control to Uniform.
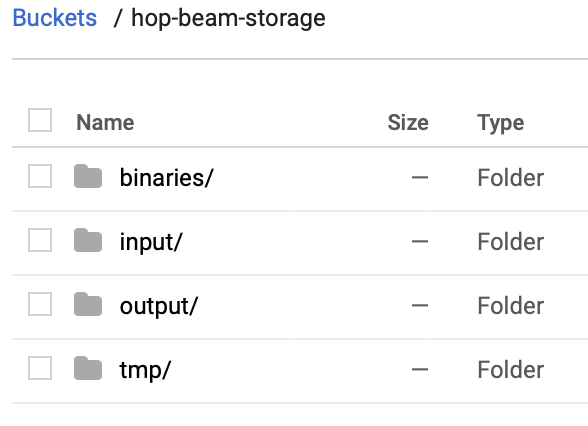
Next create the few folders that our Hop Beam process requires.
A sample folder structure within the bucket looks like this:
- binaries: To store all the Hop binaries
- input: To store any input data files your process consumes. For running our example pipeline, upload the sample file
event-data.csvto this folder. - output: To store any output data files your process produces
- tmp: To store any temporary files that your process creates
Hop Pipeline Run Configuration for Apache Beam
In the Hop Gui, choose File > New and then pick Pipeline Run Configuration.
Important: Your beam process must run in the same region as your bucket is in.
For your transformation create a dedicated GCP DataFlow config. Define:
- Name:
GCP Data Flow - Description: optional
- Runner: Pick
Beam DataFlow pipeline engine.
Note: At this point you might have to resize the dialog window to see all the options.
There is a massive list of settings available. Since we only run a very simple pipeline with very little data, we only pick low performant setup:
- Project ID: see comment further down
- Application Name
- Staging Location: where the PDI/Kettle binaries should be stored, e.g.
gs://hop-beam-storage/binaries. - Initial number of workers: 1
- Maximum number of workers: 2
- Auto scaling algorithm
- Worker Machine Type:
e2-standard-2. See more here. - Worker Disk Type
- Disk Size in GB
- Region: Define the region - this should be the same region as your bucket is in. In my case this is
europe-west2. - Zone
- User Agent: this can be any name you fancy
- Temp Location: e.g.
gs://hop-beam-storage/tmp
Important: Prefix all paths with
gs://(also for the Temporary Location).
- Plugins to stage: comma separated list of plugins that should be included as well. Don’t worry about this for now. We discuss this later.
- Transform plugin classes
- XP plugin classes
- Streaming Hop transforms flush intervals (ms)
- Hop streaming transforms buffer size
- Fat jar location: When using GCP DataFlow, Hop will automatically upload all the required binaries to the service, however, you can also create a fat jar (Hop main menu Tools > Generate a Hop fat jar). Once generated, you can specify the path to this file here.
The optional settings give you more control over the auto-scaling which is built-in with GCP DataFlow. One of the great things about GCP DataFlow is that you do not have to implement any logic for auto-scaling: This service takes care of it for you.
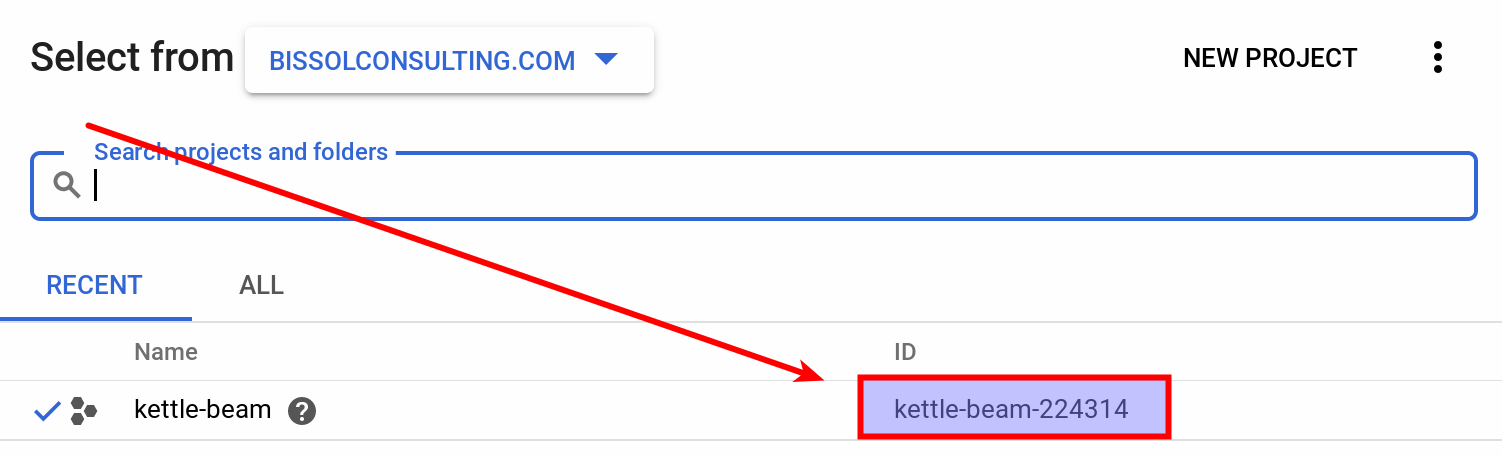
Important: Pay attention to the Project ID: This is not the name but - well as it says - the ID (which can be different). If you are not sure what the project ID is, simply click on the project picker at the top of the Web UI and the pop-up will show you the project name with the ID:
Alternatively, you can query the project ID with the command line tool:
$ gcloud projects list
PROJECT_ID            NAME                PROJECT_NUMBER
k8s-pentaho-server    k8s-pentaho-server  619953174803
kettle-beam-224314    kettle-beam         684324837668
The first time you run the Hop Beam pipeline in **GCP DataFlow ** it will be quite slow:
In the Pipeline Run Configuration you define under Staging location to which bucket the binaries should be uploaded to (example: gs://hop-beam-storage/binaries). The first time you run your pipeline the Google DataFlow runner will upload the Hop binaries from the lib folder to this Staging folder. It is also possible to include any specific Hop plugins in the upload that you require for your project.
Note that any other file paths you define should also follow this VFS pattern, e.g. gs://hop-beam-storage/input/event-data.csv.
Running the PDI Beam Pipeline
This is no differnt from any other Hop Beam execution - just pick the correct Run config.
For our example pipeline, I set the Run Options like so:
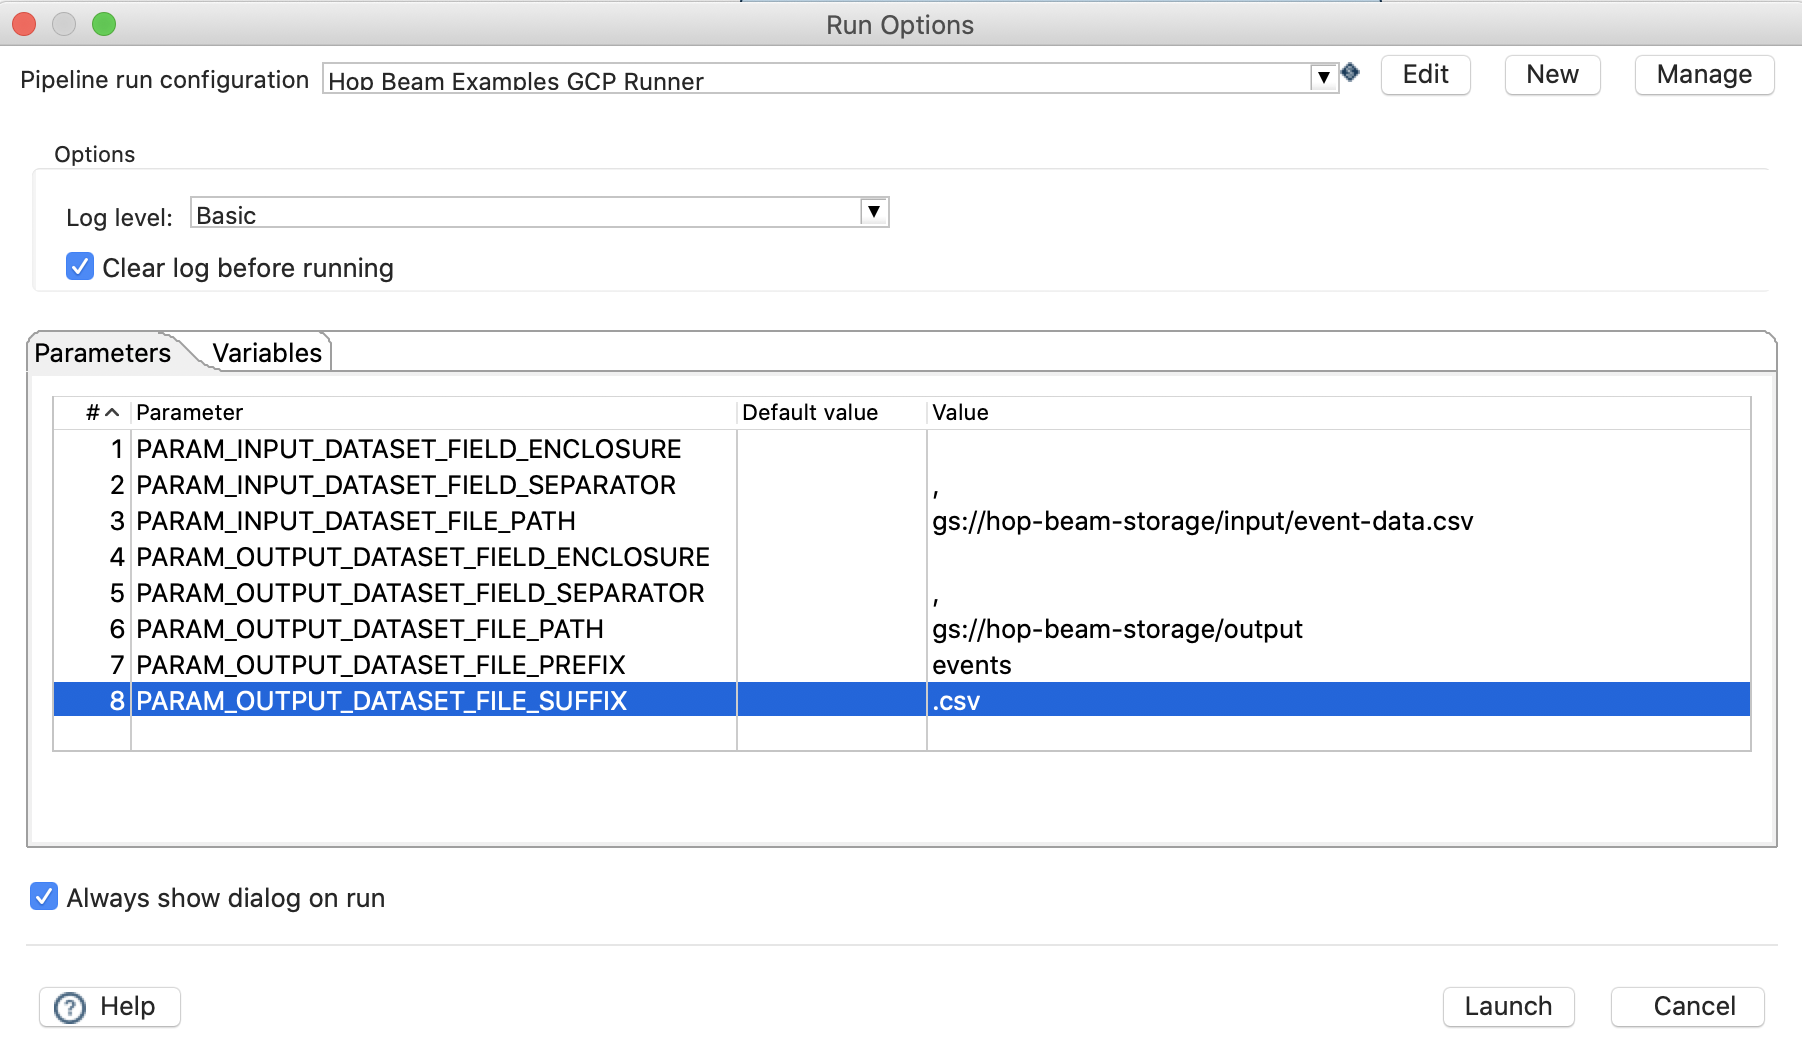
Once started, you won’t see much going on in Hop Gui - just watch the log. As mentioned, the first time round all the binaries will be uploaded to GCP so this might take a bit.
Make your way to the GCP admin console. Go to the DataFlow section. You should see your Hop Beam Pipeline there now:
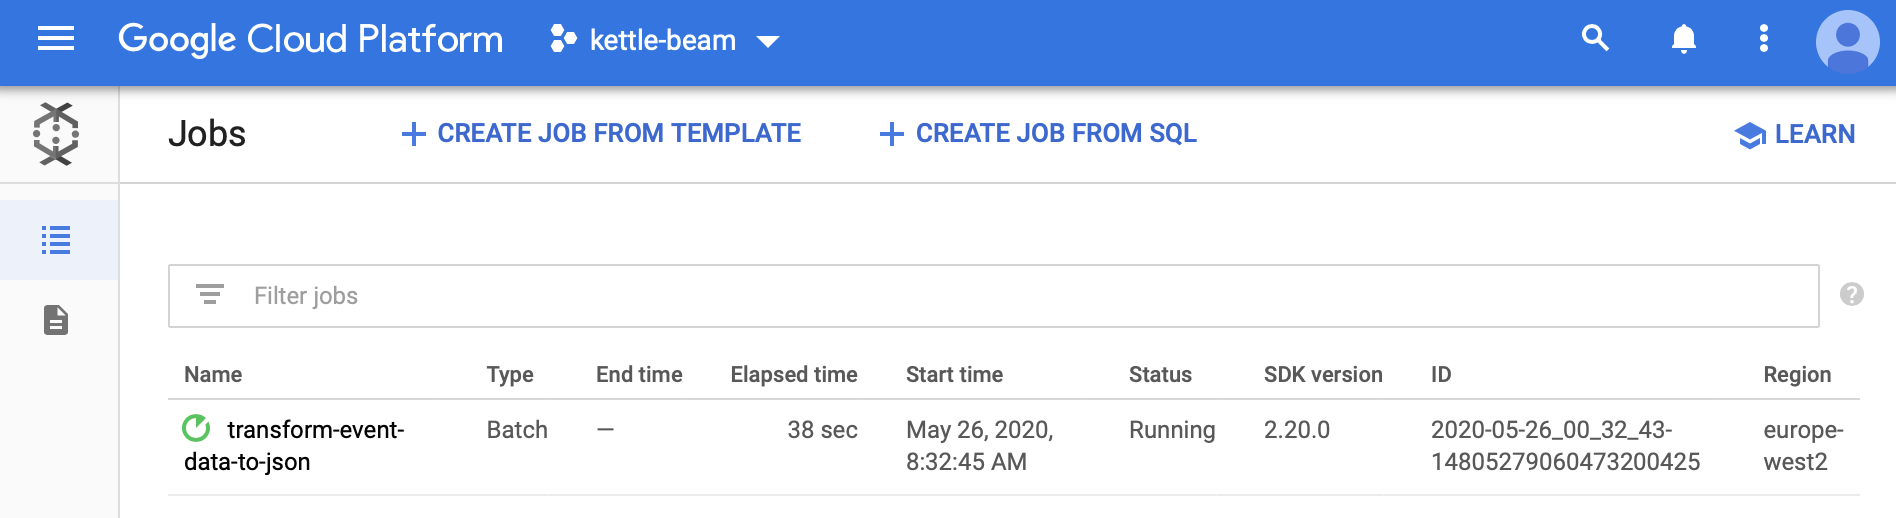
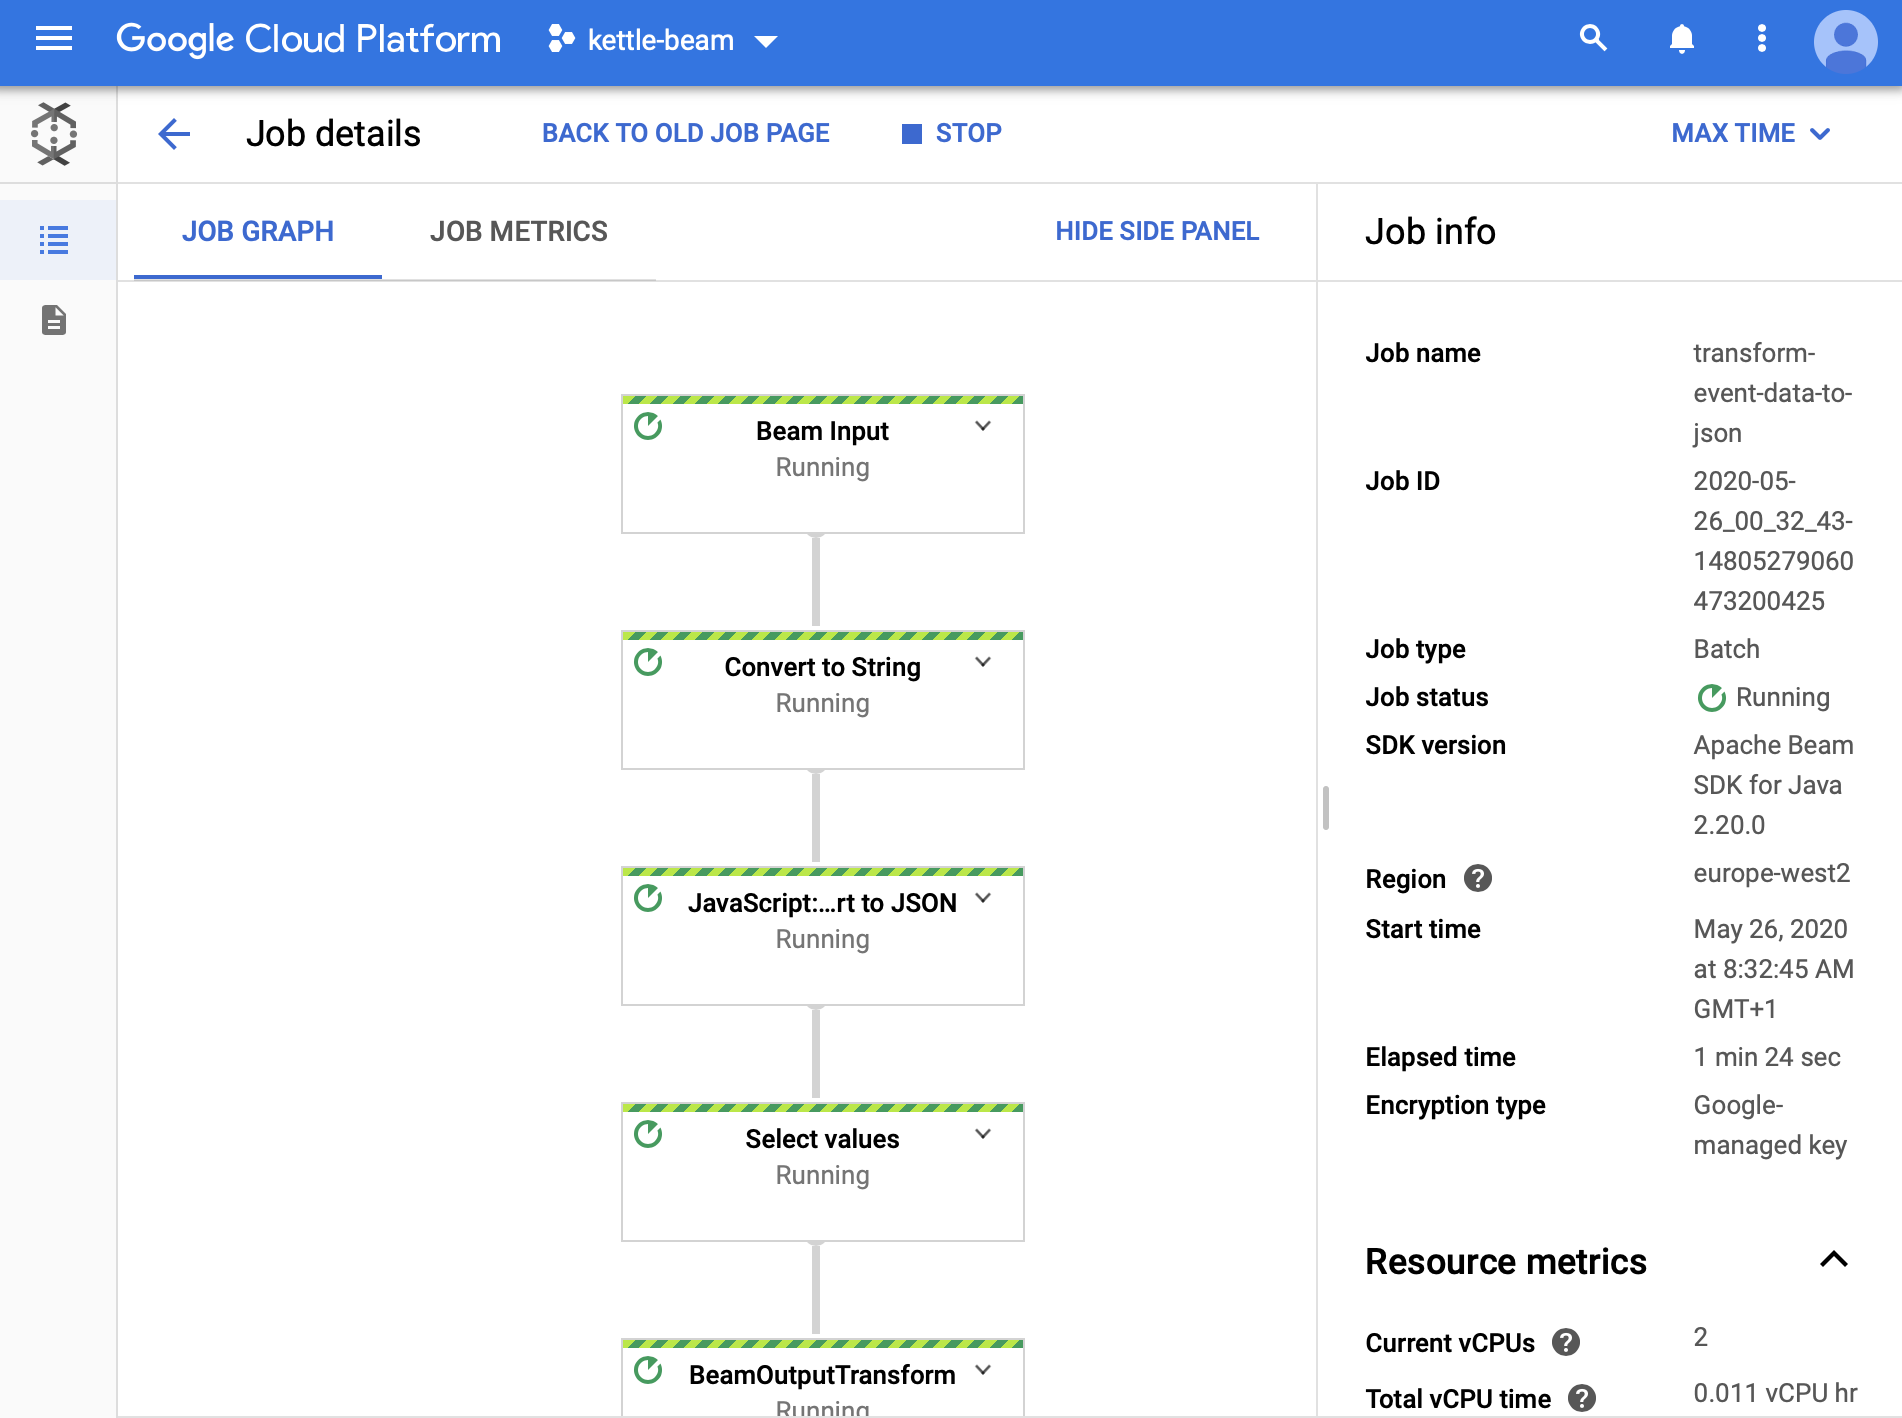
Click on your Job and you should see some more details:
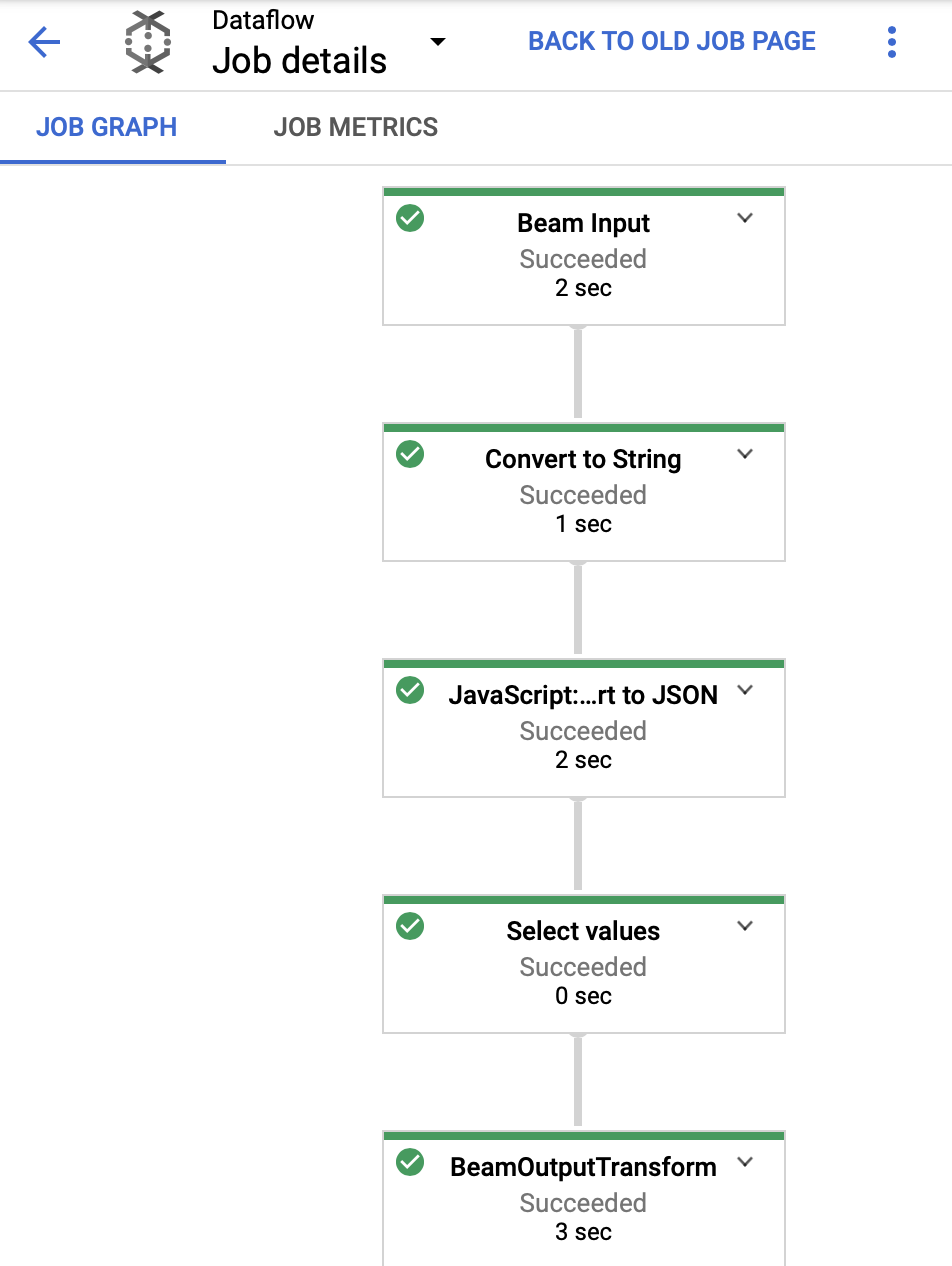
Once the job is complete, you should see the green tick marks:
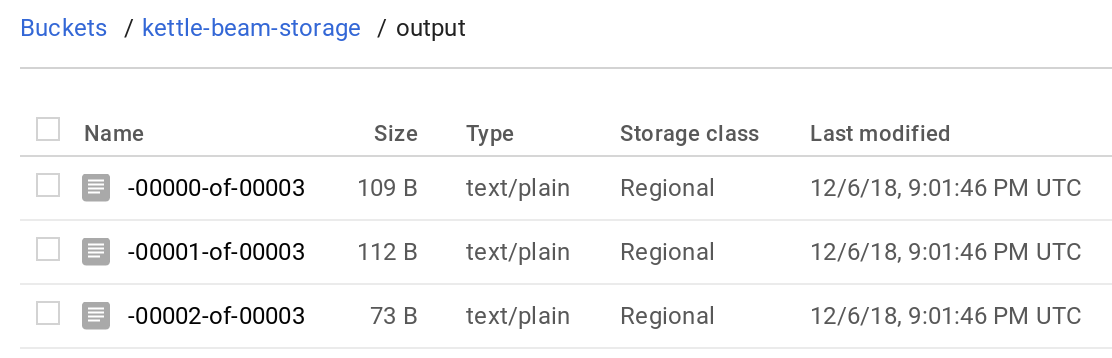
And then check the output:
How to check if the Pipeline is working
As mentioned above, the first time your execute the process on GCP DataFlow, it will take a bit for the binaries to be uploaded to the GCP Storage: This might give the impression that nothing is happening. The best thing to do in this case is to check if the jar files are showing up in the binaries folder in the GCP Storage bucket. You can do this via the web interface or by running e.g. following command:
% gsutil du -sh gs://hop-beam-storage/binaries
315.83 MiB   gs://hop-beam-storage/binaries
As you can see, all the uploaded jar files amount to nearly 316MB.
Also watch the logs:
- Within Spoon/Stdout
- In the GCP DataFlow Web Console you find an option to see the log for your job.
Errors and Solutions
The Dataflow job appears to be stuck
Error message:
Workflow failed. Causes: The Dataflow job appears to be stuck because no worker activity has been seen in the last 1h.
It’s quite likely the case that DataFlow cannot access the input files in your bucket. Make sure that the permissions are correctly in place and the the Beam process runs in the same region as the bucket is located in.