Resources:
- Github: kettle-beam repo
- Github: kettle-beam-core repo
- Github: examples
- Video: Kettle on Beam : first results
- Kettle on Beam : A second update
Introduction
Pentaho Data Integration/Kettle has for a long time offered a convenient graphical interface to create data integration processes without the need for coding (although if someone ever wanted to code something, there is the option available). About two years ago Pentaho’s/Hitachi Vantara’s own take on an adaptive execution layer (AEL) was added to PDI: The grand goal has been to design the DI process once and be able to run it via differenet engines. From the start Spark as well as PDI’s own engine was supported and this is still the state today, although in some official slides you can see that the ambitions are to extend this Flink etc. It has also taken several iteration to improve their AEL/get it production ready. Whenever I ask around, there doesn’t seem To be anyone using AEL in production (which is not to say that there aren’t companies out there using AEL in production, but it is certainly not the adoption rate that I’d hoped for).
From the start I have never quite understood why one company would try to create an AEL by themselves, considering the open source Apache Beam project was already a top level Apache project at the time with wide support from various companies. It seemed quite obvious that this project would move on in a more rapid speed than one company alone could ever achieve. Plus Apache Beam at the time already supported several execution engines. I suppose there must have been some good reasons on the Pentaho/Hitachi Vantara side to go down their own route.
Matt Casters, the original creator of Kettle/PDI left Hitachi Vantara end of last year to start a new career with Neo4j and in the last few months he has been very active creating plugins for PDI that solve some longstanding shortcomings. It was on a Slack chat that I suggested to him to go for Apache Beam, because having Beam support available within PDI would finally catapult it back to being a leading data integration tool - a position that it kind of had lost over the last few years. Remember when PDI was the first drag and drop DI tool to support MapReduce?
So here we are today looking at the rapidly evolving Kettle Beam project, that Matt Casters put a massive effort in (burning a lot of midngiht oil):
Important: Kettle Beam Plugin is currently under heavy development and it’s only a few days old (2018-12-01). It goes without saying that you must not use this plugin in production.
Special thanks: goes to Matt Casters for providing a lot of info for this article and spending a lot of his spare time in writing this very plugin we discuss here.
Info: For those of you who are confused why I mentioned Kettle quite often at the same time as PDI … the reason is simple: Kettle used to be the original name to this data integration tool - before Pentaho made it part of their stack and it subsequently called it Pentaho Data Integration (PDI).
THIS ARTICLE IS STILL DEVELOPING …
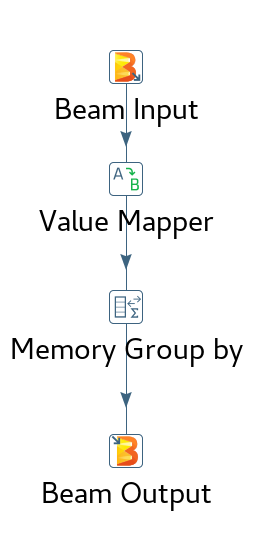
Well, why not start the article with the art of the possible? This is a Kettle Beam Pipeline Matt Casters generated to demo one of the first working more complex setups. At the top you see how the pipeline looks in Kettle/PDI’s graphic design tool called Spoon (the pipeline is called a transformation there) and at he bottom you see the graph of the same pipeline in Google Cloud Platform DataFlow:
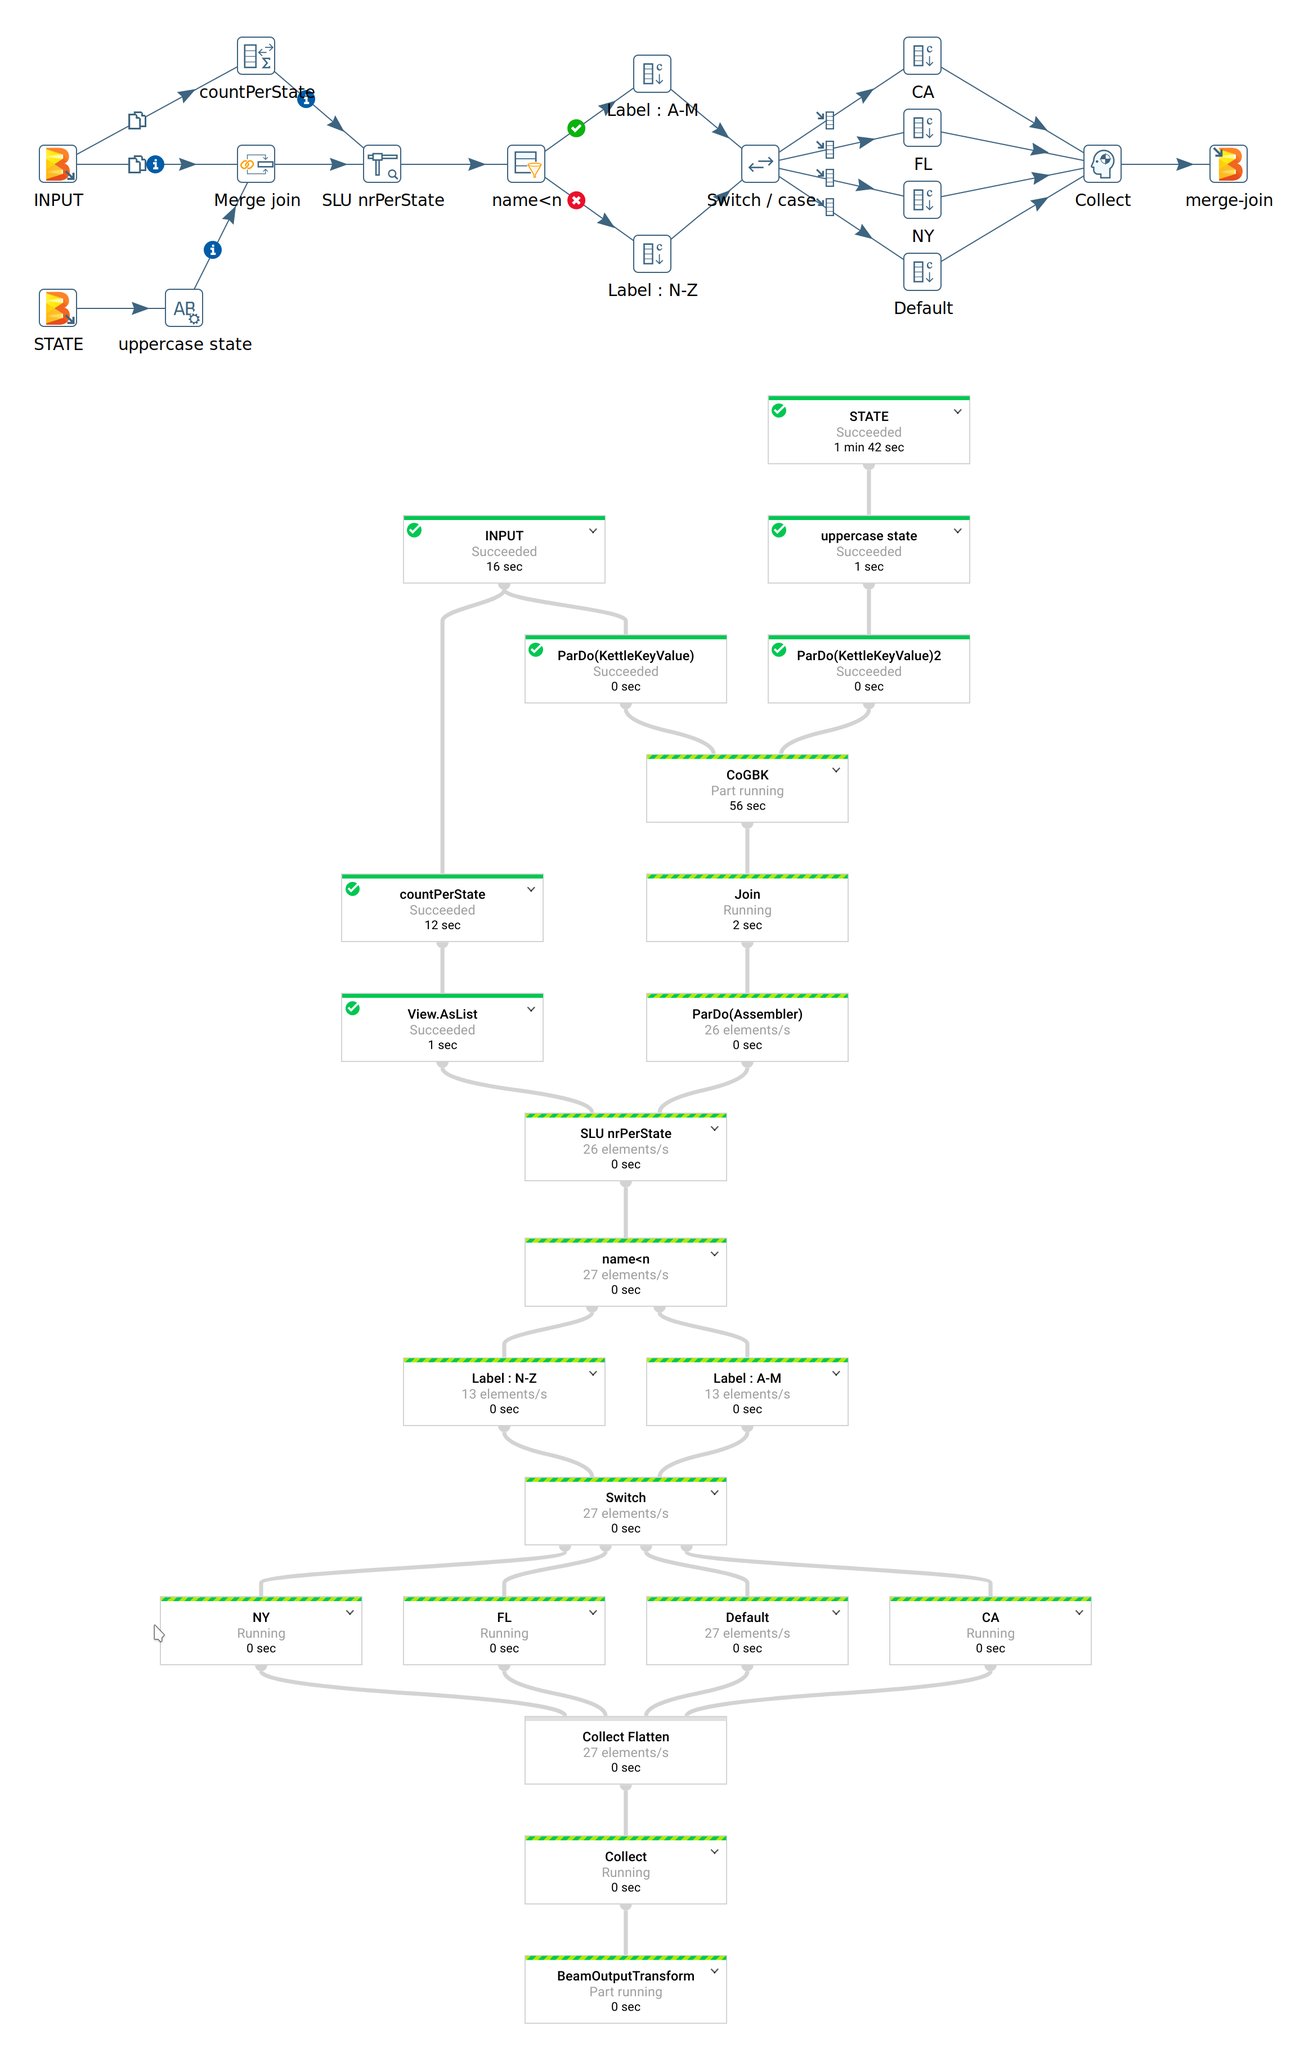
As you can see creating a Beam Pipeline in Spoon does not involve writing a single line of code … it’s all drag and drop of predefined components (steps), which you can configure.
Download Kettle/Pentaho Data Integration (PDI)
You can find the PDI package on Sourceforge. Just pick version 8.2. Once downloaded, unzip it in a convenient folder and that’s basically all there is to installation. Inside the PDI folder you find the spoon.sh file (or spoon.bat on Windows), which will start the GUI of the designer.
Note: The Kettle Beam Plugin requires Kettle/PDI v8.1 or v8.2.
Setup
There are various ways of get ready for using the Kettle Beam Plugin: If you want to skip most of the required setup, it’s best you go for the Docker Image.
The Easiest Way: Using the Kettle Remix Build
Download the build from the Kettle.be website. Make sure you pick the kettle-neo4j-remix-beam-* version. Just extract the file and you’ll get the standard data-integration folder with all the goodies in it.
Adding the Kettle Beam Plugin
In case you don’t want to use the Kettle remix build, you can download the vanilla version of Kettle/PDI from here: Look for pdi-ce-*.zip. The next steps cover adding the required plugin and patch.
Downloading the precompiled Plugin
This is the easiest way to install the plugin:
Important: This will work with PDI 8.2 and later only!
Go to the GitHub release page. At the time of this writing the latest release is 0.6.0. Instructions for any later version might vary from these ones here since it is such a fast moving project. Follow the instructions outlined in the release notes:
- Beam Plugin: Download the
kettle-beam-<version>.zipfile, extract it and move the extractedkettle-beamfolder to the<pdi-root>/pluginsfolder.
# example:
cp -r ~/Downloads/kettle-beam ~/apps/pdi-ce-8.2/plugins/
- PDI Engine Configuration Patch: If there is no option to download it, you will have to compile it from source (see instructions below): place it in the
pdifolder (not thepdi/pluginsfolder!) and extract it. Your file manager will ask you if it should overwrite existing files in Karaf to which you reply yes.
Start Spoon:
$ cd $PDI_DIR
$ ./spoon.sh
Compiling PDI Engine Configuration Patch from Source
git clone https://github.com/mattcasters/pentaho-kettle.git
cd pentaho-kettle
git checkout 8.2.0.1
cd plugins/engine-configuration
mvn clean install
Let’s try to find where the build artifacts got stored (or instead read the log messages Maven produced):
$ find . -name '*pdi-engine-configuration*.jar'
./impl/target/pdi-engine-configuration-impl-8.2.0.0-SNAPSHOT.jar
./impl/target/pdi-engine-configuration-impl-8.2.0.0-SNAPSHOT-sources.jar
./ui/target/pdi-engine-configuration-ui-8.2.0.0-SNAPSHOT-sources.jar
./ui/target/pdi-engine-configuration-ui-8.2.0.0-SNAPSHOT.jar
./api/target/pdi-engine-configuration-api-8.2.0.0-SNAPSHOT.jar
./api/target/pdi-engine-configuration-api-8.2.0.0-SNAPSHOT-sources.jar
# or
$ find ~/.m2 -name pdi-engine-configuration
/Users/diethardsteiner/.m2/repository/org/pentaho/di/plugins/pdi-engine-configuration
Next we copy the jar files across to the respective Kettle Karaf folder
# run this from following folder: pentaho-kettle/plugins/engine-configuration
KETTLE_VERSION=8.2.0.0
KETTLE_CLIENT_HOME=~/apps/pdi-ce-8.2
# create required directories
mkdir -p ${KETTLE_CLIENT_HOME}/system/karaf/system/org/pentaho/di/plugins/pdi-engine-configuration-api/${KETTLE_VERSION}
mkdir -p ${KETTLE_CLIENT_HOME}/system/karaf/system/org/pentaho/di/plugins/pdi-engine-configuration-impl/${KETTLE_VERSION}
mkdir -p ${KETTLE_CLIENT_HOME}/system/karaf/system/org/pentaho/di/plugins/pdi-engine-configuration-ui/${KETTLE_VERSION}
# copy files across
cp ./api/target/pdi-engine-configuration-api-${KETTLE_VERSION}-SNAPSHOT.jar \
${KETTLE_CLIENT_HOME}/system/karaf/system/org/pentaho/di/plugins/pdi-engine-configuration-api/${KETTLE_VERSION}
cp ./impl/target/pdi-engine-configuration-impl-${KETTLE_VERSION}-SNAPSHOT.jar \
${KETTLE_CLIENT_HOME}/system/karaf/system/org/pentaho/di/plugins/pdi-engine-configuration-impl/${KETTLE_VERSION}
cp ./ui/target/pdi-engine-configuration-ui-${KETTLE_VERSION}-SNAPSHOT.jar \
${KETTLE_CLIENT_HOME}/system/karaf/system/org/pentaho/di/plugins/pdi-engine-configuration-ui/${KETTLE_VERSION}
Building the Beam Plugin from Source
Install Maven, in example like so (adjust to your own setup):
# ########## MAVEN ##########
# https://maven.apache.org/install.html
#
cd $WORK_DIR
wget https://www-eu.apache.org/dist/maven/maven-3/3.6.0/binaries/apache-maven-3.6.0-bin.tar.gz
tar xzvf apache-maven-3.6.0-bin.tar.gz

# Add the bin directory to the PATH environment variable
cat >> ~/.bashrc <<EOL
# ======== MAVEN ======== #
export MAVEN_HOME=\$WORK_DIR/apache-maven-3.6.0
export PATH=\$PATH:\$MAVEN_HOME/bin
EOL

source ~/.bashrc

echo "--- Finished installing Maven ---"
# Confirm Maven is properly set up
mvn -v
Install the Pentaho settings.xml for maven in ~/.m2:
cd ~/.m2
wget https://raw.githubusercontent.com/pentaho/maven-parent-poms/master/maven-support-files/settings.xml
Phase 1: kettle-beam-core
Update 2019-05-20: The
kettle-beam-corerepo got merged into thekettle-beamrepo (see also here), hence this step is not required any more.
cd ~/git
git clone https://github.com/mattcasters/kettle-beam-core.git
cd kettle-beam-core
mvn clean install
On successful build mvn install basically puts the jar file into the local cache (~/.m2/repository/kettle-beam/kettle-beam-core).
There is nothing to copy at this stage to the PDI plugin folder!
Phase 2: kettle-beam
Clone the plugin and start the build:
cd ~/git
git clone git@github.com:mattcasters/kettle-beam.git
cd kettle-beam
mvn clean install
Next:
- Create a new directory called
kettle-beamin[PDI-ROOT]/plugins/. - Copy
target/kettle-beam-[VERSION].jarto[PDI-ROOT]/plugins/kettle-beam/. - All the files from the
target/libfolder also have to go into[PDI-ROOT]/plugins/kettle-beam/libfolder. - Delete
[PDI-ROOT]/system/karaf/cachesas well for good measure.
You will notice that on successful build the kettle-beam-core jar is available in the target/lib folder. This is the reason why previously you did not have to copy anything from the core repo to the PDI plugins folder.
Example:
export PDI_HOME=~/apps/pdi-ce-8.2
export KETTLE_BEAM_VERSION=0.4.0

rm -rf ${PDI_HOME}/plugins/kettle-beam
mkdir ${PDI_HOME}/plugins/kettle-beam

cp target/kettle-beam-${KETTLE_BEAM_VERSION}-SNAPSHOT.jar ${PDI_HOME}/plugins/kettle-beam

cp -r target/lib ${PDI_HOME}/plugins/kettle-beam

rm -r ${PDI_HOME}/system/karaf/caches
Rapid rebuild
Since this project is in rapid development, you will have to rebuild the plugin regulary. Here is a small (but not perfect) utility script to rebuild the plugin (adjust variables):
#!/bin/bash
export PDI_HOME=~/apps/pdi-ce-8.2
export GIT_HOME=~/git/
export KETTLE_BEAM_VERSION=0.4.0
echo "***************** NOTE ****************"
echo "If KETTLE BEAM version number changes this will break!"
echo "***************************************"
cd ${GIT_HOME}/kettle-beam-core
git pull
mvn --offline clean install
cd ${GIT_HOME}/kettle-beam
git pull
mvn --offline clean install
cp target/kettle-beam-${KETTLE_BEAM_VERSION}-SNAPSHOT.jar ${PDI_HOME}/plugins/kettle-beam
cp -r target/lib ${PDI_HOME}/plugins/kettle-beam
rm -r ${PDI_HOME}/system/karaf/caches
Creating a Beam Pipeline in PDI
Start Spoon, the graphical user interface for PDI:
cd [PDI-ROOT]
sh ./spoon.sh
Create a new transformation via the main menu: File > New > Transformation.
Input and Output Transforms
- Apache Beam API: Built-in I/O Transforms: This provides a full list of currently supported Input and Output options by the Beam API. The goal is that one day Kettle supports all of them.
TextIO
This covers reading and writing comma, pipe etc separated files via the Apache Beam API.
Create an Input and Output File Definition
If the plugin was installed correctly, you should see a Beam entry in the menu bar.
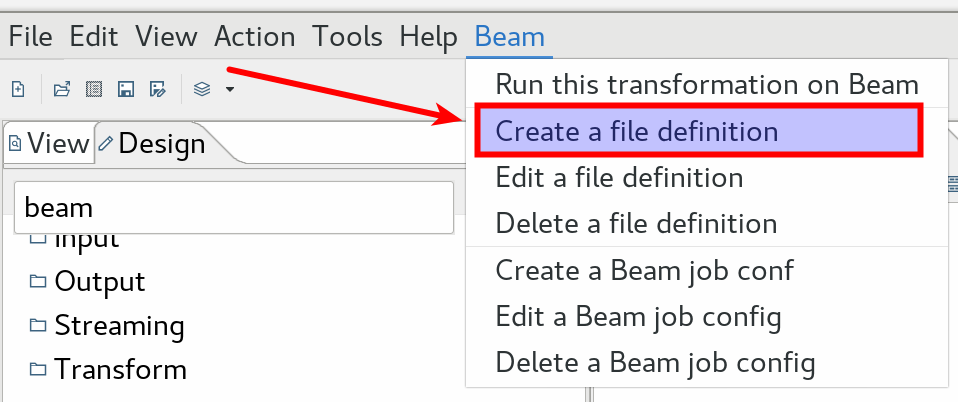
The first thing we have to do is to create an input file definition for our Beam Pipeline. This basically depicts the structure of the data when it enters the pipeline:
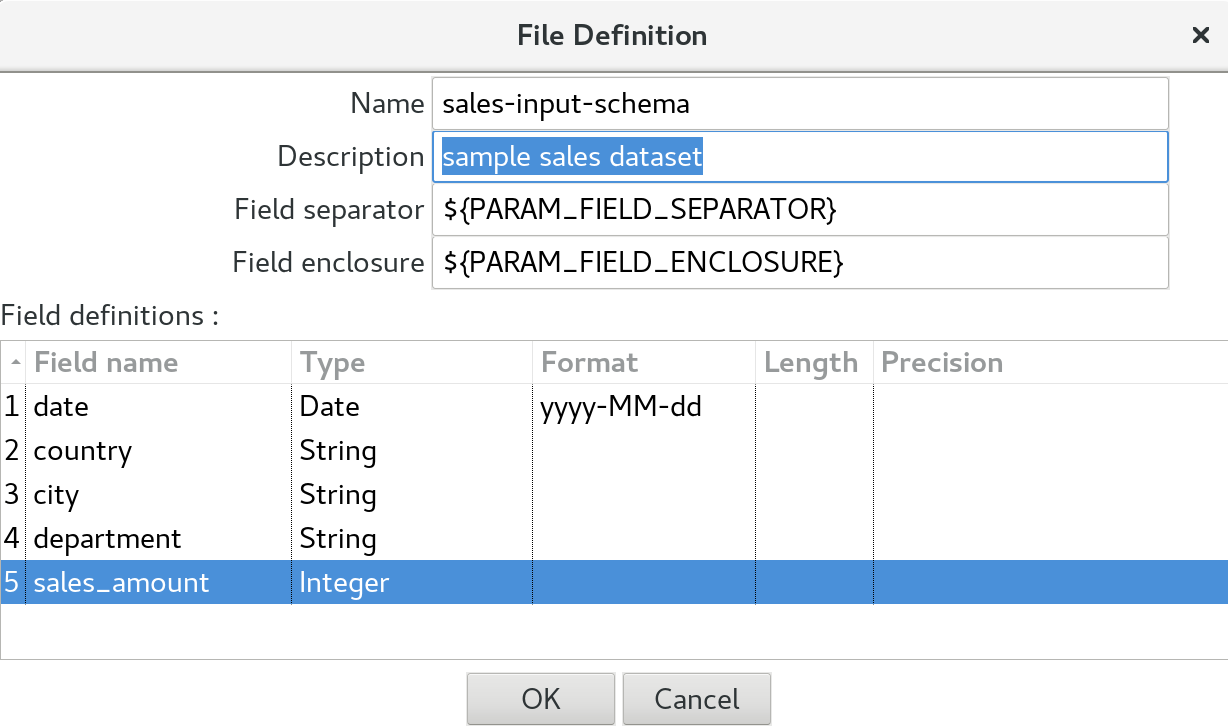
So via the main menu choose Beam > Create a file definition. The goal here is to describe the structure of the input files, which could reside in a HDFS folder or other file stores. You define which fields the file contains, of which type they are etc and also what the separator and enclosure for these fields is: all pretty standard metadata/schema. Provide all this required metadata now:
- Name:
sales-input-schema - Description:
sample sales dataset - Field Separator:
${PARAM_FIELD_SEPARATOR} - Field Enclosure:
${PARAM_FIELD_ENCLOSURE} - Field definitions: Provide as shown below in the screenshot:
Click Ok.
In a similar vain, create the file output definition. This one is actually not required any more, Kettle will fetch the metadata automatically from the incoming stream.
Add the Beam Input Step
Next, in the Design tab on the left, expand the Big Data folder (or alternatively search for Beam):
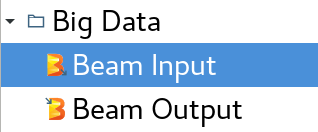
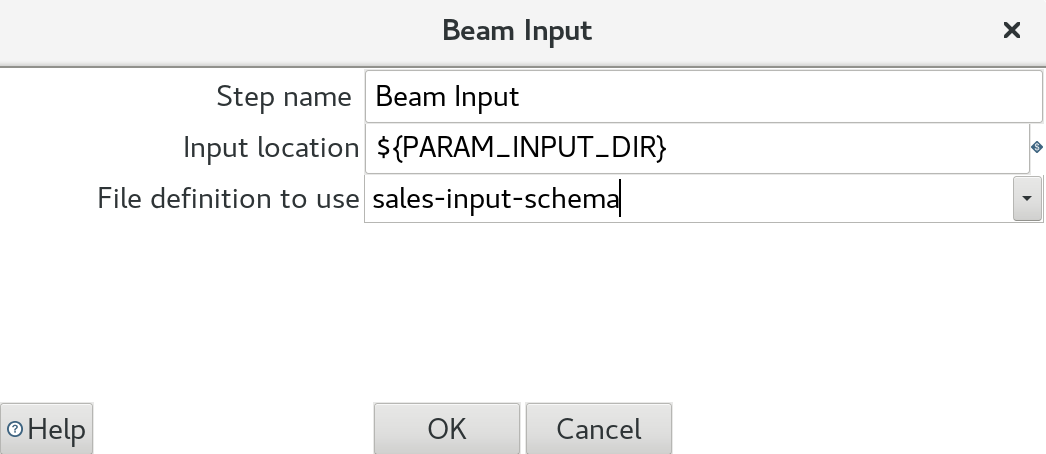
Drag and drop the Beam Input step onto the canvas and double click on it:
- Input location: The directory where your input files are stored. This could be a directory on HDFS or any other file storage. Ideally parameterise this.
- File definitoin to use: Pick the schema we created earlier on.
Note: The Beam Input step uses the Beam API (TextIO) to read the data. This is not directly done by PDI, which makes a lot of sense since the Beam I/O Transforms are more than just simple readers and writers.
Note: Wildcards are allowed as part of the Input location, e.g.
/path/to/my/file*. This way you can source multiple files at once.
Important: The input dataset must not have a header!
This won’t work:
date,country,city,department,sales_amount
2018-12-01,UK,London,Groceries,22909
2018-12-01,UK,London,Furniture,16237
2018-12-01,UK,London,Perfumes,2889
2018-12-01,UK,Glasgow,Groceries,17238
2018-12-02,UK,London,Groceries,21321
2018-12-02,UK,London,Furniture,17823
2018-12-02,UK,London,Perfumes,3210
2018-12-02,UK,Glasgow,Groceries,15223
This will work:
2018-12-01,UK,London,Groceries,22909
2018-12-01,UK,London,Furniture,16237
2018-12-01,UK,London,Perfumes,2889
2018-12-01,UK,Glasgow,Groceries,17238
2018-12-02,UK,London,Groceries,21321
2018-12-02,UK,London,Furniture,17823
2018-12-02,UK,London,Perfumes,3210
2018-12-02,UK,Glasgow,Groceries,15223
Add the Beam Output Step
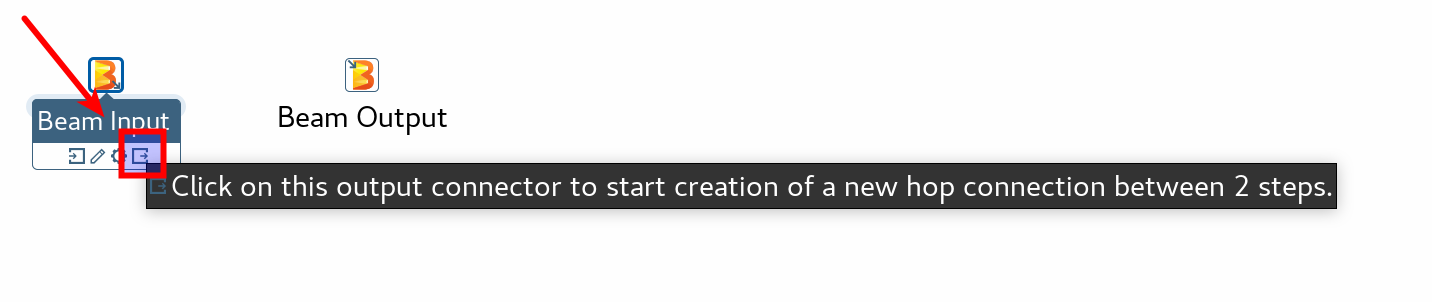
Again from the Design tab add the Beam Output step to the canvas and link it up to the Beam Input step. You can create a link/hop by hovering over the input step, which will bring up HuD dialog, then click on the icon shown below and drag the hop to the output step:
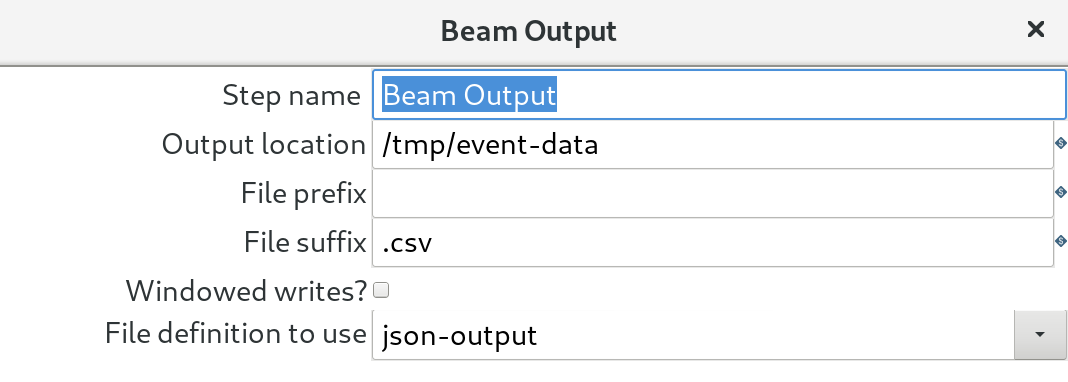
Double click on the Beam Output step. Let’s configure it:
-
Output location:
${PARAM_OUTPUT_DIR} -
File prefix:
-
File suffix: Can be used in example to add a file extension, e.g.
.csv -
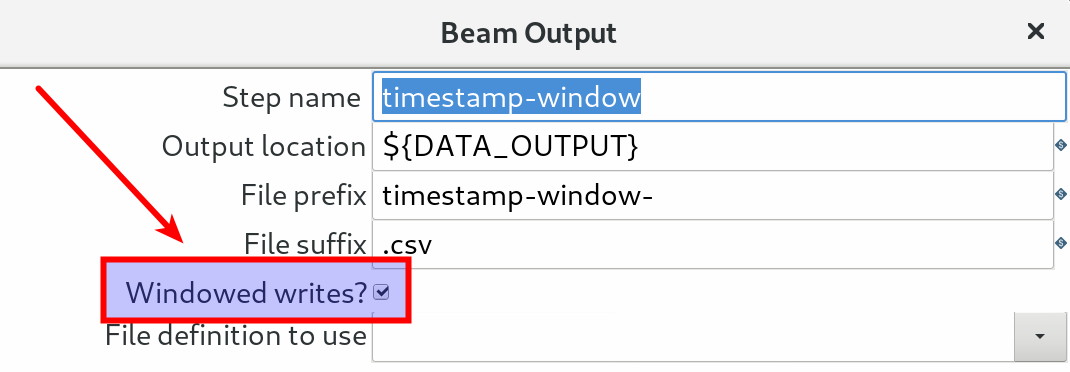
Windowed writes: Use this in conjunction with the Beam Window step.
-
File definition to use: Pick the output schema/definition you created earlier on. This one is actually not required any more, Kettle will fetch the metadata automatically from the incoming stream.
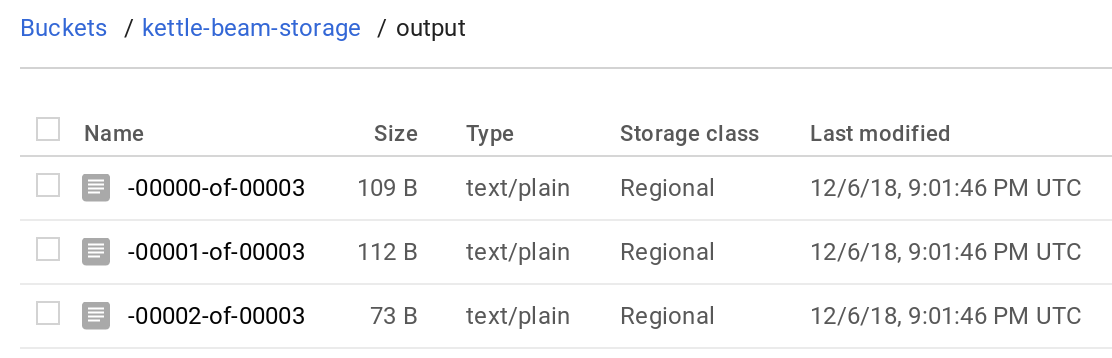
The reason why we only define the main part of the filename because apparent when you check the created output files:
$ ls /tmp/
event-data-00000-of-00005.csv
event-data-00001-of-00005.csv
event-data-00002-of-00005.csv
event-data-00003-of-00005.csv
event-data-00004-of-00005.csv
As you can see, because of the multithreaded nature of Beam more than one output file gets created.
ParquetIO
Google Big Query
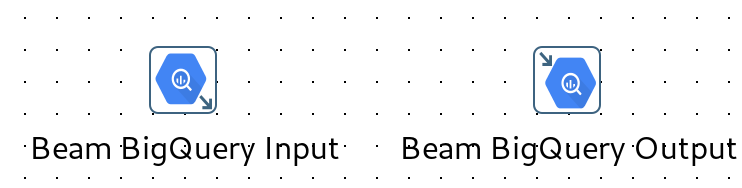
Write data to and read data from GCP Big Query.
The BigQuery Output step also offers these options (issue 28):
- fail if table is not empty
- truncate table before insert
- append data
Google Cloud Pub/Sub
These steps are available for realtime processing on the Google Cloud Platform.

Apache Kafka

Intersting related posts:
- More Kafka Consumer Options
- Beam Kafka Consumer not committing offset to the configured consumer group
Windowing
Event Time (Beam Timestamp)
If your stream does not have the event time defined (the GCP Pub/Sub step should automatically set it), then you can explicitly set it via the Beam Timestamp step.
The Get timestamp from stream? option will return the event time field if it is already defined within the stream.

Windowing Functions
Any serious streaming engine supports even-time-based windowing functions, so it’s no surprise that Apache Beam has this fully baked in as well (see here for details)).
Fixed, Sliding, Session and Global window types are currently supported within the Kettle BEAM Plugin.
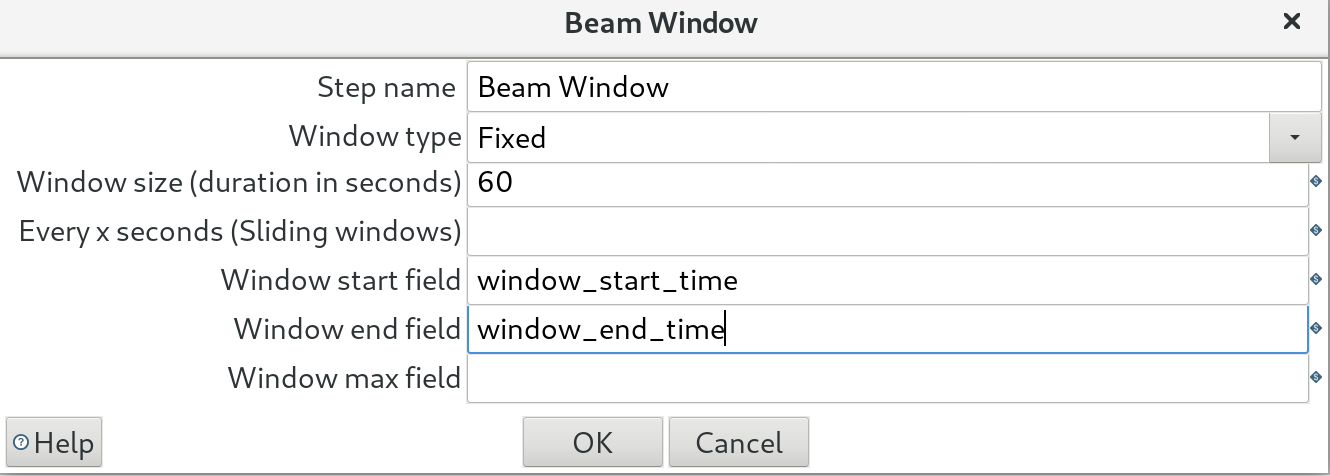
Apart from setting the window size and sliding window size, you can also have this step output the window start and end time, which is useful for when you want to aggregate the data returned within a given window.
Make sure you activated the “Windowed writes?” feature in the Beam Output step (to see the output).
Triggers
No support yet within Kettle. Create a Github ticket if you have a use case.
Generic PDI Transformation Steps
This section discusses steps that were not explicitely relabeled or converted to Kettle Beam steps.
Some steps require a special implementation, like Sort etc. As it is extremely early days with this project, these steps are supported:
- Filter Rows
- Memory Group by work with Sum and Count. See also here.
- Merge Join
- Stream Lookup
- Switch/Case
The Group By step is not supported.
Note: True sorting isn’t supported by the Beam API. The Memory Group By step does not require the input to be sorted. If you use the Pentaho PDI Datasets plugin for unit testing, you will have to sort the datasets via the built-in datasets sort definition (not the standard PDI Sort step) since you are using the Kettle engine to execute the unit test.
Beyond that all steps should work.
Generic steps like Data Grid, CSV Input, Table Input, … are meant for small, non-parallel data sets. A generic step now uses a single threaded transformation. Issue 30
Data for Kettle input steps needs to fit in memory.
Output steps use Row Set Size of transformation for batching. Batching every Row Set Size rows to push through the single threader. This will dramatically improve performance of output steps like “Table Output” and “Neo4j Output”. Issue 31
Setting the step copies to BEAM_OUTPUT reduces the number of threads to 1 by doing a grouping/flattening before the step. In other words it’s an option to reduce parallelism to a single thread. Issue 29.
A very simple example:
Set up the Beam Job Configuration
Apache Beam is an abstraction layer for data pipelines: What this means is that you design your data pipeline once and can execute it on a varity of engines. Currently Beam supports following engines/runtimes:
- Direct: Local engine meant for development environments only
- DataFlow
- Flink
- Apex
- Spark
- Gearpump
- Samza
Out of these engines, the PDI Beam Plugin currently supports:
- Direct: this is already available
- DataFlow: this is already available
- Spark: this will be made available next
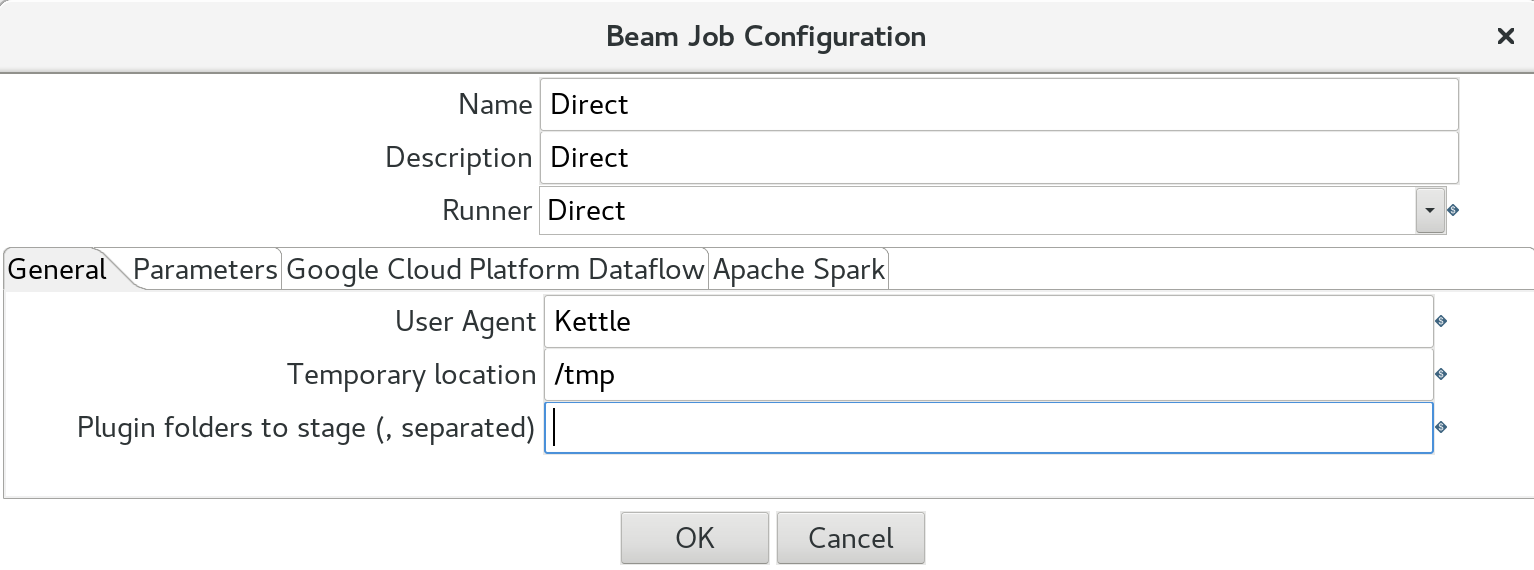
We will first set up a configuration to run the Beam pipeline locally. Don’t worry, you don’t have to install anything additionally, this is the beauty of it: The PDI Beam plugin already ships with the Beam Direct engine/runtime. Via the main menu choose Beam > Create a Beam Job Config. We will create a job configuration for the Direct runner:
- Name:
Direct - Description: anything you fancy
- Runner: The options here are
Direct,DataFlow,FlinkandSpark. Just pickDirectfor now.
In the General tab define:
- User Agent: this can be any name you fancy
- Temporary Storage Location: e.g.
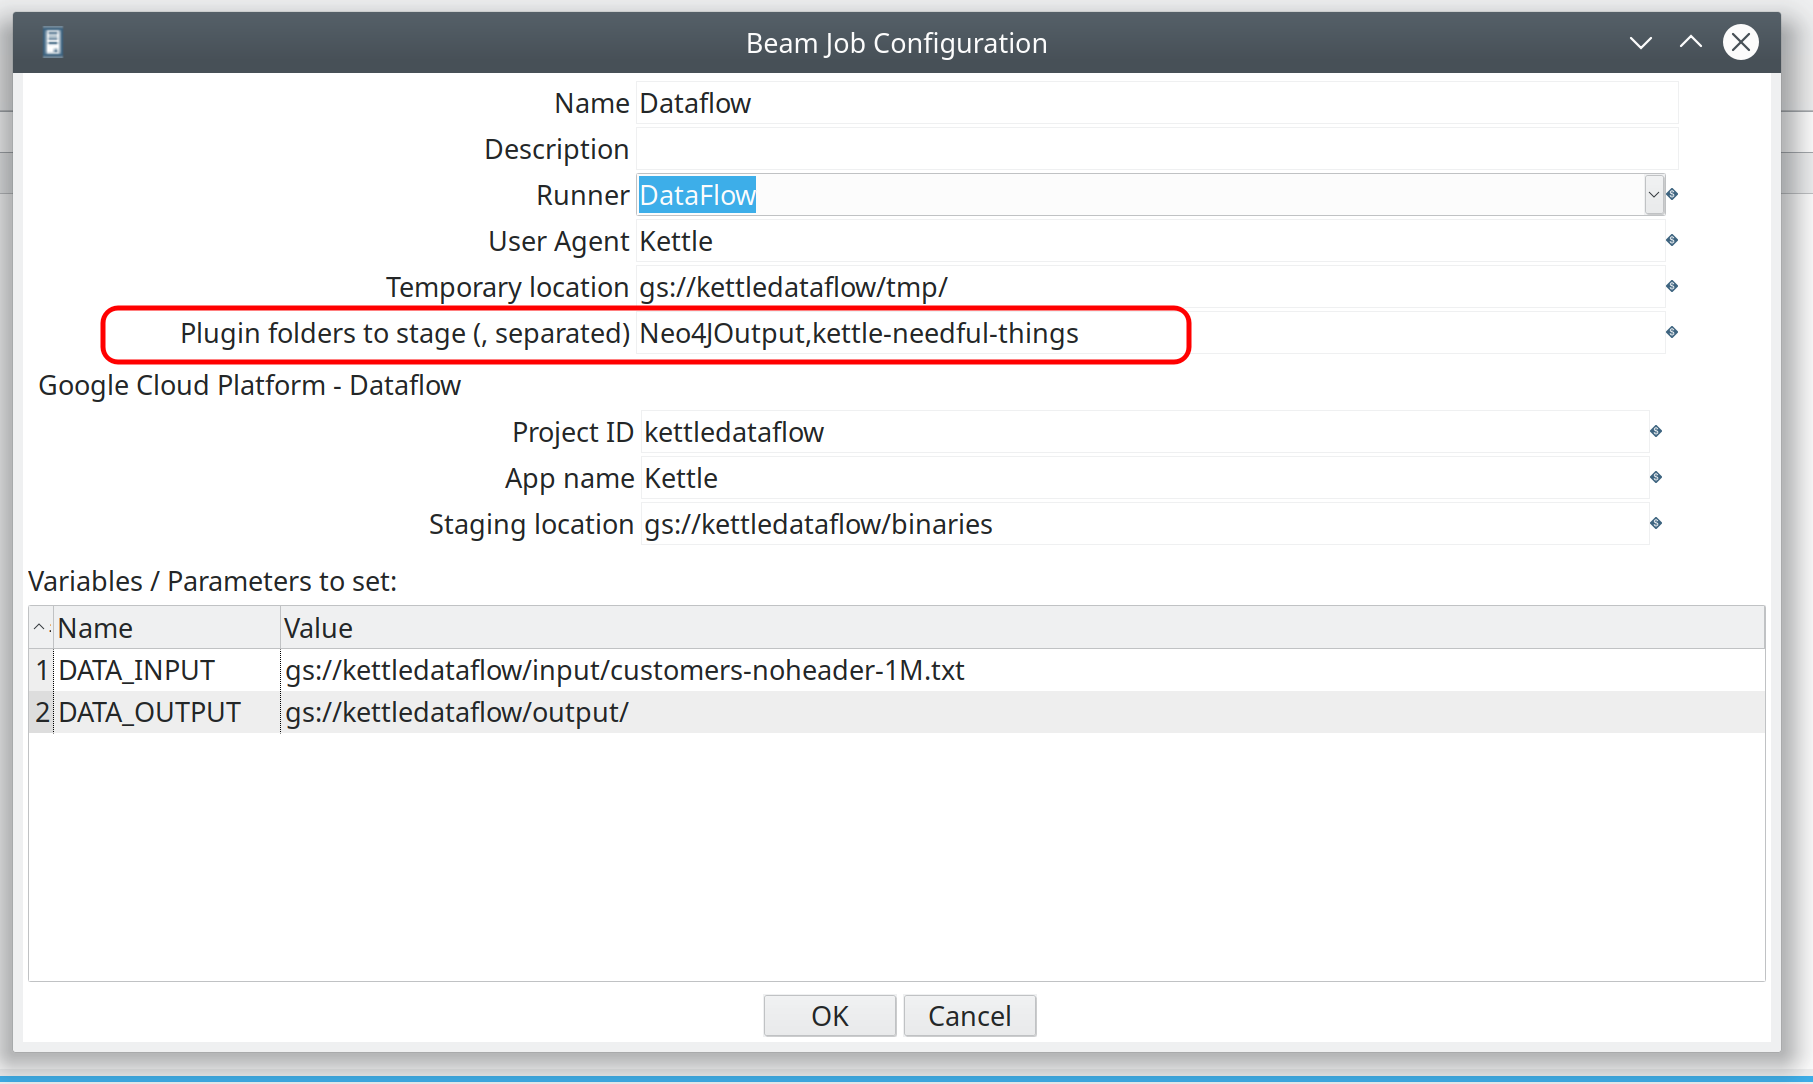
/tmp(in this case in can be a local directory) - Plugin folders to stage: comma separated list of plugins that should be included as well. Don’t worry about this for now. We discuss this later.
Finally click on the Parameters tab: We list here any parmaters and values that we want to use as part of our Beam pipeline.
Batch VS Streaming
So how do I configure the pipeline to use streaming and not batch processing you might wonder?
The PDI Beam plugin supports both bound and unbound input data sources. Kafka support was only recently released (see ticket). Once Beam sees it has an unbound (never ending) input source, it will automatically stream the data, so basically there is no action or specifial defintion from the user required.
In the Beam Job Configuration for Google Cloud Platform Dataflow there is an option to switch on Streaming. Note that it is not necessary to tick this one since Beam can figure out automatically if the input data source is bound or unbound.
Fat Jar Builder
Some of the engines like Apache Spark and Flink expect all files to be supplied as a fat jar: You can find of this as a compressed file containing all dependencies to run your data process.
References:
Once you have a fat jar you can just run transformations on Spark.
Put the transformation in hdfs:// somewhere and run it. That’s it.
Currently you have to define a temporary folder to store the flat file (while it is being build). In future a carte server will start on e.g. the Spark master and take care of this.
More details from the GitHub Issue (written by Matt Casters):
For those runners which need to be executed on a remote server using the environment of the runner, we need remote execution possibilities. This is the case for Beam runners like Spark and Flink and possibly Apex.
Carte plugins/services needed:
- start a Beam transformation
- accept statistics for an executing Beam Pipeline for a transformation
- get the status of an executing Beam transformation
The way this would work is like this:
- A client (Spoon, Job, …) would execute the Transformation using the Beam Runtime Configuration.
- This would contact Carte on the master and pass the transformation over.
- The Beam Carte plugin would execute the transformation using the Main class (SparkMain) passing the details of the Carte server.
- During execution the pipeline metrics are sent periodically to the Carte server on the master.
- During execution the client (Spoon, Job, …) would periodically get the status and metrics of the Beam transformation from the Carte server.
How to test the PDI Beam Pipeline locally
To create unit tests for your PDI Beam Pipeline, you can use Matt Casters Pentaho PDI Datasets Plugin. See also my blog post here for further info.
This plugin not only comes in handy for unit testing, but also for developing Kettle Beam pipelines. Many of the input data sources and output destinations are not quickly accessible. Plus you don’t really want to pull e.g. 100k records from BigQuery. Instead you can just define a PDI dataset for easy and quick development. See my Unit Testing blog post for details.
Execution your PDI Beam Pipeline
You can execute the PDI Beam Pipeline via Beam > Run this transformation on Beam. Then you can pick your Beam Job Configuration before running the process.
Engine: Direct
Direct uses the Direct Beam engine, which enables you to test your PDI Beam Pipeline locally. We have already created the Beam Job configuration previously for the local runner, so you are ready to go.
Check for the output files:
$ ls -l /tmp/kettle-beam-output-0000*
/tmp/kettle-beam-output-00000-of-00005
/tmp/kettle-beam-output-00001-of-00005
/tmp/kettle-beam-output-00002-of-00005
/tmp/kettle-beam-output-00003-of-00005
/tmp/kettle-beam-output-00004-of-00005
Check the content of the files:
$ cat /tmp/kettle-beam-output-0000*
2018-12-01,Groceries,40147
2018-12-01,Furniture,16237
2018-12-01,Fragrance,2889
2018-12-02,Furniture,17823
2018-12-02,Fragrance,3210
2018-12-02,Groceries,36544
Engine: Google Cloud Platform DataFlow
Note: This works as well with PDI CE (Community Edition, the one you downloaded from SourceForge) - no EE subscription required.
As you might know by now, Google initially donated the Beam abstraction layer code to the open source community. GCP Dataflow is more than just this abstraction layer: It is a managed service which apart from the engine/runtime also provisions worker nodes and does some clever stuff under the hood to optimise the dataflow. So this is pretty impressive: You don’t have to include any logic in your setup to provision nodes and to scale your process.
Setting up a Service Account
Background info:
- Deploying a Pipeline
- Getting started with authentication
- Google Cloud Dataflow Security and Permissions
Before getting started make sure you have a GCP account set up and you have the required credentials file:
- Log on to the GCP Console and pick the correct project or create a new one.
- Create a new service account via the GCP IAM - Service Accounts page. Further info: Getting started with authentication. Make sure to tick the Create key (optional) option at the end. This is the key (JSON file) that we require to authenticate from our local machine (and also to set
GOOGLE_APPLICATION_CREDENTIALS). Note: If you created the service account a longer time ago and just want to retrieve the key again, just click on the 3 dots action icon on the right hand side to get an option to create a new key.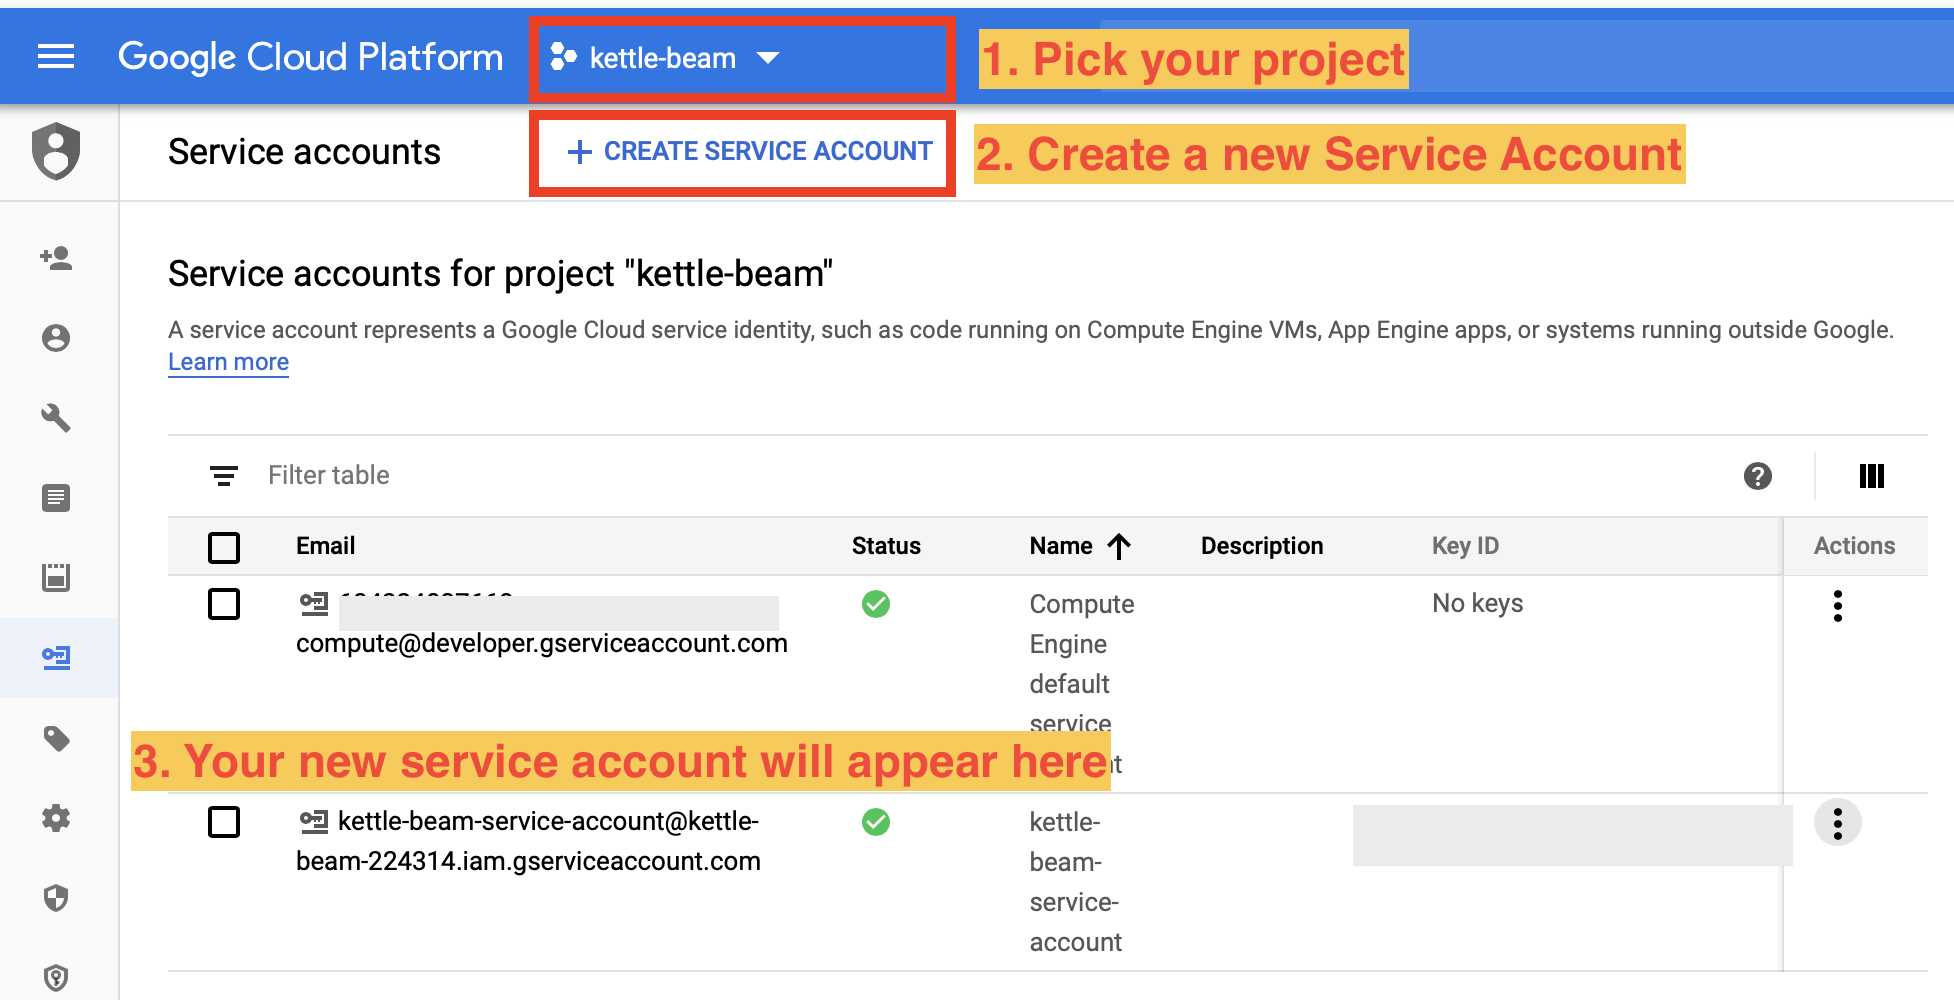
- Define the
GOOGLE_APPLICATION_CREDENTIALSenvironment variable:export GOOGLE_APPLICATION_CREDENTIALS=/path/to/your/credentials.json(ideally in your.bashrcor.zprofileor whatever shell you use). - Create a custom role called
kettle-beam-rolevia the GCP Roles page. Find further instructions here. Assign to this role everything you can find related to API, Storage, Dataflow. Not complete list of required permissions:compute.machineTypes.get,dataflow.*,storage.*,firebase.projects.get,resourcemanager.projects.get. - Assign your service account to the custom role: Go back to the IAM page, click on the pencil icon left next to the service account and click on the Role pull-down menu. Type
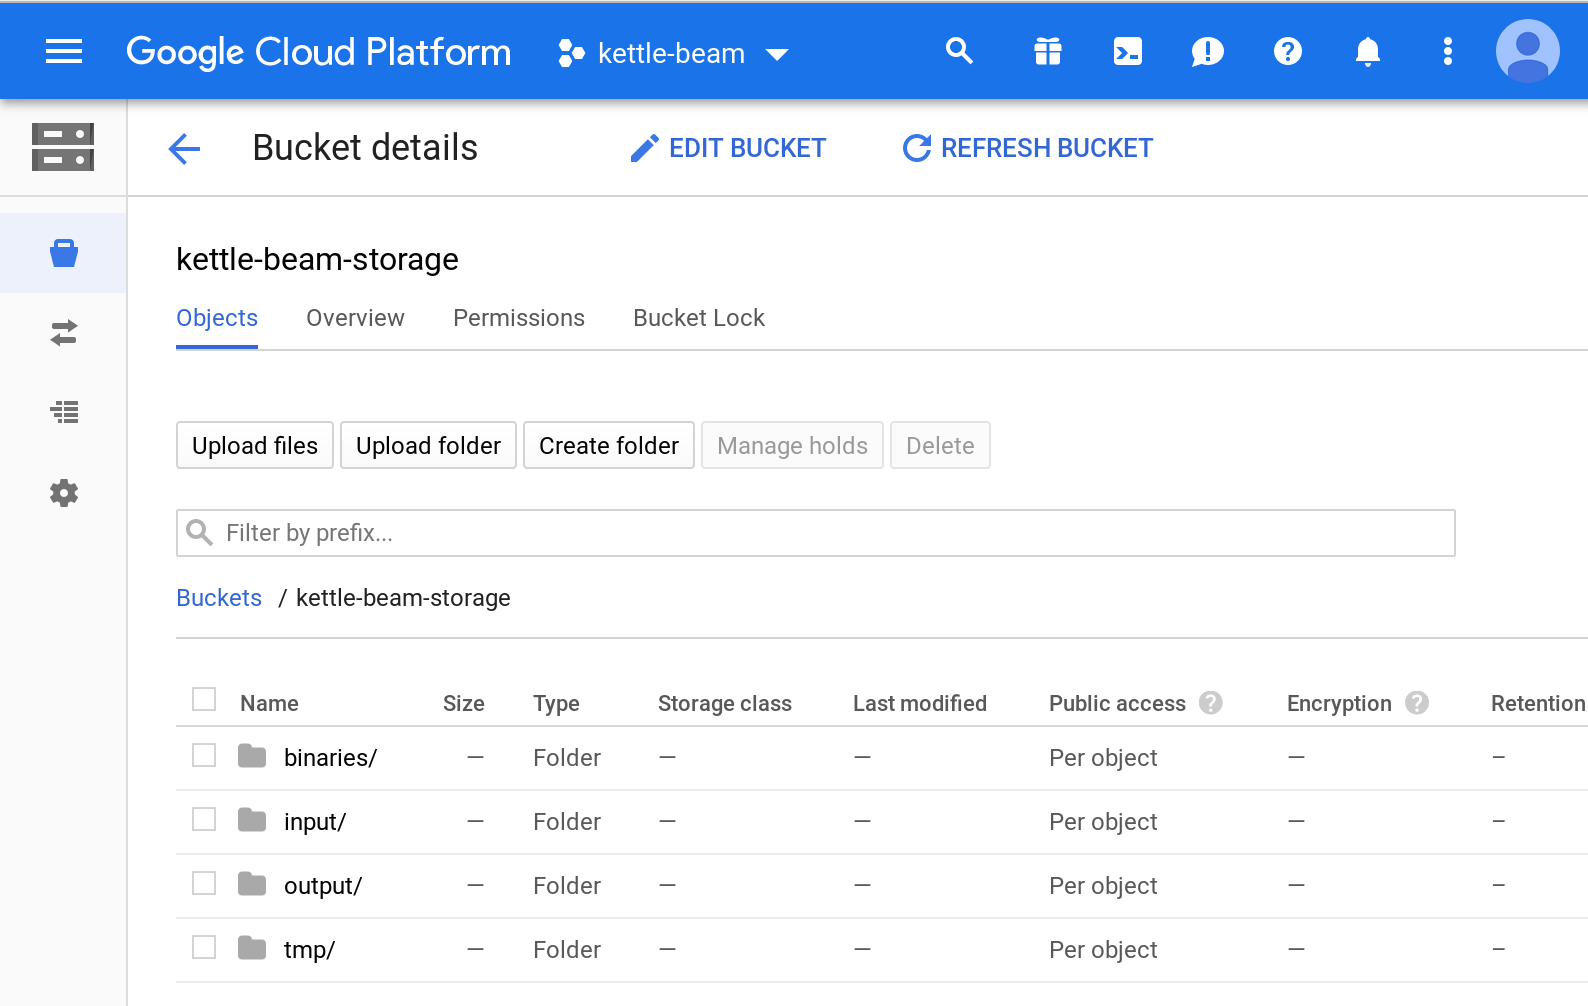
beaminto the filter and then select ourkettle-beam-role. - Create a storage bucket: Go to the GCP Storage page and click on the Create bucket icon. Name it
kettle-beam-storage. Once created, you should be automatically forwarded to the Bucket Details page: Click on Create folder and name itinput. Create two other ones:binaries,output. - Still on the Bucket Details page, click on the
inputfolder and click on Upload files. Upload the input file for your PDI Beam pipeline. - Grant service account permissions on your storage bucket: Still on the Bucket Details page, click on the Permissions tab. Here your service account should be listed.
- Enable the Compute Engine API for your project from the APIs Library page in the Google Cloud Platform Console. Pick your project and search for
Compute Engine API. After a few clicks you come to the full info page. Give it a minute or so to show the Manage etc buttons. In my case the API enabled status was already shown: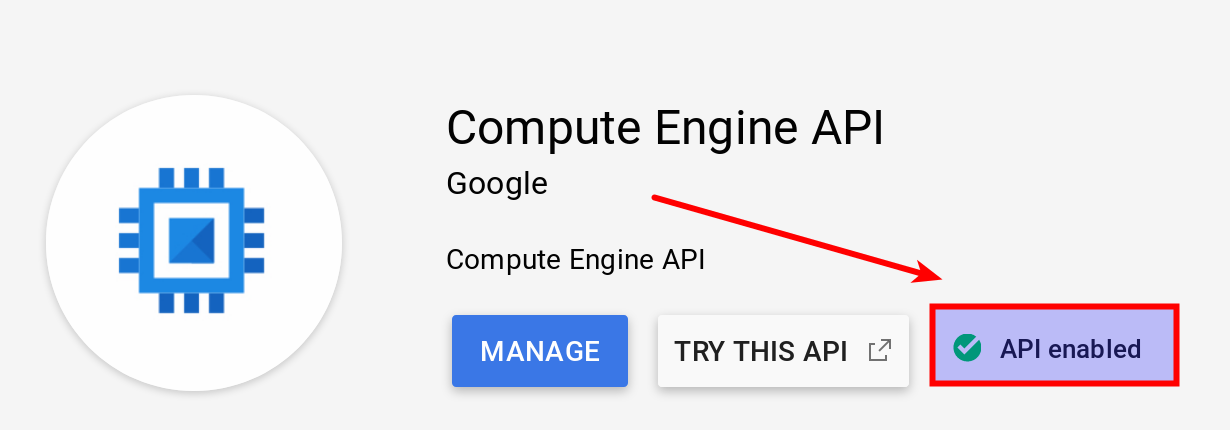 Following APIs are required (most of them are enabled by default):
- BigQuery API (if using BigQuery only)
- BigQuery Data Transfer API (if using BigQuery only)
- Cloud Datastore API
- Cloud Filestore API: used for creating and managing cloud file servers.
- Cloud Firestore API (NoSQL document database) - not enabled by default
- Firebase Rules API
- Cloud OS Login API
- Cloud Resource Manager API
- Compute Engine API
- Compute Engine Instance Group API
- Dataflow API
- Google Cloud APIs
- Google Cloud Deployment Manager v2 API
- Google Cloud Storage
- Google Cloud Storage JSON API
- Google Compute Engine Instance Group Updater API
- Service Management API
- Service Usage API
- Stackdriver Debugger API
- Stackdriver Logging API
- Stackdriver Monitoring API
- Stackdriver Trace API
- Grant service account permissions on DataFlow: Go to the GCP Dataflow page and ?? [OPEN] I didn’t see any options here. See also Google Cloud Dataflow Security and Permissions for more info. Two accounts required: Cloud Dataflow Service Account and Controller Service Account. By default, workers use your project’s Compute Engine service account as the controller service account. This service account (
<project-number>-compute@developer.gserviceaccount.com) is automatically created when you enable the Compute Engine API for your project from the APIs page in the Google Cloud Platform Console.
Additional info:
These are the roles required on Google Storage for this to work (Source):
- Storage Admin
- Storage Object Admin
- Storage Object Creator
- Storage Object Viewer
Then locally on your machine set following environment variables so that PDI can pick up the credentials:
GOOGLE_APPLICATION_CREDENTIALS=/path/to/google-key.json
GOOGLE_CLOUD_PROJECT=yourproject # this one is no longer needed
# since now include in the PDI Beam job config
Working with the Google Cloud SDK Command Line Tools
Install the Cloud SDK command line tools.
On macOS, you can also install it via Homebrew:
brew cask install google-cloud-sdk
Follow the install instructions on the GCP website. Once done your local environment should be properly configured. Validate the config:
gcloud config list
In case you are wondering with which user you are running the commands, execute this:
$ gcloud auth list
            Credentialed Accounts
ACTIVE  ACCOUNT
*       diethard.steiner@bissolconsulting.com

To set the active account, run:
    $ gcloud config set account `ACCOUNT`
If you created the project earlier on, you can list all projects like so:
$ gcloud projects list
You can switch to the kettle-beam project run:
$ gcloud config set project kettle-beam
# Check which project is active
$ gcloud config list project
[core]
project = kettle-beam

Your active configuration is: [default]
Note:
GOOGLE_APPLICATION_CREDENTIALSare not used by the gcloud client tools and there is no way to set this. See also here. It is used for service accounts only.
There are many command options available which you can explore by yourself easily.
Setting up the Storage Bucket
A sample folder structure within the bucket looks like this:
- binaries: To store all the Kettle/PDI binaries
- input: To store any input data files your process consumes
- output: To store any output data files your process produces
- tmp: To store any temporary files that your process creates
Testing Basic GCP Connection from within Spoon
Restart Spoon and choose File > Open URL. From the Open File dialog pick Google Cloud Storage from the Location pull-down menu. You will notice that the folder path automatically changes to gs://, but no files or folders are shown. Just add your bucket name to the folder path (e.g gs://kettle-beam-storage/) and hit Enter. Now the folder should be displayed:

PDI: Beam Job Config
For your transformation create a dedicated GCP DataFlow config. Define:
- Name
- Description: optional
- Runner: Pick
DataFlow.
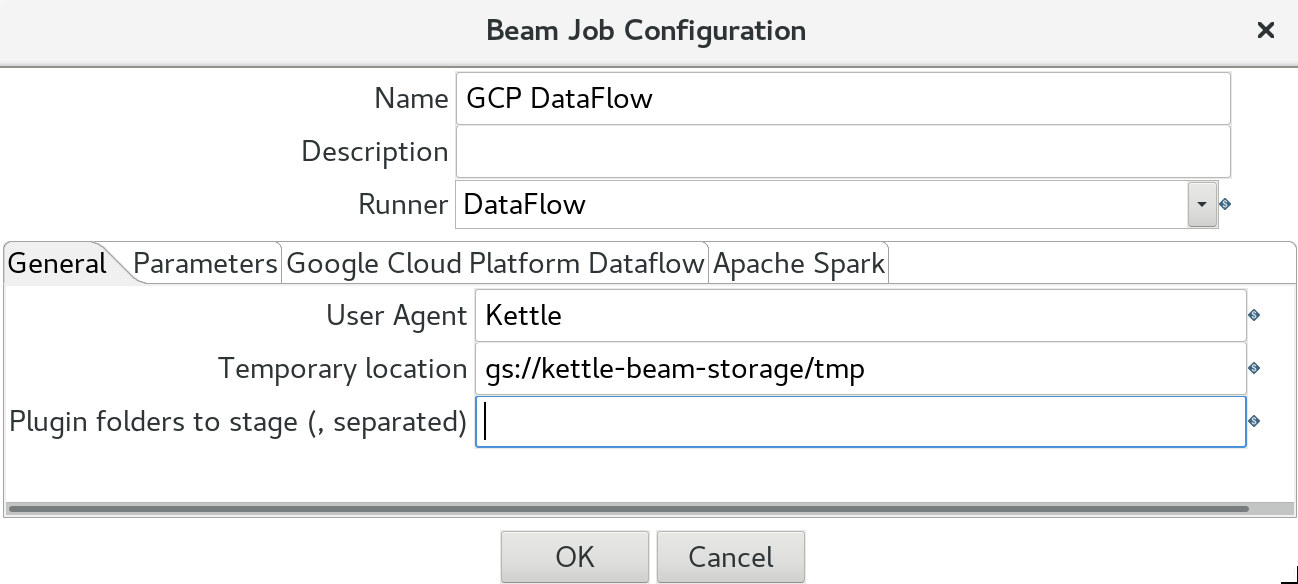 In the General tab define:
- User Agent: this can be any name you fancy
- Temporary Storage Location: e.g.
gs://kettle-beam-storage/tmp - Plugin folders to stage: comma separated list of plugins that should be included as well. Don’t worry about this for now. We discuss this later.
Important: Prefix all paths with
gs://(also for the Temporary Location).
Next click on the Google Cloud Platform DataFlow tab. There is a massive list of settings available. At the minimum you have to define the first three ones:
- Project ID: see comment further down
- App Name
- Staging Location: where the PDI/Kettle binaries should be stored, e.g.
gs://kettle-beam-storage/binaries. - Initial number of workers
- Maximum number of workers
- Auto scaling algorithm
- Worker Machine Type
- Worker Disk Type
- Disk Size (GB)
- Region
- Zone
- Streaming?
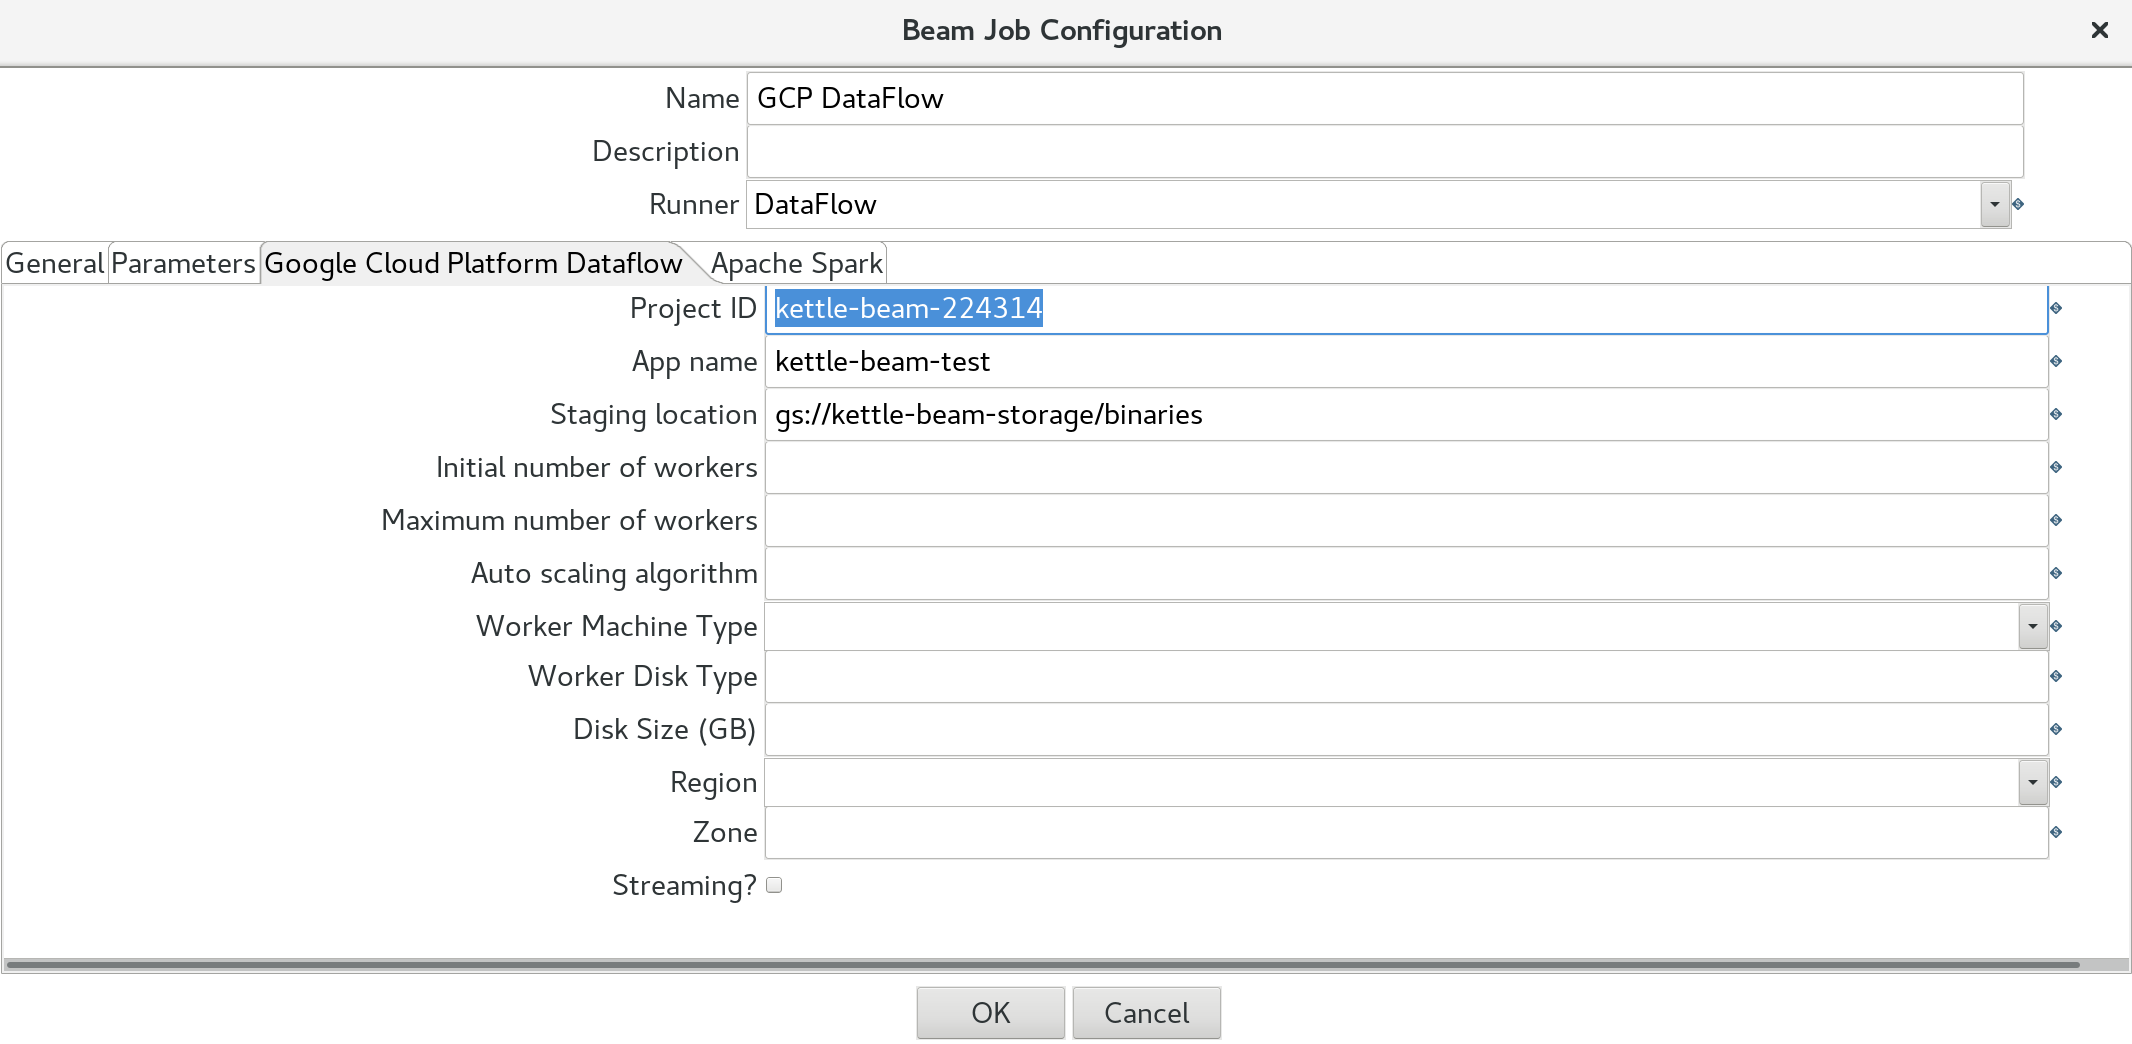
The optional settings give you more control over the auto-scaling which is built-in with GCP DataFlow. One of the great things about GCP DataFlow is that you do not have to implement any logic for auto-scaling: This service takes care of it for you.
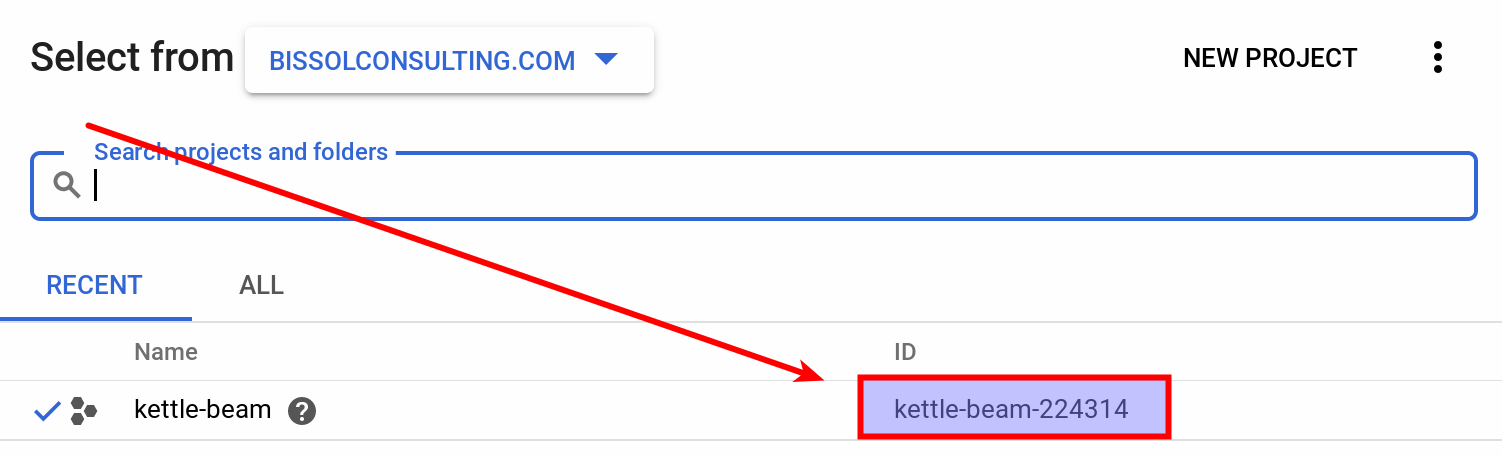
Important: Pay attention to the Project ID: This is not the name but - well as it says - the ID (which can be different). If you are not sure what the project ID is, simply click on the project picker at the top of the Web UI and the pop-up will show you the project name with the ID:
Alternatively, you can query the project ID with the command line tool:
$ gcloud projects list
PROJECT_ID            NAME                PROJECT_NUMBER
k8s-pentaho-server    k8s-pentaho-server  619953174803
kettle-beam-224314    kettle-beam         684324837668
The first time you run the PDI Beam pipeline in **GCP DataFlow ** it will be quite slow:
In the Beam Job Configuration within the DataFlow settings you define under Staging location where to store the binaries (example: gs://kettle-beam-storage/binaries). The first time your run your pipeline the Google DataFlow runner will upload the PDI/Kettle binaries from the lib folder to this Staging folder. This allows you to also include any specific PDI plugins that you require for your project.
Note that any other file paths you define should also follow this VFS pattern, e.g. gs://kettle-beam-storage/input/sales-data.csv.
Running the PDI Beam Pipeline
This is no differnt from any other PDI Beam execution - just pick the correct config.
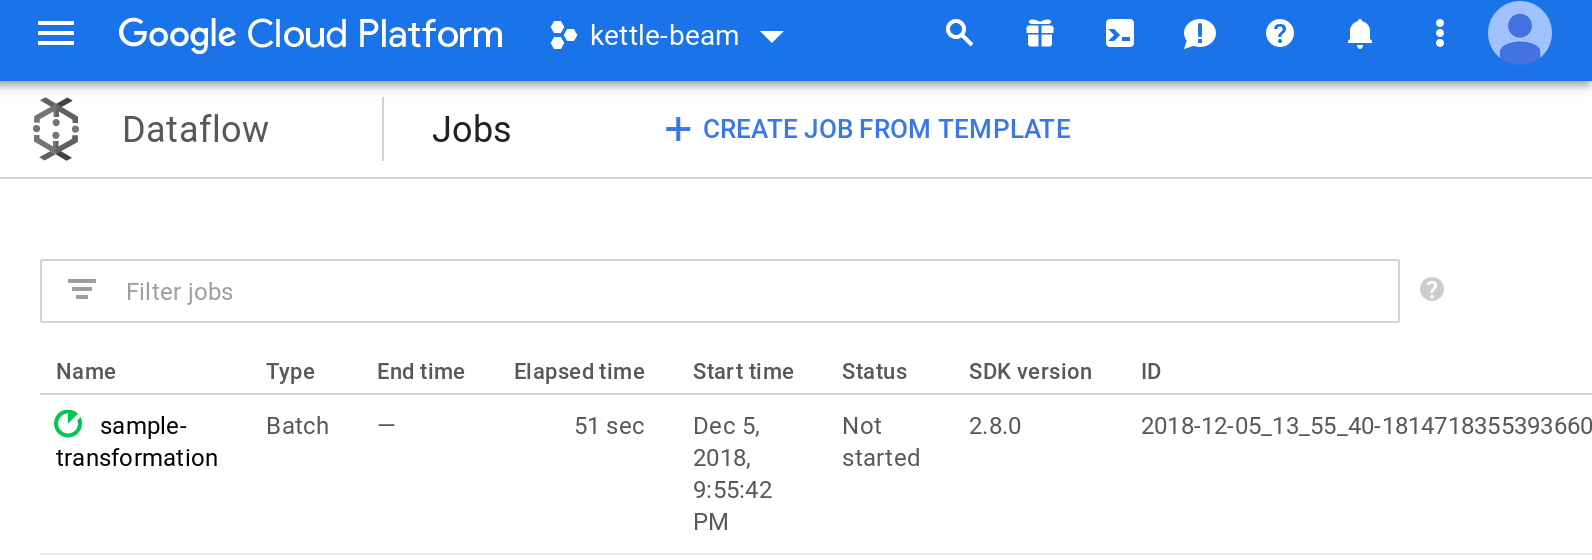
Once started, you should after a bit see this screen:
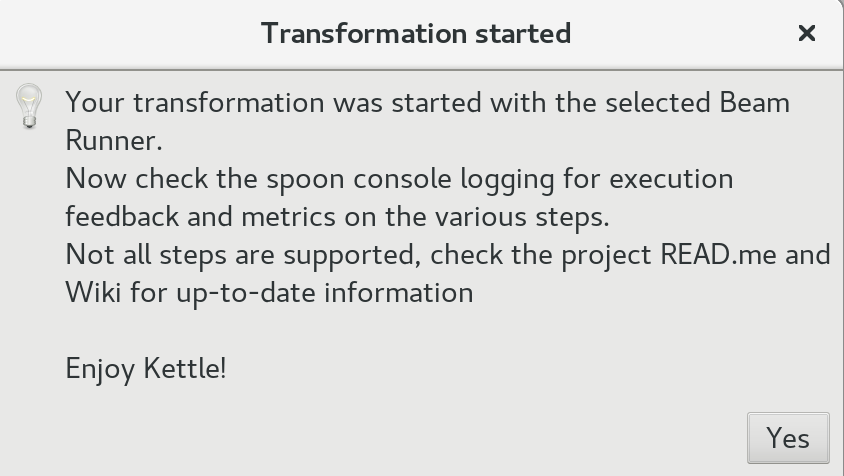
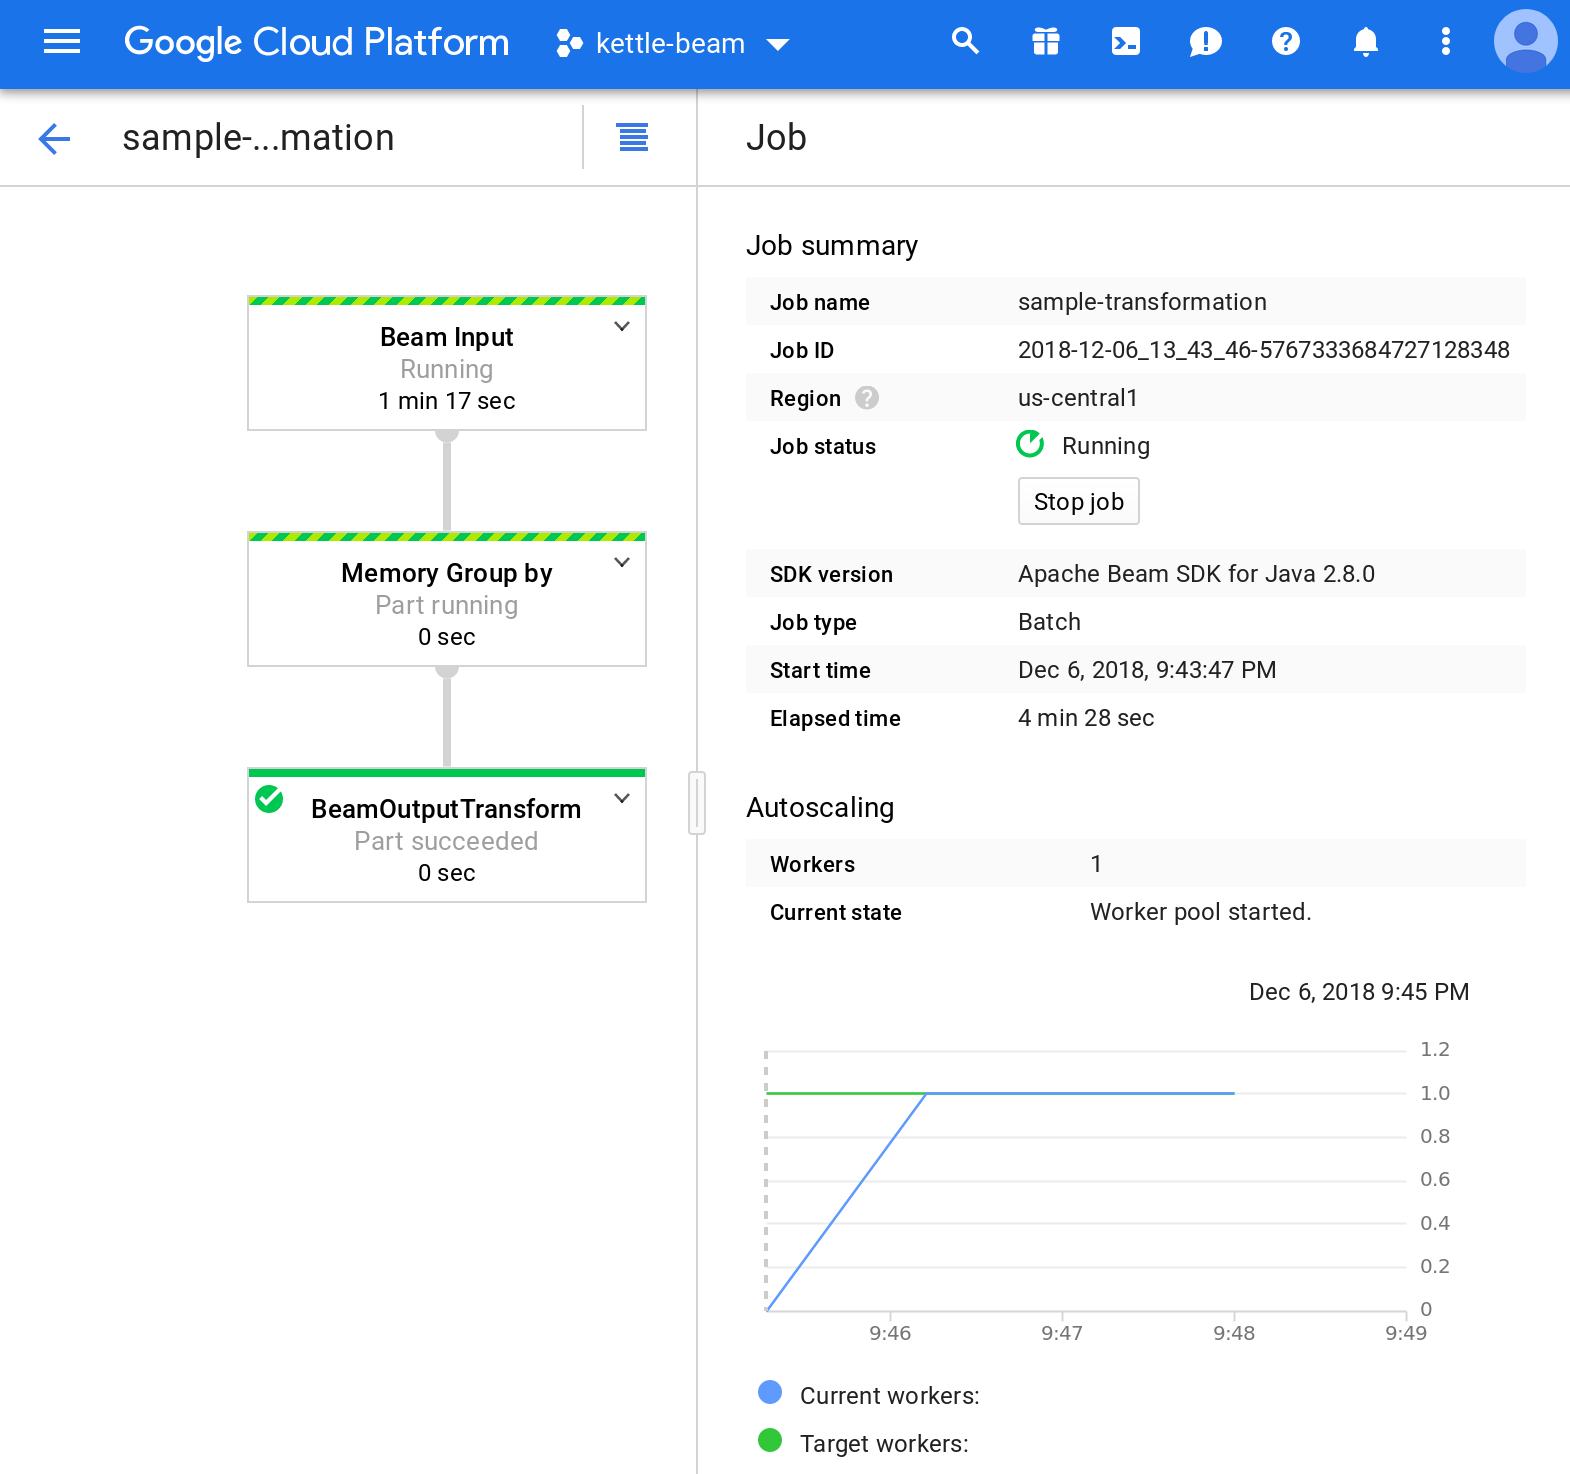
Just click Yes and the make your way to the GCP admin console. Go to the DataFlow section. You should see your PDI Beam Pipeline there now:
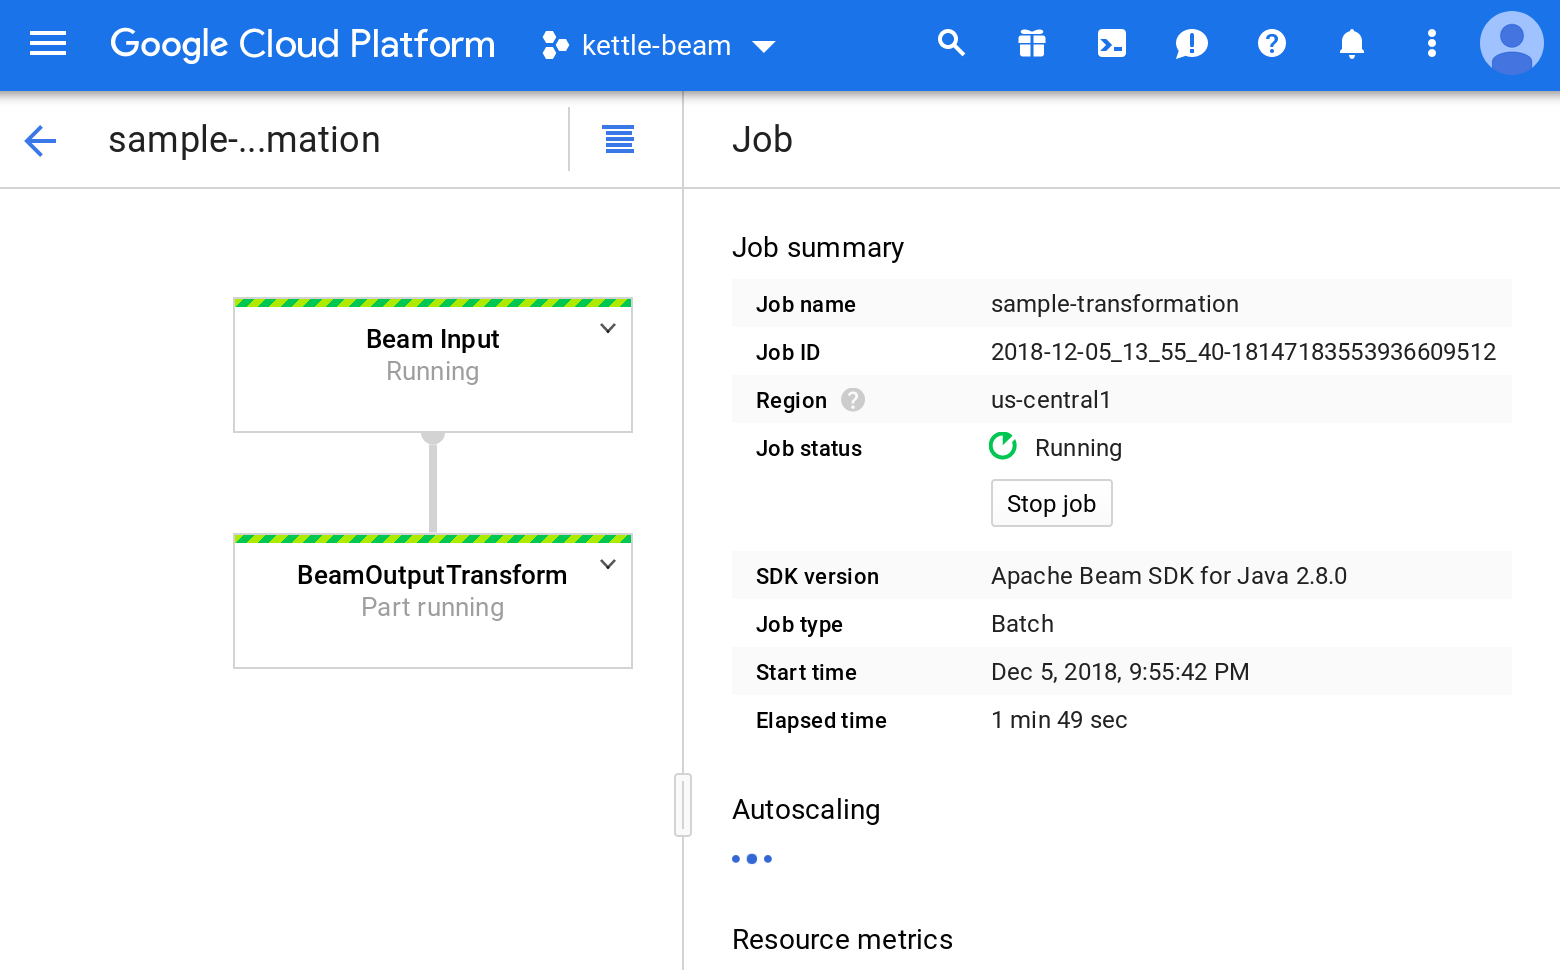
Click on your Job and you should see some more details:
And then check the output:
The job/PDI Beam pipeline you saw the screenshot of above was extremely simple (just input and output) - if we add another step to transform the data, in example a Memory Group By step, the resulting graph will look like this:
How to check if the Pipeline is working
As mentioned above, the first time your execute the process on GCP DataFlow, it will take a bit for the binaries to be uploaded to the GCP Storage: This might give the impression that nothing is happening. The best thing to do in this case is to check if the jar files are showing up in the binaries folder in the GCP Storage bucket. You can do this via the web interface or by running e.g. following command:
$ gsutil du -sh gs://kettle-beam-storage/binaries
397.17 MiB  gs://kettle-beam-storage/binaries
As you can see, all the uploaded jar files amount to nearly 400MB.
Also watch the logs:
- Within Spoon/Stdout
- In the GCP DataFlow Web Console you find an option to see the log for your job.
GCP Pub/Sub
Creating a Queue
On the GCP cloud console navigate to Pub/Sub > Topic via the main menu. If you haven’t created a topic yet, a small splash screen will be shown asking you to create a topic. Go ahead and create one. This is a very simple setup.
You should end up on the Topics page. On the top right hand side click on Show Info Panel. Then click on the topic name (in the table where all the topics are listed). Pay attention to the Permissions section in the Info Panel. It looks quite likely similar to this one:
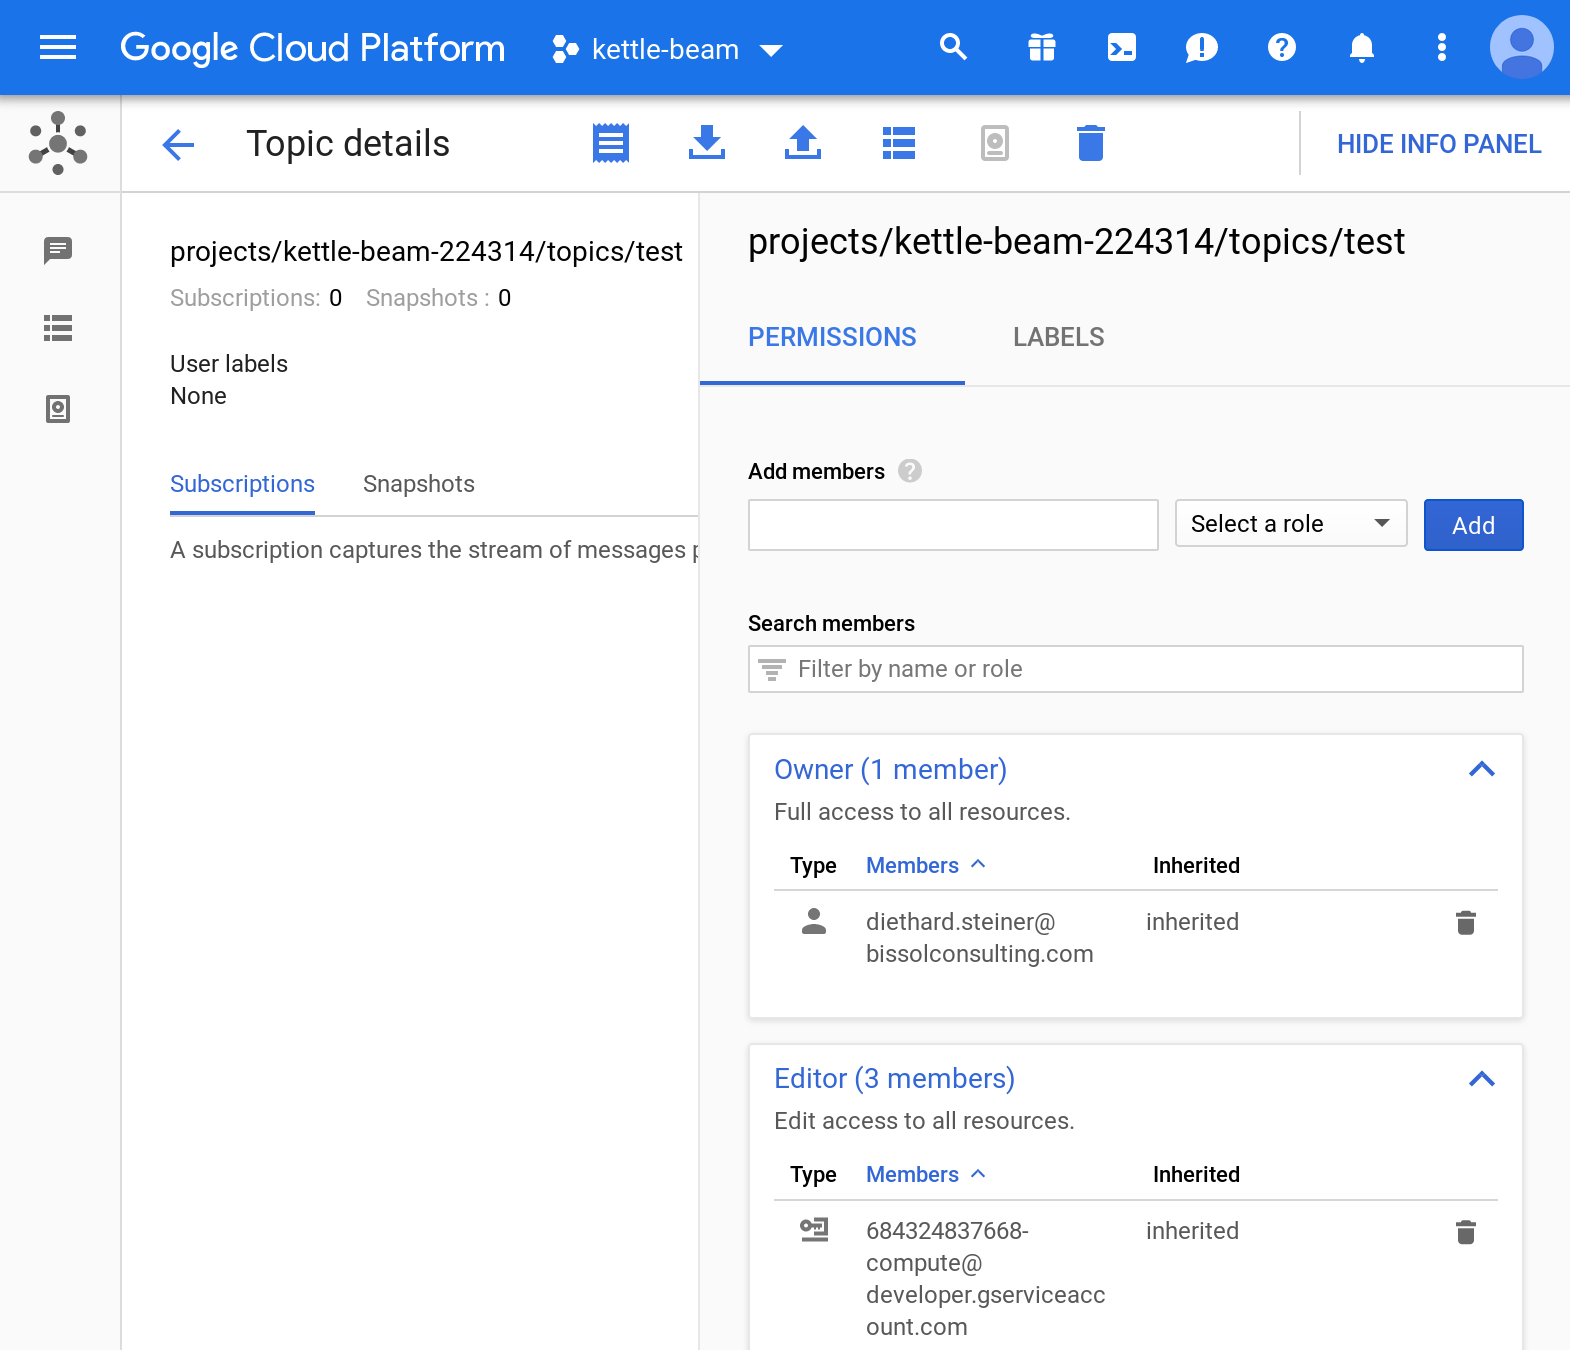
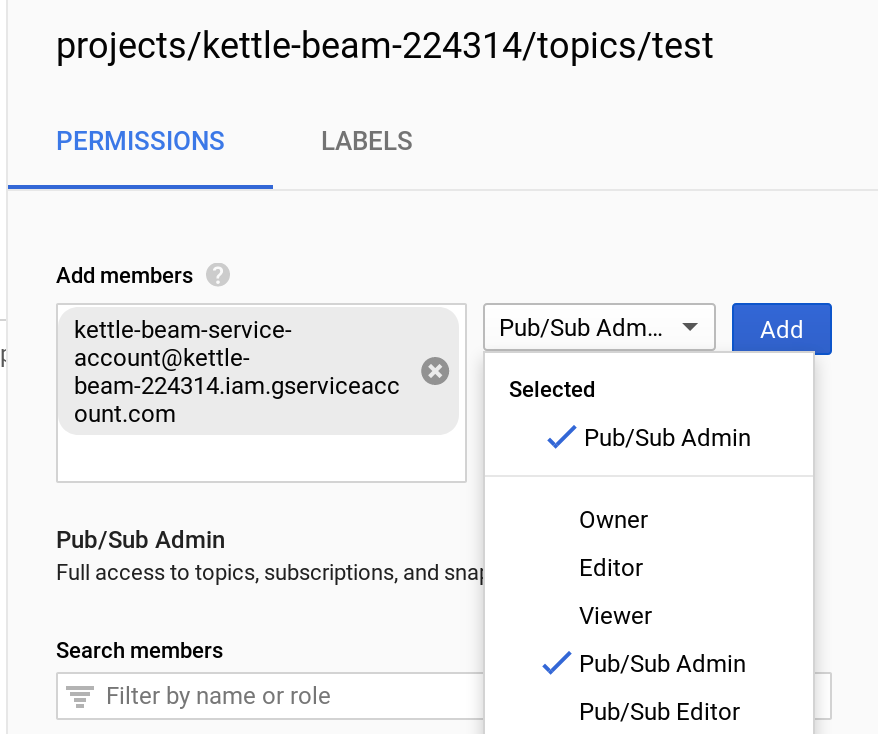
Note that our service account is not listed there. So let’s add it then via the Add members option. Assign at least the role Pub/Sub Admin. Confirm by clicking Add.
Create a Subscription
On your topic page, in the top menu you click on the Create Subscription link:

On the next page provide a subscription name. All the other setting can remain on their defaults. Finally click Create.
The subscription name is required to configure the Kettle Beam GCP Pub/Sub: Subscribe step and is expected to be in this format:
projects/<project>/subscriptions/<subscription>
# Example
projects/kettle-beam-224314/subscriptions/test
Note:
- The batch process writing data into pub/sub has to run at the same time as the process reading from it.
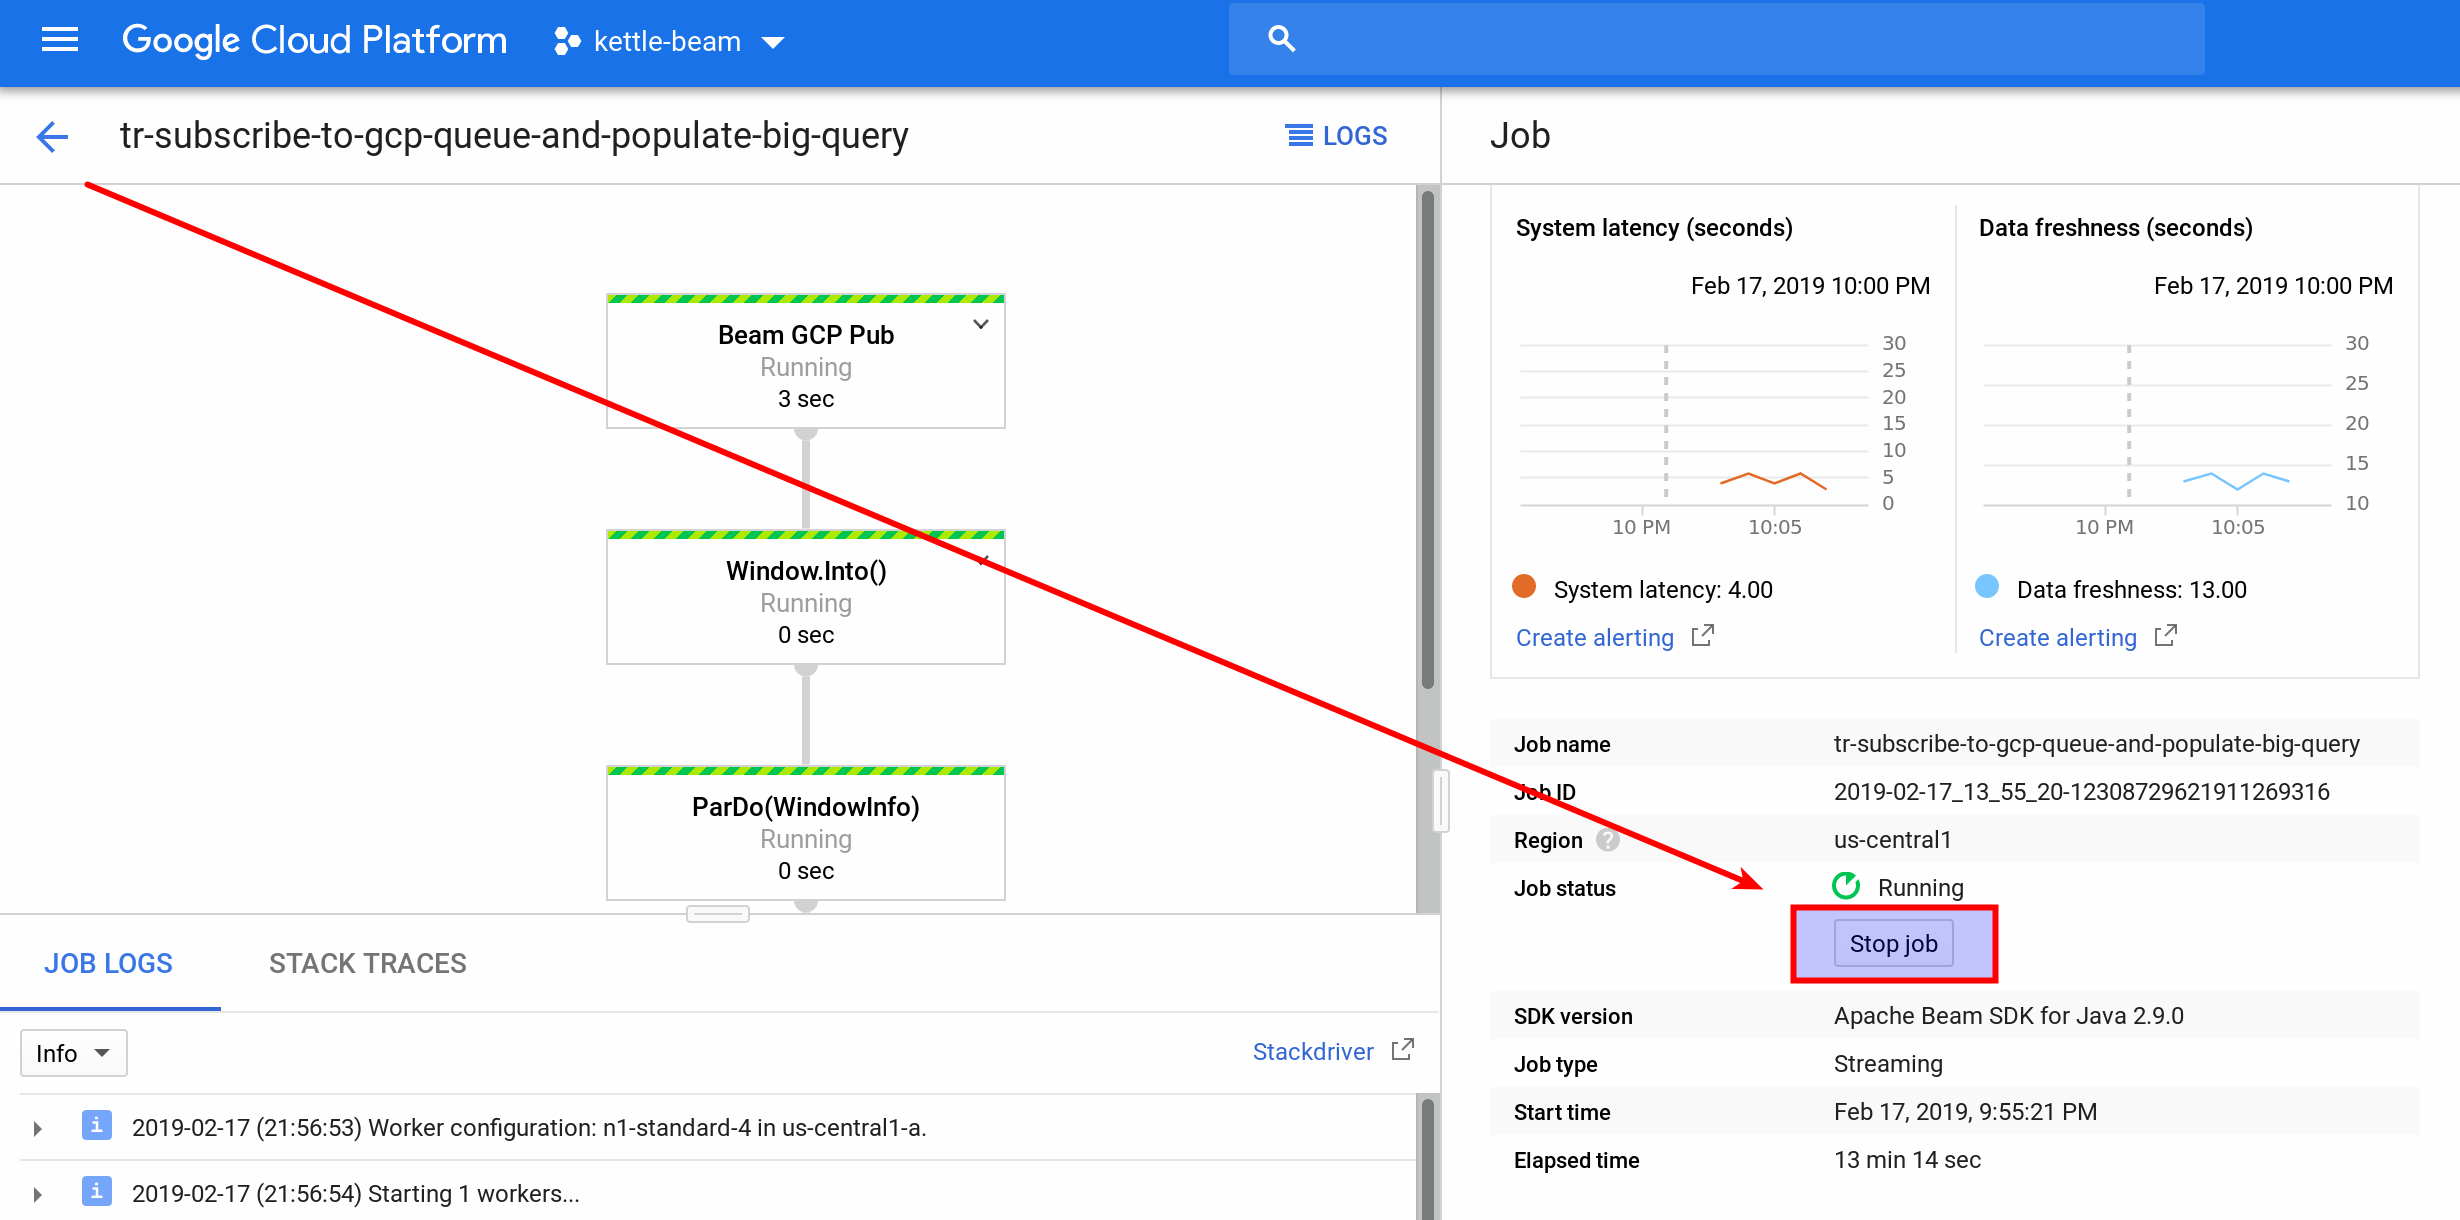
- To kill the constanly running subscriber job, do the following:
GCP Big Query
On the GCP cloud console navigate to Big Query or alternatively click on this link. On the left hand side click on Resources and then Add Data: Choose Pin project and choose your project. Your project name should be displayed below … click on it. Now on the right hand side you should see a Create dataset button. Click on it. Fill out the required details in the upcoming dialog.
A dataset name will show up under your pinned project. Click on it. Next click on Create Table (on the right). In the upcoming dialog set Create table from to Empty Table (since we want to populate it via the Beam BigQuery Output step). Provide all the other details. More info on the official Quickstart Guide.
Tips:
- Dates: BigQuery tables with DATE columns will fail on Beam BigQuery Input step because the
SimpleDateFormatobject inBQSchemaAndRecordToKettleFn.javawon’t parse the value coming from the table in the formatyyyy-MM-dd, despitesetLenient = TRUE. Just source them as String and check for length equal to 10 and then parse the short format. (Source).
Common Errors
Recommended Approach
What to do:
- Run a unit test and make sure that everything works (using the pentaho-pdi-datasets plugin). If this didn’t highlight any errors, next try:
- Execute the pipeline using the Direct Runner.
Errors shown within Spoon
Permissions Error
If there are permission issues, Spoon will show the error message in a pop-up, e.g.:
Failed to create a workflow job: (7b5183c85358d0cf): Could not create workflow; user does not have write access to project: kettle-beam Causes: (7b5183c85358d196): Permission 'dataflow.jobs.create' denied on project: 'kettle-beam'
In my case I did originally specify the project name instead of the project ID in the Beam job config. Changing this resolved the problem.
Failed to construct instance from factory method DataflowRunner
The was an error building or executing the pipeline:
Failed to construct instance from factory method DataflowRunner#fromOptions(interface org.apache.beam.sdk.options.PipelineOptions)
There could be several reasons for this error. Simply press the Details button within the Error window:

And then you should find the detailed error message, like here in example:
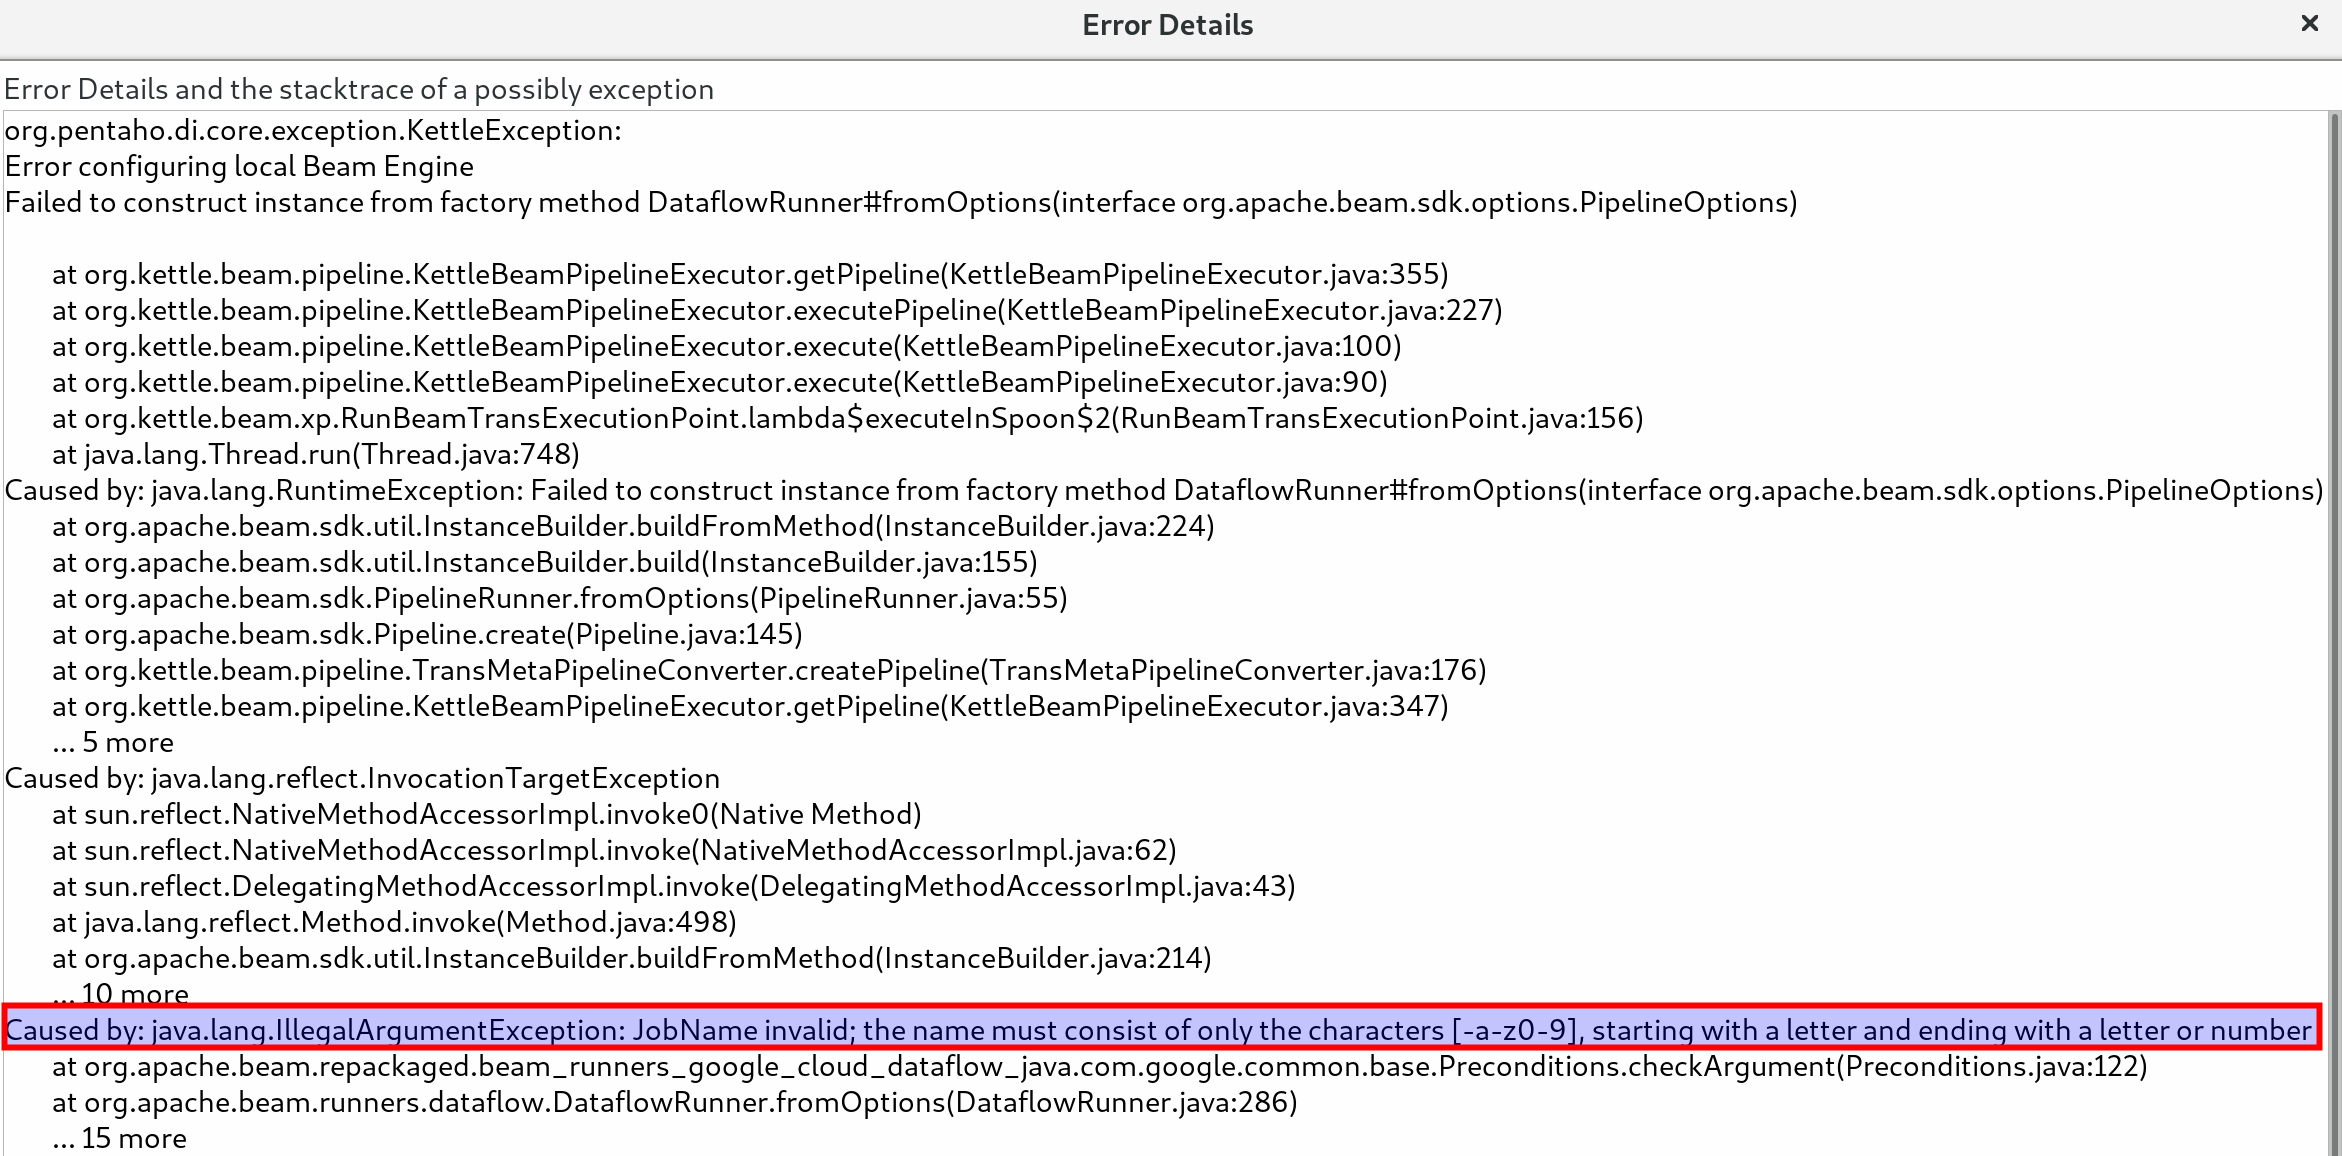
...
JobName  invalid; the name must consist of only the characters [-a-z0-9],  starting with a letter and ending with a letter or number
...

Unable to confirm BigQuery dataset presence …
Unable to confirm BigQuery dataset presence for table "kettle-beam-224314:sensor_data.amount". If the dataset is created by an earlier stage of the pipeline, this validation can be disabled using #withoutValidation.
Check that you have all the relevant BigQuery permissions assigned to your role!
Errors shown within GCP Dataflow Web Console
Read this article: Troubleshooting Your Pipeline.
Example 1:
Example 2:
java.io.FileNotFoundException: No files matched spec: gs://...
Make sure you have permissions to see the file! Open Spoon and go to New > Open URL. For Location pick Google Cloud Storage and paste the whole path into the Folder input field and hit enter. If you have the correct permissions you should see the folder/file.
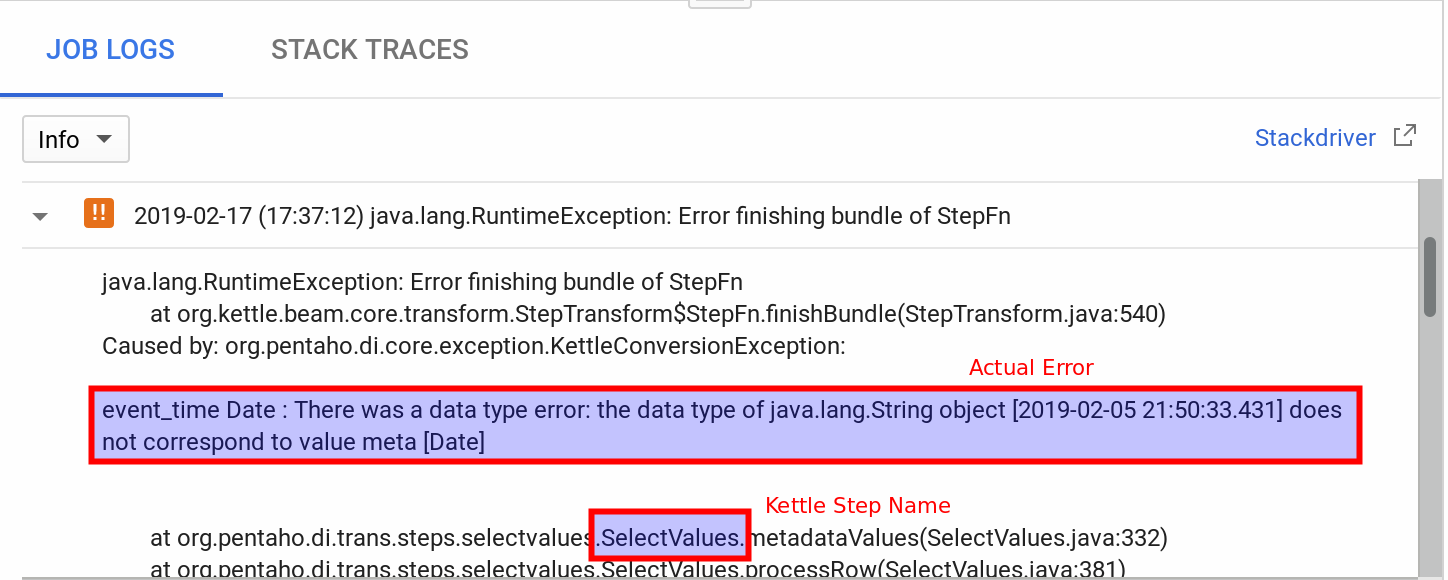
Error in String to Kettle Row conversion function
java.lang.RuntimeException: Error in String to Kettle Row conversion function org.kettle.beam.core.fn.StringToKettleRowFn.processElement(StringToKettleRowFn.java:65) Caused by: org.apache.beam.sdk.util.UserCodeException: java.lang.RuntimeException: Error executing StepFn
Scroll a bit further down in the error log and you should find something like this (or many other error reasons … all you have to look for is some text containing org.kettle.*) :
Unable to load step plugin with ID JsonInput, this plugin isn't in the plugin registry or classpath
Solution: Edit the Beam Job Configuration and list the required plugin (in this example JsonInput requires the kettle-json-plugin PDI plugins folder to be staged, so mention kettle-json-plugin in the Beam Job Settings).
Other possible error:
Caused by: java.lang.RuntimeException: Error adding timestamp to rows
        org.kettle.beam.core.fn.TimestampFn.processElement(TimestampFn.java:130)
Caused by: java.lang.IllegalArgumentException: No instant converter found for type: java.time.Instant
        org.joda.time.convert.ConverterManager.getInstantConverter(ConverterManager.java:165)
Analysing the Stats
Via the GCP interface you can analyse the various stats around Counters (see Custom Counters section). Each PDI step gets its own counter here.
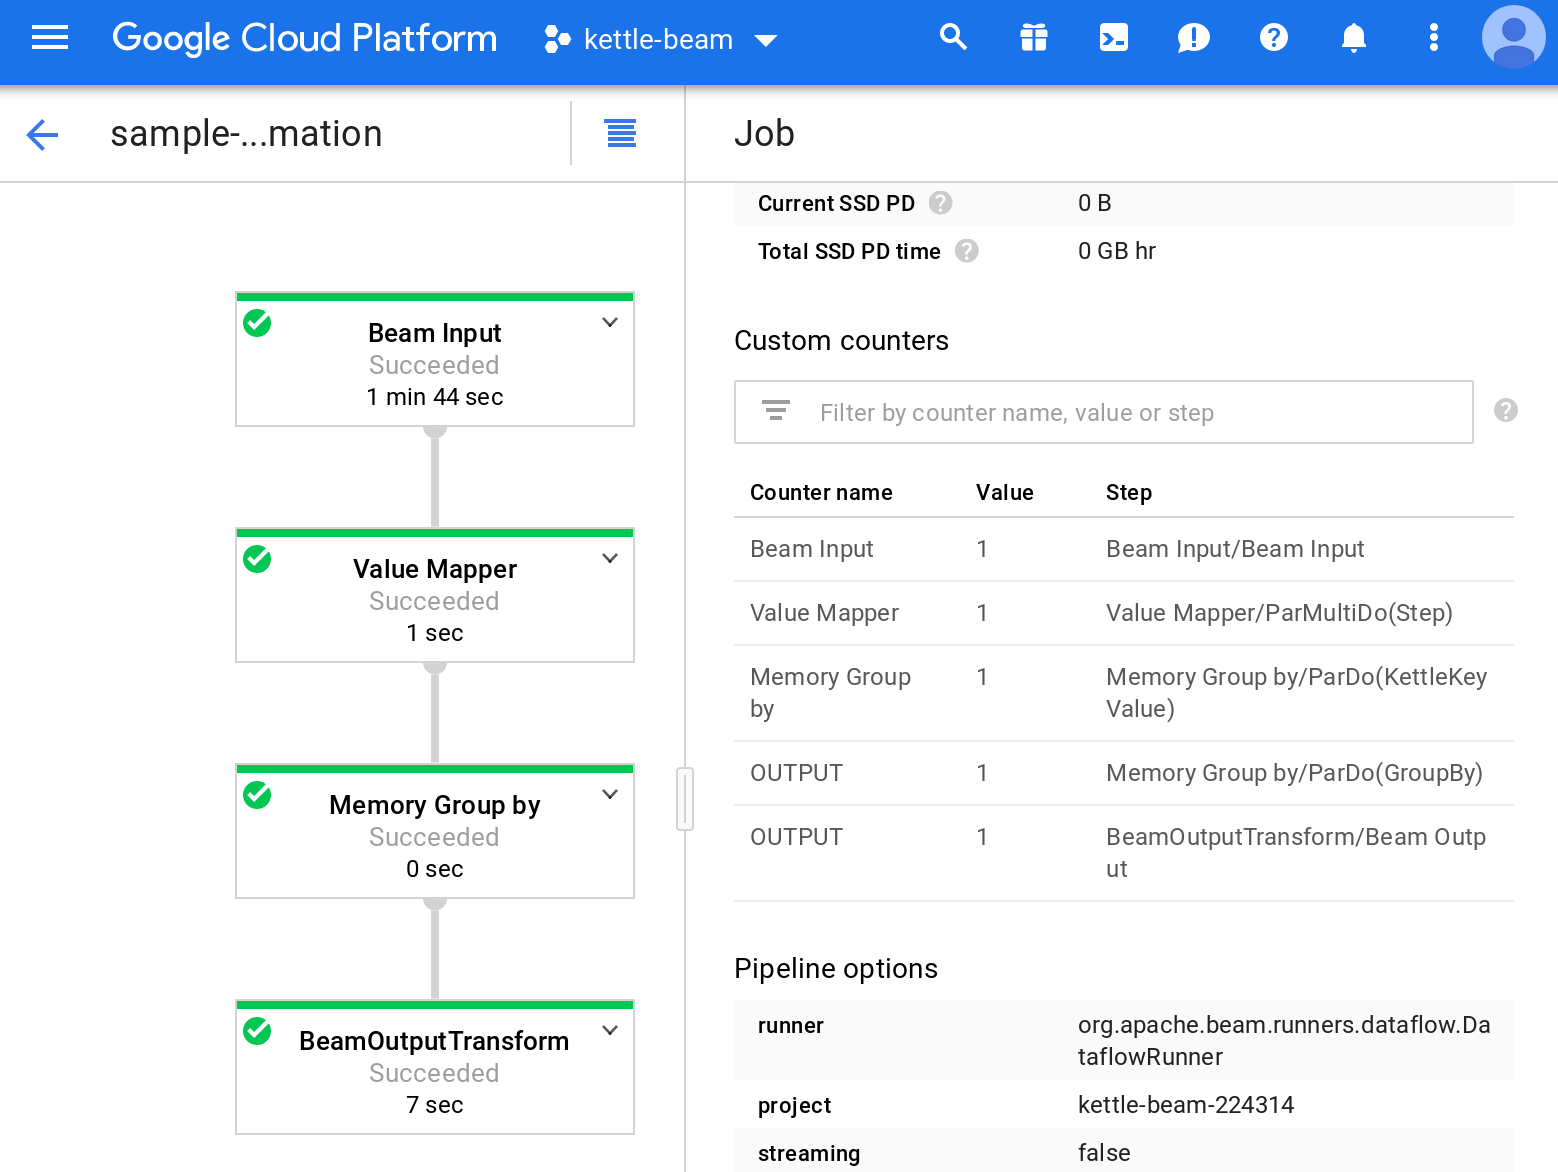 The screenshot above shows that one record (OPEN - this can’t be - it seems to reflect the init phase shown in the Spoon logs below only) was passed through the Value Mapper step.
Within Spoon you get some more detailled logging:
2018/12/11 21:41:41 - Spoon -   ----------------- Metrics refresh @ 2018/12/11 21:41:41 -----------------------
2018/12/11 21:41:41 - Spoon - Name: MetricName{namespace=init, name=OUTPUT} Attempted: 1 Committed: 1
2018/12/11 21:41:41 - Spoon - Name: MetricName{namespace=read, name=Beam Input} Attempted: 8 Committed: 8
2018/12/11 21:41:41 - Spoon - Name: MetricName{namespace=read, name=Value Mapper} Attempted: 8 Committed: 8
2018/12/11 21:41:41 - Spoon - Name: MetricName{namespace=read, name=Memory Group by} Attempted: 8 Committed: 8
2018/12/11 21:41:41 - Spoon - Name: MetricName{namespace=written, name=OUTPUT} Attempted: 6 Committed: 6
2018/12/11 21:41:41 - Spoon - Name: MetricName{namespace=read, name=OUTPUT} Attempted: 6 Committed: 6
2018/12/11 21:41:41 - Spoon - Name: MetricName{namespace=written, name=Value Mapper} Attempted: 8 Committed: 8
2018/12/11 21:41:41 - Spoon - Name: MetricName{namespace=init, name=OUTPUT} Attempted: 1 Committed: 1
2018/12/11 21:41:41 - Spoon - Name: MetricName{namespace=written, name=Beam Input} Attempted: 8 Committed: 8
2018/12/11 21:41:41 - Spoon - Name: MetricName{namespace=init, name=Memory Group by} Attempted: 1 Committed: 1
2018/12/11 21:41:41 - Spoon - Name: MetricName{namespace=init, name=Value Mapper} Attempted: 1 Committed: 1
2018/12/11 21:41:41 - Spoon - Name: MetricName{namespace=init, name=Beam Input} Attempted: 1 Committed: 1
2018/12/11 21:41:41 - Spoon - Name: MetricName{namespace=read, name=OUTPUT} Attempted: 6 Committed: 6
2018/12/11 21:41:41 - Spoon - Name: MetricName{namespace=written, name=OUTPUT} Attempted: 6 Committed: 6
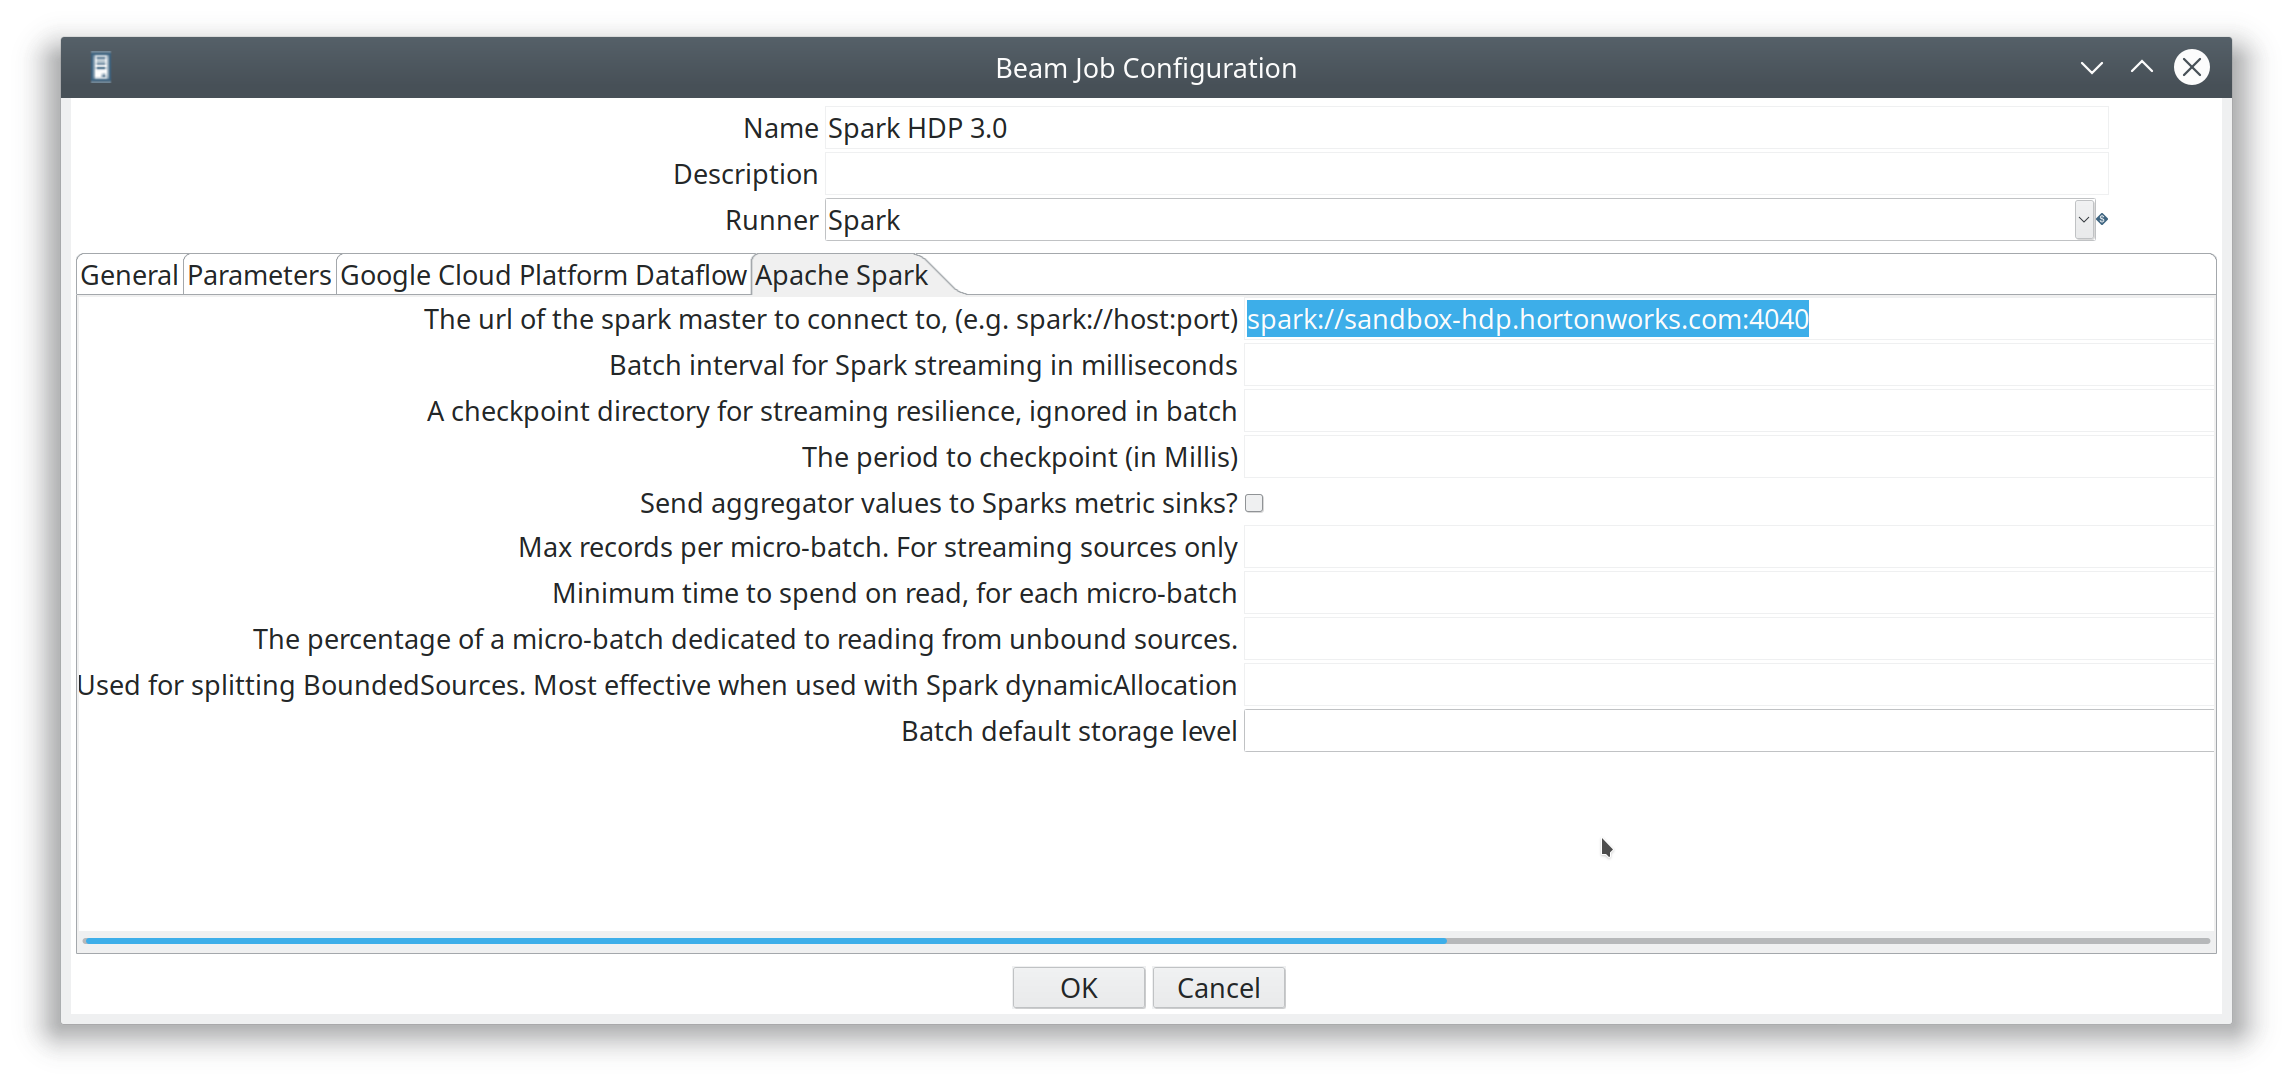
Apache Spark
PDI Job Configuration
Define:
- Name
- Description: optional
- Runner: Pick
Spark.
In the General tab define:
- User Agent: this can be any name you fancy
- Temporary Storage Location:
- Plugin folders to stage: comma separated list of plugins that should be included as well. Don’t worry about this for now. We discuss this later.
Flink Runner
Two modes are supported:
- Local Direct Flink Runner
- Flink Runner (Issue 32): Execution via Flink Master on a clustered setup.
Matt: If you want to play with Flink that’s easy as well. Download 1.7.2 and unzip. Follow local setup show in the official documentation. Create this script in the 1.7.2 folder. Follow instructions in the comments of this script, create some folders, …
If you’re using master code you can use the following script to run a Kettle transformation on Flink (.ktr):
TRANS=$1

bin/flink run \
  --class org.kettle.beam.pipeline.flink.MainFlink \
  --parallelism 6 \
  ~/software/kettle-8.2-beam-2.13-fat.jar \
  "${TRANS}" \
  file:///home/kettle/metadata/metastore.json \
  "Flink server"
“Flink server” is the name of my Beam Run Config.
The fat jar is generated by Spoon and put on the Flink master (you can load it into hdfs:// somewhere as well).
Job Orchestration
Within the Kettle/PDI world orchestration is achieved via creating Kettle jobs.
While a dedicated job entry was initially planned (see Job Entry to execute Kettle Beam transformations), this idea was retired in favour of a dedicated Run Configuration.
When you configure a Transformation job entry you can set the Run configuration to your Beam Job Configuration:
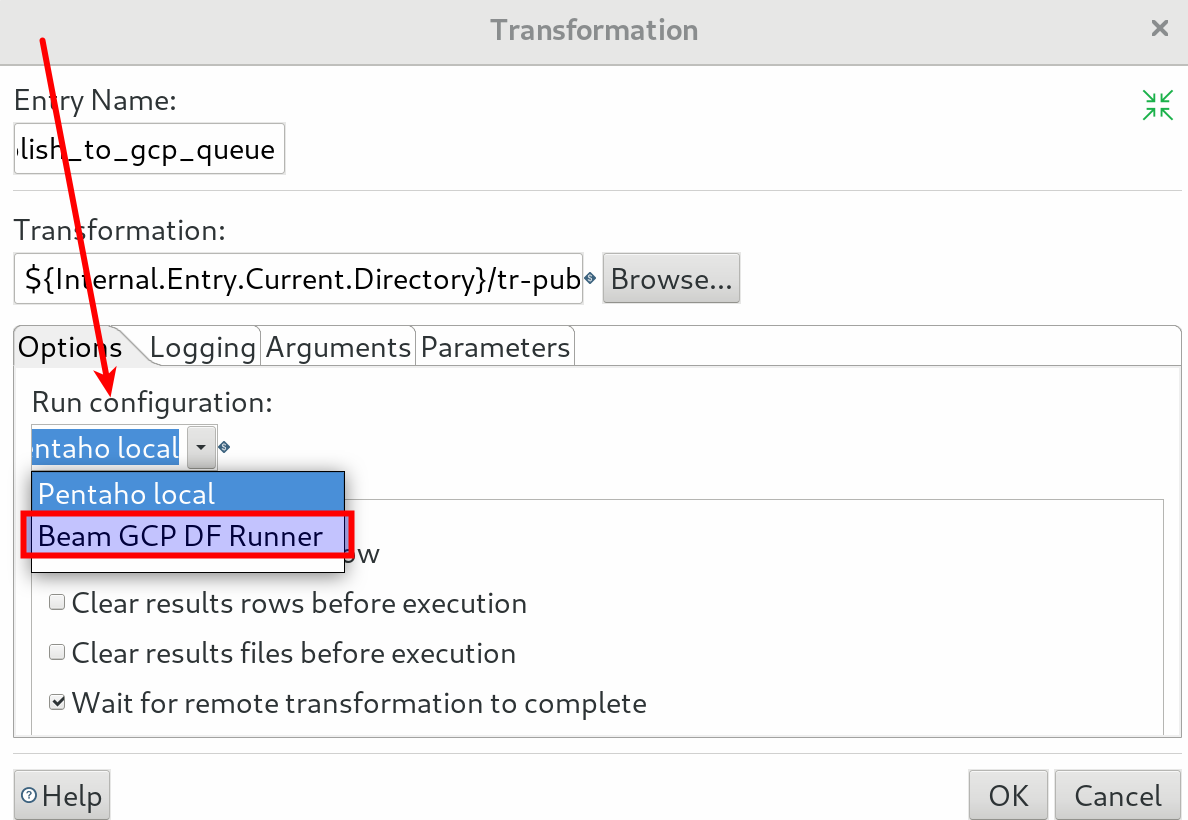
Run configuration
The patch provided with the latest version of Kettle Beam Plugin ensures an even tighter integration with the standard PDI functionality: Now you can create a Run configuration for your Kettle Beam Pipelines!
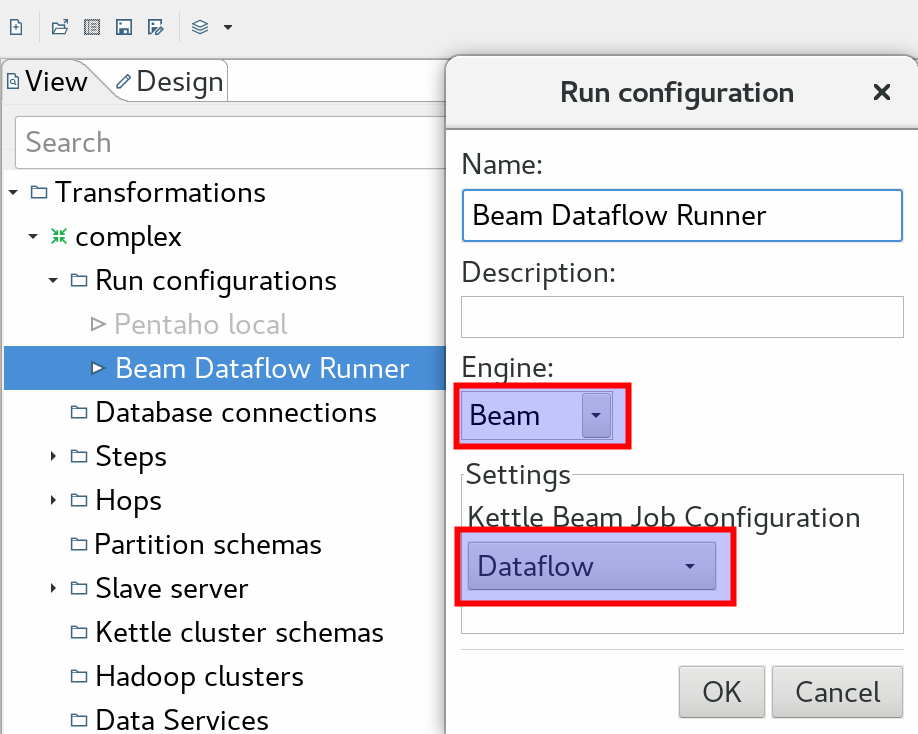
Simply go to the View tab on the left hand side and right click on Run configurations: Select New. On the Run configuration dialog provide a name, description, pick as Engine Beam and from the Kettle Beam Job Configuration choose a configuration you created earlier on. Example:
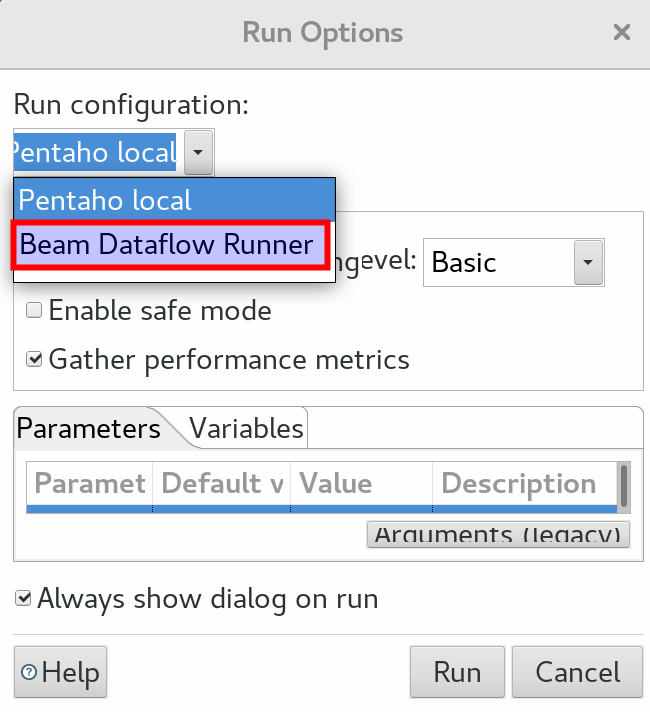
Once created, you can just click on the standard Play/Execute icon and in the Run configuration you can just pick the runner we previously defined:
Using other PDI Plugins
The PDI/Kettle core functionality can be extended via plugins: There are many plugins available, most of them can be conveniently source via the Marketplace. See also Support for plugins for the PDI Beam pipelines.
Deployment to Higher Level Environments
Submitting a PDI Beam pipeline from Spoon is nice for development and testing. But let’s say we have script/CI server that automatically deploys a PDI Beam pipeline into production. How would this work? See this issue.
Matt Casters suggest to simply point to an install directory of PDI instead (I guess via the plugin paths that you can define), which means no messing around with complicated packaging exercises.
Installing the Kettle Beam Examples
Matt Casters also provides a Git repo with a few Kettle Beam Examples. Apart from covering Beam, it also showcases good practices by using unit testing and environment specification. It is a totally self contained git repo.
To properly use this git repo, you have to install following PDI plugins:
Next clone the Kettle Beam Examples Git repo to a convenient location (somewhere outside the PDI directory).
Once you start up Spoon, you should be presented with an Environments dialog. Click the + icon to create a new environment.
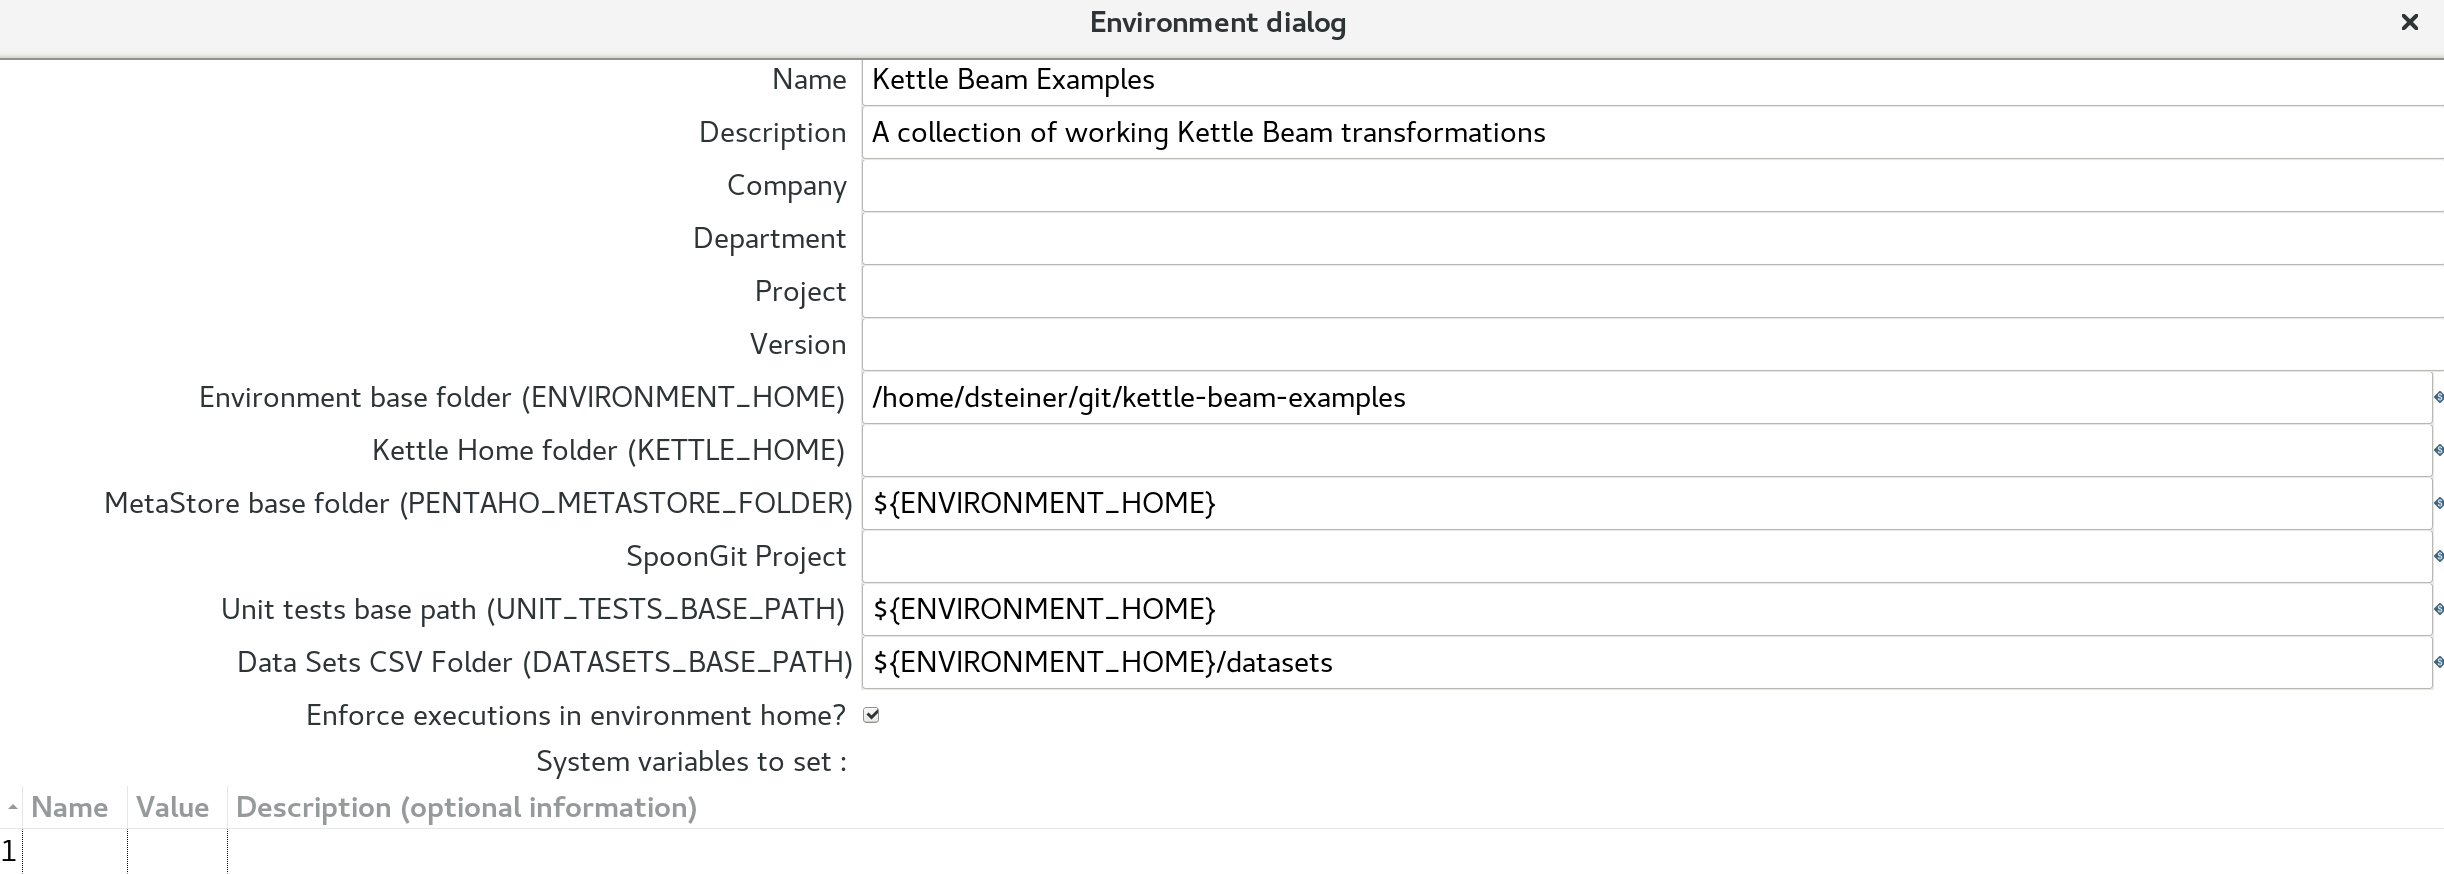
All you have to do is provide a name, description and environment base folder (last one is directory in which the git repo is stored) and job done.