This is a follow-up article to the concepts previously discussed in Pentaho Dashboards (CDE): Create your custom table.
Sometimes the form controls / selects have to provide some additional functionality than the out-of-the-box form selector components provide.
If you need more flexibility with form controls, then this simple approach might be useful to you:
- Create a datasource
- Create a Query Component
- Use the Post Execution function in the Advanced Properties section of the Query Component to dynamically add the necessary form controls.
On a side note, it would be nice if the standard CDE form controls had a CSS Class, so that you could apply the the bootstrap styles directly.
In any case, this article is not only about applying bootstrap styles, but also about adding some additional functionality to the form controls.
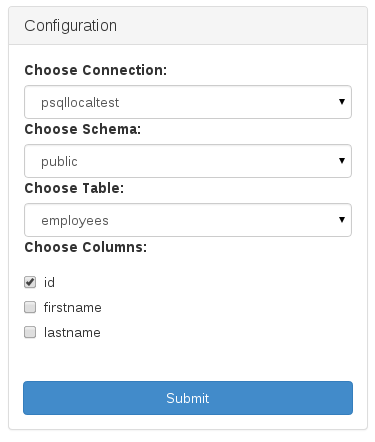
We will try to create this dynamic cascading input:
The approach outlined above is fairly simple, apart from maybe the last one, which I will discuss in detail here:
In the Layout Structure create a structure similar to this one: Column > Row > HTML. Key part is that you use HTML at the end. This will allow you to make use of more than one boostrap component.
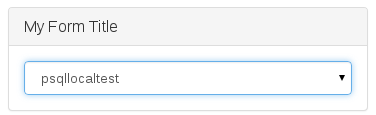
For the HTML node click on the ellipsis button next to the HTML property and insert following HTML snippet (example shown below). Provide an id for the container that you want to place your form element in (in example html_db_connection_picker). Note that we are already using the Bootstrap style panel panel-default for the outer-most div element:
<div class="panel panel-default">
  <div class="panel-heading">
    <h3 class="panel-title">My Form Title</h3>
  </div>
  <div class="panel-body">
    <div id="html_db_connection_picker"></div>
  </div>
</div>
In the Datasource Panel add a datasource of your choice and provide the mandatory properties.
In the Component Panel insert a Query Component, link it to the datasource you just created, and provide a name for the Result Var (i.e. result_fetch_db_connections).
Click on the ellipsis button next to the Post Execution property and insert a code similar to this one:
function(){
    //document.getElementById('html_db_connection_picker').innerHTML = JSON.stringify(result_fetch_db_connections);
    var myData = result_fetch_db_connections;
    var myContainer = document.getElementById('html_db_connection_picker');
    var mySelect = document.createElement('select');
    var myOption = document.createElement('option');
    myContainer.appendChild(mySelect.cloneNode()).className = "form-control";
    for(var i = 0; i < myData.length; i++) {
        var myValue = document.createTextNode(myData[i][0]);
        myContainer.lastChild.appendChild(myOption.cloneNode()).appendChild(myValue);
        }
}
This is the very basic and simple function and a good starting point to add additional functionality. This is pure JavaScript - we will have a look at using JQuery later on to make things a lot easier.
Let’s do a preview:
Next step is to make this a bit more generic. Cut this code and go to the Layout Structure panel and add a Resource of the type JavaScript snippet. Ideally later on you can move this to an external JavaScript file. In the Properties panel proved a name and click on the ellipsis button next to the Resource Code property. Paste the code. With a few slight modifications it should work:
function cdeBootstrapSelect(myContainerId, myData){
    var myContainer = document.getElementById(myContainerId);
    var mySelect = document.createElement('select');
    var myOption = document.createElement('option');
    mySelect.className = "form-control";
    for(var i = 0; i < myData.length; i++) {
        var myValue = document.createTextNode(myData[i][0]);
        mySelect.appendChild(myOption.cloneNode()).appendChild(myValue);
        }
    myContainer.appendChild(mySelect);
}
Go back to the Component panel and change the Post Execution function of our Query Component to the following:
function(){
  cdeBootstrapSelect('html_db_connection_picker',result_fetch_db_connections);
}
Note: The second argument is without quotation marks as we are passing the actual result set along. Our code is reusable now - we can build several other select components of the same type without duplicating the code. It’s still quite basic code, but we can extend the functionality in future.
Now the question is of course, how can my custom form components interact with other components? The code below shows a generic implementation of the above code with the addition of an event listener. The code below supports cascading selects: Imagine you have several selects that deplend on each other.
- Only the relevant selects are shown (and not all selects).
- If the user decides to change a value further up the select tree, irrelevant child selects will be automatically removed.
function bissolCreateSelect(myCdeContainerId, myDashboardObjectId, myLabelText, myData, cdeParam){
    //document.getElementById('html_db_connection_picker').innerHTML = JSON.stringify(result_fetch_db_connections);

    console.log(myDashboardObjectId + " with following values: " + JSON.stringify(myData));

    // 1. Check if data is available
    if(myData.length > 0){

        var myLabel = '<label for="' + myDashboardObjectId + '">' + myLabelText + '</label>';

        var myOptions = '<option disabled selected>Please select an option...</option>';

        $.each(myData, function(i, val){
           myOptions += '<option>' + val + '</option>';
        });

        var mySelect = '<select id="' + myDashboardObjectId  + '" class="form-control">'
            + myOptions + '</select>';

        // Check if select exists
        // if it exists ...
        if($('#' + myDashboardObjectId).length){
            Dashboards.fireChange(cdeParam,null);
        }

        $('#' + myCdeContainerId).empty() // empty in case there is already a select
        $('#' + myCdeContainerId).append(myLabel + mySelect);

        $('#' + myDashboardObjectId).on('change', function(){
            Dashboards.fireChange(cdeParam, $( this ).find('option:selected').val());
        });
    }
    // if no data is available remove any existing selects
    else {
        $('#' + myCdeContainerId).empty();
        Dashboards.fireChange(cdeParam,null);
    }
}
This is all written in plain JavaScript - to make things a bit easier you could just make use of JQuery as well.
This function can be referenced from the Post Execution property of the Query Component in the following fashion in example:
function(){
    bissolCreateSelect('html_db_connection_picker', 'dbConnectionPicker', 'Choose Connection:', result_fetch_db_connections, 'param_db_connection');
}
An important concept to understand is that however complicated your form may be, you should always link one selector to a CDE parameter (which can be created via javascript function Dashboards.setParameter() or the CDE GUI). Just make sure that you update the value of this parameter once the value in the selector changes. You can use the Dashboards.fireChange(parameter, value) function to do just this. Remember, that the values are then always stored in these CDE parameters, so there is no need to create an extra array or similar to hold the selected values. You can easily retrieve the value of a given parameter by using the JavaScript function Dashboards.getParameterValue(parameter). I have mentioned a few CDF JavaScript functions so far: I guess you are wondering by now, what other ones are available! How do you get hold of them? Probably one of the easiest ways to get a list of all functions etc. is to preview your Dashboard, fire up your browser’s developer tools and type Dashboards. into the JavaScript console and wait until auto-completion kicks in:
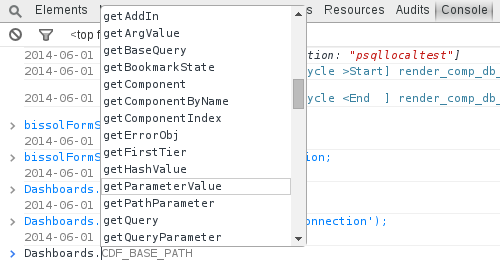
In case you are more curious, you can search for the Dashboard.js file in your biserver/pentaho-solutions/system folder. In older versions you could find it in the pentaho-cdf/js folder.
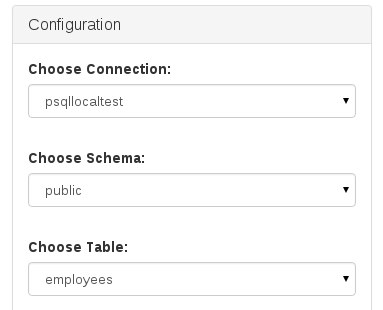
Note: If you have a set of cascading selects, you do not have to pass all parameters for each step in your JavaScript. In example the picture below depicts a scenario where the user can choose first the database connection, then the database schema and finally the table. In each step, there is one more parameter required to query the options. In the JavaScript, at each step only one parameter is passed: So there is no need to pass both the selected database name and schema name to the table select (which it depends on), but only the schema name (via the
Dashboards.fireChange()function), because the other parameter values are already stored. So in your CDE Query Component for the table selector you would define the schema name parameter as Listener and specify the database name and schema name parameters in the Parameters property.
Let’s now take a look at checkboxes. We will continue with the example mentoined above. Imagine that after selecting the table, we want the user to select some columns of the table. A bootstrap style checkbox is made up of following syntax:
  <div class="checkbox">
    <label>
      <input name="fruit" type="checkbox" value="orange">orange
    </label>
  </div>
Our JavaScript version (part of the resource file) could look something like this then:
function bissolCreateCheckboxSet(myCdeContainerId, myDashboardObjectId, myLabelText, myData, cdeParam){

    // create main container which holds all the checkboxes
    var myCheckboxSetContainer = '<div id="' + myDashboardObjectId + '"><label>' + myLabelText + '</label></div>';

    // 1. Check if data is available
    if(myData.length > 0){

        var myCheckboxes = '';
        $.each(myData, function(i, val){
            myCheckboxes +=
            '<div class="checkbox">' +
            '<label>' +
            '<input type="checkbox" name="' + cdeParam + '" value="' + myData[i][0] + '"></input>' +
            myData[i][0] + '</label>' +
            '</div>';
        });

        // Check if checkbox exists
        if($('#' + myDashboardObjectId).length){
            Dashboards.fireChange(cdeParam,'');
        }

        $('#' + myCdeContainerId).empty(); //if checkbox exists remove
        $('#' + myCdeContainerId).append(myCheckboxSetContainer);
        $('#' + myDashboardObjectId).append(myCheckboxes);

        $('#' + myDashboardObjectId).find('input[type=checkbox]').on('change', function(){

            var myCheckedValues = [];

            $('#' + myDashboardObjectId + ' input:checkbox:checked').each(function() {
                myCheckedValues.push($(this).val());
            });

            // fire change
            Dashboards.fireChange(cdeParam,myCheckedValues);
            console.log('Setting parameter ' + cdeParam + ' to: ' + myCheckedValues);
        });

    }
    // if no data is available remove any existing selects
    else {
        $('#' + myCdeContainerId).empty();
        Dashboards.fireChange(cdeParam,'');
    }
}
And you can call this function via the Post Execution property of the Query Component like this:
function(){
    bissolCreateCheckboxSet('html_db_column_picker','dbColumnPicker', 'Choose Columns:', result_fetch_db_columns, 'param_db_column');
}
This is how our selects look so far:
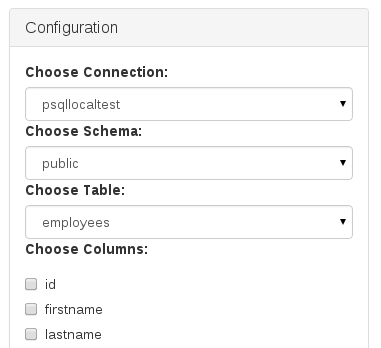
The idea is that as soon as a user ticks a checkbox, the subsequent form item or button gets displayed.
The last thing to do is to write the JavaScript which displays a submit button once a checkbox is ticked. Let’s create the button structure:
function bissolCreateButton(myCdeContainerId, myDashboardObjectId, myLabelText, cdeParamIncoming, cdeParam){

    var myExistingButtons = $('#' + myDashboardObjectId);

    if(!!Dashboards.getParameterValue(cdeParamIncoming) && Dashboards.getParameterValue(cdeParamIncoming).length > 0){
        // check if select already exists otherwise create
        if(myExistingButtons.length === 0){
            $('#' + myCdeContainerId).append('<button type="submit" id="' + myDashboardObjectId + '" class="btn btn-primary bissolConfigSubmit">' + myLabelText + '</button>');

            $('#' + myDashboardObjectId).on('click', function(){
                Dashboards.fireChange(cdeParam,'save');
            });
        }
    } else {
        // remove button
        $('#' + myCdeContainerId).empty();
    }

}
So the idea is that we have to listen to a specific paramter - and only when this parameter has a value, we want to crate this button. If the parameter has no value, the button must be removed. How do we achieve this?
An easy way to implement this is to use the Freeform Component. Just set its Listener to the specific parameter which should trigger the action and the Custom Script to the following:
function(){
    bissolCreateButton('html_submit','config-submit','Submit','param_db_column','param_config_save');
}
Now our dynamic form should be working!
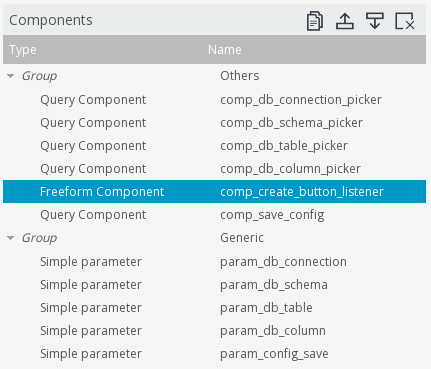
Just to recap: This is how the Components were set up:
This is the HTML code I used within the html element in the Layout Structure:
<div class="panel panel-default bissolConfigBox">
  <div class="panel-heading">
    <h3 class="panel-title">Configuration</h3>
  </div>
  <div class="panel-body">
    <div id="html_db_connection_picker"></div>
    <div id="html_db_schema_picker"></div>
    <div id="html_db_table_picker"></div>
    <div id="html_db_column_picker"></div>
  </div>
  <div id="html_submit"></div>
</div>
I hope this tutorial gave you a good idea on how flexible Pentaho Community Dashboards really are. And the really exciting point is that you can all implement this using standard HTML technologies!