Recently I realized that I hadn’t written a blogpost about Pentaho Data Integration (Kettle) for a long time, so it’s time to focus on this again:
Dan Keeley published an interesting blogpost on installing the Cloudera Hadoop distribution some time ago to illustrate a way to test PDI with Hadoop on an environment with limited resources.
In this article I’d like to explain how to set up Vanilla Hadoop and configure PDI for it. For our development evironment we might only need HDFS and Hive. Although setting up Hadoop might sound like an extremely complex task, the reality is that it is usually fairly straight forward (unless you hit a few bugs). We will first install Apache Hadoop, then Apache Hive and finally configure Pentaho Data Integration to access these services. Pentaho Data Integration allows you to import data to Hadoop from a variate of sources (databases, text file etc), create MapReduce jobs and also export the data to a variety of destinations, all this via a simple to use GUI (without any coding). All this functionality is available in the open source edition! I bet you are really motivated by now, so let’s see how this is done:
Apache Hadoop and Hive Installation: Minimal Dev Environment
This article focuses on setting up a minimal Hadoop dev environment. There are certainly easier ways, e.g. using one of the VMs supplied by one of the major commercial Hadoop vendors: If you have a machine with enough memory this is certainly the most convenient way to go. However, you might not want to sacrifice a vast amount of RAM or not have such a high spec machine, so setting up Hadoop natively on your machine is the way to go. It might not be the easiest way, but you’ll certainly learn a few interesting details on the way - that’s what any great journey is about!
If you very interested in Hadoop, I can strongely recommend the excellent book Hadoop - The Definitive Guide by Tom White.
Installing HDFS
Downloading the required files
You can download the files directly from the Apache Hadoop website or they might be available via your packaging system (e.g. on Fedora it is available via yum or dnf). The instructions here will mainly follow my setup on Mac OS X - your milage may vary.
On Mac OS X you can alternatively install Hadoop via Homebrew: brew install hadoop, in which case all the files will be located in /usr/local/Cellar/hadoop/<version>.
I assume you have JDK already installed: Check that you are using the correct supported Java version.
I added the hadoop files under /Applications/Development/Hadoop, you can choose any other suitable directory.
Add the following to ~/.bash_profile (adjust if required):
## HADOOP

export HADOOP_HOME=/Applications/Development/Hadoop/hadoop-2.6.0
export PATH=$PATH:$HADOOP_HOME/sbin
export PATH=$PATH:$HADOOP_HOME/bin
JAVA_HOME must be set in ~/.bash_profile already.
Next we have to enable passwordless login:
In regards to ssh there is not much to do on Mac OS X: Just make sure that you enable Remote Login via the Mac OS X System Settings > Sharing. There is no need to install anything else. Linux Users might have to install ssh and openssh-server.
Generate a new SSH key with an empty passphrase:
ssh-keygen -t rsa -P '' -f ~/.ssh/hadoop_rsa
cat ~/.ssh/hadoop_rsa.pub >> ~/.ssh/authorized_keys
Make sure you add your key via ssh-add (required on Mac OS X, on Linux only if you are running ssh-agent), e.g.:
ssh-add ~/.ssh/hadoop_rsa
Only this makes the password-less login possible!
Now test if you can login without a password:
ssh localhost
You should not be prompted for a password!
Next configure Hadoop:
All the config file are located in <HADOOP_HOME>/etc/hadoop>.
For pseudo-distributed node add this:
core-site.xml:
<configuration>
  <property>
    <name>fs.defaultFS</name>
    <value>hdfs://localhost</value>
  </property>
</configuration>
Note: The default port for HDFS (the namenode) will be
8020. You can however set the port as well in the config above like so:hdfs://localhost:9000.
hdfs-site.xml:
Option 1: data gets stored in /tmp directory.
<configuration>
  <property>
    <name>dfs.replication</name>
    <value>1</value>
  </property>
</configuration>
Option 2: Dedicated permanent data directory. You do not have to create the directories on the file system upfront - it will be created automatically for you.
<configuration>
  <property>
    <name>fs.defaultFS</name>
    <value>hdfs://localhost</value>
  </property>
  <property>
    <name>dfs.data.dir</name>
    <value>/Users/diethardsteiner/hdfs/datastore/data</value>
  </property>
  <property>
    <name>dfs.name.dir</name>
    <value>/Users/diethardsteiner/hdfs/datastore/name</value>
  </property>
</configuration>
Note: All possible properties and default values for
hdfs-site.xmlyou can find here.
Next:
mapred-site.xml:
<configuration>
  <property>
    <name>mapreduce.framework.name</name>
    <value>yarn</value>
  </property>
</configuration>
Note: All possible properties and default values for
mapred-site.xmlyou can find here.
And finally:
yarn-site.xml:
<configuration>
  <property>
    <name>yarn.nodemanager.aux-services</name>
    <value>mapreduce_shuffle</value>
  </property>
  <property>
    <name>yarn.nodemanager.aux-services.mapreduce.shuffle.class</name>
    <value>org.apache.hadoop.mapred.ShuffleHandler</value>
  </property>
  <property>
    <name>yarn.resourcemanager.scheduler.address</name>
    <value>localhost:8030</value>
  </property>
  <property>
    <name>yarn.resourcemanager.address</name>
    <value>localhost:8032</value>
  </property>
  <property>
     <name>yarn.resourcemanager.webapp.address</name>
     <value>localhost:8088</value>
  </property>
  <property>
     <name>yarn.resourcemanager.resource-tracker.address</name>
     <value>localhost:8031</value>
  </property>
  <property>
     <name>yarn.resourcemanager.admin.address</name>
     <value>localhost:8033</value>
  </property>
  <property>
    <name>yarn.nodemanager.vmem-check-enabled</name>
    <value>false</value>
    <description>Whether virtual memory limits will be enforced for containers</description>
  </property>
  <property>
    <name>yarn.nodemanager.vmem-pmem-ratio</name>
    <value>4</value>
    <description>Ratio between virtual memory to physical memory when setting memory limits for containers</description>
  </property>
</configuration>
Note: All possible properties and default values for
yarn-site.xmlyou can find here.
Now we can format the namenode:
hdfs namenode -format
Pay attention to the last few lines of the log output, where you will find the root directory of your HDFS file system, e.g.: /tmp/hadoop-diethardsteiner/dfs/name.
To start HDFS, YARN and MapReduce, run the below commands (this can be run from any directory):
IMPORTANT: Before you start Hadoop, make sure that HDFS is formatted. Even after the original setup it might be necessary to do this upfront as the HDFS directory might be located in
/tmp(and hence gets lost each time you restart your machine).
start-dfs.sh
start-yarn.sh
mr-jobhistory-daemon.sh start historyserver
Check that the following websites are accessible:
Create user directory:
hdfs dfs -mkdir -p /user/$USER
Browse the file system:
hdfs dfs -ls /
Inside the root folder of your Hadoop installation try to run this map-reduce job to check everything is working (amend version number).
Note: The first command will put the file directly into the current user’s HDFS directory (so make sure it exists). So although only
inputis mentioned, it will automatically be expande to/user/$USER/input.
hdfs dfs -put etc/hadoop input
# remove one directory that would cause problems with map-reduce job we will run
# this didn't happen in version 2.6 but in 2.8
hdfs dfs -rm -r /user/dsteiner/input/hadoop
# check that the input dir got created
hdfs dfs -ls /user/diethardsteiner/input
# make sure to amend the version if required
# hadoop jar share/hadoop/mapreduce/hadoop-mapreduce-examples-2.6.0.jar grep input output 'dfs[a-z.]+'  # old version, use this instead
yarn jar share/hadoop/mapreduce/hadoop-mapreduce-examples-2.6.0.jar grep input output 'dfs[a-z.]+'
# check for output files
hdfs dfs -ls /user/diethardsteiner/output
Note: The
yarn jarcommand replaces the olderhadoop jarcommand. See YARN docu VS Hadoop Docu.
Solving Problems
Note: If the map-reduce job fails, go to the Resource Manager website, click on the application id link, then on the logs for one of the attempts, then on the stderr.
ResourceManager not starting up
Scenario: You run jps and cannot see ResourceManager in the returned list. You can also not access http://localhost:8088. However, when you run ps -ef | grep yarn you can see that the daemons are running.
Solution: Check if port 8088 is already taken by another process:
sudo netstat -lanp | grep 8088
If this returns something another process is already using this port. You have two options now: Either stop the other process or change the port for the ResoureManager Web UI.
MacOS: Java no such file or directory
In my case it said: /bin/bash: /bin/java: No such file or directory. This is an issue particular to Mac OS X and the workaround is to amend the $HADOOP_HOME/libext/hadoop-config.sh file:
Replace this:
 # On OSX use java_home (or /Library for older versions)
   if [ "Darwin" == "$(uname -s)" ]; then
       if [ -x /usr/libexec/java_home ]; then
           export JAVA_HOME=($(/usr/libexec/java_home))
       else
           export JAVA_HOME=(/Library/Java/Home)
       fi
   fi
    ...
with this:
   # On OSX use java_home (or /Library for older versions)
    if [ "Darwin" == "$(uname -s)" ]; then
        if [ -x /usr/libexec/java_home ]; then
            export JAVA_HOME=$(/usr/libexec/java_home)
        else
            export JAVA_HOME=/Library/Java/Home
        fi
    fi
Now restart Yarn: stop-yarn.sh && start-yarn.sh. And try to run the MapReduce example again.
Running Beyond Virtual Memory Limits Error 143
Scenario: When running the map-reduce job, you get following error …
17/11/24 21:27:11 INFO mapreduce.Job: Job job_1511556774115_0007 failed with state FAILED due to: Application application_1511556774115_0007 failed 2 times due to AM Container for appattempt_1511556774115_0007_000002 exited with  exitCode: -103
Failing this attempt.Diagnostics: Container [pid=13437,containerID=container_1511556774115_0007_02_000001] is running beyond virtual memory limits. Current usage: 345.4 MB of 2 GB physical memory used; 4.6 GB of 4.2 GB virtual memory used. Killing container.
...
Container killed on request. Exit code is 143
Solution: As stated in this post on stackoverflow: There is a check placed at Yarn level for Vertual and Physical memory usage ratio. Issue is not only that VM doesn’t have sufficient pysical memory. But it is because Virtual memory usage is more than expected for given physical memory.
Note : This is happening on Centos/RHEL 6/Fedora due to its aggressive allocation of virtual memory.
It can be resolved either by :
- Disable virtual memory usage check by setting
yarn.nodemanager.vmem-check-enabledtofalse. - Increase VM:PM ratio by setting
yarn.nodemanager.vmem-pmem-ratioto some higher value.
Add following property in yarn-site.xml:
  <property>
    <name>yarn.nodemanager.vmem-check-enabled</name>
    <value>false</value>
    <description>Whether virtual memory limits will be enforced for containers</description>
  </property>
  <property>
    <name>yarn.nodemanager.vmem-pmem-ratio</name>
    <value>4</value>
    <description>Ratio between virtual memory to physical memory when setting memory limits for containers</description>
  </property>
Final instructions
To stop them, run:
mr-jobhistory-daemon.sh stop historyserver
stop-yarn.sh
stop-dfs.sh
Now that we know that everything is working, let’s fine-tune our setup. Ideally we should keep the config files (all *site.xml files) separate from the install directory (so that it is e.g. easier to upgrade). I copied these files to a dedicated Dropbox folder and use the HADOOP_CONFIG_DIR environment variable to point to it. Another benefit is that now I can use the same config files for my dev environment on another machine.
Note: It seems like you have to copy all files in this conf directory, as I saw error messages that e.g. the slaves file could not be found.
Add the below e.g. to .bash_profile:
export HADOOP_CONF_DIR=/Users/diethardsteiner/Dropbox/development/config/hadoop
To conveniently start and stop HDFS, we will create dedicated scripts which we store outside the install directory:
Option 1: HDFS data directory is specified as /tmp (this is the default):
start-hadoop.sh:
hdfs namenode -format
start-dfs.sh
start-yarn.sh
mr-jobhistory-daemon.sh start historyserver
stop-hadoop.sh:
mr-jobhistory-daemon.sh stop historyserver
stop-yarn.sh
stop-dfs.sh
Option 2: HDFS data directory is permanent
start-hadoop.sh:
start-dfs.sh
start-yarn.sh
mr-jobhistory-daemon.sh start historyserver
stop-hadoop.sh:
mr-jobhistory-daemon.sh stop historyserver
stop-yarn.sh
stop-dfs.sh
Then source the bash profile file.
Command Line Utilities
You’ve already been exposed to the two essential commands:
hdfs: Documentationyarn: Documentation
Installing Hive
Initial Setup
Some sources mention to first create the dedicated Hive directory on HDFS, however, this is not really necessary, as once you create a managed Hive table, Hive will automatically create this directory:
hadoop fs -mkdir -p /user/hive/warehouse
hadoop fs -chmod g+w /user/hive/warehouse
You will also need a permanent HDFS directory, because otherwise the Metastore will get confused (as the HDFS data gets delete with every restart of the machine).
Download Hive from here and extract it in a convenient location.
Add this e.g. to .bash_profile:
export HIVE_HOME=/Applications/Development/Hadoop/apache-hive-0.14.0-bin
export PATH=$PATH:$HIVE_HOME/bin
Source .bash_profile and then you can start the Hive shell like this:
WARNING: When issuing the below command, the Hive Metastore will be created in the same directory as the command was issued from. For this reason make sure that you are in a suitable directory before issuing this command the first time. The Metastore is stored in a directory called
metastore_db. For this mode an embedded Derby database is used, to which only one user at a time can connect.
hive
Now issue SQL commands like SHOW TABLES etc.
If Hive returns errors on startup and then exits, search the log for errors. If there is not enough info, run Hive in debug mode:
hive -hiveconf hive.root.logger=DEBUG,console
Setting up a local metastore
Let’s set up the local Metastore now so that more users can connect to Hive. In local mode all the metadata will be stored in a good old relational database of your choice.
Note it is also possible to set up Derby to handle more than one connection: Instructions
Note: The metastore will not be created until the first SQL query hits it.
Create the database upfront (e.g. for PostgreSQL):
CREATE DATABASE hive_metastore_db;
-- CREATE DATABASE hive_stats;
Configuration (hive-site.xml)
Find the Metadstore Admin Manual here.
Find some info on how to configure the Hive Stats DB here.
Add the respective JDBC driver to $HIVE_HOME/lib directory.
In the $HIVE_HOME/conf directory take a copy of hive-default.xml.template and rename it to hive-site.xml.
Note: Since Hive 0.14 you can put all Metastore specific settings into
hivemetastore-site.xmland HiveServer2 specific settings intohiveserver2-site.xml. This is optional, so you can still stick everything intohive-site.xml. A few properties, likehive.metastore.urisare expected to be in bothhive-site.xmlandhivemetastore-site.xml, so for simplicity sake, we progress with using justhive-site.xml.
Open this file and delete everything between the <configuration> tags and then add this inside it (adjust to your settings):
This is an example for PostgreSQL:
PostgreSQL:
<configuration>
  <property>
    <name>javax.jdo.option.ConnectionURL</name>
    <value>jdbc:postgresql://localhost:5432/hive_metastore_db</value>
    <description>JDBC connect string for a JDBC metastore</description>
  </property>
  <property>
    <name>javax.jdo.option.ConnectionDriverName</name>
    <value>org.postgresql.Driver</value>
    <description>Driver class name for a JDBC metastore</description>
  </property>
  <property>
    <name>javax.jdo.option.ConnectionUserName</name>
    <value>postgres</value>
    <description>username to use against metastore database</description>
  </property>
  <property>
    <name>javax.jdo.option.ConnectionPassword</name>
    <value>postgres</value>
    <description>password to use against metastore database</description>
  </property>
  <property>
    <name>datanucleus.autoStartMechanism</name>
    <value>SchemaTable</value>
  </property>
  <property>
    <name>datanucleus.fixedDatastore</name>
    <value>true</value>
    <description/>
  </property>
  <property>
    <name>datanucleus.autoCreateSchema</name>
    <value>false</value>
    <description/>
  </property>
  <property>
    <name>hive.metastore.uris</name>
    <value>thrift://127.0.0.1:9083</value>
    <description/>
  </property>
  <property>
    <name>hive.server2.enable.doAs</name>
    <value>false</value>
  </property>
  <!-- only MySQL supported
  <property>
    <name>hive.stats.dbclass</name>
    <value>jdbc:postgresql</value>
    <description/>
  </property>
  <property>
    <name>hive.stats.dbconnectionstring</name>
    <value>jdbc:postgresql://localhost:5432/hive_stats?user=postgres&password=postgres</value>
    <description/>
  </property>
  <property>
    <name>hive.stats.jdbcdriver</name>
    <value>org.postgresql.Driver</value>
    <description/>
  </property>
  <property>
    <name>hive.aux.jars.path</name>
    <value>file:///home/dsteiner/apps/apache-hive-2.1.1-bin/lib/postgresql-42.0.0.jar</value>
    <description/>
  </property>
  -->
</configuration>
MySQL: Make sure the DB user has a password otherwise it will not work.
<configuration>
<property>
<name>javax.jdo.option.ConnectionURL</name>
<value>jdbc:mysql://localhost:3306/hive_metastore_db?createDatabaseIfNotExist=true</value>
<description>JDBC connect string for a JDBC metastore</description>
</property>
<property>
<name>javax.jdo.option.ConnectionDriverName</name>
<value>com.mysql.jdbc.Driver</value>
<description>Driver class name for a JDBC metastore</description>
</property>
<property>
<name>javax.jdo.option.ConnectionUserName</name>
<value>root</value>
<description>username to use against metastore database</description>
</property>
<property>
<name>javax.jdo.option.ConnectionPassword</name>
<value>root</value>
<description>password to use against metastore database</description>
</property>
<property>
<name>hive.metastore.warehouse.dir</name>
<value>/user/hive/warehouse</value>
<description>location of default database for the warehouse</description>
</property>
<property>
<name>datanucleus.autoStartMechanism</name>
<value>SchemaTable</value>
</property>
<property>
<name>datanucleus.fixedDatastore</name>
<value>true</value>
<description/>
</property>
<property>
<name>datanucleus.autoCreateSchema</name>
<value>false</value>
<description/>
</property>
<property>
<name>hive.metastore.uris</name>
<value>thrift://127.0.0.1:9083</value>
<description/>
</property>
<property>
<name>hive.server2.enable.doAs</name>
<value>false</value>
</property>
<!--
<property>
<name>hive.stats.dbclass</name>
<value>jdbc:mysql</value>
</property>
<property>
<name>hive.stats.jdbcdriver</name>
<value>com.mysql.jdbc.Driver</value>
</property>
<property>
<name>hive.stats.dbconnectionstring</name> <value>jdbc:mysql://<stats_mysql_host>:3306/<stats_db_name>?useUnicode=true&characterEncoding=UTF-8&
user=<stats_user>&password=<stats_password></value>
</property>
<property>
<name>hive.aux.jars.path</name>
<value>file:///usr/share/java/mysql-connector-java.jar</value>
</property>
-->
</configuration>
Note: These are the correct settings as well for using HiverServer2. The last 3 properties I copied from the CDH VM Hive settings.
Create the tables:
schematool --verbose -dbType postgres -initSchema
Some notes on certain properties:
hive.server2.enable.doAs: This is related to HiveServer2, which we will take a look at a bit later on. When connecting via a client to HiveServer2, this property specifies whether HiveServer2 should impersonate the connected user or not. For our little and simple set up we want to disable this so that we can log on without username and password.
Note that you can configure various authentication mechanisms via HiveServer2, see here for more details.
You also see a commented section for the Hive Stats DB:
hive.stats.dbclasshive.stats.dbconnectionstringhive.stats.jdbcdriver
Note: Hive table statistics are not supported for PostgreSQL or Oracle - MySQL only!
The reason why I commented/disabled them is that table and column stats show up with out this extra DB any ways. You can check this be running e.g.:
CREATE TABLE test (foo STRING, bar STRING);

ANALYZE TABLE test COMPUTE STATISTICS;
DESCRIBE EXTENDED test;
ANALYZE TABLE test COMPUTE STATISTICS FOR COLUMNS;
DESCRIBE EXTENDED test;

-- this one shows up in the metastore, not the dedicated stats db
SELECT * FROM "TAB_COL_STATS";
I am not too sure what the purpose of this dedicated stats database is, the manual says that it stores temporary hive statistics … but no more details are given.
The Metastore has to run as a service. Start it like this:
hive --service metastore
You might get following error:
MetaException(message:Version information not found in metastore. )
Just as an interesting side node: This days Hive includes a Hive Schema Tool, which can be used to verify if the Metastore schema is suitable for the version of Hive used. It also enables you via a command line tool to initialise (create) the schema and also upgrade it from one version to the next. The error message we saw above is returned by the schema validator of this very tool, but in our case it means that some tables are missing. To resolve the issue, we can simply use this command:
schematool -dbType postgres -info
In my case this returned:
org.apache.hadoop.hive.metastore.HiveMetaException: Failed to get schema version.
Underlying cause: org.postgresql.util.PSQLException : ERROR: relation "VERSION" does not exist
When I checked which tables existed (using psql), I saw that only a few tables were created. I recreated the database and create the schema with the Hive schematool:
# drop existing database
psql -Upostgres -c "DROP DATABASE hive_metastore_db;"
# create database
psql -Upostgres -c "CREATE DATABASE hive_metastore_db;"
# create the hive metastore schema
schematool --verbose -dbType postgres -initSchema
# validate hive metastore schema
schematool -dbType postgres -info
# start hive metastore service
hive --service metastore
So taking the learnings from this error, it is better if we use the schematool to create the schema instead of the datanucleus.autoCreateSchema=true setting in the hive-site.xml.
Another note on using PostgreSQL with Hive. Since most of the metastore tables are in upper case, you have to quote them when selecting from them:
hive=# SELECT * FROM VERSION;
ERROR:  relation "version" does not exist
LINE 1: SELECT * FROM VERSION;
                      ^
hive=#
hive=# SELECT * FROM "VERSION";
 VER_ID | SCHEMA_VERSION |      VERSION_COMMENT
--------+----------------+----------------------------
      1 | 2.1.0          | Hive release version 2.1.0
Now start the Hive CLI in a new terminal tab like this to see the log output in the terminal:
hive --hiveconf hive.root.logger=INFO,console
And finally, another note on PostgreSQL: If you are tempted to use a dedicated schema within the database, don’t try, it won’t work. The reason for this is that within the Metastore DDL the search_path is set to public, so this schema is used even if you try to add searchpath=<yourSchema> or currentSchema=<yourSchema> to the connection URL. You can find the metastore DDL following folder:
scripts/metastore/upgrade/postgres/
# there is one file for each version, example:
scripts/metastore/upgrade/postgres/hive-schema-0.14.0.postgres.sql
For MySQL I got following error:
ERROR DataNucleus.Datastore: Error thrown executing CREATE TABLE `SERDE_PARAMS`
(
    `SERDE_ID` BIGINT NOT NULL,
    `PARAM_KEY` VARCHAR(256) BINARY NOT NULL,
    `PARAM_VALUE` VARCHAR(4000) BINARY NULL,
    CONSTRAINT `SERDE_PARAMS_PK` PRIMARY KEY (`SERDE_ID`,`PARAM_KEY`)
) ENGINE=INNODB : Specified key was too long; max key length is 767 bytes
com.mysql.jdbc.exceptions.jdbc4.MySQLSyntaxErrorException: Specified key was too long; max key length is 767 bytes
To fix this run:
ALTER DATABASE hive_metastore_db character set latin1;
USE hive_metastore_db;
CREATE TABLE `SERDE_PARAMS`
(
    `SERDE_ID` BIGINT NOT NULL,
    `PARAM_KEY` VARCHAR(256) BINARY NOT NULL,
    `PARAM_VALUE` VARCHAR(4000) BINARY NULL,
    CONSTRAINT `SERDE_PARAMS_PK` PRIMARY KEY (`SERDE_ID`,`PARAM_KEY`)
) ENGINE=INNODB
;
You should be able to start Hive CLI without problems now.
Since Hive is moving away from MapReduce to Spark, you should also have a look at Hive on Spark: Getting Started
HiveServer2
To connect to Hive via JDBC (and beeline client, which uses JDBC), we have to set up HiveServer2.
Note: These days Hive supports transactions (ACID) and also the
UPDATEandDELETEcommand. These features rely on dedicated locking tables in the metastore tables, which are managed by at least one Zookeeper instance (Source). For our setup, we do not require any of these features and hence also not Zookeeper.
Configuring HiveServer2: For the very basic setup no configuration is required. If you require transaction etc, then you will have to amend the configuration details. See for more details Setting Up HiveServer2
Next let’s start HiveServer2:
hiveserver2
Or to output the log to the console use (RECOMMENDED):
hiveserver2 --hiveconf hive.root.logger=INFO,console
I found following error message in the log output:
ERROR DataNucleus.Datastore: An exception was thrown while adding/validating class(es) : Specified key was too long; max key length is 767 bytes
To fix this I first dropped the DB and recreated it:
DROP DATABASE hive_metastore_db;
CREATE DATABASE hive_metastore_db character set latin1;
Then I executed scripts/metastore/update/hive-schema-0.14.0.mysql.sql. After restarting the HiveServer2 the error message was gone.
If HiveServer2 started successfully, try to connect via beeline:
$ beeline
beeline> !connect jdbc:hive2://localhost:10000
You will be prompted for username and password, which you can leave empty.
Errors
I got following error (essential bits shown only):
Error: Could not establish connection to jdbc:hive2://localhost:10000: Required field 'serverProtocolVersion' is unset!
...
errorCode:0, errorMessage:Failed to open new session: java.lang.RuntimeException: org.apache.hadoop.ipc.RemoteException(org.apache.hadoop.security.authorize.AuthorizationException): User: dsteiner is not allowed to impersonate dsteiner), serverProtocolVersion:null) (state=08S01,code=0)
This was related to hive.server2.enable.doAs. Setting it to false solved the problem.
Validate Hive Installation
-
Make sure the hive database (e.g. MySQL) is up and running
-
Start the metastore service:
nohup hive --service metastore>/tmp/hive.out 2>/tmp/hive.log & -
Test Hive:
hive show databases; create table test(col1 int, col2 string); show tables; exit; -
Start HiveServer2:
nohup hiveserver2 > /tmp/hiveserver2.out 2> /tmp/hiveserver2.log & tail -f /tmp/hiveserver2.log -
Open Beeline command line shell to interact with HiveServer2.
 beeline
 !connect jdbc:hive2://localhost:10000
You will be asked for:
-
username: currently logged in user, e.g.
diethardsteiner -
password:
password(actually it works without specifying a password at all)
More info: Apache Wiki Reference
Creating Start and Stop Scripts
If everything worked as expected, we can create the following shell files to conveniently start and stop the Hive services (adjust the DB commands).
In a convenient folder outside the Hive install directory place these start and stop scripts (and amend if necessary). You should place them in the same folder as you put the HDFS start and stop scripts.
start-hive.sh:
mysql.server start
nohup hive --service metastore>/tmp/hive.out 2>/tmp/hive.log &
nohup hiveserver2 > /tmp/hiveserver2.out 2> /tmp/hiveserver2.log &
stop-hive.sh: This this one on your OS - this is my custom version for Mac OS X.
ps -ef | grep hive | awk '{print $2}' | head -n2 | xargs kill -9
mysql.server stop
Find some more interesting info on the Hortonworks Wiki.
More info on Hive Clients.
Final Cross Check - Basic Hadoop Setup
Check that all processes are running. A very quick way to do so is using jps:
$ jps
4066 JobHistoryServer
3811 NodeManager
3238 DataNode
3463 SecondaryNameNode
4458 Jps
3053 NameNode
4222 RunJar
3646 ResourceManager
4223 RunJar
Pentaho Data Integeration (PDI) and Hadoop
Installing PDI
It’s extremely easy to install PDI: Just download the latest version from Sourceforge, unzip the folder and place it in a convientent location (e.g. Applications folder).
Configurating PDI
Any Hadoop Distro except Apache
This section is a general overview for any Hadoop distro - if you followed the previous Hadoop tutorial, the next section will be the ideal fit!
- In order to tell PDI which Hadoop distro you are using, you have to adjust the properties file in
data-integration/plugins/pentaho-big-data-plugin/plugin.properties. Amendactive.hadoop.configurationto your respective Hadoop setup (suitable values can be found in the folder names indata-integration/plugins/pentaho-big-data-plugin/hadoop-configurations). If you are using any additional Kettle plugins list them inpmr.kettle.additional.pluginsso that they are distributed across the HDFS cluster as well. -
Copy all your
*-site.xmlconfiguration files from your distro (in our case the most of the files we configured earlier on for Apache Hadoop and Hive) into thedata-integration/plugins/pentaho-big-data-plugin/hadoop-configurations/<hadoop-distro>folder. In our case the<hadoop-distro>ishdp*, which stands for Hortonworks Hadoop Distro. As there is no Pentaho Big Data Shim for Apache Hadoop and Hive, we use the Hortonworks Shim, as it is the closest match. Copy the following files:core-site.xmlhdfs-site.xmlhive-site.xmlyarn-site.xml
PDI EE version Only: If you are using CDH, PDI expects a secured/kerberised install. If you install is unsecured, amend data-integration/plugins/pentaho-big-data-plugin/cdh*/plugin.properties: comment out all the lines containing: activator.classes=<anything>. (This seems to be EE only)
Pentaho provides a few examples to get started in the Next Steps section on this page.
Sources:
Apache Hadoop OR Latest Hadoop Version Not Supported
If you are using the vanilla Apache Hadoop installation (so not Cloudera or similar), then there is one important point to consider: PDI ships with an ancient Big Data shim for this Apache Hadoop. The default PDI shim is hadoop-20 which refers to an Apache Hadoop 0.20.x distribution (Source), so don’t be fooled that the 20 suffix refers to the Hadoop 2.x.x release you just downloaded.
Matt Burgess suggested using the Hortenworks (HDP) shim instead (for the reason that Hortonworks feeds most of the in-house improvements back into the open source projects). This works fine out-of-the-box if you are only using HDFS directly (so copying files etc). To use MapReduce, we have to make a few amendments:
How to figure out which version of Hadoop a particular shim uses: Go into the <shim>/lib/client folder and see which version number the hadoop* files have. This will help you understand if your vanilla Hadoop distro version is supported or not. In my case I had vanilla Apache Hadoop 2.6.0 installed and required a shim that supported just this version. PDI-CE-5.3 ships with the hdp21 shim, which seems to support Hadoop 2.4. Luckily Pentaho had already a newer Hortonworks shim available: You can browse all the available Shims on Github and download a compiled version from Shims on CI (note this is PDI version specific, see notes further down also for detailed download instructions). The shim that supported the same version was hdp22.
Once download, I added this file to the other shims and extracted it. Then I adjusted following shim config files in pdi-ce-5.3/plugins/pentaho-big-data-plugin/hadoop-configurations/hdp22 (only amended sections mentioned). However what is shown below is not really necessary … just copy the config files from your Hadoop distro into the shim folder and the job is done. However, I outline what I did alternatively:
mapred-site.xml:
  <property>
    <name>mapreduce.jobhistory.address</name>
    <value>localhost:19888</value>
  </property>
yarn-site.xml:
  <property>

  <!--DS: Use this once you start using the external hadoop config dir
    <value>$HADOOP_CONF_DIR:$HADOOP_HOME/share/hadoop/common/*:$HADOOP_HOME/share/hadoop/common/lib/*:$HADOOP_HOME/share/hadoop/hdfs/*:$HADOOP_HOME/share/hadoop/hdfs/lib/*:$HADOOP_HOME/share/hadoop/yarn/*:$HADOOP_HOME/share/hadoop/yarn/lib/*
    </value>
  -->
      <value>$HADOOP_HOME/etc/hadoop:$HADOOP_HOME/share/hadoop/common/*:$HADOOP_HOME/share/hadoop/common/lib/*:$HADOOP_HOME/share/hadoop/hdfs/*:$HADOOP_HOME/share/hadoop/hdfs/lib/*:$HADOOP_HOME/share/hadoop/yarn/*:$HADOOP_HOME/share/hadoop/yarn/lib/*
      </value>

  </property>

  <property>
    <name>yarn.resourcemanager.hostname</name>
    <value>localhost</value>
  </property>

  <property>
    <name>yarn.resourcemanager.address</name>
    <value>${yarn.resourcemanager.hostname}:8032</value>
  </property>
Then don’t forget to adjust pdi-ce-5.3/plugins/pentaho-big-data-plugin/plugin.properties so that the correct shim is used:
active.hadoop.configuration=hdp22
All the configuration details are set up now.
For more details on how to adjust the PDI Shin to specific distributions see here.
Info about Shims:
- Precompiled additional shims (Not up-to-date), see Check for Pentaho Hadoop Distribution Support section
- Shims on Github
- Shims on CI: There are several shim sections, 5.3 is just one of them, so search around in the Big Data section and try to find the right one. Then click on Last Successful Artifacts, on the next page choose the shim you want from the folder. On the next page click on the
distfolder. Then finally all the files are shown. Choose the package file to download, e.g.pentaho-hadoop-shims-hdp22-package-5.3-SNAPSHOT.zip.
Using HDFS
How Do I Connect to HDFS?
To connect to Hadoop you connect directly to the HDFS namenode. How do you find out the exact port number? Either inspect core-site.xml or you go to the HDFS Namenode website, usually found on http://localhost:50070/dfshealth.html#tab-overview. The first heading will reveal the full URL with the port number, e.g.:
Overview 'localhost:8020' (active)
Specifying the Hadoop Cluster
Under View > Jobs > Hadoop Clusters right click and choose New.
You can specify connection settings for HDFS, JobTracker (this is a MR1 term, if you run MR2/Yarn this will be the ResourceMananger), Zookeper and Oozie. Only fill out the entries for the components you have installed and delete any defaults for the other components.
So my settings were:
HDFS:
- Hostname: localhost
- Port: 8020
- Username:
- Password:
Just to be clear (for our tutorial): there is no username or password to be specified!
JobTracker (which is really the ResourceMananger in MR2):
- Hostname: localhost
- Port: 8032
If you are not sure about the default Yarn Port, take a look at this reference.
These settings can be used in job entries like Pentaho MapReduce. Note that settings somehow do not get updated in the job if you change the cluster settings. In this case, open the Pentaho MapReduce job entry, click on the Cluster tab and then Edit next to the Connection input box. Just click OK to confirm the settings and save the job.
Additional Web UIs:
How to Test the Hadoop Connection
The Hadoop Cluster config panel doesn’t have a check connection option. However, the Hadoop Copy Files job entry has a Browse feature for File/Folder Destination, which will allow you to browse HDFS directories and hence will confirm if your connection details are correct.
Importing Data to HDFS
You have following options:
- Hadoop Copy Files job entry: This is similar to the
hadoop fs -putcommand, so this should only be used to import file to HDFS but not to move files within one HDFS cluster! - Text Output step: using VFS
- Hadoop File Output step: The VFS originally didn’t support HDFS hence this step was developed. It looks very similar to the Text Output step and there is no particular reason why you would use this step over the Text Output step.
- Sqoop job entry
Use these steps as well for Hive and Impala, just in this case you will have to let the Metastore know about the new data files. Do not use the Table Output step for importing data as it is not supported.
Note: Hadoop Copy Files and Hadoop File Output only support text (and CVS) files. Use Sqoop to store files directly as Parquet etc.
Reading HDFS Files and Outputting to HDFS
The Hadoop File Input and Hadoop File Output steps are designed to read data from and output data to HDFS. These steps only support the text and CSV data types.
Important: Do not use the Hadoop File Input to process data within Hadoop, as it will export all the data from Hadoop to PDI. Instead create a Pentaho MapReduce job or use Hive etc.
Example: Use the Hadoop File Input to prepare some data for a PRD report or export it to a relational database.
File Management Job Entries
File Management job entries all work with HDFS, although not all of them offer a Browse HDFS function. You can, however, specify the Apache VFS (virtual file system) path manually like so:
hdfs://<username>:<password>@<namenode>:<port>/
<folderpath>
What to Do Next
What these excellent introduction videos:
- Loading Data into Hadoop
- Introduction to Pentaho MapReduce
- Pentaho Hadoop Tutorials or this more up-to-date version
Using Hive
Specifying the Connection Details
Note: Normally you have to add a dedicated JDBC driver to the PDI lib directory in order to be able to connect to a certain DB. This is not required for Hive, as the respective driver is already part of the Big Data Shim.
In Spoon create a new database connection:
- Connection Type: Hadoop HiveServer2
- Host Name: localhost
- Port Number: 10000
- Username: currently logged in user ?? or user running the hive server2 process?? e.g. diethardsteiner
- Password: password
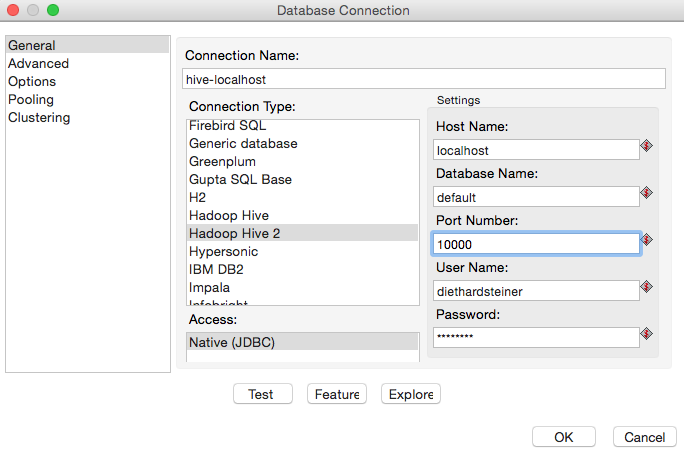
Click the Test button to make sure the connection details are correct. The database connection test should return a message similar to this one: Connection to database [hive-localhost] is OK.. Click OK twice. Then right click on the connection we just created and choose Share:
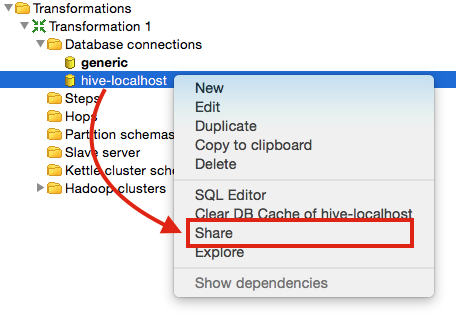
Next right click again on the connection name and choose Explore. This will open a new dialog window which will allow you to see the existing schemas and tables (among other things). You can e.g. right on a table name and see the first 100 rows, which is a very useful feature to get a bit accustomed to the available data.
Now we are all set to start exploring the exciting world of Hadoop and Hive!
What’s Not Supported
Hive does not support SQL Insert, Update or Delete Statements: Pentaho Table Output, Update and Delete steps do not work. Import files into the HDFS for the Hive tables using Hadoop Copy Files or use the Hadoop File Output step to create a file for Hive. Use other file management steps to create or move a file for Hive.
Notes on PDI Job entries and Steps
Hadoop Copy Files
Note: This job entry should be only used to copy local data to a HDFS cluster or from cluster to cluster. Do not use it to copy files within a cluster (because it would stream data through PDI) - use the file management job entries or shell scripts instead.
Important (Source): When not using Kerberos security, the Hadoop API used by this step sends the username of the logged in user when trying to copy the file(s) regardless of what username was used in the connect field. To change the user you must set the environment variable
HADOOP_USER_NAME. You can modify spoon.bat or spoon.sh by changing the OPT variable:
OPT="$OPT .... -DHADOOP_USER_NAME=HadoopNameToSpoof"
Next Steps
The follow up article on how to setup the fast Big Data query engine Presto is available here.