Note: There is a new article available here since the version below has been reworked and added to so many times that it by now does not really provide a very concise overview any more.
About a year ago Matt Casters, lead developer of Pentaho Data Integration (PDI), managed to get the approval by Pentaho to open source one of his internal projects focusing on adding unit testing functionality to PDI. This is a first look at what is available so far (as of Feb 2016 it is not feature complete), which should provide you a brief understanding of what has been achieved so far and hopefully get you on board to support this project!
Preparing the Sample
Start Spoon and create a new transformation.
Note: There is currently a bug with the
pentaho-pdi-datasetplugin which will make the Preview feature in Spoon fail (see bug report). Hence we will for now refrain from installing it as we have to prepare an example transformation. Once you are done with this tutorial, simply remove the plugin and all should be fine again.
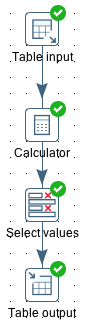
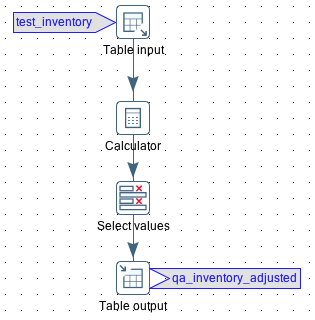
For demonstration purposes, let’s create an extremely simple transformation. Add the following steps in the specified order and connect them:
- Table Input
- Calculator
- Select Values
- Table Output
In a database of your choice (I use PostgreSQL for this example) create two tables as shown below (adjust SQL to your DB dialect):
CREATE TABLE test.inventory (
	item_name VARCHAR(120)
	, item_count INT
)
;

INSERT INTO test.inventory
VALUES
	('headphones', 20)
	, ('microphones', 17)
;

CREATE TABLE test.inventory_adjusted (
	item_name VARCHAR(120)
	, item_count INT
)
;
Back in Spoon create a new database connection so that we can access these new tables.
In the Table input step specify this database connection and specify the following query:
SELECT * FROM test.inventory;
In the Calculator step simply add 1 to item_count and store the result in item_count_new. In the Select values step keep the item_name and item_count_new fields - rename the latter one to item_count. Finally, in the Table output step specify inventory_adjusted as the target table.
Installation of the plugin
The extremely simple way
Download the jar file from the latest release and copy it into <pdi-root-dir>/plugins/pentaho-pdi-dataset. Job done.
Building it yourself
Close Spoon.
Clone the Git project in a convenient folder, e.g. ~/git:
$ git clone https://github.com/mattcasters/pentaho-pdi-dataset.git
Then build the plugin:
$ cd pentaho-pdi-dataset
$ ant
Once the build process finished successfully, you will find a file called pentaho-pdi-dataset-TRUNK-SNAPSHOT.jar in the dist folder. Next create a folder inside your PDI installations plugin folder and copy this file there (example only, adjust accordingly):
$ cd /Applications/Development/pdi-ce-5.4/plugins
$ mkdir pentaho-pdi-dataset
$ cp ~/git/pentaho-pdi-dataset/dist/pentaho-pdi-dataset-TRUNK-SNAPSHOT.jar .
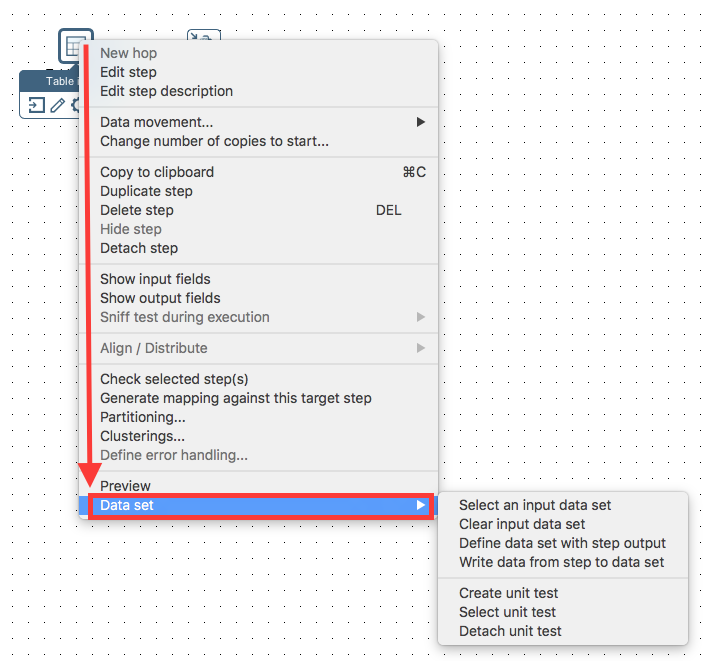
Start Spoon. Right click on a step on the canvas and you should see the Data Set option in the context menu:
Creating a Data Set Group
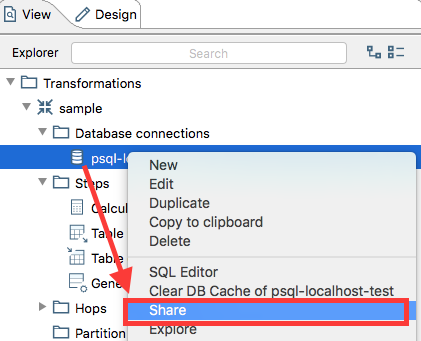
Important: For the next step to work, you have to share the database connection (otherwise the database connection pull down menu in the Data Set Group dialog will not be populated). Click on the View panel, expand the Database connections node and right click on the database connection you just created. Choose share:
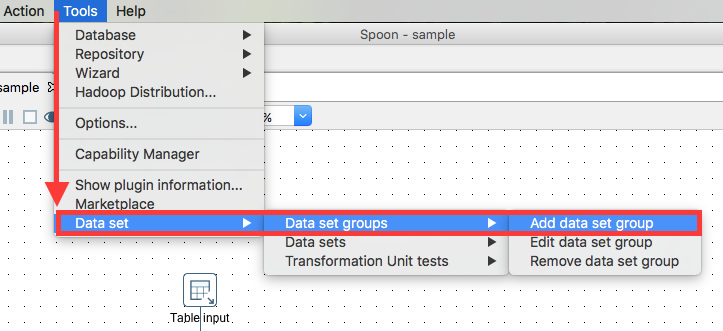
Next choose Tools > Data set > Add data set group:
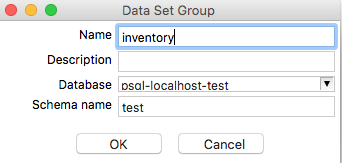
Provide the required information in the Data Set Group dialog:
Note: The menu options to Edit or Delete Data Set Groups are currently not working. This doesn’t mean, however, that you cannot do this at all. The workaround is to navigate on the Terminal/Command Line to the Metastore as shown below. The Data Set Groups are stored as XML files there. This way you can easily edit or even remove them:
$ ls -la  ~/.pentaho/metastore/pentaho/Kettle\ Data\ Set\ Group/
total 16
drwxr-xr-x  4 diethardsteiner  staff  136  6 Feb 15:51 .
drwxr-xr-x  4 diethardsteiner  staff  136  6 Feb 15:38 ..
-rw-r--r--  1 diethardsteiner  staff  214  6 Feb 15:38 .type.xml
-rw-r--r--  1 diethardsteiner  staff  570  6 Feb 15:51 inventory.xml
$ cat ~/.pentaho/metastore/pentaho/Kettle\ Data\ Set\ Group/inventory.xml
<?xml version="1.0" encoding="UTF-8" standalone="no"?>
<element>
  <id>inventory</id>
  <value/>
  <type>String</type>
  <children>
    <child>
      <id>database_name</id>
      <value>psql-localhost-test</value>
      <type>String</type>
    </child>
    <child>
      <id>schema_name</id>
      <value>test</value>
      <type>String</type>
    </child>
    <child>
      <id>description</id>
      <value/>
      <type>String</type>
    </child>
  </children>
  <name>inventory</name>
  <security>
    <owner/>
    <owner-permissions-list/>
  </security>
</element>
Creating a Data Set
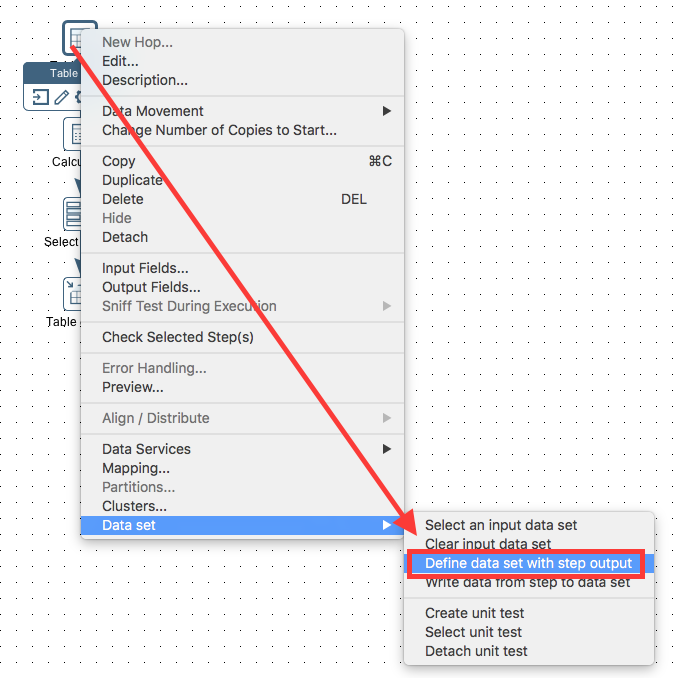
You can create a new data set either via Tools > Data Set > Data sets > Add data set or by right clicking on PDI step and choosing Data set > Define data set with step output. The last option is quite convenient, as it not only allows you to define the columns of the data set, but also source the data from the step.
Define Data Set with Step Output
Now right click on the Table input step and choose Data set > Define data set with step output:
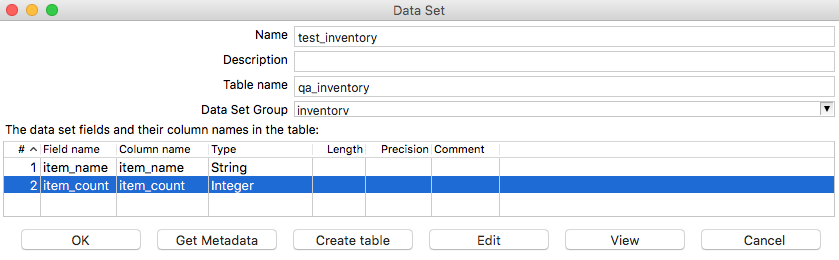
In the Data Set dialog provide the name of the the data set, the Table name (qa_inventory) and the choose the Data Set Group (inventory). Now we have two options: If we had already created the table qa_inventory, we could press Get Metadata. In our case though, we want to first make sure that table with the field and column names etc is filled out correctly and then we can press Create table. The DDL / CREATE TABLES statement will be shown - if you are happy with it press Execute. Note that you can adjuste the DDL to your liking before executing it. Once the DDL was executed successfully, click Close and then OK in the Data Set dialog.
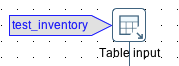
Finally, you have to link this data set to one particular step: Right click on the Table output step and choose Data Set > Select an input data set:

In the next dialog choose the data set we created earlier on. Then you should see an indicator next to the Table input step:
Define a Data Set based on existing Table and Data
The previous approach is very useful if you already have some sample data in your dev environment. Sometimes you might, however, prepare your test data upfront, in which case you will have to define the dataset in a different way. Let us do just this for the final output - the golden dataset:
Execute the SQL statements below in your favourite SQL client (adjust to your DB dialect if required):
CREATE TABLE test.qa_inventory_adjusted (
	item_name VARCHAR(120)
	, item_count INT
)
;

INSERT INTO test.qa_inventory_adjusted
VALUES
	('headphones', 21)
	, ('microphones', 18)
;
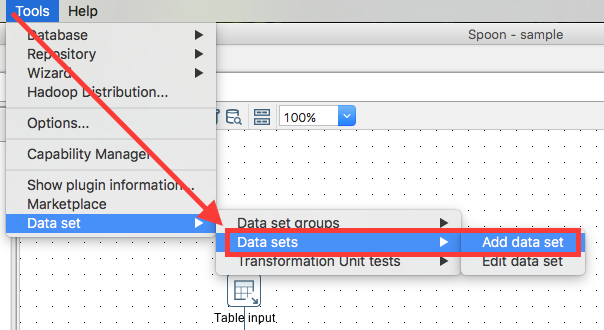
From the main menu choose Tools > Data Set > Data sets > Add data set:
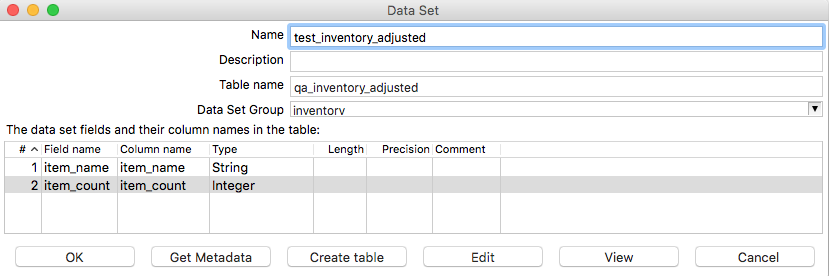
Provide all the required details in the Data Set dialog. Make sure that this time you do not click Create Table but instead click Get Metadata. If you are interested in what your testing data looks like, click View. Finally click OK:
Create a Unit Test
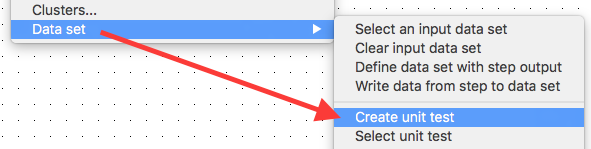
Now there is just one task left to do: Create a Unit Test. Right click on the the Table Output step and choose Data Set > Create unit test:
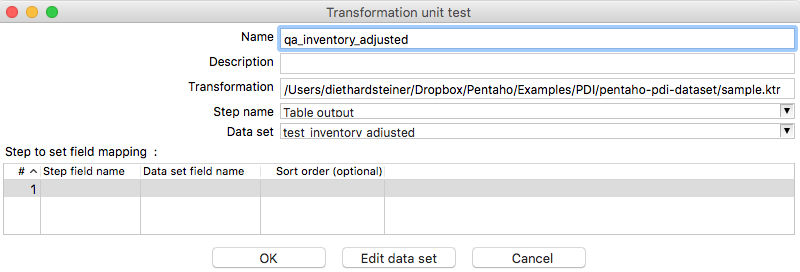
In the Transformation unit test dialog provide a name and choose the Data set. Then click OK:
The Table output step should have an indicator now:
And this is where it stops right now … there is no GUI right now to run a unit test, but as per discussions with Matt Casters in Feb 2016 work on implementing this has begun, so I am really looking forward to trying this out! Matt has also fixed the preview bug, however, currently this code is not yet on Github. Unit Testing is a very important part of the development workflow, so please show this project some support!
OK, you have been real patient :-)
Update May 2016
You can now run the unit tests in Spoon! Command line options will be added at a later stage.
So when you install the latest version, you get a Click for unit test options label in the top left corner, but when you left click on it nothing happens. It turns out, actually by just right clicking anywhere on the canvas, you can access the Unit tests menu:
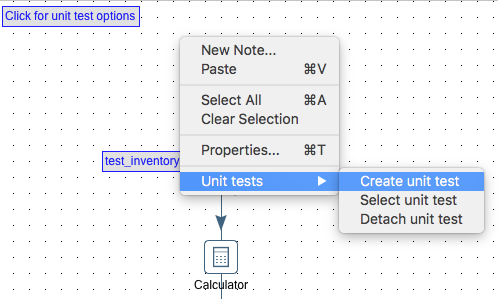
Note: Adding Unit tests via the standard menu bar (Tools > Datasets > Transformation unit tests) is still not working.
The workflow should be:
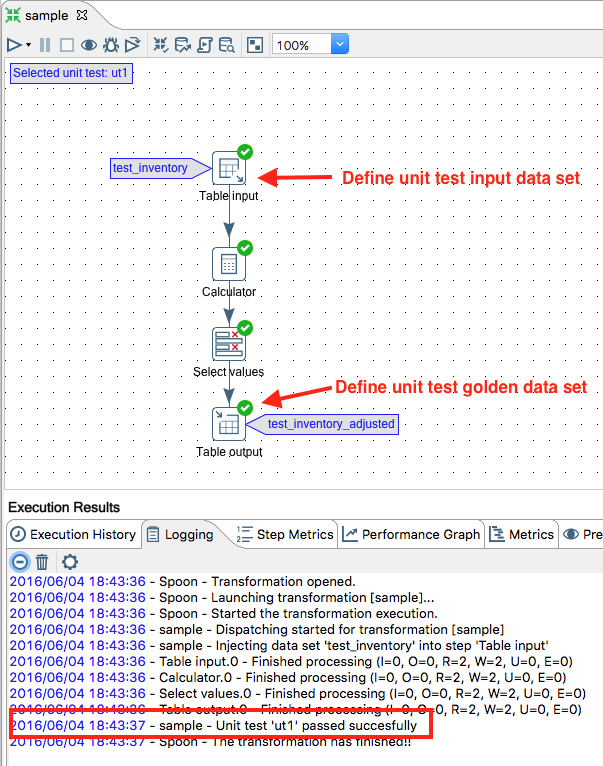
- Right click anywhere on the canvas and choose Unit tests > Create unit test.
- Right click on the step which should be populated by the unit test input dataset and choose Data set > Input data: Select a data set.
- Right click on the step which should be populated by the unit test output dataset and choose Data set > Golden data: Select a data set.
- Run the transformation in Spoon and you should see the result of the unit test in the log:
There have been quite a few changes. Matt published a new video on YouTube to speak you through the new features.
Update November 2016
Recent additions to the plugin are:
New Unit Test Icon with Shortcuts
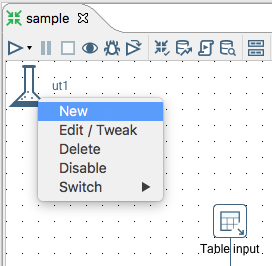
Now there is a new narrow neck flask icon in the top right hand corner of the canvas for each transformation which provides shortcuts to unit testing features:
Tweek Unit Testing Features
There is also a new option to exclude specific steps within a transformation from the unit tests: This can be configured by right clicking on a step and choosing Unit test > Enable tweek: Remove step in unit test. An X icon will then be shown on the top right hand side corner of the step icon:
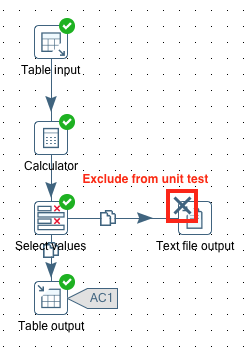
Note: You might wonder what happens if you disable a step which is part of the main stream, imagine a step which calculates the value of the a new field? Here you have to keep in mind that for the golden dataset you also define a mapping between the real output dataset and the golden dataset. In case you disable the step which generates the calculated field, you simply do not specify the calculated field in the mapping and all will work fine.
Execute Unit Tests Transformation Step
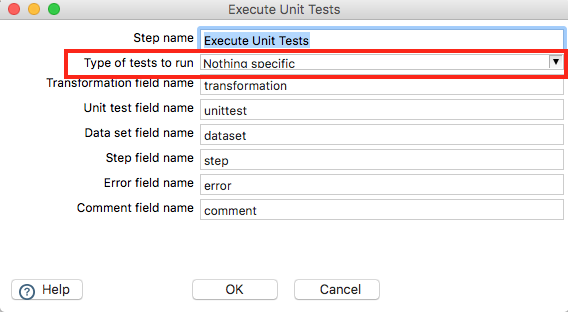
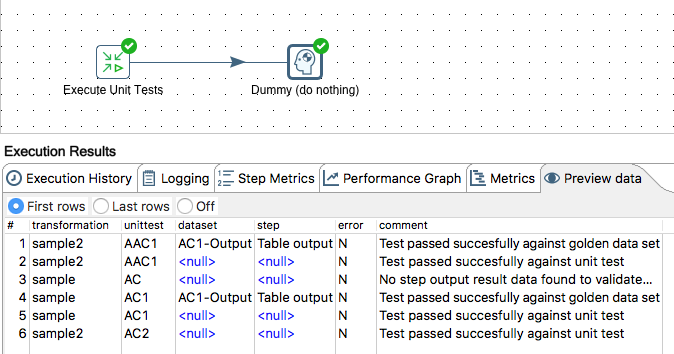
Finally, and most importantly, there is a new step to execute unit tests called Execute unit tests. It is super easy to use: There is no input required - it will automatically source all the unit tests from the Metastore. You can filter for certain types of tests (Conceptual, Development, Unit Test):
Sample transformation with output shown:
Sort Order
When attaching a dataset to a step, you can now also define the sort order. This is particulary important for MapReduce Input and other steps which rely on a given sort order.
Replace Database Connection
On per unit test level you can replace the original database connection(s) defined in the transformation with one for unit testing:
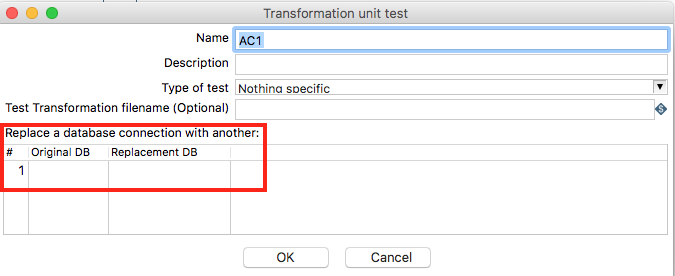
This feature becomes available when you edit an existing unit test definition.
Other Notes
Quick Reference on how to set up a Unit Test
This approach uses the current input and output for the unit tests as well, which might not always be the best way. It works if you are developing locally with a sample dataset and want to use this one for your unit tests as well. Note: You can also just assign other/existing datasets as well.
-
Click on the narrow narrow neck flask icon and choose New. Provide a name for the unit test, e.g.
AC1(for acceptence test 1). -
For the unit test datasets we will need a dataset group: Tools > Data set > Data set groups > Add data set group. Define the name, e.g.
ACs, the database connection and the schema name (if required):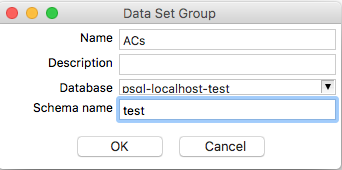
-
Right click on the main data input step and choose Unit test > Define dataset with step output. Provide a name, e.g.
AC1-Input, a table name, e.g.ac1_inputand choose a dataset group, e.g.ACs. Edit the column names so they are in line with the field names. Then click on Create Table, adjuste the DDL if necessary and click Execute. Click Close followed by Ok: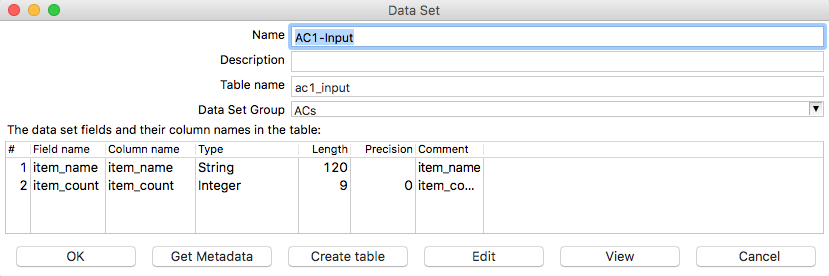
- Right click on the main data input step and choose Unit test > Write data from step to dataset, next pick the dataset and click OK. Next define the mapping (make sure you do this as otherwise PDI will write out empty records!) and thereafter the transformation will be executed and your database table should have the sample data now.
-
Right click on the main input data step, select Unit test > Input data: select dataset and pick the one we just created. Define the Mapping and Sort Order. Your input data step should be flagged with the unit test dataset now:
- Repeat step 3 to 5 for the main output step, just instead of the input data you define the golden dataset.
-
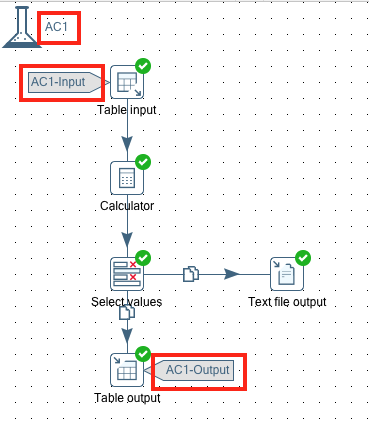
Your transformation should have these three elements for the unit test set now:
Sample files for this setup are available on my Github folder.
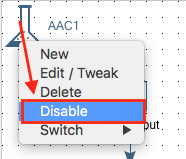
How to disable Unit Tests for a given Transformation
Simply click on the narrow neck flask icon and choose Disable:
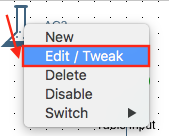
Investigating the ETL transformation generated for the Unit Test
Under the hood, and in memory, PDI generates a transformation for your unit test. Based on your specification certain steps of the original transformations will be replaced. In some sitatuations, especially while debugging, it might be worth checking the unit testing transformation PDI generates. This can be done by clicking on the narrow neck flask icon and choosing Edit/Tweek:
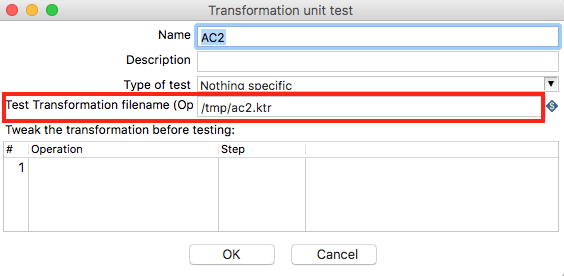
In the next dialog you can specify the output location for the generated transformation:
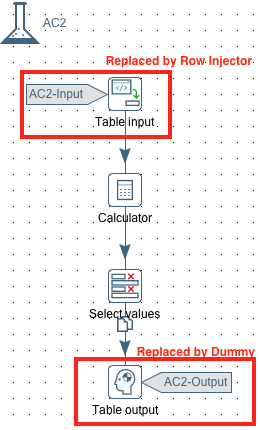
Sample generated transformation:
How to save the Unit Tests in a given Project Folder
By default the unit test definitions are stored in the Pentaho Metastore under the user’s home directory:
~/.pentaho/metastore/pentaho/Kettle\ Transformation\ Unit\ Test
This might not be a convenient location in a lot of situations, as sometimes you might want to bundle all project related files in one place. Fortunately there is an environment variable called PENTAHO_METASTORE_HOME, which allows you to set a custom directory.
Note: You might be familiar with the
KETTLE_HOMEvariable, which stores.kettlein a convenient location. The metastore is by default stored in~/.pentaho/metastore. Using thePENTAHO_METASTORE_HOMEvariable makes it possible to define a custom location for this folder. Note tough that not the full folder hierarchy will be replicated (justmetadataand not.pentaho/metastore).
You will have to change spoon.sh to take this variable into account. Simple add ` -DPENTAHO_METASTORE_FOLDER=$PENTAHO_METASTORE_FOLDER to the end of the OPT=` section:
Before:
OPT="$OPT $PENTAHO_DI_JAVA_OPTIONS -Dhttps.protocols=TLSv1,TLSv1.1,TLSv1.2 -Djava.library.path=$LIBPATH -DKETTLE_HOME=$KETTLE_HOME -DKETTLE_REPOSITORY=$KETTLE_REPOSITORY -DKETTLE_USER=$KETTLE_USER -DKETTLE_PASSWORD=$KETTLE_PASSWORD -DKETTLE_PLUGIN_PACKAGES=$KETTLE_PLUGIN_PACKAGES -DKETTLE_LOG_SIZE_LIMIT=$KETTLE_LOG_SIZE_LIMIT -DKETTLE_JNDI_ROOT=$KETTLE_JNDI_ROOT"
After:
OPT="$OPT $PENTAHO_DI_JAVA_OPTIONS -Dhttps.protocols=TLSv1,TLSv1.1,TLSv1.2 -Djava.library.path=$LIBPATH -DKETTLE_HOME=$KETTLE_HOME -DKETTLE_REPOSITORY=$KETTLE_REPOSITORY -DKETTLE_USER=$KETTLE_USER -DKETTLE_PASSWORD=$KETTLE_PASSWORD -DKETTLE_PLUGIN_PACKAGES=$KETTLE_PLUGIN_PACKAGES -DKETTLE_LOG_SIZE_LIMIT=$KETTLE_LOG_SIZE_LIMIT -DKETTLE_JNDI_ROOT=$KETTLE_JNDI_ROOT -DPENTAHO_METASTORE_FOLDER=$PENTAHO_METASTORE_FOLDER"
It’s possible to assign a dataset to a step without setting up a unit test - is this valid?
Yes. The PDI Datasets plugin was not only create for unit testing. You can as well just assign a dataset to a step in scenarios where it is otherwise difficult to design the transformation because input data is missing, e.g. for Pentaho Map Reduce, where you could assign a dataset to a MapReduce Input step.
Unit Tests, Datasets and Dataset Groups and their relationship to Transformations
- A Unit Test is specific to one transformation.
- A Dataset can be used in various transformations.
- A Dataset is a child of a Dataset Group, which has the Database Connection defined for the related Datasets.
Update Oct 2018
Improvements
Metastore Unit Test File stores absolute path to ktr: Relative Path
Use pre-defined variable UNIT_TESTS_BASE_PATH to define the path to the folder where you store the unit test jobs and transformations.
Do not store Pentaho Dataset Plugin Settings in ktr or kjb
Due to the plugin not being officially supported by Hitachi Vantara, storing the settings directly in the kjb and ktr files could cause issues with their support. This request was to store these settings seperatley in sidecar file (it ended up being stored in a PDI Metastore. This was already the case before actually, just that the settings were stored in the ktr and kjb files as well).
Custom Location for PDI Metastore Folder
Since all the settings for the PDI Datasets Plugin are stored in the PDI Metastore, it would be convenient if you could add the metastore to your git repo. This can be achieved by setting the predefined PENTAHO_METASTORE_FOLDER PDI parameter. It’s only Carte which doesn’t respect variable PENTAHO_METASTORE_FOLDER, the other tools handle it just fine. Matt provided a patch for this here: This is just a plugin, so just add it to the plugin folder.
Open Transformation and Test
Also new in that release is opening a transformation from the viewpoint of the unit test: On the flask there is a Unit Test menu : Open Transformation and Test.
Update Dec 2018
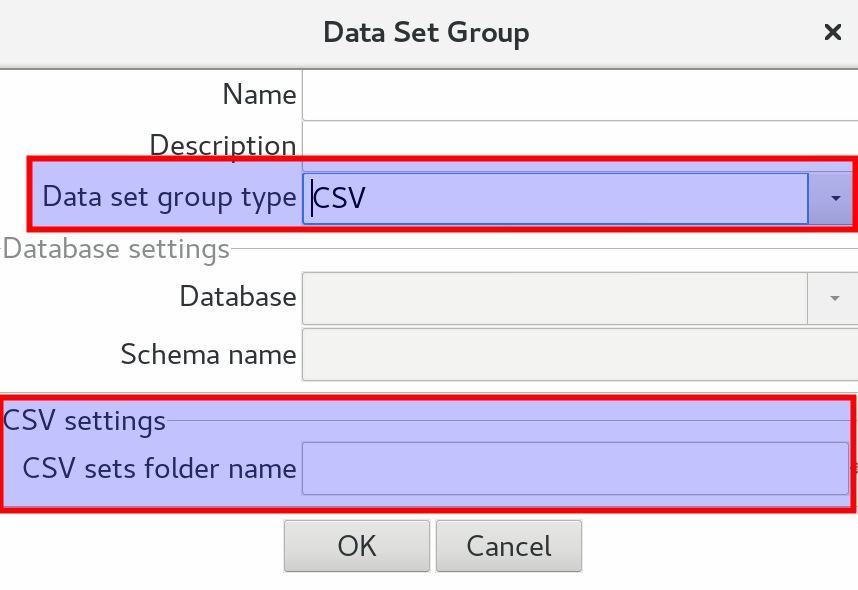
CSV Test Files Support
Ideally you want to store your test files as part of your Git repo. Certainly you don’t want to use any binary file format like Excel for this, since this will just bload your repo when you can something (as it has to save a new version of the whole file again instead of just the changes). CSV or text files are rather convenient for this purpose. And in most cases you can still manipulate them via spreadsheet apps if you do it correctly.
In the latest release the Dataset Groups dialog received an additional option to specify a folder containing CSV files:
Environment Integration
Ideally when you fire up Spoon (or use Kitchen) you want PDI to be aware where your unit test definitions and test data live. Now this feature is available via the Kettle Environment plugin:
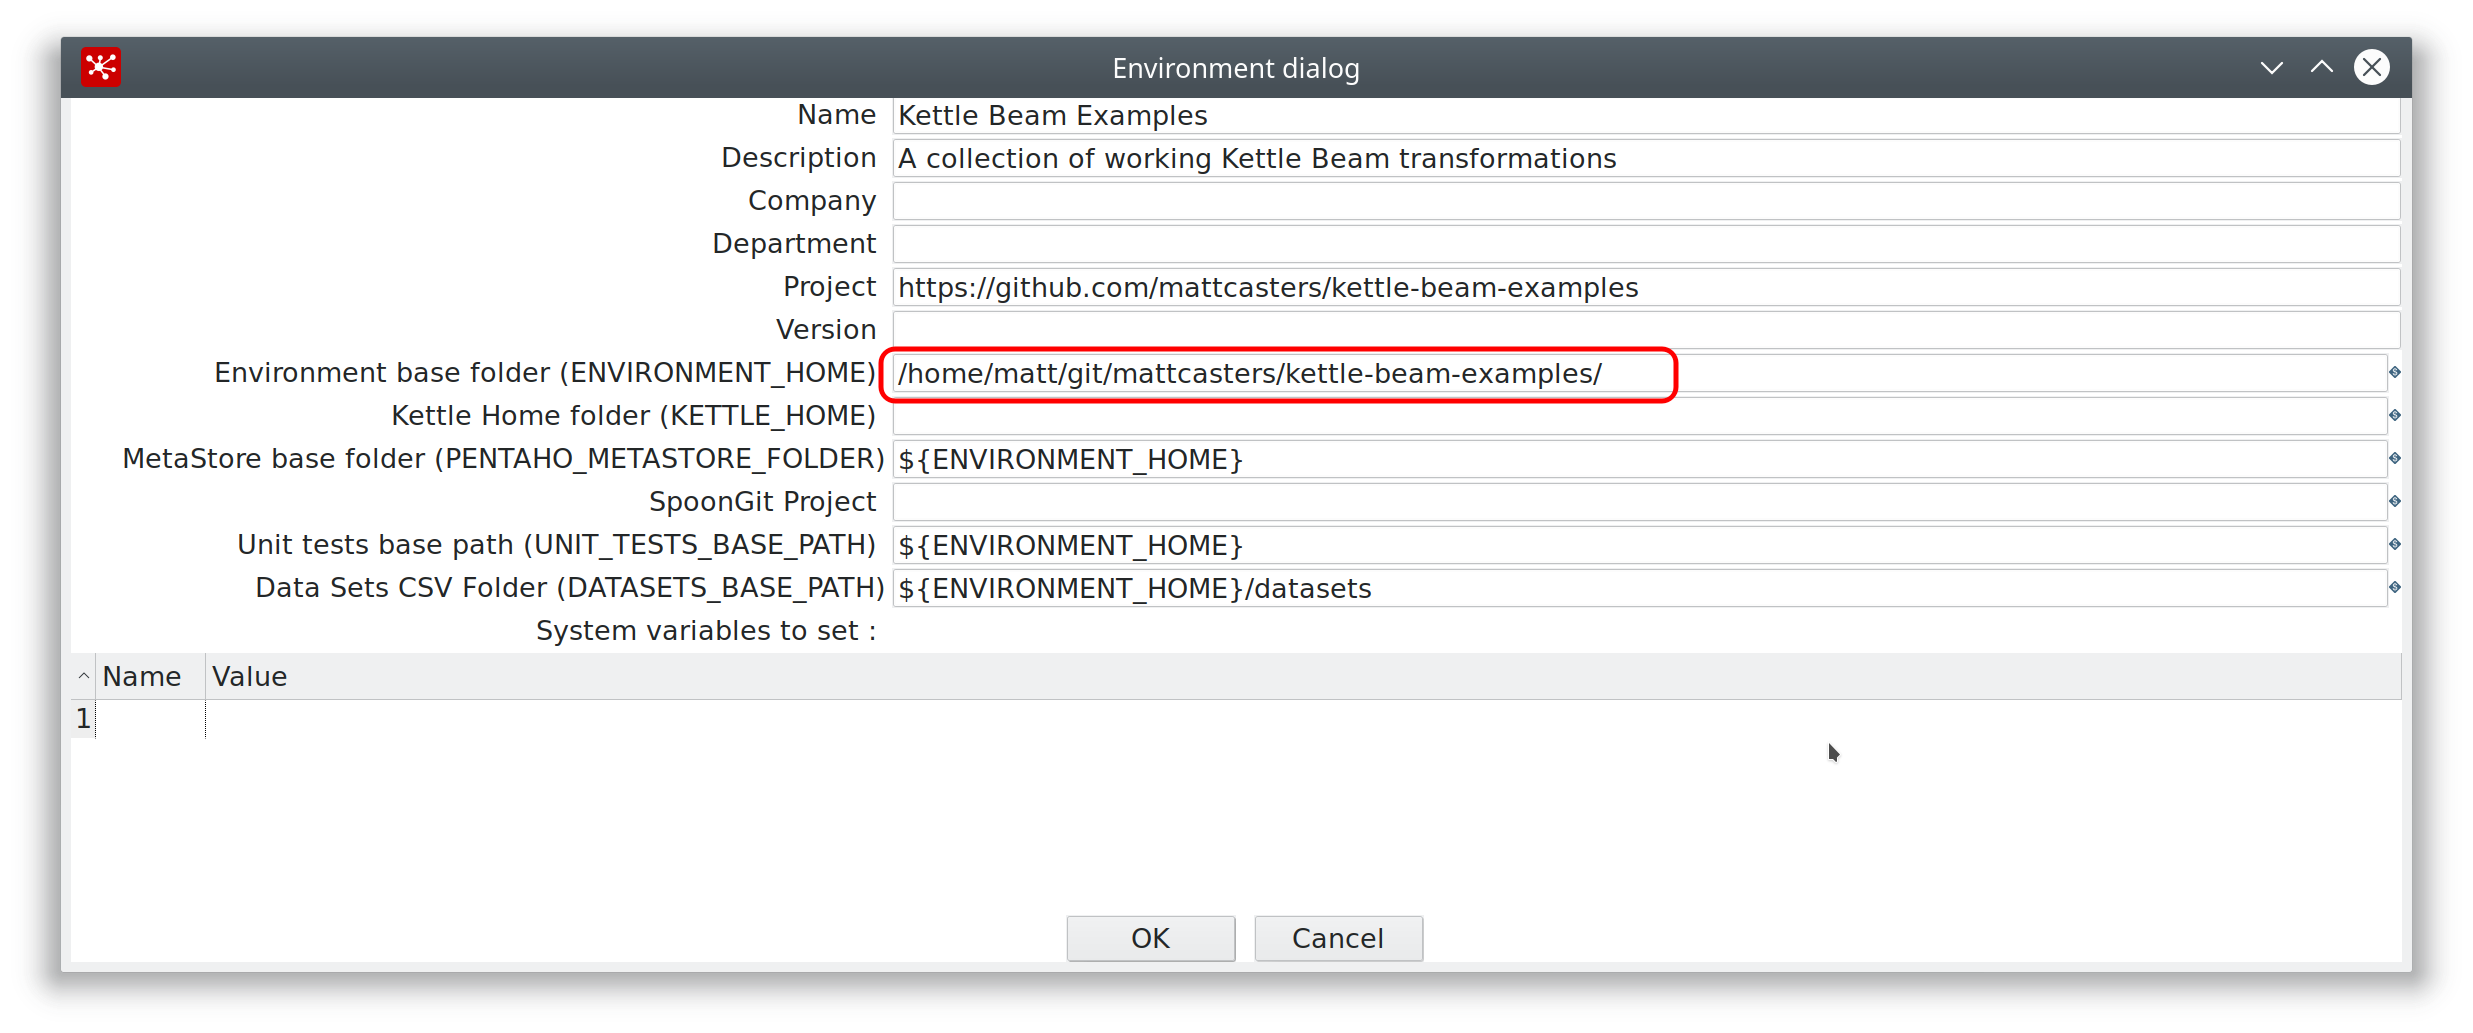 It allows you define an Environment base folder (this is where your code lives), the Metastore base folder (this is where your unit test definitions live among other things) and also your Datasets CSV Folder (test data folder). So everything is conveniently managed via this plugin.