Download and Install Jenkins
Sample installation using Tomcat:
cd ~/apps
wget http://mirrors.ukfast.co.uk/sites/ftp.apache.org/tomcat/tomcat-9/v9.0.0.M17/bin/apache-tomcat-9.0.0.M17.zip
unzip apache-tomcat-9.0.0.M17.zip
rm apache-tomcat-9.0.0.M17.zip
chmod 700 apache-tomcat-9.0.0.M17/bin/*.sh
cd apache-tomcat-9.0.0.M17/webapps
wget http://mirrors.jenkins.io/war-stable/latest/jenkins.war

cd ../bin
sh ./startup.sh
Go to localhost:8080/jenkins and enter the password (which can be found under ~/.jenkins/secrets/initialAdminPassword.
After logging in you will be presented with an option to install plugins.
At this stage you want to install the Git plugin.
Schedule PDI Job
Sources:
Once logged on to the Jenkins web interface do the following:
- Click on New Item.
- Provide a name for the item and choose Freestyle project.
- Under Build Triggers tick Build periodically. Insert a Crontab like schedule into the Schedule box (e.g.
* * * * *to run the job every minute). - In the Build section click Add build step and then choose Execute shell. Insert the shell command into the text box. This is the same command as you would normally use to run your jobs or transformations. Example:
  /home/dsteiner/apps/pentaho-ee/design-tools/data-integration/pan.sh \
  -file=/home/dsteiner/git/diethardsteiner.github.io/sample-files/pdi/test.ktr
- Click Save.
- Wait a bit and soon you should see the build running (on the Build History section). Click on the build number and then on Console Output to see the log.
Once you have satisfied your curiosity delete the Item.
On Commit Build
Next we will be looking at a more interesting approach: We want to trigger the build once we commit our code to git. There are at least two approaches to achieving this: You could have Jenkins continuously polling the git repository for changes or more efficiently, have git tell Jenkins about any commits that happen.
Sources:
In the context of PDI build means running a PDI job or transformation.
We will use a git hook to notify Jenkins about a new commit. The plugin provides the following endpoint:
http://localhost:8080/jenkins/git/notifyCommit
A quick intro to Git Hooks:
- Git Hooks let you define action on specific events (e.g.
post-commit). - There are client and server-side versions of git hooks. Git hooks are stored in
<git-root>/.git/hooksand are basically shell scripts (or any other scripting language). Filenames do not have an extension. - Git hooks do not get version controlled and are not pushed to the server. Keep this in mind when creating client side hooks. They are local to each repo.
- You can use a symlink and store the shell script within the standard repo path. As an alternative, Git also provides a Template Directory mechanism that makes it easier to install hooks automatically. All of the files and directories contained in this template directory are copied into the .git directory every time you use git init or git clone.
- Git hooks have to be executable.
Create a file called post-commit (no extension) in the .git/hooks directory of your git project. Add the following to the file (adjust to your requirements - the last file path points to a local git repo):
#!/bin/sh
curl http://localhost:8080/jenkins/git/notifyCommit?url=file:///home/dsteiner/git/diethardsteiner.github.io
Finally make the file executable:
$ chmod 700 .git/hooks/post-commit
The webservice endpoint notifyCommit is exposed by the Git plugin we installed earlier on.
Let’s create a new Jenkins item:
- Click on New Item.
- Provide a name for the item and then choose Freestyle project.
- In the Source Code Management section choose Git and set the Repository URL to your local git repo (in example:
file:///home/dsteiner/git/diethardsteiner.github.io). (This is for testing purposes only, in a standard setup you would use a remote git server). - Build Triggers section: For the git endpoint to work you have to enable Poll SCM in your Jenkins build configuration. Important: Don’t specify a schedule!
- In the Build section click on Add build step and choose Execute shell. Add following command (adjust to your setup) and then click save:
/home/dsteiner/apps/pentaho-ee/design-tools/data-integration/pan.sh \
  -file=/home/dsteiner/git/diethardsteiner.github.io/sample-files/pdi/test.ktr
Next, on the command line, navigate to the git repo you specified earlier on, make a change and commit. You should see Jenkins kick off the job.
When working in a team, you would have your central git server and configure server-side hooks (e.g. update) to trigger a build. There are also Jenkins plugins for other popular non-vanilla git server offerings like Gitbucket and Gitlab, some of which offer notify-like webservice endpoints as well.
Testing Job or Transformation against different versions of PDI
The section below follows an approach originally shown to me by Alex Schurman:
The main purpose here is to test a set of transformations on different versions of PDI.
Note: If you haven’t installed the Console Parser Plugin yet, save your current item and then click on Jenkins in the top left corner, next click on Manage Jenkins. Next from the list choose Manage Plugins. Type Log Parser into the Filter field and then tick Log Parser Plugin in the results. Click on Install without restart. Note: It seems like the Console Parser Plugin has been replaced by the Log Parser Plugin.
Let’s create a new item:
- Choose New Item.
- Provide a name and click Multi-configuration project.
General Tab:
Advance Project Options:
- Build Triggers: Tick Build Periodically and supply a schedule, e.g.
H * * * *.
Configuration Matrix:
This section allows us to define variables:
-
Click on Add axis > User-defined Axis. Specify
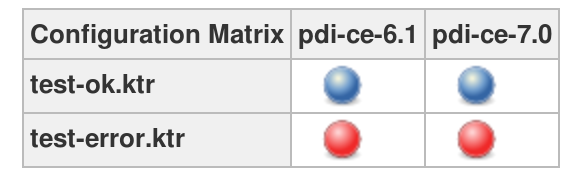
PDI_ROOT_FOLDER_NAMEas Name and the names of your local PDI installations as Values (on multiple lines), e.g.pdi-ce-6.1 pdi-ce-7.0The idea here is that we can test against various versions of PDI. Do not use commas here, just put each PDI installation name on a new line.
-
Click on Add axis > User-defined Axis. Specify
PDI_FILE_NAMEand specify any transformation that you want to test, just the filename, not the whole path, e.g.:test-ok.ktr test-error.ktr
- Tick the Combination Filter and set it to
!(PDI_ROOT_FOLDER_NAME=="dummy"). This is just makes sure that this folder is excluded - this is just an example, it doesn’t really do anything in our setup here.
Build Environment:
Tick Abort the build if it’s stuck, set the Timeout Strategy to No Activity and Timeout seconds to 240 (in example). Next set add the following Time-out actions:
- Abort the build
- Fail the build
Build
- Click on Add build step > Execute shell and add in example following command:
export PENTAHO_PDI_JAVA_OPTIONS="-Xms512m -Xmx1024m -XX:MaxPermSize=256m -Dpentaho.karaf.root.transient=true"
export APPS_HOME_DIR=/home/dsteiner/apps
export PDI_FILE_DIR=/home/dsteiner/git/diethardsteiner.github.io/sample-files/pdi/jenkins
if [[ "$PDI_FILE_NAME" =~ .*ktr ]]; then
	echo RUNNING A TRANSFORMATION
    $APPS_HOME_DIR/$PDI_ROOT_FOLDER_NAME/pan.sh \
    -file="$PDI_FILE_DIR/$PDI_FILE_NAME" \
    -level=Basic
fi
if [[ "$PDI_FILE_NAME" =~ .*kjb ]]; then
	echo RUNNING A JOB
    $APPS_HOME_DIR/$PDI_ROOT_FOLDER_NAME/kitchen.sh \
    -file="$PDI_FILE_DIR/$PDI_FILE_NAME" \
    -level=Basic
fi
Note how we reference here the axis variables we defined earlier on.
Post-build Actions:
- Choose Add post-build action > Console output (build log) parsing. Tick all the 3 checkboxes under Console output (build log) parsing. Then click Use project rule and provide the path to your rule file.
The contents of the rule file console-validation-rules.properties should be as follows:
ok /not really/

# create a quick access link to lines in the report containing 'INFO'
ok /INFO/
info /DEBUG/

# list of warnings here...
info /[Ww]arning/
info /WARNING/

warning /error.*BootFeatures/i
warning /BootFeaturesInstaller/i
warning /error.*karaf/i

#flag as warnings all the DELETE TEMPORAL files from Karaf at end of transformation
warning /Unable to delete karaf directory/i
warning /Unable to delete directory/i

#Special Case, due to a minor ERROR of metadata Step
warning /Target key.*is not defined in/i
warning /Source step.*is not available in/i

# match line with 'error', case-insensitive
error /(?i)error/
error /Unexpected error/
Note: PDI v6 to v7 has problems running jobs shortly after each other because of a Karaf bug. There is a workaround, however, using a Karak flag (
-Dpentaho.karaf.root.transient=true).
Once this job/item runs, you get a matrix like the one shown below to highlight what failed:
And here some additional info:
Note: You can export the whole job configuration by adding at the end of the URL
config.xml. Save this then to a file. This file can then be imported (into another Jenkins server in example) via a command line utility. To see how this is working go to Manage > Jenkins CLI and look for COMMAND create-job - click on the link to get details on how to execute the command.
http://localhost:8080/jenkins/job/<job-name>/config.xml
For this to work we must first change the config.xml (see here for details) and then restart the server.
In our case the config file should be located in:
~/.jenkins/config.xml
Set useSecurity to false and comment out the authorizationStrategy block. Not recommended for production environments!
Restart Tomcat.
java -jar jenkins-cli.jar -s http://localhost:8080/jenkins/ create-job <NAME>

# example
cd webapps/jenkins/WEB-INF/
# upload job specification
cat ~/Downloads/AlexImplementationJob.xml | java -jar jenkins-cli.jar -s http://localhost:8080/jenkins/ create-job AlexImplementationJob