This is a long overdue artilce on Hiromu’s WebSpoon. Hiromu has done a fantastic work on WebSpoon - finally bringing the familiar Spoon Desktop UI to the web browser.
- Github: Webspoon
- Github: Webspoon Docker
- Docker page
- Slide deck: Hands-on demo of PDI using webSpoon
- Cloud Deployment
For completeness sake I took the liberty of copying Hiromu’s instructions on how the set up the intial AWS Elastic Beanstalk environment. My main focus here is to provide simple approaches on how to add persistant storage options to your WebSpoon setup, some of which are fairly manual approaches (which should be later on replaced by a dedicated automatic setup). The article is more aimed toward users which are new to AWS.
Note: Once finished, always remember to terminate your AWS environment to stop occuring costs.
Cloud Deployment with AWS Beanstalk
Overview
This guide will give you an example of how to deploy webSpoon to the cloud with the following requirements.
- Deploy webSpoon to the cloud
- Deploy webSpoon with plugins
- Auto-scale and load-balance
Initial Quick Setup
To easily satisfy the requirements, this example uses the Docker image with the plugins and deploys it to AWS Elastic Beanstalk.
These are the rough steps using the new Amazon Configuration Interface:
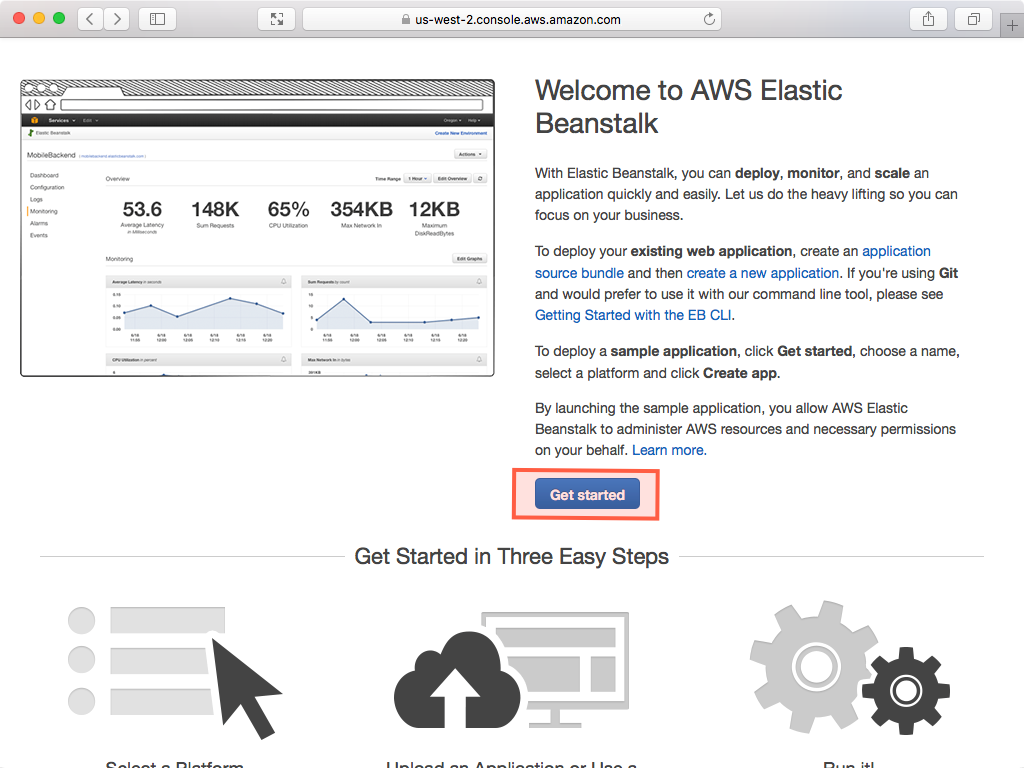
- Head to the AWS Console and sign into the console. Choose Beanstalk from the main menu. Then click Get Started or Create New Application:
-
In the Choose Environment dialog pick Web server environment.
-
In the Platform section, choose Multi-container Docker as a Preconfigure platform.
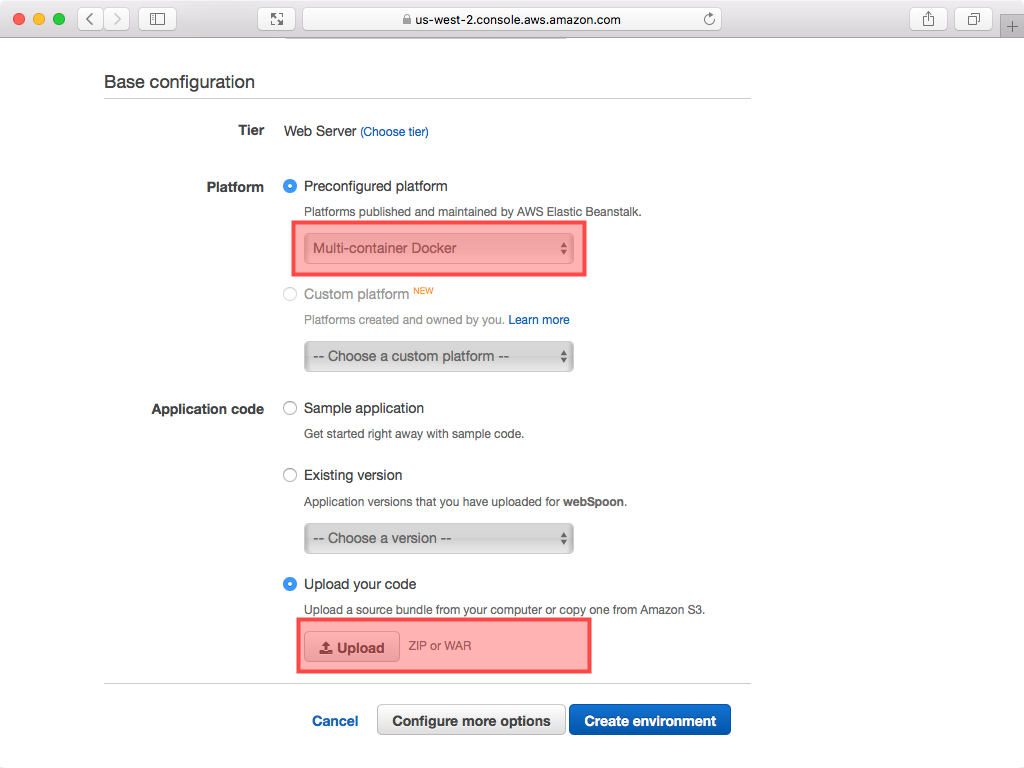
- While we have a
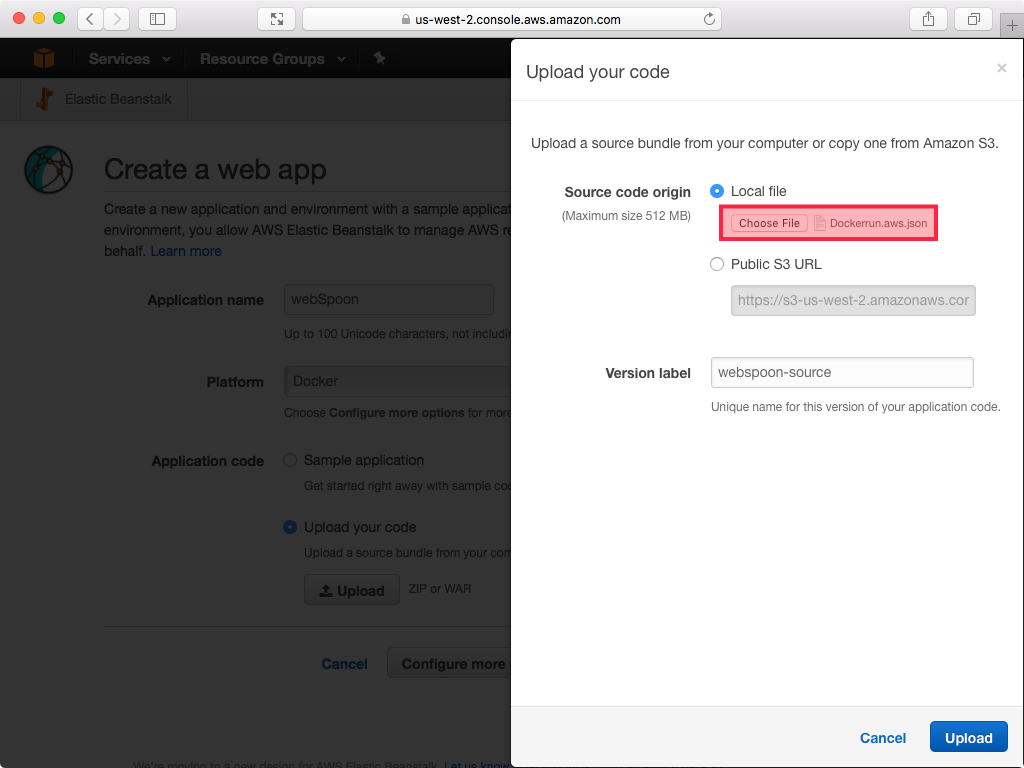
Dockerfileto provision our machine(s), we still need a method of orchestrating the setup of our cluster. This is where theDockerrun.aws.jsonfile comes in. In the Application code section, tick Upload your code and choose Dockerrun.aws.json as an Application code - contents copied below for convenience:
  {
  "AWSEBDockerrunVersion": 2,
  "containerDefinitions":
    [
      {
        "name": "webSpoon",
        "image": "hiromuhota/webspoon:latest-full",
        "essential": true,
        "memory": 1920,
        "environment": [
          {
            "name": "JAVA_OPTS",
            "value": "-Xms1024m -Xmx1920m"
          }
        ],
        "portMappings": [
          {
            "hostPort": 80,
            "containerPort": 8080
          }
        ]
      }
    ]
  }
- Click Configure more options instead of Create application.
- On the next screen under Configuration presets you have two options. If you just want to run the container on one node choose Custom Configuration, otherwise choose High Availability.

- On the same page, change EC2 instance type from
t2.microtot2.smallor an instance type with 2GB+ memory. Click Save. - Optional: If you plan to ssh into the EC2 instance, edit the Security settings: Define your key pair.
- Click Create Environment. Wait until your application and environment are created, which will take a few minutes:
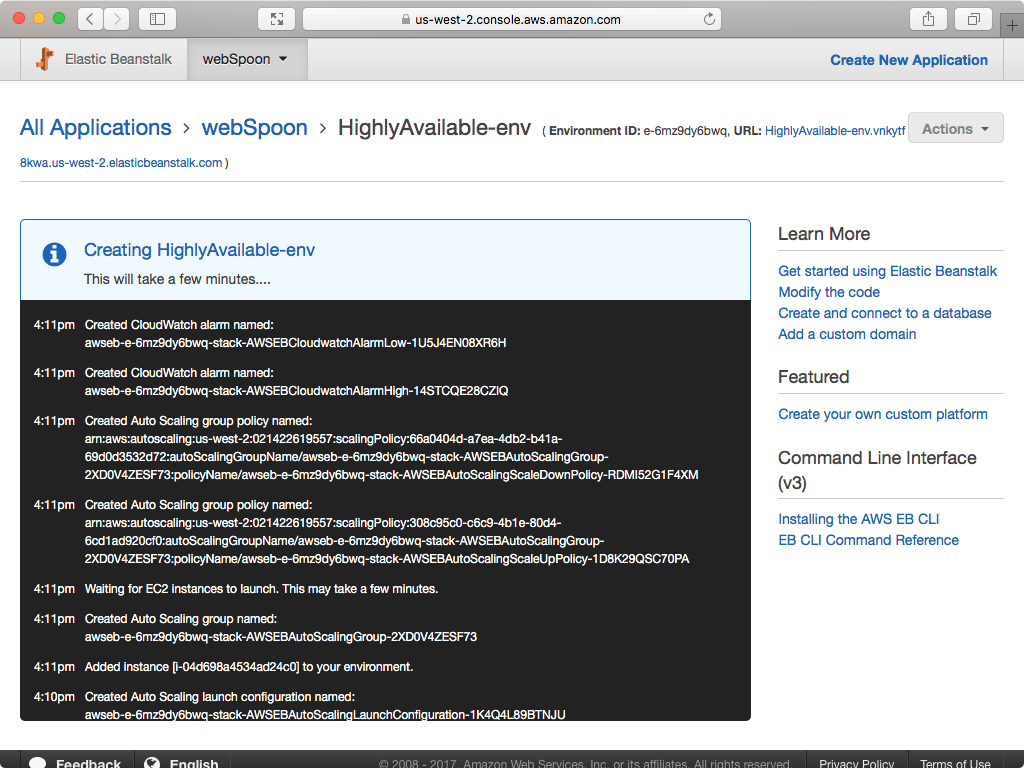
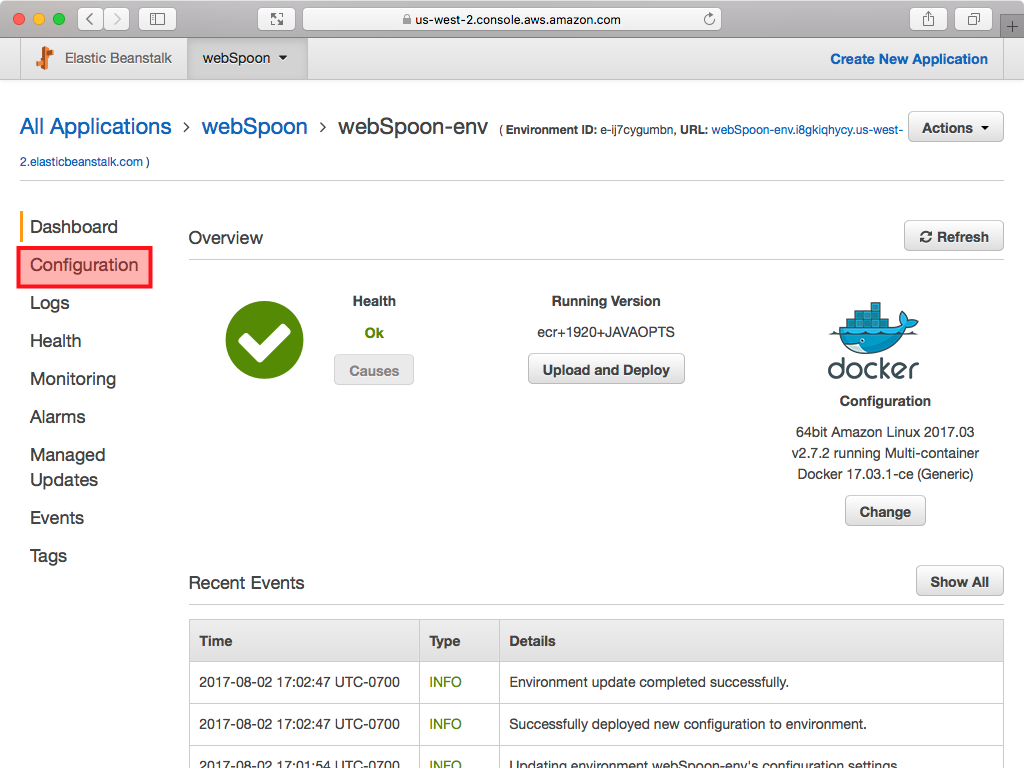
- High Availability option only: The screen will look like this one the environment is ready. Click on Configuration in side panel.
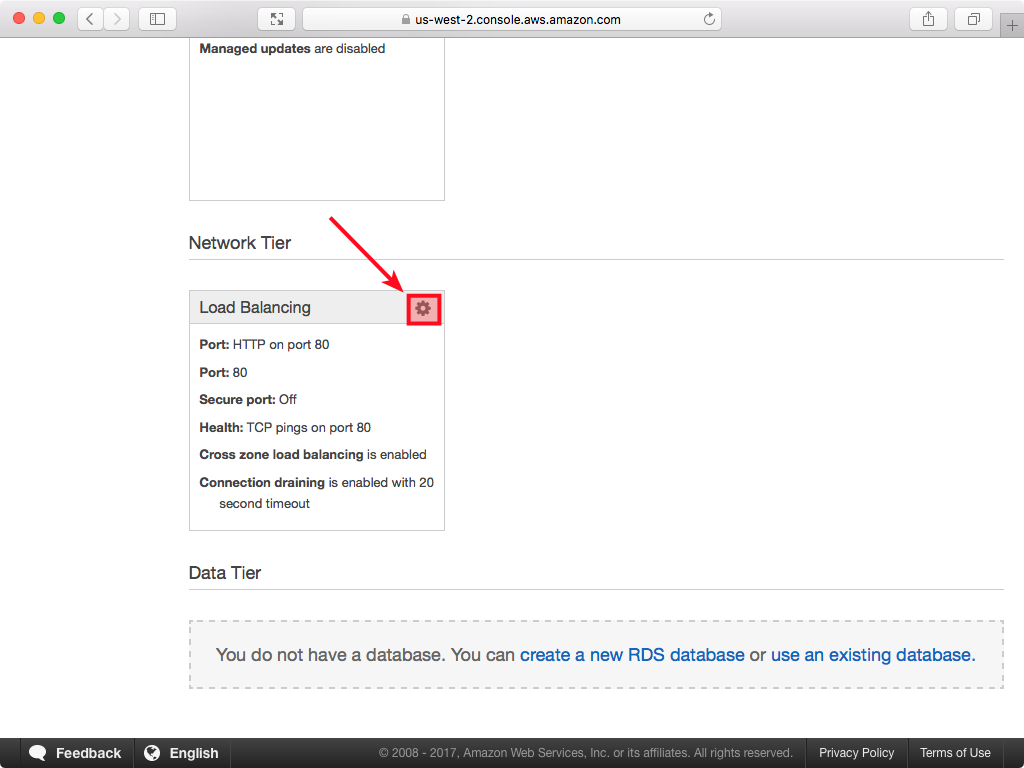
- High Availability option only: Scroll down to find the Load Balancing section and click on the wheel icon:
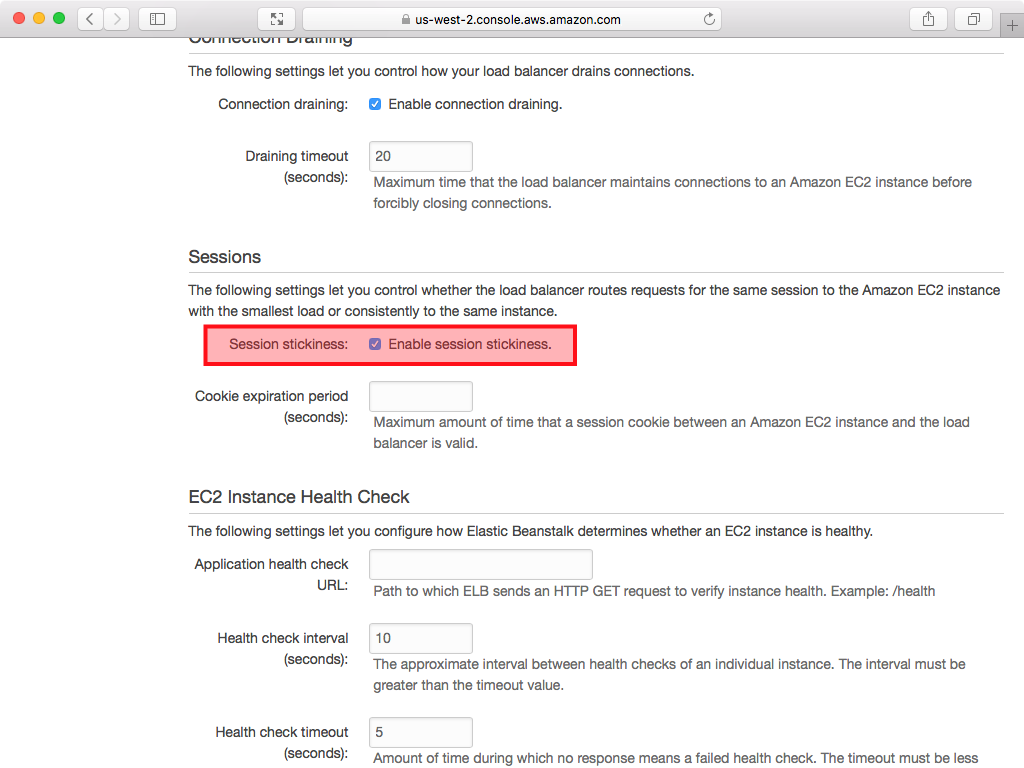
- High Availability option only: On the following screen enable session stickiness:
- You can access the Spoon Web Interface via this URL:
http://<your-beanstalk-app-url>.com:8080/spoon/spoon
Your Beanstalk App URL is shown on the AWS Beanstalk application overview page.
Adding Volumes
The main aim of adding volumes is to persist the data outside of the Docker Container. We will have a look at various options:
Adding an EC2 Instance Docker Volume
Sources:
Note: Choosing this option does not really provide much benefit: We only map Docker container folders to local folders on the EC2 instance. So if you were to terminate your Beanstalk environment, the files would be gone as well. The main benefit here is that if the Docker Container gets terminated, the file at least survice on the EC2 instance.
Create a new project folder called beanstalk-with-ec2-instance-mapping.
Inside this folder create a Dockerrun.aws.json with following content:
{
  "AWSEBDockerrunVersion": 2,
  "volumes": [
    {
      "name": "kettle",
      "host": {
        "sourcePath": "/var/app/current/kettle"
      }
    },
    {
      "name": "pentaho",
      "host": {
        "sourcePath": "/var/app/current/pentaho"
      }
    }
  ],
  "containerDefinitions": [
    {
      "name": "webSpoon",
      "image": "hiromuhota/webspoon:latest-full",
      "essential": true,
      "memory": 1920,
      "environment": [
        {
          "name": "JAVA_OPTS",
          "value": "-Xms1024m -Xmx1920m"
        }
      ],
      "portMappings": [
        {
          "hostPort": 80,
          "containerPort": 8080
        }
      ],
      "mountPoints": [
        {
          "sourceVolume": "kettle",
          "containerPath": "/root/.kettle",
          "readOnly": false
        },
        {
          "sourceVolume": "pentaho",
          "containerPath": "/root/.pentaho",
          "readOnly": false
        },
        {
          "sourceVolume": "awseb-logs-webSpoon",
          "containerPath": "/usr/local/tomcat/logs"
        }
      ]
    }
  ]
}
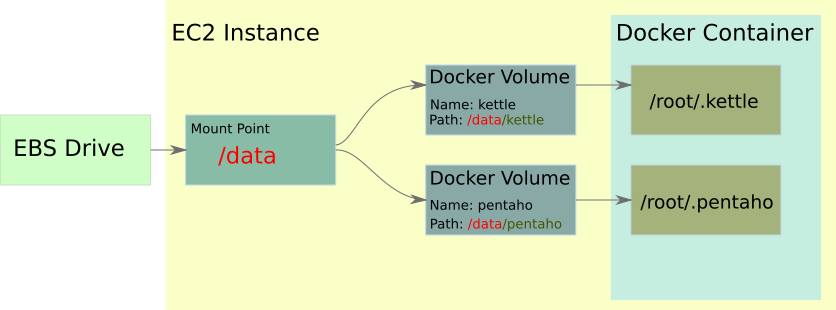
First we create two volumes on the EC2 instance using the top level volumes JSON node: one for the .kettle files and one for the .pentaho files. Note that the sourcePath is the path on the host instance.
Note: This defines volumes on the hard drive of the EC2 instance you run your Docker container on. This is pretty much the same as if you were defining volumes on your laptop for a Docker container that you run. This does not set up magically any new EBS or EFS volumes.
Next, within the containerDefinitions for webSpoon, we add three mountPoints within the Docker Container. Here we map the container paths to the volumes we created earlier on (kettle and pentaho). The third mount point we define is for writing the logs out: This is a default requirement of the Beanstalk setup. For each container Beanstalk will create automatically a volume to store the logs. The volume name is made up of awseb-logs- plus the container name: In our case, this is: awseb-logs-webSpoon. And the logs we want to store are the Tomcat server logs.
The Beanstalk environment setup procedure is exactly the same as before, so go ahead and set up the environment.
Note: On the EC2 instance the directory
/var/app/current/is where the app files get stored (in our case this is onlyDockerrun.aws.json). This folder does not required sudo privileges. If you ran the Docker container on your laptop you might have noticed that by default Docker stored name volumes in/var/lib/docker/volumes. On the EC2 instance this directory requires sudo privileges.
Once the environment is running, we can ssh into the EC2 instance.
Note: You can find the public DNS of your EC2 instance via the EC2 panel of the AWS console.
It is beyond the scope of this article to explain how to set up the required key pairs to ssh into an EC2 instance: Here is a good article describing the required steps. If you want to ssh into your instance, read this first. You also have to make sure that your Beanstalk environment knows which key you want to use. You can configure this via the main Configuration Panel under Security. This will restart the EC2 instance.
ssh -i <path-to-pem-file> ec2-user@<ec2-instance-public-dns>
We can double check now that the volume directories got created:
$ ls -l /var/app/current/
total 12
-rw-r--r-- 1 root root 1087 Dec 26 09:41 Dockerrun.aws.json
drwxr-xr-x 2 root root 4096 Dec 26 09:42 kettle
drwxr-xr-x 3 root root 4096 Dec 26 09:43 pentaho
Adding an EBS Volume
Sources:
- Advanced Environment Customization with Configuration Files (.ebextensions)
- Configuration Options
- Option Settings
- Adding and Customizing Elastic Beanstalk Environment Resources
- Customize Ephemeral and EBS Volumes in Elastic Beanstalk Environments
- Mount a EBS volume (not snapshot) to Elastic Beanstalk EC2
- Attach EBS volume to amazon elastic beanstalk
- Create an Application Source Bundle
- Making an Amazon EBS Volume Available for Use
Note: An EBS Drive is a device that will be mounted directly to your EC2 instance. It cannot be shared with any other EC2 instance. In other words, every EC2 instance will have their own (possibly set of) EBS Drive(s). This means that files cannot be shared across EC2 instances.
Two ESB Drives to Two Docker Volumes
For the next steps to work the volume mapping from Docker container to the EC2 instance has to be in place (as discussed in the previous section). We cover this below again.
Basically we have to create two layers of volume mapping:
- Docker Container to EC2 instance
- EC2 instance to EBS
There is no way to define an EBS volume in the Dockerrun.aws.json file: You have to create another file with a .config extension, which has to reside in the .ebextensions folder within your project’s folder. So the project’s folder structure should be like this:
.
├── Dockerrun.aws.json
└── .ebextensions
    └── options.config
If you are not familiar with how mounting drivers on Linux works, read this article first.
Important: Configuration files must conform to YAML formatting requirements. Always use spaces to indent and don’t use the same key twice in the same file.
On the EC2 instance we will create a mount point under a new /data directory, which has less chance to interfere with any other process.
Let’s get started:
Create a new project folder called beanstalk-with-ebs-two-volumes.
Inside this folder create a Dockerrun.aws.json with following content:
{
  "AWSEBDockerrunVersion": 2,
  "volumes": [
    {
      "name": "kettle",
      "host": {
        "sourcePath": "/data/kettle"
      }
    },
    {
      "name": "pentaho",
      "host": {
        "sourcePath": "/data/pentaho"
      }
    }
  ],
  "containerDefinitions": [
    {
      "name": "webSpoon",
      "image": "hiromuhota/webspoon:latest-full",
      "essential": true,
      "memory": 1920,
      "environment": [
        {
          "name": "JAVA_OPTS",
          "value": "-Xms1024m -Xmx1920m"
        }
      ],
      "portMappings": [
        {
          "hostPort": 80,
          "containerPort": 8080
        }
      ],
      "mountPoints": [
        {
          "sourceVolume": "kettle",
          "containerPath": "/root/.kettle",
          "readOnly": false
        },
        {
          "sourceVolume": "pentaho",
          "containerPath": "/root/.pentaho",
          "readOnly": false
        },
        {
          "sourceVolume": "awseb-logs-webSpoon",
          "containerPath": "/usr/local/tomcat/logs"
        }
      ]
    }
  ]
}
Inside your project directory (beanstalk-with-ebs-two-volumes), create a subdirectory called .ebextensions.
In the .ebextensions directory create a new file called options.config and populate it with this content:
commands:
  01mkfs:
    command: "mkfs -t ext3 /dev/sdh"
  02mkdir:
    command: "mkdir -p /data/kettle"
  03mount:
    command: "mount /dev/sdh /data/kettle"
  04mkfs:
    command: "mkfs -t ext3 /dev/sdi"
  05mkdir:
    command: "mkdir -p /data/pentaho"
  06mount:
    command: "mount /dev/sdi /data/pentaho"

option_settings:
  - namespace: aws:autoscaling:launchconfiguration
    option_name: BlockDeviceMappings
    value: /dev/sdh=:1,/dev/sdi=:1
These instructions basically format our two external volumes and then mount them. Note that at the very end under option_settings we specified that each EBS volume should be 1 GB big (which is very likely quite a bit too much for the pentaho volume, however, this is the minimum you can define).
Now we have to zip our files from within the project root directory:
[dsteiner@localhost beanstalk-with-ebs-two-volumes]$ zip ../webspoon-with-ebs.zip -r * .[^.]*
  adding: Dockerrun.aws.json (deflated 65%)
  adding: .ebextensions/ (stored 0%)
  adding: .ebextensions/options.config (deflated 43%)
Note: The zip file will be conveniently placed outside the project directory.
Next via the Web UI create a new Beanstalk environment. The approach is the same as before, just that instead of the Dockerrun.aws.json you have to upload the zip file now.
Important: You have to create the new Beanstalk environment in exactly the same Availability Zone within your Region as your EBS Drive resides in! Otherwise you can’t connect it! You can define the Availability Zone in the Capacity settings on the Configure env name page.
Once the environment is running, ssh into the EC2 instance.
Note: You can find the public DNS of your EC2 instance via the EC2 panel of the AWS console.
ssh -i <path-to-pem-file> ec2-user@<ec2-instance-public-dns>
We can check the mount points now:
$ ls -l /data
total 8
drwxr-xr-x 3 root root 4096 Dec 26 16:12 kettle
drwxr-xr-x 4 root root 4096 Dec 26 16:11 pentaho
$ lsblk
NAME    MAJ:MIN RM SIZE RO TYPE MOUNTPOINT
xvda    202:0    0   8G  0 disk
└─xvda1 202:1    0   8G  0 part /
xvdh    202:112  0   1G  0 disk /data/kettle
xvdi    202:128  0   1G  0 disk /data/pentaho
As you can see, now everything looks fine.
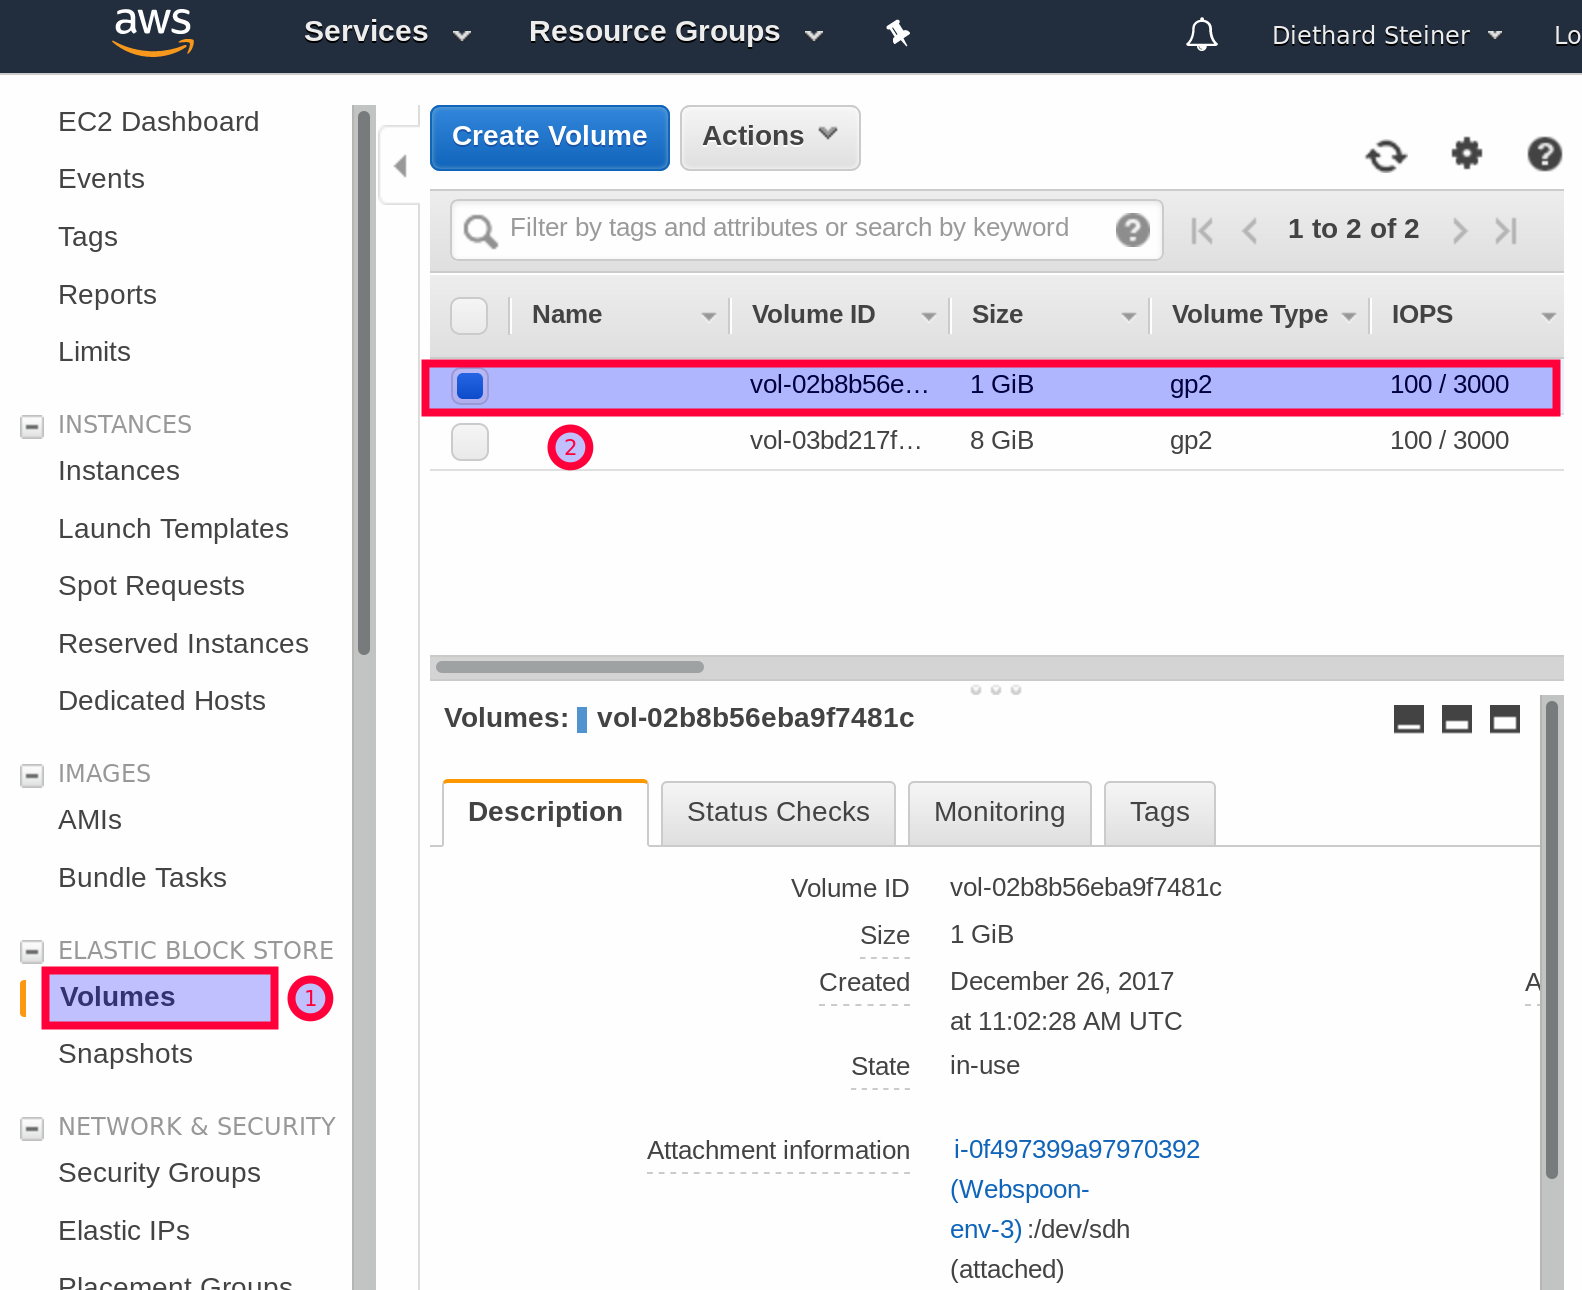
Once you have the new configuration running, you might want to check if the new volumes got created: You can do this by going to the EC2 section of the AWS console. On the side panel under Elastic Block Storage click on Volumes:
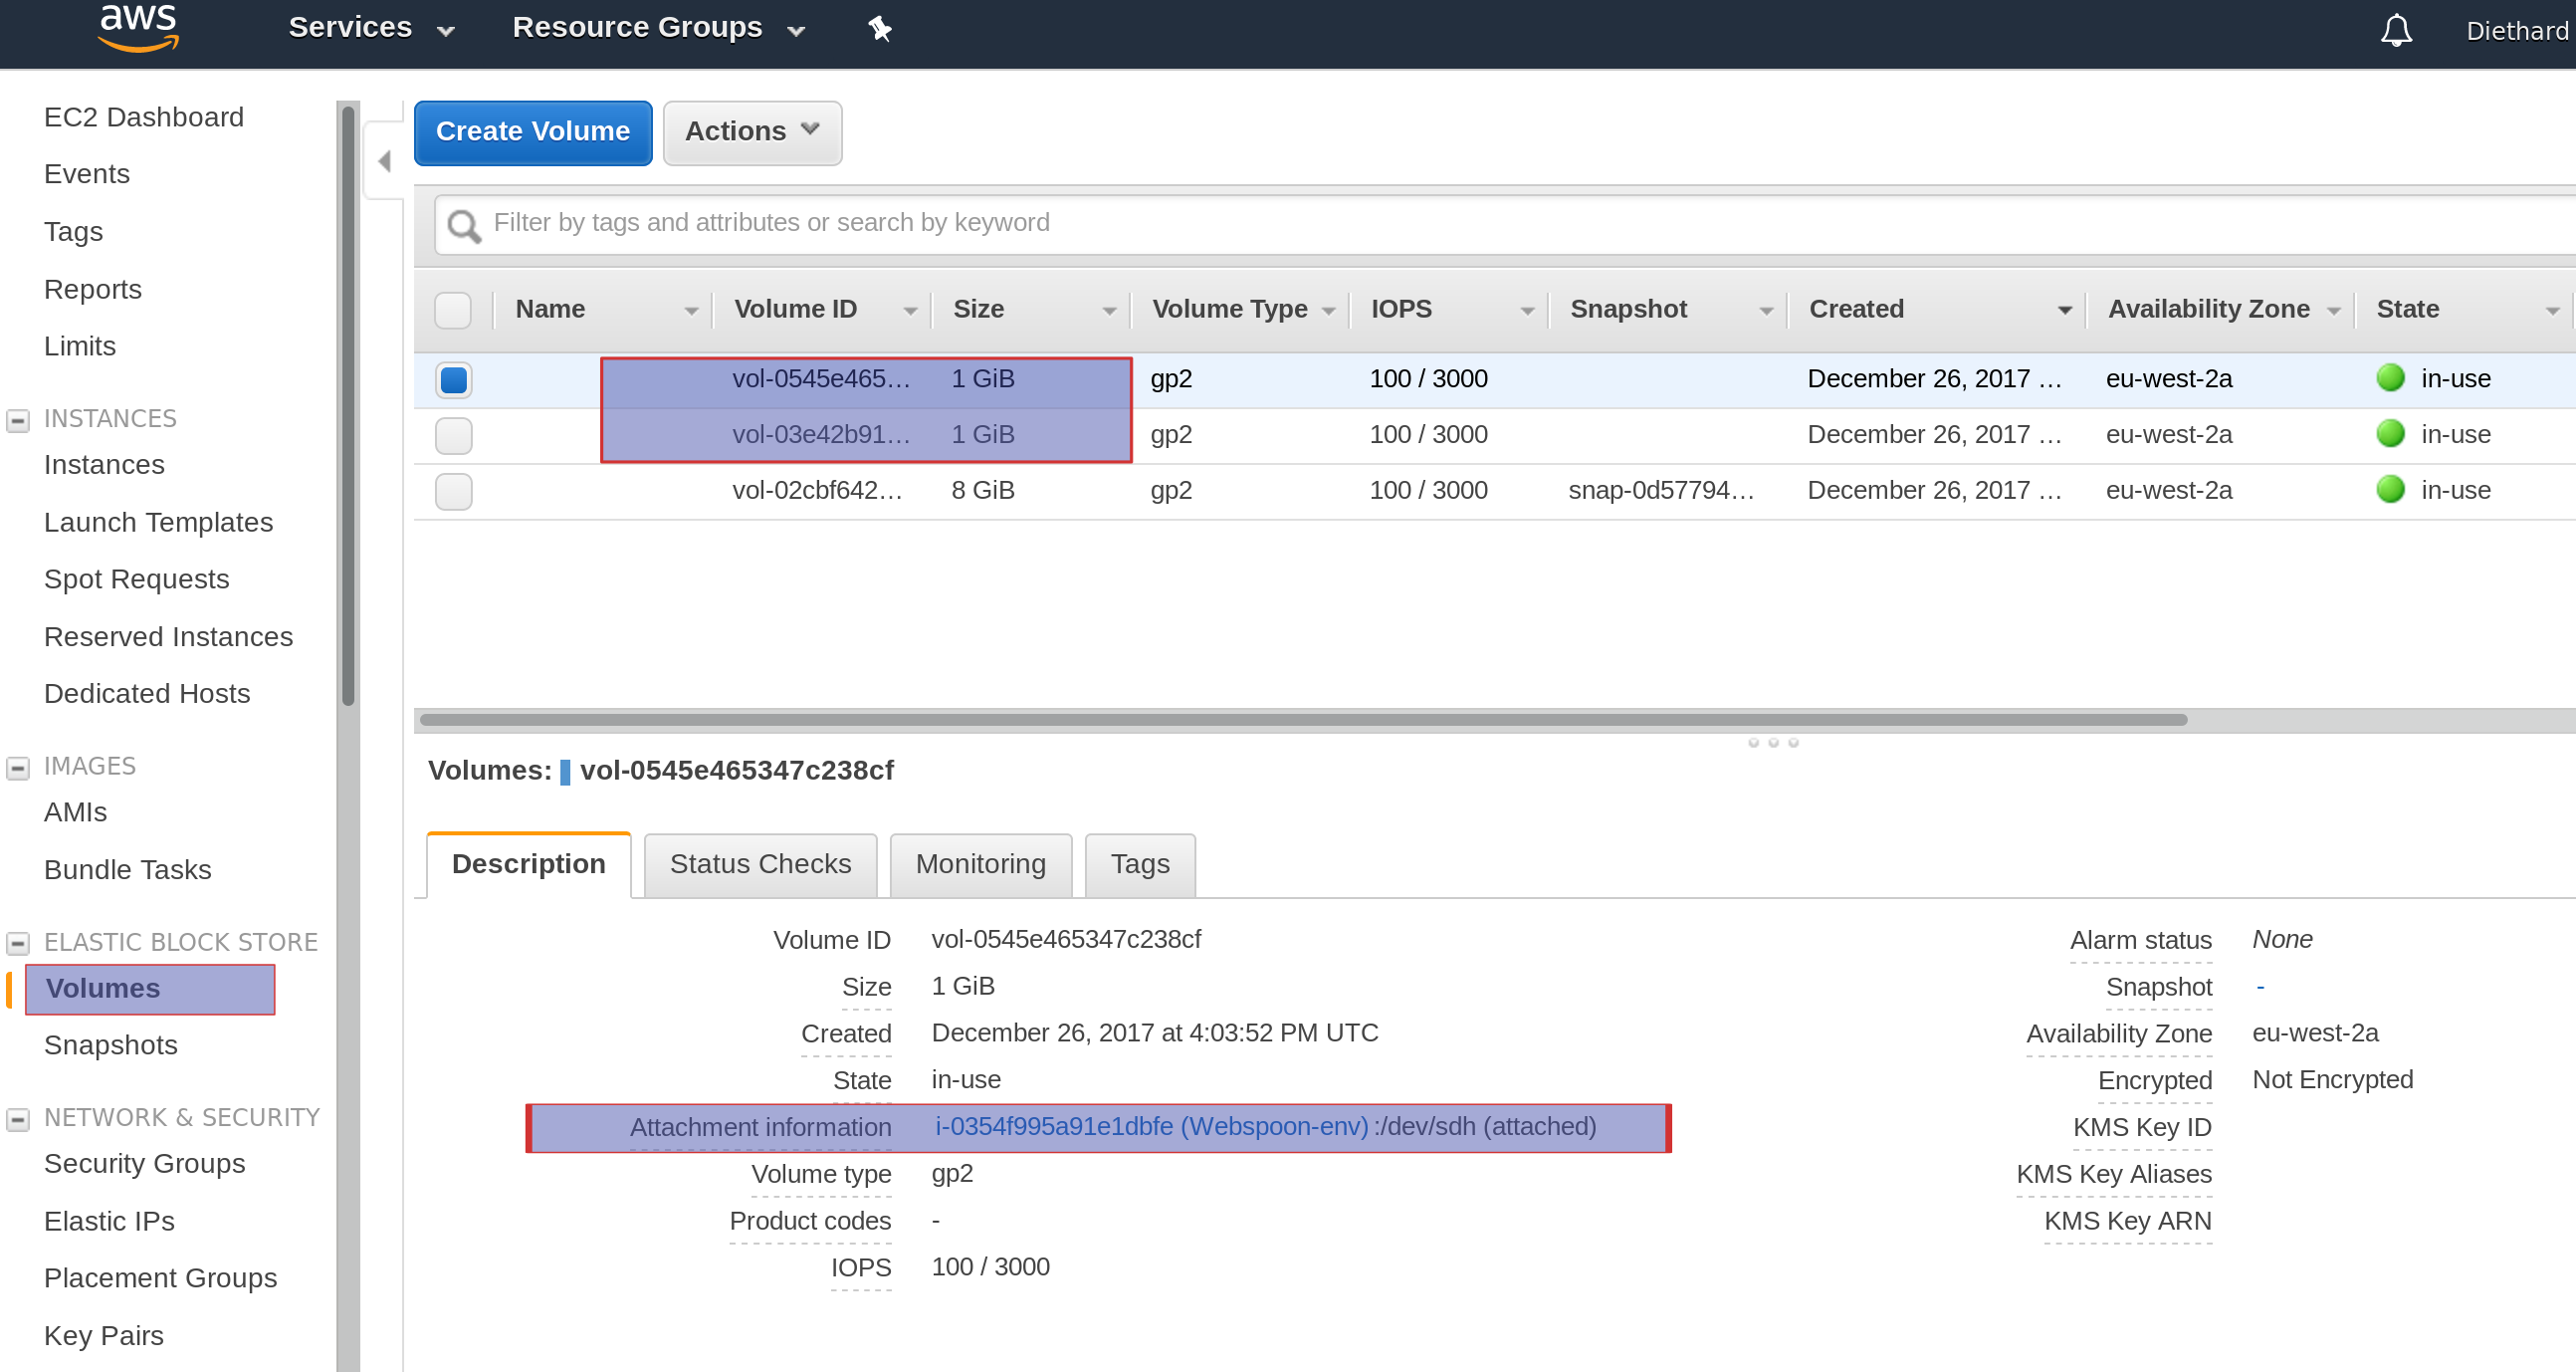
Note: Elastic Beanstalk will by default create also a volume
/dev/xvdczto store the Docker image.
One ESB Drive to Two Docker Volumes
Actually, what we did was a bit too complex (but might be required in some scenarios): We could have simply just mapped the /root folder of the Docker container to the /data folder on the EC2 instance and created a mount point /data that links the EC2 instance directory to the EBS volume. This way all the data is contained in one drive. Well, as it turns out, this is actually not a good idea, as we get loads of other files/folders as well:
[ec2-user@ip-xxx-xx-xx-xx ~]$ ls -la /data
total 40
drwxr-xr-x  7 root root  4096 Dec 26 21:36 .
drwxr-xr-x 26 root root  4096 Dec 26 21:24 ..
drwxr-x---  3 root root  4096 Dec 26 21:36 .java
drwxr-x---  3 root root  4096 Dec 26 21:37 .kettle
drwx------  2 root root 16384 Dec 26 21:24 lost+found
drwxr-x---  3 root root  4096 Dec 26 21:26 .m2
drwxr-x---  3 root root  4096 Dec 26 21:36 .pentaho
Ok, so instead of this, we can leave the original Docker container to EC2 instance volume mapping in place:
| Docker container path | EC2 instance volume path |
|---|---|
/root/.kettle |
/data/kettle |
/root/.pentaho |
/data/pentaho |
And just use one ESB volume, which we mount to /data.
Create a new project directory called beanstalk-with-ebs-one-volume.
Add a new Dockerrun.aws.json file to this folder, which looks like this (it’s exactly the same as when we added the volumes originally):
{
  "AWSEBDockerrunVersion": 2,
  "volumes": [
    {
      "name": "kettle",
      "host": {
        "sourcePath": "/data/kettle"
      }
    },
    {
      "name": "pentaho",
      "host": {
        "sourcePath": "/data/pentaho"
      }
    }
  ],
  "containerDefinitions": [
    {
      "name": "webSpoon",
      "image": "hiromuhota/webspoon:latest-full",
      "essential": true,
      "memory": 1920,
      "environment": [
        {
          "name": "JAVA_OPTS",
          "value": "-Xms1024m -Xmx1920m"
        }
      ],
      "portMappings": [
        {
          "hostPort": 80,
          "containerPort": 8080
        }
      ],
      "mountPoints": [
        {
          "sourceVolume": "kettle",
          "containerPath": "/root/.kettle",
          "readOnly": false
        },
        {
          "sourceVolume": "pentaho",
          "containerPath": "/root/.pentaho",
          "readOnly": false
        },
        {
          "sourceVolume": "awseb-logs-webSpoon",
          "containerPath": "/usr/local/tomcat/logs"
        }
      ]
    }
  ]
}
Inside your project directory (beanstalk-with-ebs-one-volume), create a subdirectory called .ebextensions.
In the .ebextensions directory create a new file called options.config and populate it with this content:
commands:
  01mkfs:
    command: "mkfs -t ext3 /dev/sdh"
  02mkdir:
    command: "mkdir -p /data"
  03mount:
    command: "mount /dev/sdh /data"

option_settings:
  - namespace: aws:autoscaling:launchconfiguration
    option_name: BlockDeviceMappings
    value: /dev/sdh=:1
Now we have to zip our files from within the project root directory:
[dsteiner@localhost beanstalk-with-ebs-one-volume]$ zip ../webspoon-with-ebs.zip -r * .[^.]*
  adding: Dockerrun.aws.json (deflated 65%)
  adding: .ebextensions/ (stored 0%)
  adding: .ebextensions/options.config (deflated 43%)
Note: The zip file will be conveniently placed outside the project directory.
Next via the Web UI create a new Beanstalk environment. The approach is the same as before, just that instead of the Dockerrun.aws.json you have to upload the zip file now.
Important: You have to create the new Beanstalk environment in exactly the same Availability Zone within your Region as your EBS Drive resides in! Otherwise you can’t connect it! You can define the Availability Zone in the Capacity settings on the Configure env name page.
When we shh into our EC2 instance, we can see:
[ec2-user@ip-172-31-14-201 ~]$ lsblk
NAME    MAJ:MIN RM SIZE RO TYPE MOUNTPOINT
xvda    202:0    0   8G  0 disk
└─xvda1 202:1    0   8G  0 part /
xvdh    202:112  0   1G  0 disk /data
[ec2-user@ip-172-31-14-201 ~]$ ls -l /data/
total 24
drwxr-xr-x 3 root root  4096 Dec 26 22:33 kettle
drwx------ 2 root root 16384 Dec 26 22:05 lost+found
drwxr-xr-x 3 root root  4096 Dec 26 22:33 pentaho
As you can see, our /data directory looks way tidier now.
Avoid Conflicts
If we had specified /var/app/current/kettle and /var/app/current/pentaho as mount points we would have run into problems. Everything specified in .ebextensions gets executed before anything in Dockerrun.aws.json. So this approach would have mounted the EBS volumes first under /var/app/current and then later on when Dockerrun.aws.json would have tried to deploy our project, it would have seen that the /var/app/current already exists. In this case it would have renamed it to /var/app/current.old and deployed the app to a fresh new /var/app/current directory.
You can see this when you run the lbslk command to check how the devices were mounted:
[ec2-user@ip-xxx-xx-xx-xx ~]$ lsblk
NAME    MAJ:MIN RM SIZE RO TYPE MOUNTPOINT
xvda    202:0    0   8G  0 disk
└─xvda1 202:1    0   8G  0 part /
xvdh    202:112  0   1G  0 disk /var/app/current.old/kettle
Conclusion: That’s why we need a different mount point! We want to specify a custom location that does not interfere with any other process.
Really Persisting the Data
Note: Here we only discuss a simple manual approach. This is only sensible if you run a single EC2 node with WebSpoon on it. For a more complex setup with load balancer and auto-scaling an automatic solution should be put in place.
So what is the point of this exercise really? Why did we do this? Our main intention was to have some form of persistent storage. Still, if we were to terminate the Beanstalk environment now, all our EBS volumes would disappear as well! However, via the EC2 panel under Elastic Block Storage there is a way to detach the volume:
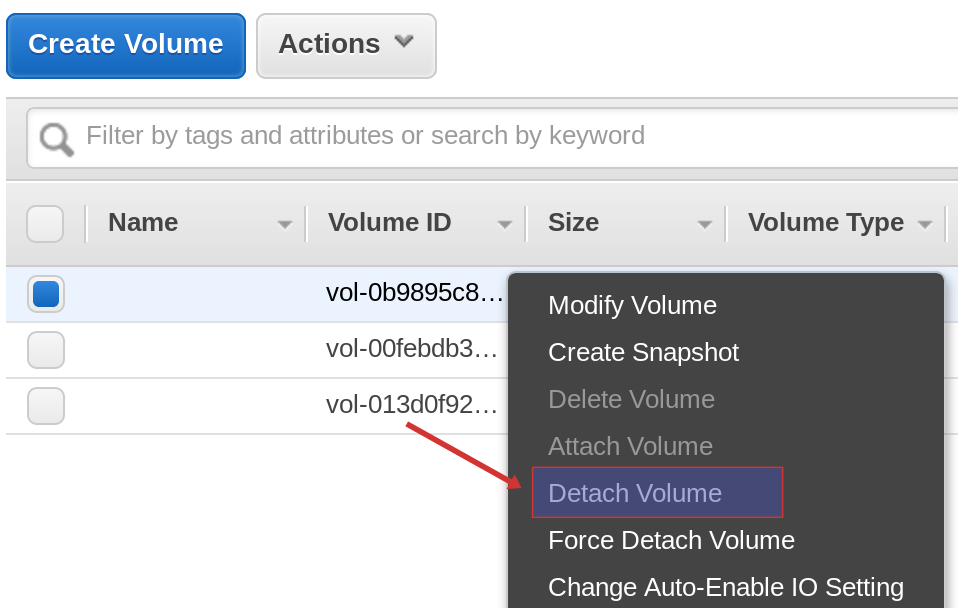
The normal Detach Volume command might not work, because the volume is still used by our EC2 instance. You can, however, choose the Force Detach Volume command, which should succeed. Wait until the state of the drive shows available.
Next terminate your current Beanstalk environment. Once it’s terminated, you will see that your EBS Drive is still around. Start a new Beanstalk environment (this time just use the Dockerrun.aws.json file from this section, not the whole zip file - we do not want to create an new EBS drive).
Important: You have to create the new Beanstalk environment in exactly the same Availability Zone within your Region as your EBS Drive resides in! Otherwise you can’t connect it! You can define the Availability Zone in the Capacity settings on the Configure env name page.
Next, on the EC2 page in the AWS Console go to the EBS Volumes, mark our old EBS drive and right click: Choose Attach Volume. In a pop-up window you will be able to define to which instance you want to attach the EBS drive to.
Once it is attached, grab the public URL of your EC2 Instance from the EC2 area of the AWS console (click on Instances in the side panel). Ssh into your EC2 instance and then run the following:
$ lsblk
NAME                                                MAJ:MIN   RM  SIZE RO TYPE MOUNTPOINT
xvda                                                202:0      0    8G  0 disk
└─xvda1                                             202:1      0    8G  0 part /
xvdf                                                202:80     0    1G  0 disk
xvdcz                                               202:26368  0   12G  0 disk
Originally I asked the EBS drive to be named sdf, but due to OS specifics it ended up being called xvdf as we can see from running the lsblk command. Note that the last letter remains the same. Also, you can see that it doesn’t have a mount point yet. So now we want to mount the EBS drive to the /data directory:
$ sudo mount /dev/xvdf /data
Next you have to restart the Docker container so that the changes can be picked up.
$ sudo docker ps
CONTAINER ID        IMAGE                             COMMAND             CREATED             STATUS              PORTS                  NAMES
18dfb174b88a        hiromuhota/webspoon:latest-full   "catalina.sh run"   15 minutes ago      Up 15 minutes       0.0.0.0:80->8080/tcp   ecs-awseb-Webspoon-env-xxx
0761525dd370        amazon/amazon-ecs-agent:latest    "/agent"            16 minutes ago      Up 16 minutes                              ecs-agent
$ sudo docker restart 18dfb174b88a
Note: If you create the EBS Driver upfront separate from the Beanstalk environment, when you later shutdown the environment, the EBS Driver does not get terminated.
Alternative Approach: Manually create EBS Drive
Note: This approach is only really sensible if you were to run one EC2 instance only. The beauty of the previous approach is that every EC2 instance spun up via the auto-scaling process will have exactly the same setup (so e.g. one EC2 instance with one EBS drive). So for the approach outlined below, you do not need a load balancer and also not auto-scaling.
If you want to go down the manual road, you can as well create the EBS Drive manually:
- Go to the EC2 area within the AWS Console and click on Volumes under Elastic Blockstorage (in the side panel).
- Click on the Create Volume button. Fill out the required settings and confirm to create the volume.
- Next go to the Elastic Beanstalk area of the AWS Console. Start a new Beanstalk environment: Use the
Dockerrun.aws.jsonfile from thebeanstalk-with-ebs-one-volumeproject (if you skipped the previous sections, the instructions for setting up the Beanstalk environment are quite at the beginning of this article). This time also change edit the Capacity settings on the Configure env name page. For the Availability Zone define the same zone as your EBS Drive resides in. - Once the environment is up and running, you can Attach the Volume. On the EC2 page in the AWS Console go to the EBS Volumes:
- Mark our EBS drive and right click: Choose Attach Volume. In a dialog you will be able to define to which instance you want to attach the EBS drive to.
- Once it is attached, grab the public URL of your EC2 Instance from the EC2 area of the AWS console (click on Instances in the side panel). Ssh into your EC2 instance and then run the following:
$ lsblk
NAME                                                MAJ:MIN   RM  SIZE RO TYPE MOUNTPOINT
xvda                                                202:0      0    8G  0 disk
└─xvda1                                             202:1      0    8G  0 part /
xvdf                                                202:80     0    1G  0 disk
xvdcz                                               202:26368  0   12G  0 disk
Originally I asked the EBS drive to be name sdf, but due to OS specifics it ended up being called xvdf as we can see from running the lsblk command. Note that the last letter remains the same. Also, you can see that it doesn’t have a mount point yet.
Since it is a fresh new EBS drive, we have to format it first:
$ sudo mkfs -t ext3 /dev/xvdf
Next we want to mount the EBS drive to the /data directory:
$ sudo mount /dev/xvdf /data
Next you have to restart the Docker container so that the files can be picked up:
$ sudo docker ps
CONTAINER ID        IMAGE                             COMMAND             CREATED             STATUS              PORTS                  NAMES
18dfb174b88a        hiromuhota/webspoon:latest-full   "catalina.sh run"   15 minutes ago      Up 15 minutes       0.0.0.0:80->8080/tcp   ecs-awseb-Webspoon-env-xxx
0761525dd370        amazon/amazon-ecs-agent:latest    "/agent"            16 minutes ago      Up 16 minutes                              ecs-agent
$ sudo docker restart 18dfb174b88a
Once you terminate your environment, the EBS Drive will still be available, so you can later on easily attach it to a new EC2 instance. It behaves this way because you created the EBS Drive separately from the Beanstalk environment.
Making use of Snapshots
If you don’t want to use WebSpoon nor the EBS drive for some time, you can take a snapshot of the data on the EBS Drive and store the snapshot on S3. Then you can get rid of the EBS Drive. Whenever you decide to get WebSpoon running again, you can restore the data from the snapshot onto a EBS Drive and attach it to the EC2 instance that is running WebSpoon and all is back to normal again.
Adding EFS Volume
- Using Elastic Beanstalk with Amazon Elastic File System
- What Is Amazon Elastic File System?
- Amazon EFS: How It Works
Note: An EFS Volume is a network file storage (available in all AWS regions that support it) that can be shared between many EC2 instances at the same time. Because it is a network storage, it will be a bit slower than an EBS Volume (which is a device directly attached to an EC2 instance). Another advantage of an EFS Volume is that it grows or shrinks automatically according to your storage needs.
“You can create an Amazon EFS volume as part of your environment, or mount an Amazon EFS volume that you created independently of Elastic Beanstalk.”
Important: Before you start make sure that EFS is available in your region! If not, change the region selector in the top right hand corner of the AWS console.
Manual Approach: Via Web UI and Command Line
Note: This approach is only really suitable for smaller setups.
Go to the EFS Console and click on Create file system button. Provide the relevant details in the wizard dialog. This is really quite easy. Your network drive should be ready in a matter of minutes.
Next you can either ssh into your EC2 instances and run a few commands to mount the EFS Drive or add an additional config file to the beanstalk config files (and there are a few other options available as well). We will go with the first option for now.
Follow these steps:
- Create a new Beanstalk environment with the
Dockerrun.aws.jsonfile from thebeanstalk-with-ebs-one-volumeproject. - In the EFS Console, expand the details on your EFS Volume and you will find a link on how to mount the volume to an EC2 instance. The steps below are mostly a copy and paste of these instructions.

- Check which security group is assigned to your EFS Volume Mount targets. Chances are that it is the default security group. We have to add the same security group to our EC2 instance(s), so that the instance can access the EFS mount target.
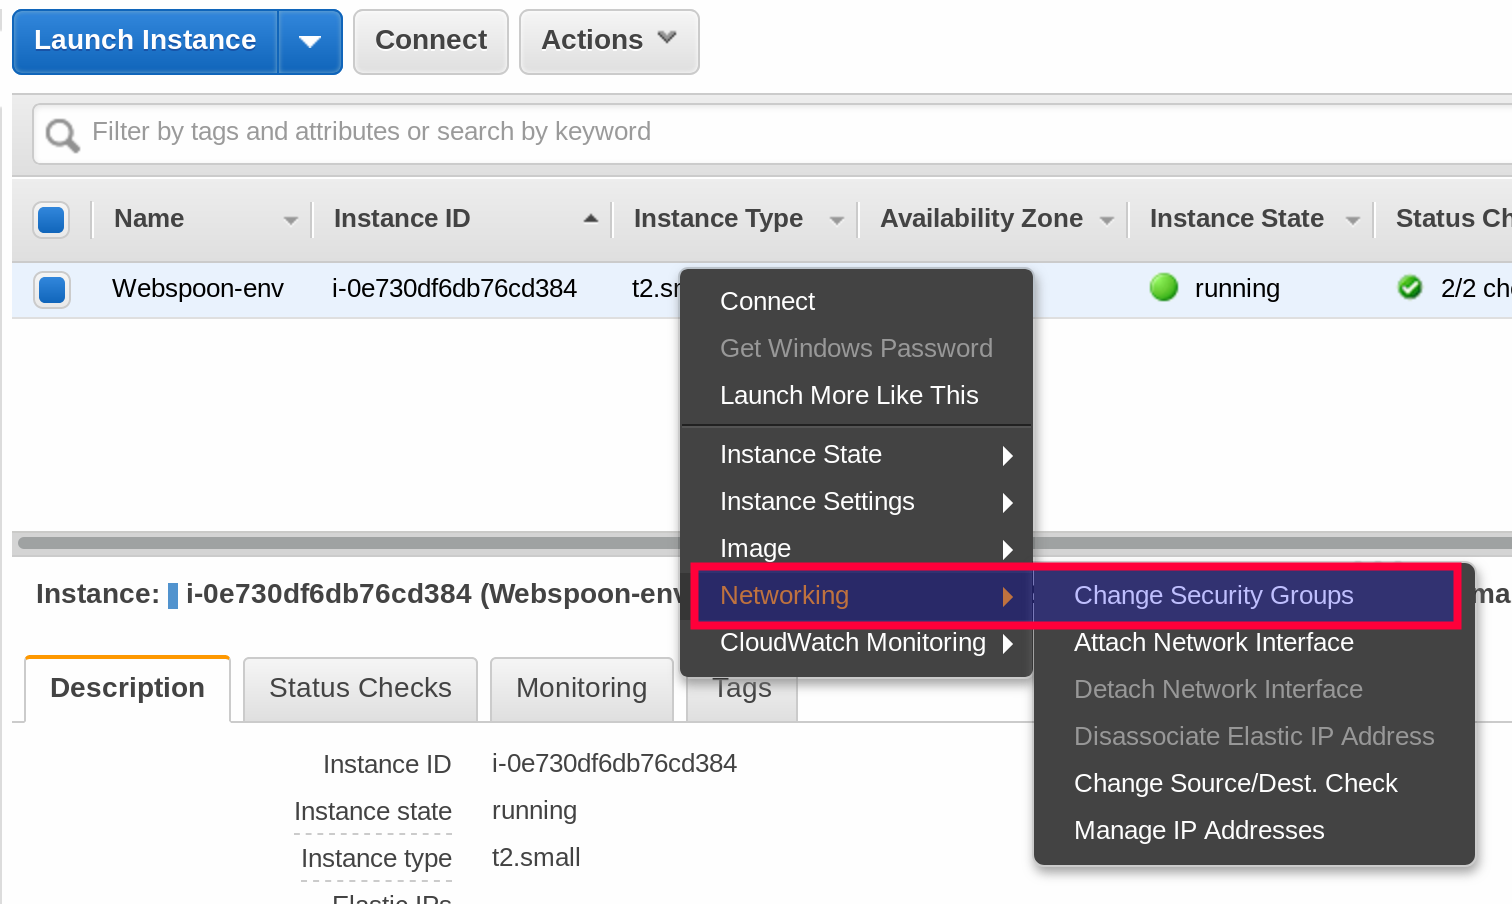
- Head over to the EC2 console and click on Instance, then right click on your currently running instance: Networking > Change Security Groups.
- Tick the default security group and confirm changes.
- Next copy the Public DNS of your EC2 instance, then from the command line, ssh into your instance.
- Once logged in, let’s install the NFS client:
sudo yum install -y nfs-utils - In our case, the mount directory already exists (
/data), hence we can directly mount the NFS Volume like so:
sudo mount -t nfs4 -o nfsvers=4.1,rsize=1048576,wsize=1048576,hard,timeo=600,retrans=2 fs-9c912d55.efs.eu-west-1.amazonaws.com:/ /data
If you run the ls command on the /data directory you will see that it is empty now. Restart the Docker Container now so that these changes can be picked up.
Via Config
Important: Make sure that the EC2 instance has the same Security group assigned as the EFS Volume, otherwise you won’t be able to connect the two!
Elastic Beanstalk provides the option to:
- create a new EFS (using the
storage-efs-createfilesystem.config- Example). Note that this volume will be deleted once the environment is terminated since it is defined within the configuration detailed of this particular environment. - mount an existing EFS (using the
storage-efs-mountfilesystem.config- Example).
These options are not exclusive: So you can either create a new EFS Volume and mount it or mount an existing EFS volume (which you already created separately at some point in the past - the configuration details are not part of the Beanstalk configuration details, in which case the EFS Volume will still exist after the Beanstalk environment was terminated).
If your plan is to not have the EFS Volume running all times (and WebSpoon for that matter), you can take a backup of the drive and reinstate it later on.
The configuration files have to be stored in the .ebextensions directory in your source code.
Note: “EFS requires a VPC. You can use the default VPC or create a custom VPC to use. Use the VPC management console to determine the number of available AZs and the default subnet for each.”
Mount Existing EFS
We will deploy new artifacts one by one to make sure that everything is working correctly:
- Create a new project folder called
beanstalk-with-efs-mount-existing-volume. - Copy and paste the
Dockerrun.aws.jsonfile from thebeanstalk-with-ebs-one-volumeproject into this directory. - Create a new Beanstalk environment with this
Dockerrun.aws.jsonfile. - Next go to the EFS Console and create a new EFS Volume. Once the volume is ready, expand the details on your EFS Volume and copy the ID of Volume.
- Check which security group is assigned to your EFS Volume Mount targets. Chances are that it is the default security group. We have to add the same security group to our EC2 instance(s), so that the instance can access the EFS mount target.
- Head over to the EC2 console and click on Instance, then right click on your currently running instance: Networking > Change Security Groups.
- Tick the default security group and confirm changes.
- Inside this your project directory (
beanstalk-with-efs-mount-existing-volume), create a subdirectory called.ebextensions. - In the
.ebextensionsdirectory create a new file calledstorage-efs-mountfilesystem.configand populate it with this content:
  option_settings:
    aws:elasticbeanstalk:application:environment:
      # Use variable in conjunction with storage-efs-createfilesystem.config or
      # replace with EFS volume ID of an existing EFS volume
      # FILE_SYSTEM_ID: '`{"Ref" : "FileSystem"}`'
      FILE_SYSTEM_ID: 'fs-5d6fd394'
      # Replace with the required mount directory
      MOUNT_DIRECTORY: '/data'


  ##############################################
  #### Do not modify values below this line ####
  ##############################################
      REGION: '`{"Ref": "AWS::Region"}`'

  packages:
    yum:
      nfs-utils: []
      jq: []

  commands:
    01_mount:
      command: "/tmp/mount-efs.sh"

  files:
    "/tmp/mount-efs.sh":
        mode: "000755"
        content : |
          #!/bin/bash

          EFS_REGION=$(/opt/elasticbeanstalk/bin/get-config environment | jq -r '.REGION')
          EFS_MOUNT_DIR=$(/opt/elasticbeanstalk/bin/get-config environment | jq -r '.MOUNT_DIRECTORY')
          EFS_FILE_SYSTEM_ID=$(/opt/elasticbeanstalk/bin/get-config environment | jq -r '.FILE_SYSTEM_ID')

          echo "Mounting EFS filesystem ${EFS_DNS_NAME} to directory ${EFS_MOUNT_DIR} ..."

          echo 'Stopping NFS ID Mapper...'
          service rpcidmapd status &> /dev/nulljq
          if [ $? -ne 0 ] ; then
              echo 'rpc.idmapd is already stopped!'
          else
              service rpcidmapd stop
              if [ $? -ne 0 ] ; then
                  echo 'ERROR: Failed to stop NFS ID Mapper!'
                  exit 1
              fi
          fi
          # our mount point already exists, hence commented this section out
          # echo 'Checking if EFS mount directory exists...'
          # if [ ! -d ${EFS_MOUNT_DIR} ]; then
              # echo "Creating directory ${EFS_MOUNT_DIR} ..."
              # mkdir -p ${EFS_MOUNT_DIR}
              # if [ $? -ne 0 ]; then
                  # echo 'ERROR: Directory creation failed!'
                  # exit 1
              # fi
          # else
              # echo "Directory ${EFS_MOUNT_DIR} already exists!"
          # fi

          mountpoint -q ${EFS_MOUNT_DIR}
          if [ $? -ne 0 ]; then
              echo "mount -t nfs4 -o nfsvers=4.1,rsize=1048576,wsize=1048576,hard,timeo=600,retrans=2 ${EFS_FILE_SYSTEM_ID}.efs.${EFS_REGION}.amazonaws.com:/ ${EFS_MOUNT_DIR}"
              mount -t nfs4 -o nfsvers=4.1,rsize=1048576,wsize=1048576,hard,timeo=600,retrans=2 ${EFS_FILE_SYSTEM_ID}.efs.${EFS_REGION}.amazonaws.com:/ ${EFS_MOUNT_DIR}
              if [ $? -ne 0 ] ; then
                  echo 'ERROR: Mount command failed!'
                  exit 1
              fi
              chmod 777 ${EFS_MOUNT_DIR}
              runuser -l  ec2-user -c "touch ${EFS_MOUNT_DIR}/it_works"
              if [[ $? -ne 0 ]]; then
                  echo 'ERROR: Permission Error!'
                  exit 1
              else
                  runuser -l  ec2-user -c "rm -f ${EFS_MOUNT_DIR}/it_works"
              fi
          else
              echo "Directory ${EFS_MOUNT_DIR} is already a valid mountpoint!"
          fi

          echo 'EFS mount complete.'
Replace the FILE_SYSTEM_ID with the id of your EFS Volume Id. The config file I use here is fairly similar to this example, just that I commented out the section that creates the mount point, since this one already exists in our case: Remember that this directory gets created already by the instructions in our Dockerrun.aws.json (where we ask it to create the Docker volumes).
- Next zip the two files up as we did before.
- Go to the Dashboard page of your Beanstalk app and click on Upload and Deploy.
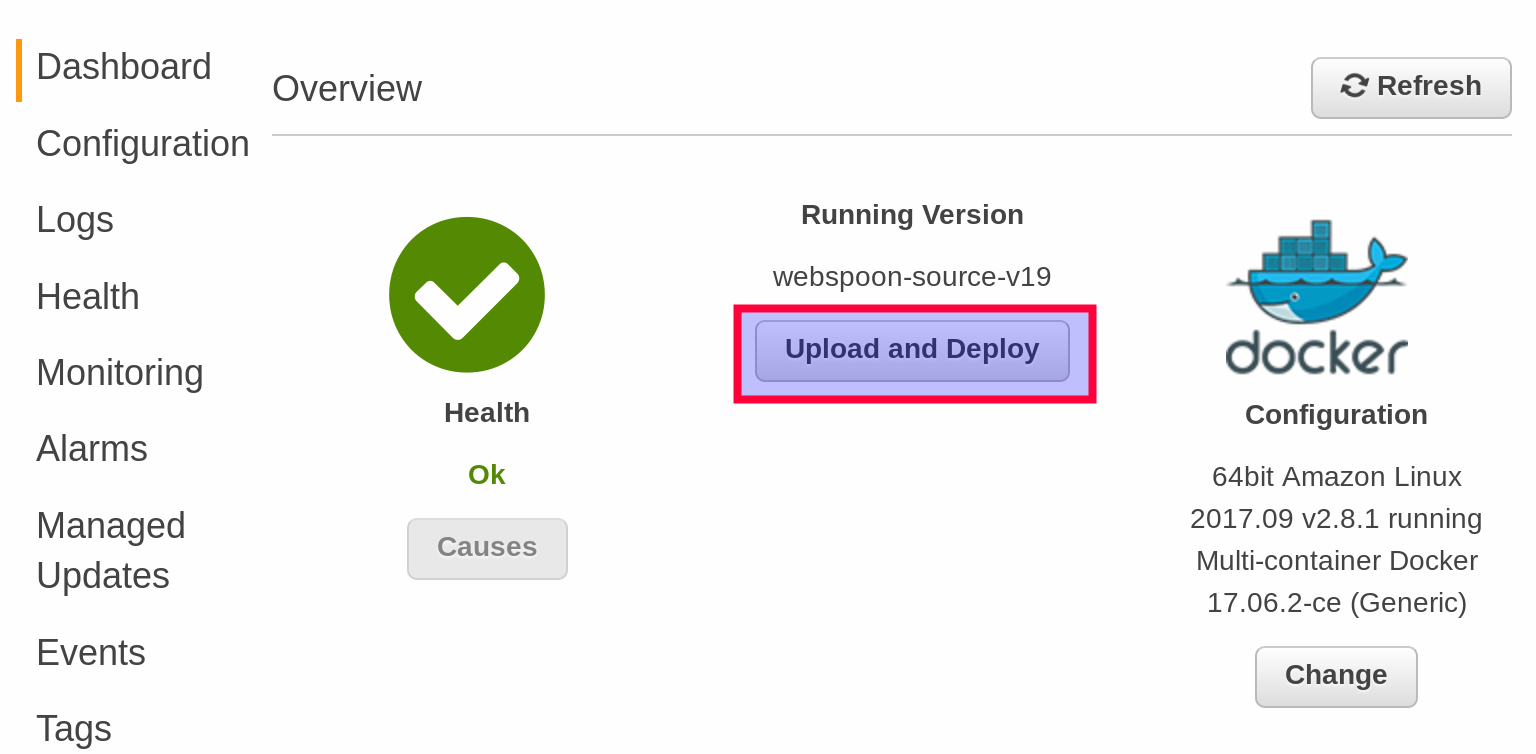
- Add the zip file we just created and provide a version number. Confirm changes. It will attempt to deploy the new configuration: The good things now is that if this fails, it will automatically revert to the previous version, so at no point your are left with a broken environment.
- Once the deployment succeeds, ssh into the EC2 instance and verify that the mounting was successful:
[ec2-user@ip-xxx-xx-xx-xxx ~]$ mount -t nfs4
xxxxxx.efs.eu-west-1.amazonaws.com:/ on /data type nfs4 (rw,relatime,vers=4.1,rsize=1048576,wsize=1048576,namlen=255,hard,proto=tcp,timeo=600,retrans=2,sec=sys,clientaddr=xxx-xx-xx-xxx,local_lock=none,addr=xxx-xx-xx-xxx)
Create EFS and Mount It
This time we will create and mount the EFS volume via config settings.
The AWS Guide recommends deploying the storage-efs-createfilesystem.config with the source code code first (without any other changes), make sure that this deployment succeeds and only deploy everything with storage-efs-mountfilesystem.config. “Doing this in two separate deployments ensures that if the mount operation fails, the file system is left intact. If you do both in the same deployment, an issue with either step will cause the file system to terminate when the deployment fails.”
We actually have to do this in three major steps:
- Create a new project folder called
beanstalk-with-efs-create-and-mount-existing-volume. - Copy and paste the
Dockerrun.aws.jsonfile from thebeanstalk-with-ebs-one-volumeproject into this directory. - Create a Beanstalk environment only with the
Dockerrun.aws.jsonfile. - Inside the your project directory (
beanstalk-with-ebs-two-volumes), create a subdirectory called.ebextensions. -
In the
.ebextensionsdirectory create a new file calledstorage-efs-createfilesystem.configwith following content:option_settings: - namespace: aws:elasticbeanstalk:customoption option_name: VPCId value: "vpc-9acf2ffc" - namespace: aws:elasticbeanstalk:customoption option_name: SubnetEUWest1a value: "subnet-9e9d92f9" - namespace: aws:elasticbeanstalk:customoption option_name: SubnetEUWest1b value: "subnet-b02536f9" - namespace: aws:elasticbeanstalk:customoption option_name: SubnetEUWest1c value: "subnet-d74e058c" Resources: FileSystem: Type: AWS::EFS::FileSystem Properties: FileSystemTags: - Key: Name Value: "EB-EFS-FileSystem" PerformanceMode: "generalPurpose" Encrypted: "false" ## Mount Target Resources # specify one mount target by availability zone MountTargetA: Type: AWS::EFS::MountTarget Properties: FileSystemId: {Ref: FileSystem} SecurityGroups: - {Ref: MountTargetSecurityGroup} SubnetId: Fn::GetOptionSetting: {OptionName: SubnetEUWest1a} MountTargetB: Type: AWS::EFS::MountTarget Properties: FileSystemId: {Ref: FileSystem} SecurityGroups: - {Ref: MountTargetSecurityGroup} SubnetId: Fn::GetOptionSetting: {OptionName: SubnetEUWest1b} MountTargetC: Type: AWS::EFS::MountTarget Properties: FileSystemId: {Ref: FileSystem} SecurityGroups: - {Ref: MountTargetSecurityGroup} SubnetId: Fn::GetOptionSetting: {OptionName: SubnetEUWest1c} ############################################## #### Do not modify values below this line #### ############################################## MountTargetSecurityGroup: Type: AWS::EC2::SecurityGroup Properties: GroupDescription: Security group for mount target SecurityGroupIngress: - FromPort: '2049' IpProtocol: tcp SourceSecurityGroupId: Fn::GetAtt: [AWSEBSecurityGroup, GroupId] ToPort: '2049' VpcId: Fn::GetOptionSetting: {OptionName: VPCId}
Note: There are various syntax options available: shorthand and longform expressions. To understand how they work, take a look at Option Settings. Also, validate the YAML file with one of the available online services, e.g. Code Beautify.
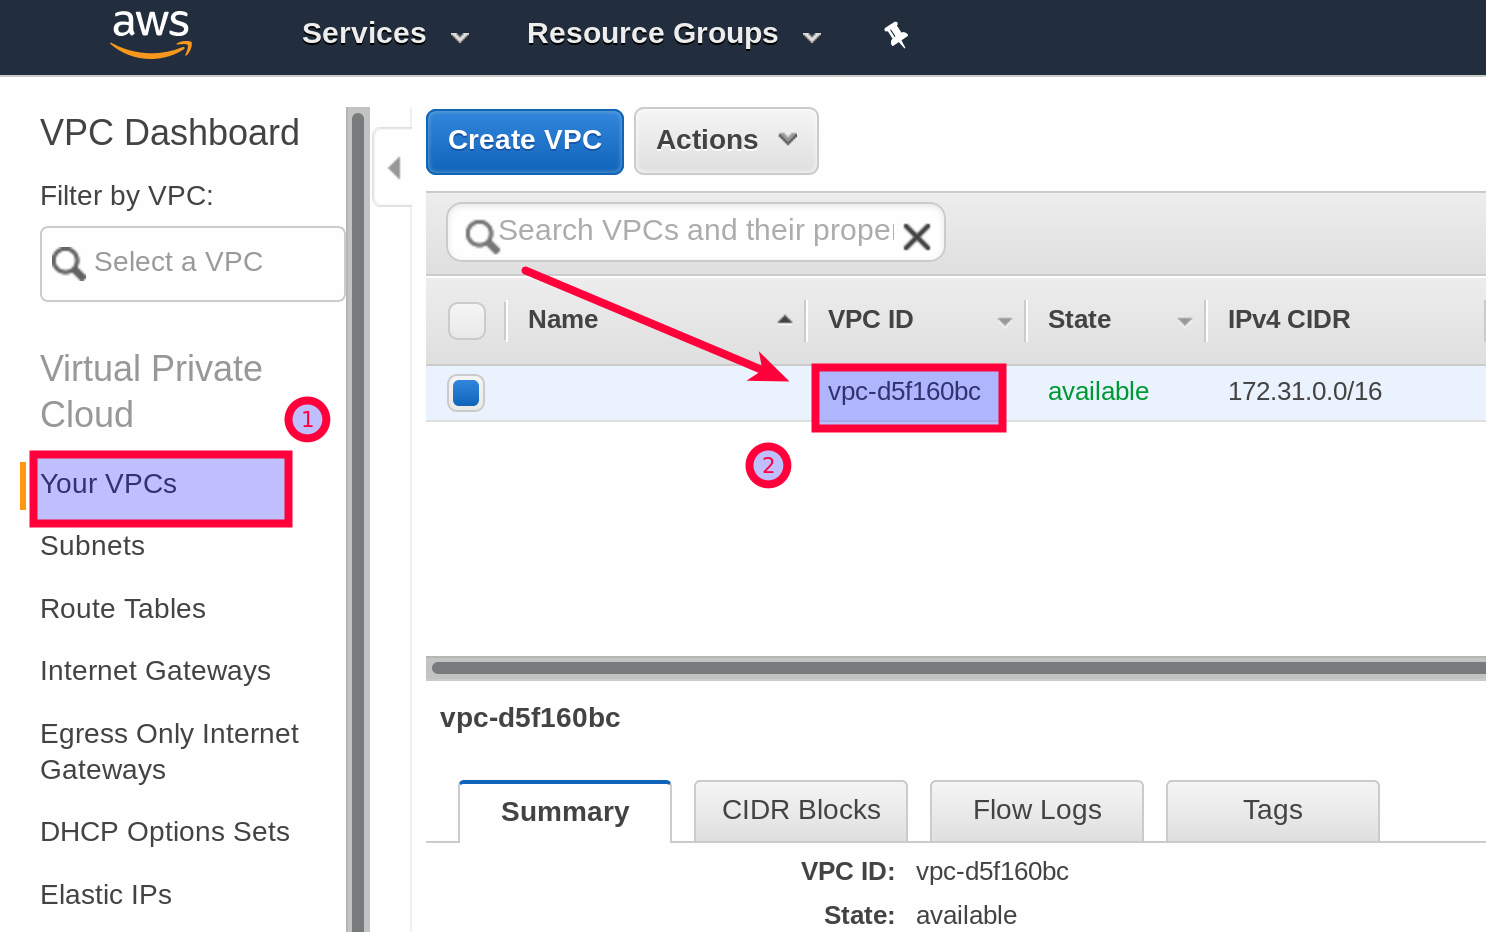
- Once Beanstalk environment is created, the dedicated VPC is set up as well. Go to the VPN management console and get the VPC ID. Paste it into the relevant section within your
storage-efs-createfilesystem.configfile.
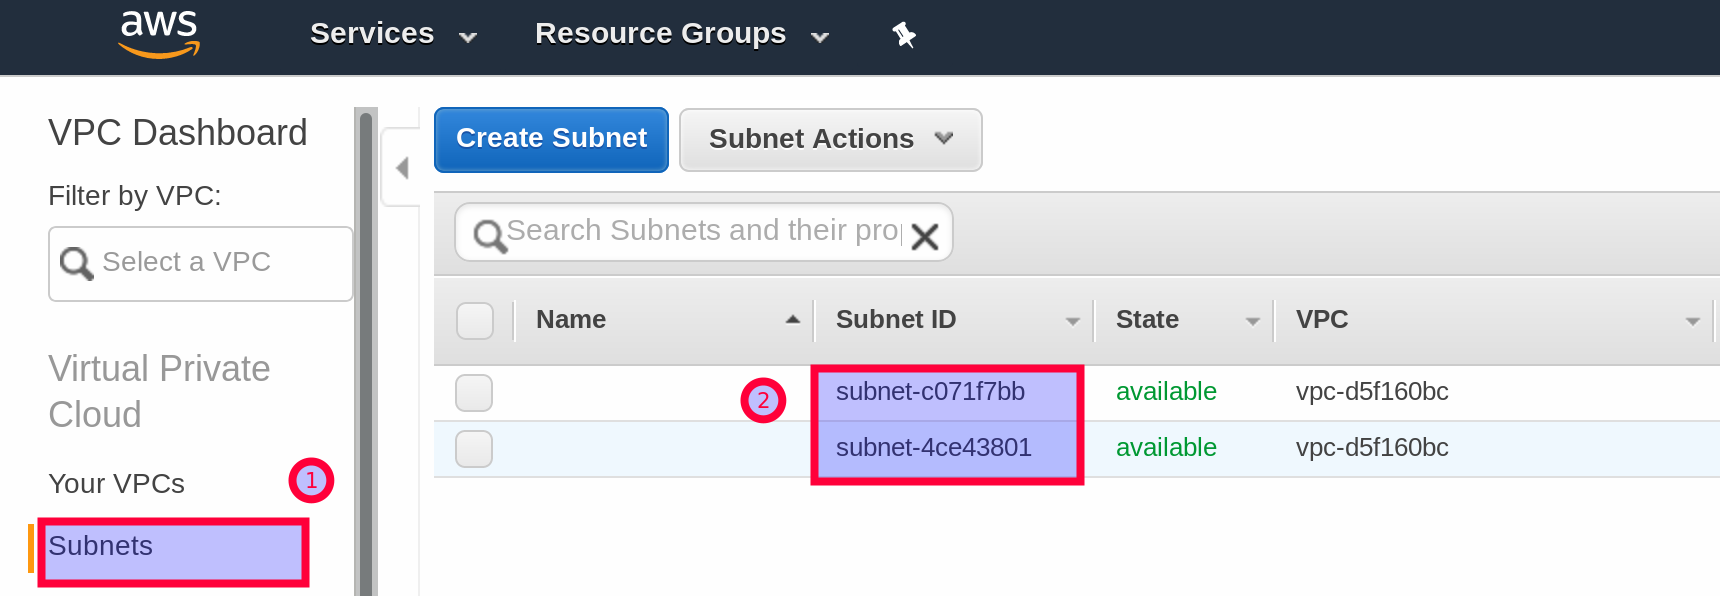
- Next get the Subnet IDs. Paste them into the relevant section within your
storage-efs-createfilesystem.configfile.
- Next zip up the two files as we did before.
- Go to the Dashboard page of your Beanstalk app and click on Upload and Deploy.
- Add the zip file we just created and provide a version number. Confirm changes. It will attempt to deploy the new configuration: The good things now is that if this fails, it will automatically revert to the previous version, so at no point your are left with a broken environment. Once deployment is successful, you should see the new volume in the EFS panel (Web UI).
- Next add the
storage-efs-mountfilesystem.configfrom thebeanstalk-with-efs-mount-existing-volumeproject. We just have to make a small modification: Replace the hardcodedFILE_SYSTEM_IDwith a variable:
  option_settings:
    aws:elasticbeanstalk:application:environment:
      # Use variable in conjunction with storage-efs-createfilesystem.config or
      # replace with EFS volume ID of an existing EFS volume
      FILE_SYSTEM_ID: '`{"Ref" : "FileSystem"}`'
      # FILE_SYSTEM_ID: 'fs-5d6fd394'
      # Replace with the required mount directory
      MOUNT_DIRECTORY: '/data'

  ##############################################
  #### Do not modify values below this line ####
  ##############################################
      REGION: '`{"Ref": "AWS::Region"}`'

  packages:
    yum:
      nfs-utils: []
      jq: []

  commands:
    01_mount:
      command: "/tmp/mount-efs.sh"

  files:
    "/tmp/mount-efs.sh":
        mode: "000755"
        content : |
          #!/bin/bash

          EFS_REGION=$(/opt/elasticbeanstalk/bin/get-config environment | jq -r '.REGION')
          EFS_MOUNT_DIR=$(/opt/elasticbeanstalk/bin/get-config environment | jq -r '.MOUNT_DIRECTORY')
          EFS_FILE_SYSTEM_ID=$(/opt/elasticbeanstalk/bin/get-config environment | jq -r '.FILE_SYSTEM_ID')

          echo "Mounting EFS filesystem ${EFS_DNS_NAME} to directory ${EFS_MOUNT_DIR} ..."

          echo 'Stopping NFS ID Mapper...'
          service rpcidmapd status &> /dev/nulljq
          if [ $? -ne 0 ] ; then
              echo 'rpc.idmapd is already stopped!'
          else
              service rpcidmapd stop
              if [ $? -ne 0 ] ; then
                  echo 'ERROR: Failed to stop NFS ID Mapper!'
                  exit 1
              fi
          fi
          # our mount point already exists, hence commented this section out
          # echo 'Checking if EFS mount directory exists...'
          # if [ ! -d ${EFS_MOUNT_DIR} ]; then
              # echo "Creating directory ${EFS_MOUNT_DIR} ..."
              # mkdir -p ${EFS_MOUNT_DIR}
              # if [ $? -ne 0 ]; then
                  # echo 'ERROR: Directory creation failed!'
                  # exit 1
              # fi
          # else
              # echo "Directory ${EFS_MOUNT_DIR} already exists!"
          # fi

          mountpoint -q ${EFS_MOUNT_DIR}
          if [ $? -ne 0 ]; then
              echo "mount -t nfs4 -o nfsvers=4.1,rsize=1048576,wsize=1048576,hard,timeo=600,retrans=2 ${EFS_FILE_SYSTEM_ID}.efs.${EFS_REGION}.amazonaws.com:/ ${EFS_MOUNT_DIR}"
              mount -t nfs4 -o nfsvers=4.1,rsize=1048576,wsize=1048576,hard,timeo=600,retrans=2 ${EFS_FILE_SYSTEM_ID}.efs.${EFS_REGION}.amazonaws.com:/ ${EFS_MOUNT_DIR}
              if [ $? -ne 0 ] ; then
                  echo 'ERROR: Mount command failed!'
                  exit 1
              fi
              chmod 777 ${EFS_MOUNT_DIR}
              runuser -l  ec2-user -c "touch ${EFS_MOUNT_DIR}/it_works"
              if [[ $? -ne 0 ]]; then
                  echo 'ERROR: Permission Error!'
                  exit 1
              else
                  runuser -l  ec2-user -c "rm -f ${EFS_MOUNT_DIR}/it_works"
              fi
          else
              echo "Directory ${EFS_MOUNT_DIR} is already a valid mountpoint!"
          fi

          echo 'EFS mount complete.'
- Zip everything up. Deploy this new archive to your Beanstalk environment.
- After successful deployment, you can ssh into the EC2 instance and double check that the EFS volume is mounted:
[ec2-user@ip-xxx-xx-xx-xxx ~]$ mount -t nfs4
fs-cb48f402.efs.eu-west-1.amazonaws.com:/ on /data type nfs4 (rw,relatime,vers=4.1,rsize=1048576,wsize=1048576,namlen=255,hard,proto=tcp,timeo=600,retrans=2,sec=sys,clientaddr=xxx-xx-xx-xxx,local_lock=none,addr=xxx-xx-xx-xxx)
Pentaho Server
You could also use Elastic Beanstalk to spin up a Pentaho Server with the Jackrabbit Repository and use the latter to store you files.