Introduction
Setting up LDAP Security on the Pentaho BI Server Community Edition must seem like a daunting task, especially to people not famamiliar with the LDAP service. There is a huge amount of contradicting info on the internet about setting up LDAP security for Pentaho BI Server, which certainly doesn’t help a novice. This article aims to shed some light on it in order to help you get started more easily.
LDAP Basics
What is LDAP?
Wikipedia explains:
The Lightweight Directory Access Protocol (LDAP) is an open, vendor-neutral, industry standard application protocol for accessing and maintaining distributed directory information services over an Internet Protocol (IP) network.[1] Directory services play an important role in developing intranet and Internet applications by allowing the sharing of information about users, systems, networks, services, and applications throughout the network.[2] As examples, directory services may provide any organized set of records, often with a hierarchical structure, such as a corporate email directory. Similarly, a telephone directory is a list of subscribers with an address and a phone number. […] A common usage of LDAP is to provide a “single sign on” where one password for a user is shared between many services, such as applying a company login code to web pages (so that staff log in only once to company computers, and then are automatically logged into the company intranet).
What do all these acronyms stand for?
There is a certain set of standard attributes, which you should be aware of:
| acronym | description |
|---|---|
| dn | distinguished name, each entry has a unique identifier |
| dc | domain component, is the DN of the parent entry |
| various attributes: | |
| ou | organizational unit |
| cn | common name, this is can be a user group name |
| any other freeform attributes |
Let’s have a look at an example:
CN=DWH,OU=Finance,DC=intern,DC=mycompany,DC=com
This search represents a hierarchical structure, which you read from the left to the right:
- Search for the com domain component
- then for the mycompany domain component
- then for the intern domain component
- then for the oranizational unit Finance
- then find the node which has a common name called DWH
Preparation
Before you set out to setup LDAP security, you should make sure you have the following info:
- The connection details to their LDAP server
- Know which users and user groups should be able to access the Pentaho BI Server
- It might be necessary that you create additional groups, something like ‘Pentaho Administrator’ and ‘Pentaho User’. Also, you might want to create a special user just for connecting.
LDAP Server Setup
To make our tutorial a bit more realistic, we will just quickly set up an LDAP server, so that we have some example users to play with.
We will be using Apache DS for this tutorial. You could download a standalone version of ApacheDS, but Apache Directory Studio is shipped with an integrated Apache Directory Server. As we are planning to use Apache Directory Studio any ways, this is the most convenient setup for the purpose of this tutorial.
Download Apache Directory Studio from here and start it up.
Setting up the LDAP Server
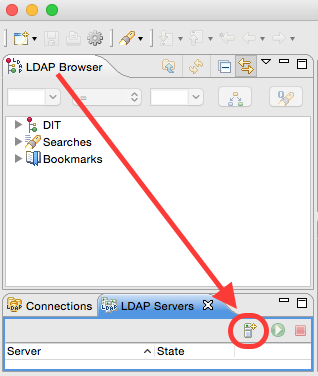
In the bottom left hand corner click on the LDAP Servers view tab.
Next click on the New Server icon:
On the next screen choose the latest version of ApacheDS and provide a Server Name and then click on Finish:
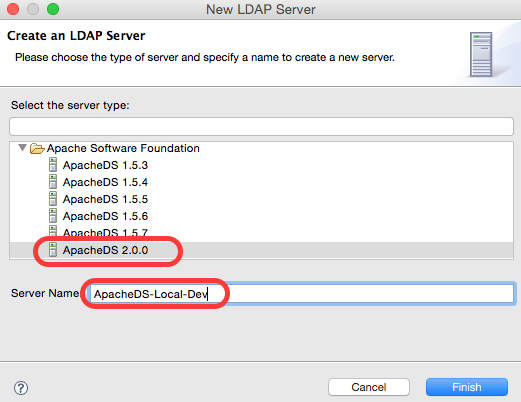
You just created your local ApacheDS LDAP Server.
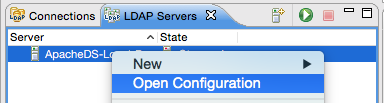
In the LDAP Servers view right click on the new server entry and choose Open Configuration:
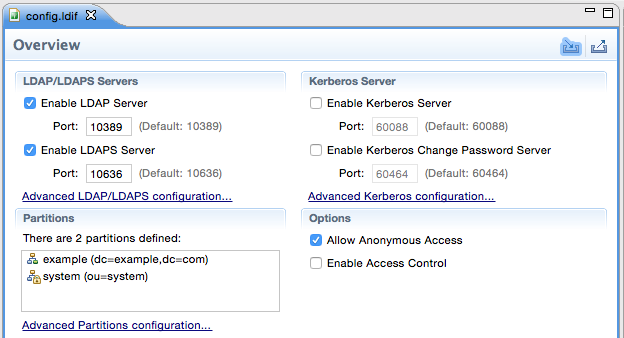
By default our server listens to ports 10389 and 10636 (for SSL). The admin account is uid=admin,ou=system and the password is secret.
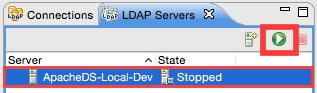
In the LDAP Servers view mark the new server entry and then click on the Run button:
Creating the Connection to the LDAP Server
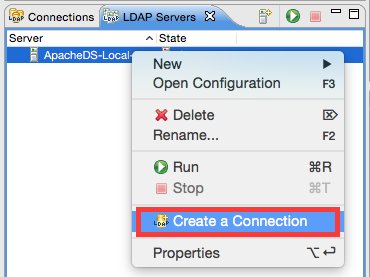
Next let’s specify a new connection for our LDAP Browser. Right click on our server entry and choose Create New Connection:
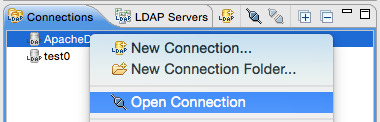
Click on the Connections view tab and right click on our new connection. Choose Open Connection:
Now you should be able to expand the nodes in the LDAP Browser:
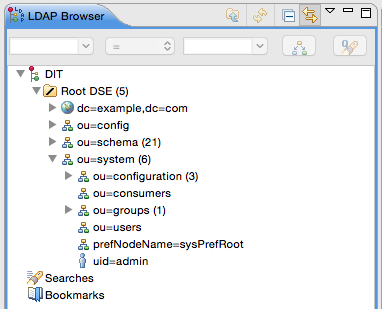
You can see that we only have one user configured, which is the admin user.
We could load a sample now in th form of an ldif file, but as we only need two users and two groups, we might as well take the opportunity and learn a bit more about LDAP.
Creating a Domain Name
In our case we already have a sample domain called dc=example,dc=com pre-configured, so we might as well make use of it for the purpose of this tutorial. A domain in the context of ApacheDS is also referred to as Partition or Suffix.
If you wish to create your own domain, just double click on the server entry on the LDAP Servers view and the the server configuration will show up in the main view. At the bottom of the Overview page click on the Advanced Partitions configuration … link. On the Partitions screen click then on the Add button.
Creating an Organizational Unit
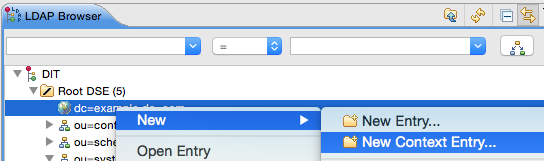
Let’s create an Organizational Unit: In the LDAP Browser tree right click on the dc=example,dc=com node and choose New > New Context Entry:
On the Entry Creation Method make sure Use exsiting entry as template is ticked. Click Next.
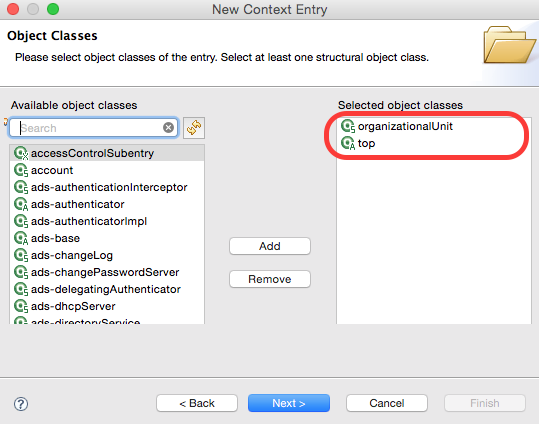
On the Object Classes screen only add the organizationalUnit and top classes (make sure you remove domain as it might be there by default) and click Next:
On the Distinguished Name screen make sure that you add on the left hand side ou=finance, to the DN. So this should be then: ou=finance,dc=example,dc=com. Click Next.
The Attributes screen provides you a nice tabular overview of the attributes we defined in the previous step. Just click on Finish.
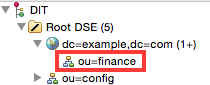
You should see the new node in the LDAP tree now:
We could theoretically add a few more child organizational units, but let’s keep it simple here.
Creating Users
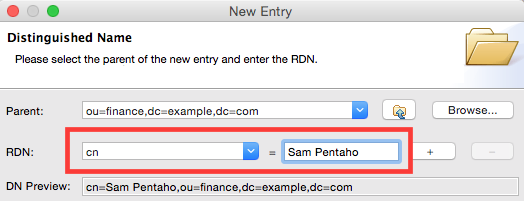
Before we create any User Groups, we have to create some users: Right click on the finance node and choose New > New Entry. Leave the Entry Creation Mode set to Create entry from scratch and click Next. Select organizationalPerson, person and top for the Object Classes and click Next. On the Distinguished Name screen make sure that Parent is set to ou=finance,dc=example,dc=com. Next choose cn from the RDN pull down menu and set its value to Sam Pentaho and click Next.
On the Attributes screen set the value of sn to spentaho and click Finish.
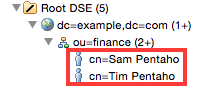
Repeat the last few steps to create a user called Tim Pentaho. Note: Set the sn to tpentaho.
The LDAP tree should look similiar to this one now:
Creating User Groups
Next let’s create some User Groups:
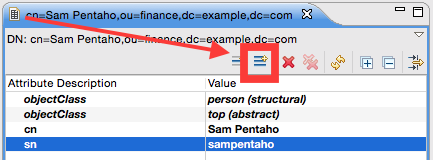
First we have to get hold of the DN of the user that we want to assign to the admin group. Mark the Sam Pentaho node in the LDAP tree and you should see the DN displayed on top of the main view:
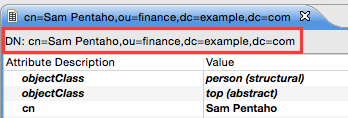
Mark the text (but do not include the DN: prefix), then right click and choose Copy.
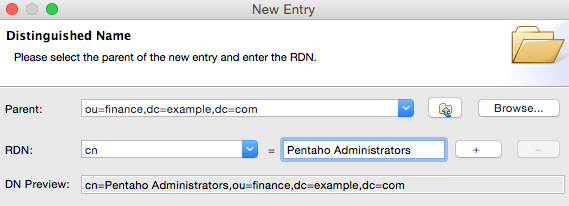
Next right click on the finance node and choose New > New Entry. Choose groupOfUniqueNames and top as Object Classes. On the Distingueshed Name screen choose cn from the RDN pull down menu and set its value to Pentaho Administrators. Click Next:
On the Attributes screen set uniqueMember to cn=Sam Pentaho,ou=finance,dc=example,dc=com (you should be able to paste this from your clipboard).
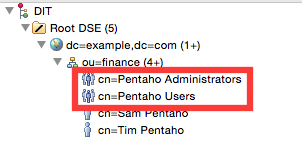
Next copy Tim Pentaho’s DN. Repeat the previous instructions to create a group called Pentaho Users and assign Tim Pentaho to this group.
Your LDAP tree should look like this now:
Note: On some other LDAP solutions you might have seen the
memberOfattribute specific for a given user. This one doesn’t exist in ApacheDS.
Note: You might as well have seen an attribute of the name
sAMAccountName. This is Microsoft specific and only used with older versions of their software (see here for more info).
Defining a password for the users
We are nearly finished. We just have to also assign the users a password.
So mark the user in the LDAP tree and in the main panel click on the New Attribute icon:
From the Attribute Type pull down menu choose userPassword and click Finish. You will be prompted to provide a password - just follow the on-screen instructions.
Repeat the same exercise for the second user.
Testing the LDAP Setup
Now it is time to check if our logins for the users are working. We can use a command line utility called ldapsearch therefore. On MacOS this utility is available by default if you have the developer command line tools installed. On Linux it is normally installed as well.
This command line utility accepts serveral arguments, most importantly the connection details. In the first example, we will just use the System Admin’s credentials for connecting. You can just simply find out these details by clicking on the Connections tab. Right click on our connection and choose Properties. On the Connection screen under Network Parameter you can see the Hostname and Port. Then click on the Authentication tab and you will see the Bind DN or user. The default password is secret.
We also have to define a Search Base, which will be the DN of our finance organisational unit:
ou=finance,dc=example,dc=com
Then we add a Search Filter. Let’s say we want to search for details about our user Sam Pentaho.
Finally we specify which attribute value we want to have return. Let’s say we want to see the DN of this user.
Putting it all together, the command looks like this:
ldapsearch \
-h localhost \
-p 10389 \
-D "uid=admin,ou=system" \
-w secret \
-b "ou=finance,dc=example,dc=com" \
-s one "(cn=Sam Pentaho)" dn
And the result should look like this:
# extended LDIF
#
# LDAPv3
# base <ou=finance,dc=example,dc=com> with scope oneLevel
# filter: (cn=Sam Pentaho)
# requesting: dn
#

# Sam Pentaho, finance, example.com
dn: cn=Sam Pentaho,ou=finance,dc=example,dc=com

# search result
search: 2
result: 0 Success

# numResponses: 2
# numEntries: 1
As you can see, we get the correct DN of Sam Pentaho returned.
So how do we check if a user can login/gets authenticated: Let’s login as Sam Pentaho and try to see any object:
ldapsearch -h localhost -p 10389 \
-D "cn=Sam Pentaho,ou=finance,dc=example,dc=com" \
-w test123 -b "ou=finance,dc=example,dc=com" \
-s one "(objectclass=*)" dn
So Sam Pentaho, our Admin user, seems to be able to see all the entries:
# extended LDIF
#
# LDAPv3
# base <ou=finance,dc=example,dc=com> with scope oneLevel
# filter: (objectclass=*)
# requesting: dn
#

# Pentaho Users, finance, example.com
dn: cn=Pentaho Users,ou=finance,dc=example,dc=com

# Tim Pentaho, finance, example.com
dn: cn=Tim Pentaho,ou=finance,dc=example,dc=com

# Pentaho Administrators, finance, example.com
dn: cn=Pentaho Administrators,ou=finance,dc=example,dc=com

# Sam Pentaho, finance, example.com
dn: cn=Sam Pentaho,ou=finance,dc=example,dc=com

# search result
search: 2
result: 0 Success

# numResponses: 5
# numEntries: 4
Let’s see what happens if we use Tim Pentaho’s credentials now:
ldapsearch \
-h localhost \
-p 10389 \
-D "cn=Tim Pentaho,ou=finance,dc=example,dc=com" \
-w test123 \
-b "ou=finance,dc=example,dc=com" \
-s one "(objectclass=*)" dn
And the result:
# extended LDIF
#
# LDAPv3
# base <ou=finance,dc=example,dc=com> with scope oneLevel
# filter: (objectclass=*)
# requesting: dn
#

# Pentaho Users, finance, example.com
dn: cn=Pentaho Users,ou=finance,dc=example,dc=com

# Tim Pentaho, finance, example.com
dn: cn=Tim Pentaho,ou=finance,dc=example,dc=com

# Pentaho Administrators, finance, example.com
dn: cn=Pentaho Administrators,ou=finance,dc=example,dc=com

# Sam Pentaho, finance, example.com
dn: cn=Sam Pentaho,ou=finance,dc=example,dc=com

# search result
search: 2
result: 0 Success

# numResponses: 5
# numEntries: 4
As you probably noticed, in both case we could not see details about the System Admin. By default this is guaranteed.
Defining ACIs
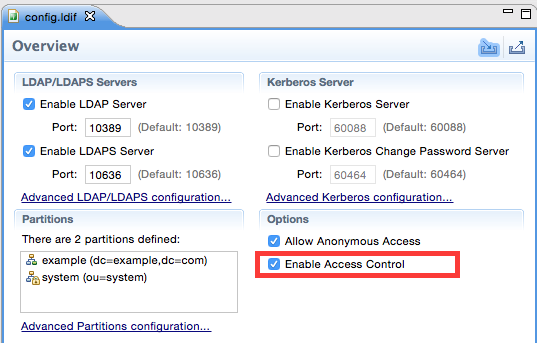
To enforce specific rights for specific users or groups, we will make use of ACIs. The acronym ACI stands for Access Control Information. We can enable this feature by clicking on the LDAP Servers view. Then right click on our server and choose Open Configuration.
In the main window under Options tick Enable Access Control and then click on the Save icon:
Next we have to restart the server for this change to take effect. As you know by know, you can do just this via the LDAP Servers view.
If we try to rerun our previous searches, we will not see any results:
$ ldapsearch \
-h localhost \
-p 10389 \
-D "cn=Sam Pentaho,ou=finance,dc=example,dc=com" \
-w test123 \
-b "ou=finance,dc=example,dc=com" \
-s one "(objectclass=*)" dn

# extended LDIF
#
# LDAPv3
# base <ou=finance,dc=example,dc=com> with scope oneLevel
# filter: (objectclass=*)
# requesting: dn
#

# search result
search: 2
result: 0 Success

# numResponses: 1

$ ldapsearch \
-h localhost \
-p 10389 \
-D "cn=Tim Pentaho,ou=finance,dc=example,dc=com" \
-w test123 \
-b "ou=finance,dc=example,dc=com" \
-s one "(objectclass=*)" dn

# extended LDIF
#
# LDAPv3
# base <ou=finance,dc=example,dc=com> with scope oneLevel
# filter: (objectclass=*)
# requesting: dn
#

# search result
search: 2
result: 0 Success

# numResponses: 1
We have to define specific rights (which is referred to as Authorization) so that user are allowed to do certain tasks.
Defining the Amdinistrative Point
An Entry becomes an Administrative Point when an administrativeRole attribute is added. This is usally defined on the Partition level (also called domain level and sometimes referred to as suffix level): in our case dc=example,dc=com. Then we will add an ASCA (Access Control Specific Area), which covers all entries under and including dc=example,dc=com.
First we will set up an Administrative Point:
Mark the dc=example,dc=com node and in the main panel click on the New Attribute icon. In the New Attribute screen untick Show subattributes only.
From the Attribute type pull down menu choose administrativeRole and click on Finish. You might get a warning that this attribute is not allowed - just ignore it. On the next screen Administrative Role Editor choose accessControlSpecificArea from the pull down menu.
Note: The
administrativeRoleis not by default visible. This attribute is part of the Operational Attributes, which are hidden by default. To see them, right click on the node and choose Fetch > Fetch Operational Attributes.
PrescriptiveACI
ACI stands for Access Control Information: It holds all the relevant access rights for a given subject. There are various types of ACIs:
- for a specific entry only (EntryACI). Ideally these ones should not be used.
- for a collection of entries (not just a single one) (PrescriptiveACI)
- for sub-entries (Subentry ACI)
Right click the dc=example,dc=com node and choose New > New Entry (Create from scratch).
For the Object Classes choose accessControlSubentry,subentry and top. Click Next.
On the Destinguished Name screen make sure the context is set to dc=example,dc=com. Choose cn from the RDN pull down menu and set it to authorizationACI. Click Next.
The Subtree Editor screen will pop up. We do not have to fill anything out here, so just click OK.
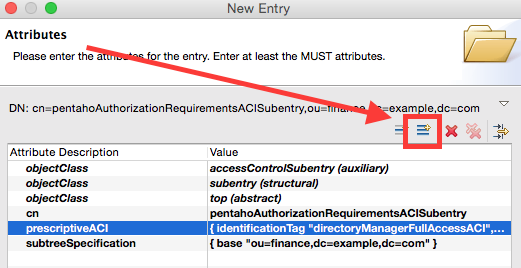
On the Attributes screen click into the Value field for prescriptiveACI:
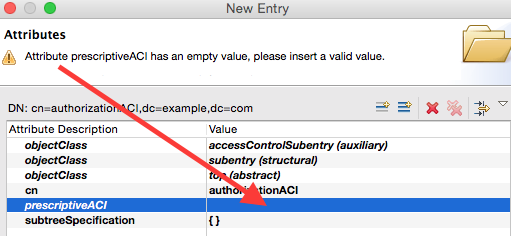
The ACI Item Editor will show up:
Set the following:
- Identification Tag to directoryManagerFullAccessACI
- Precedence to 11
- Authentication Level to simple
- For User or Item first choose User First
- In the User Classes tick User Group. Now the trick is to double click on the User Group text and the Edit User Group dialog will pop up. Click on Add and in the DN Editor click on the Browser button. Choose the Pentaho Administrators node from the tree and click OK. The DN Editor input field should eb set to
cn=Pentaho Administrators,ou=finance,dc=example,dc=comnow. Click OK twice. - In the User Permissions section click on Add and the User Permissions Editor will show up. In the Protected items section tick on Entry and All User Attribute Types and Values. In the Grants and Denials section click on Grant All.
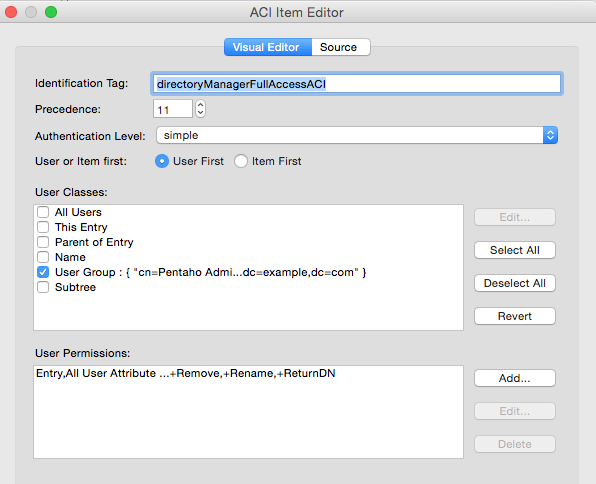
Click OK, which will bring you back to the Attributes screen. Now our Pentaho Administrators will have nearly full access to any items within ou=finance,cn=example,cn=com.
Next we have to set up a much more restrictive access for the standard Pentaho Users: Still on the Attributes screen, click on the New Attribute icon:
On the New Attribute screen untick Hide existing attributes and choose prescriptiveACI from the Attribute type pull down menu. Click on Finish.
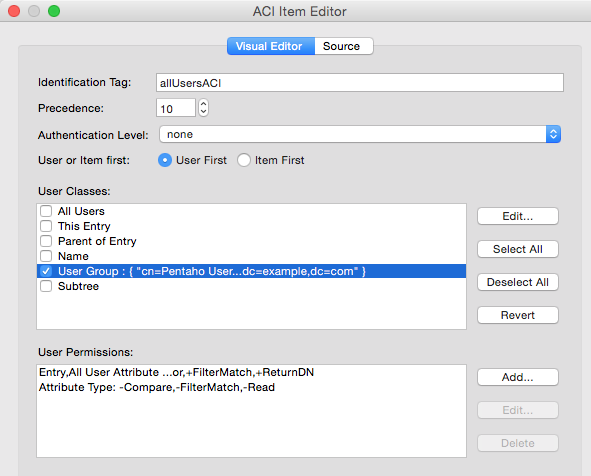
The ACI Item Editor will pop up. Configure it as follows:
- Identification Tag: allUsersACI
- Precedence: 10
- Authentication Level: none
- User or Item first: User first
- In the User Classes section tick All Users.
- In the User Permissions section click on Add. As Protected items tick Entry and All User Attribute Types and Values. In the Grands and Denials section tick all the Read Rights and also DiscloseOnError within the Advanced Rights. Click OK. So we just granted this group all these rights.
- Again in the User Permissions section click on Add. In the Protected items section tick Attribute Type and then double click on it, which will open the Edit Attribute Type dialog. Click on Add. Pick
userPasswordfrom the Attribute Editor pull down list and click OK twice. In the Grants and Denials section click three times (until you see the red cross) on Read, Compare, FilterMatch. This will basically make sure that any user cannot access the password of any other user. Click OK, which brings you back to the ACI Item Editor screen:
If you are interest in the code, which was generated by all these actions, you can click on the Source tab. Otherwise just click OK.
You should now see a new node below dc=example,dc=com with an S icon (S for Subtree):
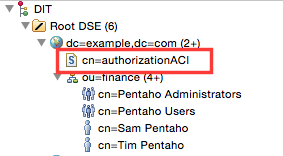
If at some later point you want to change the ACI settings, you can do this by clicking on this node and editing the prescriptiveACI attribute value.
IMPORTANT: WHERE HAS MY ACI SUBENTRY GONE? It might be that the next time you open Apache Directory Studio you do not see the ACI subentry. In this case, right click on
dc=example,dc=comand choose Fetch > Fetch Subentries. Oh, and you have to right click on the subentry node then as well and choose Fetch > Fetch Operational Attributes in order to see the prescriptiveACI attribute(s).
Now all the entries under dc=example,dc=com are ruled by this ACI.
Let’s run our searches again:
$ ldapsearch \
-h localhost \
-p 10389 \
-D "cn=Sam Pentaho,ou=finance,dc=example,dc=com" \
-w test123 \
-b "ou=finance,dc=example,dc=com" \
-s one "(objectclass=*)" dn

# extended LDIF
#
# LDAPv3
# base <ou=finance,dc=example,dc=com> with scope oneLevel
# filter: (objectclass=*)
# requesting: dn
#

# Pentaho Users, finance, example.com
dn: cn=Pentaho Users,ou=finance,dc=example,dc=com

# Pentaho Administrators, finance, example.com
dn: cn=Pentaho Administrators,ou=finance,dc=example,dc=com

# Tim Pentaho, finance, example.com
dn: cn=Tim Pentaho,ou=finance,dc=example,dc=com

# Sam Pentaho, finance, example.com
dn: cn=Sam Pentaho,ou=finance,dc=example,dc=com

# search result
search: 2
result: 0 Success

# numResponses: 5
# numEntries: 4

$ ldapsearch \
-h localhost \
-p 10389 \
-D "cn=Tim Pentaho,ou=finance,dc=example,dc=com" \
-w test123 \
-b "ou=finance,dc=example,dc=com" \
-s one "(objectclass=*)" dn

# extended LDIF
#
# LDAPv3
# base <ou=finance,dc=example,dc=com> with scope oneLevel
# filter: (objectclass=*)
# requesting: dn
#

# Pentaho Users, finance, example.com
dn: cn=Pentaho Users,ou=finance,dc=example,dc=com

# Pentaho Administrators, finance, example.com
dn: cn=Pentaho Administrators,ou=finance,dc=example,dc=com

# Tim Pentaho, finance, example.com
dn: cn=Tim Pentaho,ou=finance,dc=example,dc=com

# Sam Pentaho, finance, example.com
dn: cn=Sam Pentaho,ou=finance,dc=example,dc=com

# search result
search: 2
result: 0 Success

# numResponses: 5
# numEntries: 4
As expected, these users can see all entries now.
Where is this configuration stored?
All the configuration data is stored in the default instance directory, which on my system is the following directory:
/var/lib/apacheds-{version}/default
We have worked so far with the example partition, which is located in partitions/example within the above mentioned directoy. This folder contains two files: example.db and example.lg.
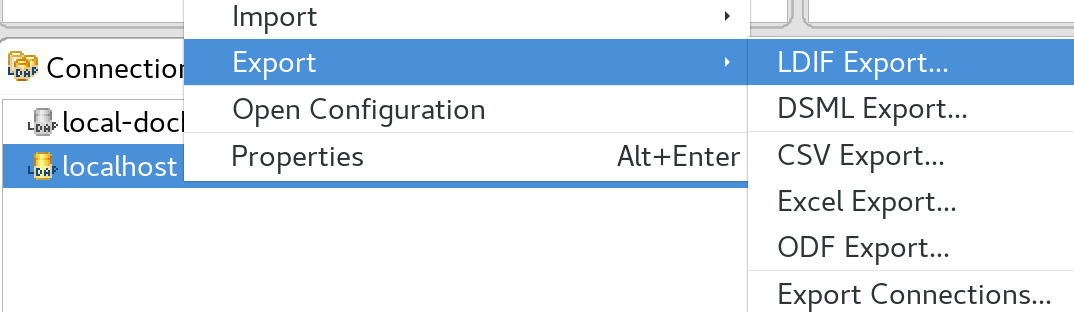
To backup or exchange this configuration, ideally we want to have our configuration available as a LDIF (LDAP Data Interchange Format) file. Within Apache Directory Studio, right click on the LDAP connection and choose Export > LDIF Export.
On the next screen restrict the search base to dc=example,dc=com and tick Operational attributes:
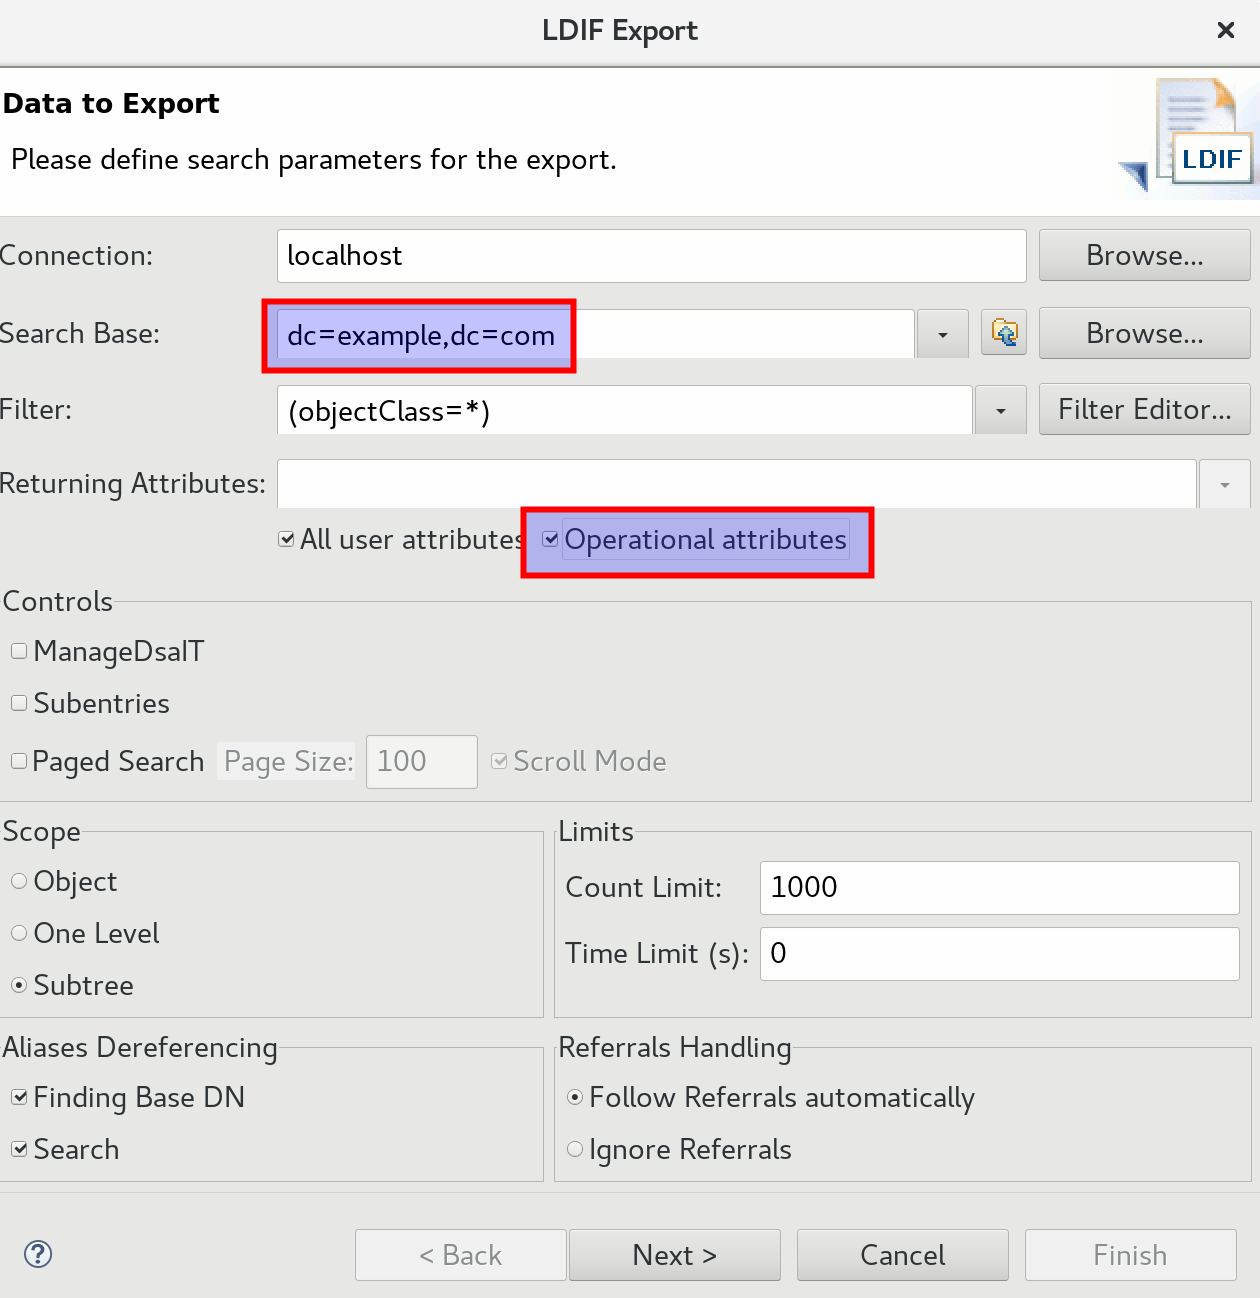
Then click Next, define a location where to store the file and then click Finish.
You can simply import this file into any Apache DS server using following command:
ldapadd -v -h <your-dip>:389 -c -x -D uid=admin,ou=system -w <your-admin-password> -f sample.ldif
Final words
So we managed to set up users and groups (a very basic setup to be precise). It might seem a bit challenging at first, but once you understand it, it is not really that difficult.
Additional Info:
- ApacheDS Basic Authorization
- ApacheDS Admin Model
- ApacheDS Administrative Points
- Enable Authenticated Users to Browse and Read Entries
- Partitions
- DS Authorization (old version with good explanation)
Configuring Pentaho BI Server v5 to use LDAP Security
There are three configuration files in the pentaho-solutions/system folder, which have to be adjusted:
security.properties: This is “main” switcher from jackrabbit to ldap securityapplicationContext-security-ldap.properties: This is where you define the connection details and user and group searchesrepository.spring.properties: This is where you define the LDAP admin user name
We will discuss in more detail on how to modify these files later on.
Note: Some info on the internet suggests creating a dedicated admin user in the Pentaho User Console first, which matches the LDAP admin user. To my experience this step is not necessary.
LDAP Properties
Some Info taken from the Pentaho Infocenter
This is what we are up to:
- The very first properties that you define are the connection properties - this is the easy part.
- When logging on to the Pentaho User Console, each user gets asked for their username (and password). This username has to be matched to the one from the LDAP service. In order to achieve this, we will provide a search pattern to lookup the Pentaho User Console login username on the LDAP server. If the user is found, this search will return the distinguished name (which is like an ID) of this specific user.
- The Pentaho BI Server has to find out now, to which user group this specific user belongs to. For this purpose we will provide a group search pattern, which takes the distinguished name of this specific user (the result of the previous step) as an argument.
- Whereas the last two searches were user specific (and just for the login process), the next two ones will look up all user names and all group names. The returned user names and groups will be used to populate the BI Server Access Control List (ACL) users and groups.
- In the end we define the adminstrator group name and a specific administrator user.
Note: All examples below are based on the previous section. You will have to adjust these example to fit your situation.
Connection Information
Specify the basic connection properties to your LDAP server
This is the very easy part and you should already know how to do this!
Example:
contextSource.providerUrl=ldap://localhost:10389/
contextSource.userDn=cn=Sam Pentaho,ou=finance,dc=example,dc=com
contextSource.password=test123
Note: In some cases there might be a specific user set up on the LDAP server for connection purposes. Here we just kept it simple and use the admin user.
Note: In some cases there are backup LDAP servers as well. You can just list several provide URLs - just leave a space between them.
To escape or not to escape: Various examples on the internet show
=,:,spaceetc being escaped. To my experience it is not necessary to escape these characters.
Users
These options control how the LDAP server is searched for user names that are entered in the Pentaho login dialog box.
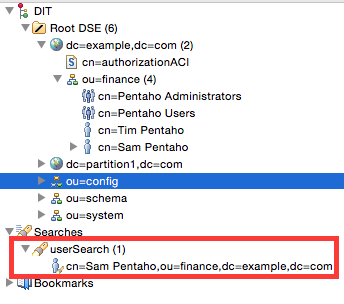
In Apache Directory Studio click on the root node of the tree on the left hand side and then click on the search icon:
![]()
Set Search Name to userSearch.
For Search Base define this in example
ou=finance,dc=example,dc=com
and for Search Filter:
(&(objectClass=person)(cn=Sam Pentaho))
So we start our search from the finance node downwards and look for every subject which is a person and has a common name of Sam Pentaho.
Click OK.
Your search result will be displayed under the Search node within the LDAP Browser view:
Note: In some older LDAP solutions (especially MS) user names are stored in the
sAMAccountName(shortened user name) ordisplayName(full user name) attribute. In the above example you see that I am usingcnwhich holds the user name in our case. So if your LDAP solution usessAMAccountNameordisplayName, just replacecnin the search string with this one.
If you get some results in Apache Directory Studio, you can add these details to the ldap properties file. Make sure however, that you replace the user name with the {0} token:
userSearch.searchBase=ou=finance,dc=example,dc=com
userSearch.searchFilter=(&(objectClass=person)(cn={0}))
User Groups (Populator)
The populator searches for roles the user belongs to based on the fully distinguished user names returned by userSearch and returns the distinguished role names.
Note: In Apache Directory Studio the distinguished name is always shown on top of the main panel!
If you explored a bit the LDAP tree structure in Apache Directory Studio, you must have realized the some nodes show a group icon (instead of the user icon). If you mark one of these, in the main window you will see all attributes etc related to this node. One of these attributes is members (in our case uniqueMember) - that’s the one we are interested right now. As expected, the members attribute shows all members that belong to this group. You can see that all the members are referenced by the distinctive name.
Create a new search by clicking on the search icon.
For the Search Base use something like this:
ou=finance,dc=example,dc=com
For the Search Filter use the member filter with the user DN we just copied:
(uniqueMember=cn=Tim Pentaho,ou=finance,dc=example,dc=com)
Note:
uniqueMemberis just an attribute of the group. Just have a look in Apache Directory Studio to understand the attributes of each node.
The result will show all the groups these user belongs to.
For the properties file we make the Search Filter more dynamic by replacing the specific user DN with the token {0} like this:
(uniqueMember={0})
Note: Tokens of type
{0}will be replaced with the user DN found during a user search. There is also the{1}token, which is replaced by the user name entered in the login screen.
Example:
populator.convertToUpperCase=false
populator.groupRoleAttribute=cn
populator.groupSearchBase=ou=finance,dc=example,dc=com
populator.groupSearchFilter=(uniqueMember={0})
populator.rolePrefix=
populator.searchSubtree=true
If required, adjust the groupRoleAttribute value to whatever attribute your LDAP solution is using.
And here a listing of all properties:
| property | description |
|---|---|
| populator.convertToUpperCase | Converts user names to upper case |
| populator.groupRoleAttribute | The attribute to get role names from |
| populator.groupSearchBase | Base (by user DN or user name) for role searches. |
| populator.groupSearchFilter | group filter |
| populator.rolePrefix | A prefix to add to the beginning of the role name found in the group role attribute; the value can be an empty string. |
| populator.searchSubtree | Indicates whether or not the search must include the current object and all children. If set to false, the search must include the current object only. |
All Authorities Search
These entries populate the BA Server Access Control List (ACL) roles. These should be similar or identical to the Populator entries.
Again, in Apache Directory Studio create a new search by clicking the search icon. Name the search allAuthoritiesSearch.
For the Search Base define something like this:
ou=finance,dc=example,dc=com
and for the Search Filter:
(objectClass=groupOfUniqueNames)
In this case we add to the properties file:
allAuthoritiesSearch.roleAttribute=cn
allAuthoritiesSearch.searchBase=ou=finance,dc=example,dc=com
allAuthoritiesSearch.searchFilter=objectClass=groupOfUniqueNames
If required, change the roleAttribute attribute value to whatever attribute your LDAP solution is using.
And finally a listing of the properties with the description:
| property | description |
|---|---|
| allAuthoritiesSearch.roleAttribute | The attribute used for role values |
| allAuthoritiesSearch.searchBase | Base for “all roles” searches |
| allAuthoritiesSearch.searchFilter | Filter for “all roles” searches. |
###All user names search
These entries populate the BA Server ACL users.
| property | description |
|---|---|
| allUsernamesSearch.usernameAttribute | The attribute used for user values |
| allUsernamesSearch.searchBase | Base for “all users” searches |
| allUsernamesSearch.searchFilter | Filter for “all users” searches |
In Apache Studio set up a new search. Set the Search Base in example to:
ou=finance,dc=example,dc=com
and the Search Filter to:
(objectClass=person)
Example:
allUsernamesSearch.usernameAttribute=cn
allUsernamesSearch.searchBase=ou=finance,dc=example,dc=com
allUsernamesSearch.searchFilter=objectClass=person
If required, adjust the usernameAttribute value to whatever attribute your LDAP solution is using.
Admin Role
Finally we have to define the admin role and user, which is fairly easy. Just look for them in the LDAP tree and copy the DN.
Example:
adminRole=cn=Pentaho Administrators,ou=finance,dc=example,dc=com
adminUser=cn=Sam Pentaho,ou=finance,dc=example,dc=com
Adjusting the Spring Repository Properties
Next we have to adjust the pentaho-solutions/system/repository-spring.properties file: Set the properties singleTenantAdminDefaultUserName and singleTenantAdminUserName to the LDAP user name (cn in our case, but might be sAMAccountName etc in your case) of the LDAP admin. In example:
singleTenantAdminDefaultUserName=Sam Pentaho
singleTenantAdminUserName=Sam Pentaho
Turn the switch
Finally edit the pentaho-solutions/system/security.properties file and set provider to ldap.
Start the biserver now and you should be able to login using the LDAP credentials.
Turn on LDAP Logging when things go wrong
If for some reason your biserver-v5 LDAP configuration is not working as expected, there is nothing worse than not understanding the reason for it.
So your searches in Apache Directory Studio are all working fine and from what you can judge, the biserver config files are all set up correctly … it seems. So what do to now?
Well, luckily there is another switch that you can turn on to get some more info about what is going wrong: We can enable LDAP Logging. You must do this only in your dev environment because passwords are exposed in plain text!
The Pentaho Wiki has quite a good article on this topic (which is not up-to-date), the essensce of which I will replicate here:
Open tomcat/webapps/pentaho/WEB-INF/classes/log4j.xml and remove any Threshold param that occurs in all of the appenders (i.e. PENTAHOFILE or PENTAHOCONSOLE). So remove or comment lines similar to this one:
<param name="Threshold" value="ERROR"/>
In the same file adjust the root logger definition: Add or change the priority to WARN, ERROR or FATAL. All loggers will inherit this logging level.
<root>
  <priority value="WARN" />
  <appender-ref ref="PENTAHOCONSOLE"/>
  <appender-ref ref="PENTAHOFILE"/>
</root>
To enable security logging, add the following snippet before the root element:
<!-- all Spring Security classes will be set to DEBUG -->
<category name="org.springframework.security">
  <priority value="DEBUG" />
</category>

<!-- all Pentaho security-related classes will be set to DEBUG -->
<category name="org.pentaho.platform.engine.security">
  <priority value="DEBUG" />
</category>
<category name="org.pentaho.platform.plugin.services.security">
  <priority value="DEBUG" />
</category>
Restart the server now. Have a look at the log tomcat/logs/catalina.out or pentaho.log and you should see something similar to this:
17:38:28,886 DEBUG [AbstractSecurityInterceptor] Public object - authentication not attempted
17:38:28,906 DEBUG [EhCacheBasedUserCache] Cache hit: false; username: Sam Pentaho
17:38:28,906 DEBUG [DefaultRoleUserDetailsServiceDecorator] injecting proxy
17:38:28,907 DEBUG [FilterBasedLdapUserSearch] Searching for user 'Sam Pentaho', with user search [ searchFilter: '(&(objectClass=person)(cn={0}))', searchBase: 'ou=finance,dc=example,dc=com', scope: subtree, searchTimeLimit: 0, derefLinkFlag: false ]
17:38:28,952 DEBUG [DefaultLdapAuthoritiesPopulator] Getting authorities for user cn=Sam Pentaho,ou=finance,dc=example,dc=com
17:38:28,952 DEBUG [DefaultLdapAuthoritiesPopulator] Searching for roles for user 'Sam Pentaho', DN = 'cn=Sam Pentaho,ou=finance,dc=example,dc=com', with filter (uniqueMember={0}) in search base 'ou=finance,dc=example,dc=com'
17:38:28,952 DEBUG [SpringSecurityLdapTemplate] Using filter: (uniqueMember=cn=Sam Pentaho,ou=finance,dc=example,dc=com)
17:38:28,962 DEBUG [DefaultLdapAuthoritiesPopulator] Roles from search: []
17:38:28,963 DEBUG [LdapUserDetailsMapper] Mapping user details from context with DN: cn=Sam Pentaho,ou=finance,dc=example,dc=com
17:38:28,970 DEBUG [EhCacheBasedUserCache] Cache put: Sam Pentaho
17:38:28,971 DEBUG [EhCacheBasedUserCache] Cache hit: true; username: Sam Pentaho
17:38:29,087 DEBUG [AbstractFallbackMethodDefinitionSource] Adding security method [CacheKey[org.pentaho.platform.repository2.unified.DefaultUnifiedRepository; public abstract org.pentaho.platform.api.repository2.unified.RepositoryFile org.pentaho.platform.api.repository2.unified.IUnifiedRepository.getFile(java.lang.String)]] with attribute [[VOTE_AUTHZ_POLICY_org.pentaho.repository.read]]
17:38:29,088 DEBUG [AbstractSecurityInterceptor] Previously Authenticated: org.springframework.security.providers.UsernamePasswordAuthenticationToken@fc3ceceb: Principal: org.springframework.security.userdetails.User@0: Username: Sam Pentaho; Password: [PROTECTED]; Enabled: true; AccountNonExpired: true; credentialsNonExpired: true; AccountNonLocked: true; Granted Authorities: Admin; Password: [PROTECTED]; Authenticated: true; Details: null; Granted Authorities: Admin
In the example above you can see that no roles were returned (Roles from search: []). I was still able to login via PUC in this case as user Sam Pentaho, but none of the admin features were showing up (but a home folder existed). I also could login as Tim Pentaho, but the user had no home folder.
The problem in this case was not related to the search filters, but I had actually not assigned a completely correct dn of Sam Pentaho to the Pentaho Administrators group in Apache Directory Studio.
Conclusion
Although it seems like quite a challenging task in the beginning, setting up LDAP security is not that extremely difficult. Certainly it doesn’t help that there is a lot of conflicting information available on this subject. I do hope that this article helped to clear up some points!
Additional Info: These were the only completely correct instructions I could find. BizCube published a very good video on LDAP setup for the EE version (which also kind of confirmed that the approach mentioned in the first article is correct).