Introduction
Today many companies strive to have their applications running in the cloud. Apart from not having to buy, setup and main hardware, one of the main advantages of a cloud setup is that applications can be scaled based on the workload. While there are many cloud providers availble these days, each one of them has their own set of services. While some are similar across providers to some extend, each one has their own specifics.
Kubernetes was originally created at Google to provision their client facing services and later on open-sourced. The main advantages of Kubernetes from my point of view are:
- It is an abstraction layer: You don’t have to know about all the hardware details.
- Declerative definitions: Any controllers, services etc that you want to be provisioned can be defined in YAML and hence version controlled.
- It’s a whole platform built to deal with provisioning. With some cloud providers different services were added over time and not necessarily all of them are accessible via the same “framework”.
- It’s open source!
- More and more cloud providers support it: Azure, AWS etc. This means you can write your definition once and if at some point required, change to another cloud provider without much rework. (Some details will always we provider specific, but Kubernetes deals with them in an elegant form.)
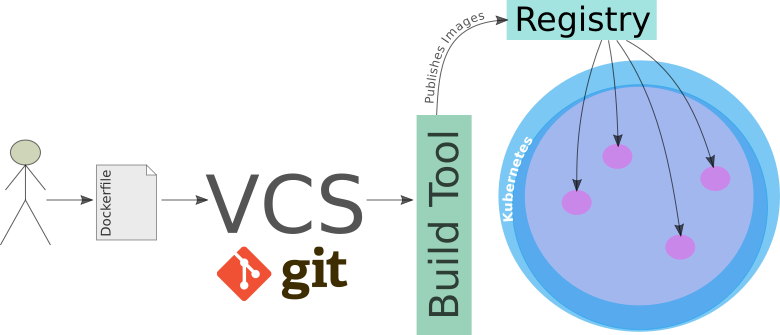
Kubernetes provides a container runtime, which is usually filled by Docker (but it certainly not restricted to Docker). Let’s for a moment focus on the way Docker Images get deployed:
- A developer creates a
Dockerfile: It includes instructions on how to build the environment for the app (and naturally includes the app itself). - The developer checks the
Dockerfileinto a version control system (e.g. git). - An automatic build process creates the Docker Images. Alternatively, the developer can create the image manually.
- Once the image is built, the automatic build process publishes the image to an Image Registry (Artifactory) in the cloud. Think of this as an artifactory holding all the different versions of your particular image. (So you can always roll back to the previous one in case something goes wrong).
- Kubernetes fetches the image from registry and provisions containers/pods with it. You can also understand one of the advantages of having an Image Registry now: Each node in the cluster does not have to build the Docker image.
Preparing the Pentaho Server
There are many projects based around Pentaho Server that should be delivered to the cloud. However, this is no easy undertaking. Hitachi Vantara does not offer an official Docker Image, so everyone is left either creating their own or searching for one that someone kindly shared.
Configuring Pentaho Server is no easy task. There is a plethora of configuration files to adjust if you want to deploy something into production.
We will start by creating a suitable Docker Image, which we will later on use in our Kubernetes Cluster.
Note: This article is aiming to guide you mostly to the final product, but it won’t provide you the finished product. Once you finished reading this article, it will still require some effort from your side to make the setup working.
Note: This article assumes that you have a basic understanding of Docker and Kubernetes.
Microservices
One of the first things we have to do is to break the Pentaho Server and HSQL DB package that the default download comes with. In essence, we follow the microservice approach, which means breaking a conglomerate of apps into their individual parts so that we can scale each of them better (each app can be scaled at differnet levels based on requirements). We cannot scale the Pentaho Server if each running instance has its own database. Instead we will create a dedicated MySQL or PostgreSQL container and change the Pentaho Server configuration to use this database server instead of the local (local to the container) HSQL DB. This way all the Pentaho Server containers we start will write and read from the same database. Naturally you could make the database more resillient by creating a database cluster, but this is not something we will cover in this article.
Kubernetes: High Level Architecture
The high-level Kubernetes architecture looks like this:
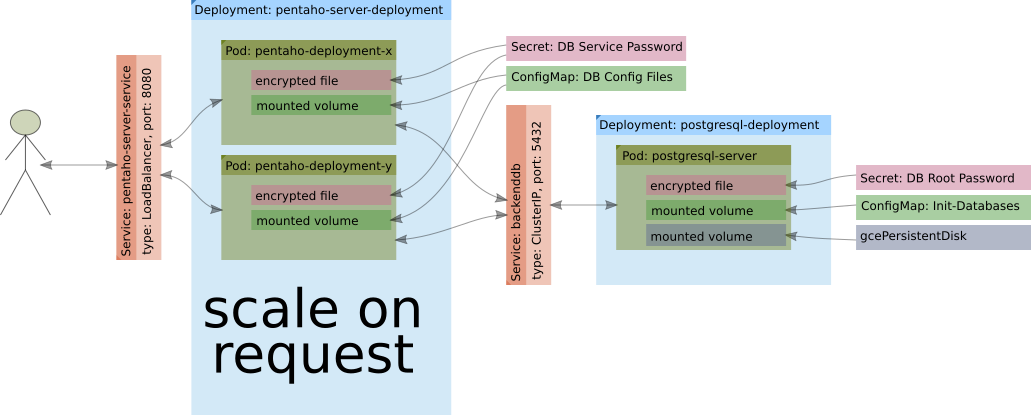
This is the simplest setup. We could further add a proper DB cluster, a LDAP server etc etc. At this point I don’t expect you to fully understand of what’s going on here - we will dive into more details shortly.
For the basic setup, we will use following Kubernetes objects:
- Secret
- ConfigMap
- Service
- Controllers:
- Deployment
Get the configuration right
We have to externalise all the essential configuration details. Our main goal is to make it easy to switch between different database backends. Naturally you could go a lot further, but we have to start with something: Choosing a database is quite often the first step, so it makes a lot of sense to look at this first.
One of the most important questions is: At wich stage should we adjust configuration files. When building the Docker Image or when starting the Container? We have to keep in mind that certain variable values like the database IP address will only be available once the container starts (in a dynamic environment). Based on this, it does not really make a lot of sense to have two rounds of variable replacement (when building the Docker image and when starting the container). The best moment to replace the variables seems to be when starting up the container. This way we can keep the image generic and customise on deployment.
How will we do this? Well, let’s consider this approach:
- We take a copy of all the essential config files from the Pentaho Server download and store them in a dedicated folder within our new project folder.
- We replace all the hard-coded values with Linux style variables, e.g.
${HIBERNATE_DB_TYPE_CFG}. - We need a mechanism to set these variables as environment variables within the container.
- We need a mechanism to inject the customised configuration files into the container.
- Within the container, we have to find a mechanism to copy these config files to the correct location within the Pentaho Server app directory.
Sounds easy, right?!
Let’s clarify point 3 and 4:
- Setting environment variables Options:
- Docker: We can specify them within the
Dockerfileand set reasonable defaults. If we want custom variable values, we can pass them in via the-eflag with thedocker runcommand. Or, alternatively, we just pass them via the-eflag with thedocker runcommand without defining them within theDockerfile. - Kubernetes: We can specify environment variables as part of the pod definition.
- Docker: We can specify them within the
- Injecting configuration files:
- Docker: We can create a Docker volume and map the local config folder to a folder within the container.
- Kubernetes: We can use a
ConfigMapand store the config file contents in there. Then we attach a volume to the container with the contents of theConfigMap.
To be clear: You will mainly use the Docker options for local testing (when you are indeed using the
docker runcommand to spin up a single container). Once you provision a Kubernetes cluster, you will have to find equivalent mechanisms - these ones where outlined above.
Let’s also understand the workflow:
- A developer creates a
Dockerfilefor the Pentaho Server and checks it into a version control system, e.g. git. - A developer or process (e.g. on a CI server) creates a Docker image based on our
Dockerfile. Specific environment variable values for configuring the backend database are not set at this point. Basically no configuration files have been changed at this point - we basically have a vanilla Pentaho Server app. - A developer or process uploads the image to a Docker image registry.
- The image gets deployed to the pods in a Kubernetes cluster.
- Once the container starts, essential environment variables depicting the configuration details are injected into the container and a boostrap process changes the configuration files of the Pentaho Server app to suit our needs.
Creating the Dockerfile
We will not go into every detail of creating the Dockerfile here, but just focus on the more noteworthy bits.
Templating Configuration Files
Pentaho Server comes with an abundance of configuration files. How do we best pass the configuration values in?
The old fashioned way
Using shell environment variables to make the setup dynamic:
export A_VALUE=yarn
cat > test.xml <<EOL
<?xml version="1.0" encoding="UTF-8"?>
<?xml-stylesheet type="text/xsl" href="configuration.xsl"?>
<configuration>
  <property>
    <name>some.property.a</name>
    <value>${A_VALUE}</value>
  </property>
  <property>
    <name>some.property.b</name>
    <value>${SYS_B_VALUE}</value>
  </property>
</configuration>
EOL
Let’s take a look at the generated file:
$ cat test.xml
<?xml version="1.0" encoding="UTF-8"?>
<?xml-stylesheet type="text/xsl" href="configuration.xsl"?>
<configuration>
  <property>
    <name>some.property.a</name>
    <value>yarn</value>
  </property>
  <property>
    <name>some.property.b</name>
    <value></value>
  </property>
</configuration>
So we see that the value for property A got correctly set, however, property a got replaced as well with nothing - wheter we wanted it or not. This behaviour is unsurprising, however, it highlights the problem that in this case we do not have a control. Some config file might use bash style notations for variables and there might be scenarios were we might not want to replace them. So we bascially want another way to define variables and hence gain more control over it. We also might want to have to option to source variables from our backends.
Introducing confd
confd is a simple and convenient templating tool. Follow the instructions on their website to install it or use my sample approach:
# ######### CONFD #################
# https://github.com/kelseyhightower/confd
#

cd $WORK_DIR
mkdir -p confd/bin
wget https://github.com/kelseyhightower/confd/releases/download/v0.15.0/confd-0.15.0-linux-amd64
mv confd-0.15.0-linux-amd64 confd/bin/confd
chmod +x confd/bin/confd

cat >> ~/.bashrc <<EOL

# ======== CONFD ======== #
export PATH=\$PATH:/home/dsteiner/apps/confd/bin
EOL
confd can source variables from various backends (environment variables, etcd, vault, redis, …). The confd setup consists of template and template configuration files:
| Artifact | Location |
|---|---|
| Template Configuration Files | /etc/confd/conf.d |
| Templates | /etc/confd/templates |
Simple example taken from their Quick Start page:
$ export MYAPP_DATABASE_URL=db.example.com
$ export MYAPP_DATABASE_USER=rob
$ sudo mkdir -p /etc/confd/{conf.d,templates}
$ sudo vi /etc/confd/conf.d/myconfig.toml
Template configuration files are written in TOML syntax. The template configuration file holds details on which template to use (src), which variables should be used (keys) and where the generated output should be stored (dest).
Insert following content and save the file:
[template]
src = "myconfig.conf.tmpl"
dest = "/tmp/myconfig.conf"
keys = [
    "/myapp/database/url",
    "/myapp/database/user",
]
Note: In our case we want to reference the environment variables we set earlier on. When we defining the keys (variables) in the template config file, all underscores
_in the environment variable names have to be replaced with forward slashes/plus an additional forward slash at the beginning. Also use lower case. Example:MYAPP_DATABASE_URLturns into/myapp/database/url.
Next let’s create the template:
$ sudo vi /etc/confd/templates/myconfig.conf.tmpl
Templates utilise the Golang text template syntax.
Insert following content and save the file:
[myconfig]
database_url = {{getv "/myapp/database/url"}}
database_user = {{getv "/myapp/database/user"}}
Note: Variables can be sourced via using a set of double curly brackets and calling the
getvfunction inside them (passing the variable name as an argument).
Next we can process the template. confd supports two modes:
- one-off mode via the
-onetimeflag - continuous mode: starts a daemon that polls the backend for changes and updates the file if necessary.
Let’s create our final config files now based on the environment variables provided:
$ confd -onetime -backend env
2018-03-10T08:32:04Z localhost.localdomain confd[11198]: INFO Backend set to env
2018-03-10T08:32:04Z localhost.localdomain confd[11198]: INFO Starting confd
2018-03-10T08:32:04Z localhost.localdomain confd[11198]: INFO Backend source(s) set to
2018-03-10T08:32:04Z localhost.localdomain confd[11198]: INFO Target config /tmp/myconfig.conf out of sync
2018-03-10T08:32:04Z localhost.localdomain confd[11198]: INFO Target config /tmp/myconfig.conf has been updated
$ cat /tmp/myconfig.conf
[myconfig]
database_url = db.example.com
database_user = rob
As you can see, the variables got correctly replaced in the output.
Using confd for customising the Pentaho Server
Based on what we learnt in the previous section, we can create an etc folder our project folder. In the simplest form, this folder will contain following confd configs and templates:
etc/
└── confd
    ├── conf.d
    │   ├── context.xml.toml
    │   ├── hibernate-settings.xml.toml
    │   ├── mysql5.hibernate.cfg.xml.toml
    │   ├── postgresql.hibernate.cfg.xml.toml
    │   ├── quartz.properties.toml
    │   ├── repository.xml.toml
    │   └── systemListeners.xml.toml
    └── templates
        ├── context.xml.tmpl
        ├── hibernate-settings.xml.tmpl
        ├── mysql5.hibernate.cfg.xml.tmpl
        ├── postgresql.hibernate.cfg.xml.tmpl
        ├── quartz.properties.tmpl
        ├── repository.xml.tmpl
        └── systemListeners.xml.tmpl
As you might be aware, these are the main config files that we have to change in order to point Pentaho Server to another database than the built-in HSQL one.
I made my version of the Docker image available on Docker Hub. Please read the description there - it is not a ready-to-go image.
Kubernetes: Backend DB
PostgreSQL
Docker Image and Container
Since we don’t want to reinvent the wheel, we will just use the official PostgreSQL Docker image. It has plenty of options, so it will perfectly fit our mission.
We have the following requirements:
- Persist DB Data: If you want to persist the PostgreSQL data, you can mount the volume to
/var/lib/postgresql/data. In this case, it usually will contain alost+foundfolder, whichinitdbdislikes. The recommendation is to store the data in a subfolder of this directory. Hence set the environment variablePGDATAto/var/lib/postgresql/data/pgdata(in example). - Configure DB Data Storage Path: Can be set via the
PGDATAenvironment variable. - Supply DB Password: Can be set via the
POSTGRES_PASSWORDenvironment variable. - Initialise Databases: The image allows to run some SQL statements once the container gets started (via the entrypoint). Make any SQL files available available in the
/docker-entrypoint-initdb.dfolder and they will be automatically executer on container startup. This feature will enable us to run the required SQL statements to create the Jackrabbit, Quartz and Hibernate databases for the Pentaho Server. For this project I create adocker-entrypoint-initdb.d/init-databases.shfile which contains all the instructions to create the Jackrabbit, Quartz and Hibernate databases for the Pentaho Server. As you can see from thedocker runexample above (for local experiments), we make this file available within the container by attaching a volume.
Additional notes:
You must set listen_addresses = '*'so that other containers will be able to access postgres. This is set as default for this image.
Here an example for local experiments:
docker run --rm -it \
    --name postgresql-instance \
    -e POSTGRES_PASSWORD=mysecretpassword \
    -e PGDATA=/var/lib/postgresql/data/pgdata \
    -v ${PWD}/pgdata:/var/lib/postgresql/data:z \
    -v ${PWD}/docker-entrypoint-initdb.d:/docker-entrypoint-initdb.d:z \
    postgres:10.3-alpine
Kubernetes
- Persist DB Data: We will attach a GCP persistent volume
- Configure DB Data Storage Path: same as before.
- Supply DB Password: The password will be supplied via an encrypted
Secretto the environment variable. - Initialise Databases: With Kubernetes we will store this file in a
ConfigMapand make it available to the pod/container viaConfigMapvolume. We can then mount this file in the required location.
## DB SETUP --- START ##

# persistent volume for database
gcloud compute disks create --size 100GB pentaho-db-disk

# password secret
kubectl create secret generic backenddb \
  --from-literal=root_password=[YOUR_PASSWORD] \
  --from-literal=pentaho_hibernate_password=[YOUR_PASSWORD] \
  --from-literal=pentaho_jcr_password=[YOUR_PASSWORD] \
  --from-literal=pentaho_quartz_password=[YOUR_PASSWORD]

# fetch sql to create required databases
kubectl create configmap init-databases.sh \
  --from-file=./postgresql/docker-entrypoint-initdb.d/init-databases.sh
The Deployment defintion looks like this:
apiVersion: extensions/v1beta1
kind: Deployment
metadata:
  name: postgresql-deployment
spec:
  replicas: 1
  minReadySeconds: 20
  strategy:
    type: RollingUpdate
    rollingUpdate:
        maxUnavailable: 1
        maxSurge: 1
  template:
    metadata:
      labels:
        app: postgresql
        zone: dev
        version: v1
    spec:
      containers:
      - name: postgresql-server
        image: postgres:10.3-alpine
        env:
          - name: POSTGRES_PASSWORD
            valueFrom:
                secretKeyRef:
                  name: pentaho-db
                  key: password
          - name: PGDATA
            value: /var/lib/postgresql/data/pgdata
        ports:
        - containerPort: 5432
          name: postgresql
          protocol: TCP
        resources:
          requests:
            memory: "2Gi"
            cpu: "1"
        volumeMounts:
          - name: pentaho-db-persistent-storage
            mountPath: /var/lib/postgresql/data
          - name: init-databases-volume
            mountPath: /docker-entrypoint-initdb.d
      volumes:
        - name: pentaho-db-persistent-storage
          gcePersistentDisk:
            pdName: pentaho-db-disk
            fsType: ext4
        - name: init-databases-volume
          configMap:
            name: init-databases.sh
Note that we attach a persistent volume to store the data. We should also take backups of this volume in regular intervals (not covered here).
And our Service definition looks like this:
apiVersion: v1
kind: Service
metadata:
  name: postgresql-service
  labels:
    app: postgresql
    zone: dev
    version: v1
spec:
  # user type ClusterIP since the ports
  # should be accessible internally only
  type: ClusterIP
  ports:
    - port: 3306
  selector:
    app: postgresql
Later on, any instance of the Pentaho Server will communicate to this service and not to the PostgreSQL pods/containers directly. This enables us to scale the Postgresql layer. Another benefit is, that it might happen that one node goes down. Note that our data is persisted outside the container on a dedicated persistent disk. Once a new node comes up, the pod/container will be rescheduled and the disk attached. If there was no service in between the Pentaho Server and the one PostgreSQL node we are currently using, then the IP address would have to be updated on the Pentaho Server side.
Let’s deploy this now:
kubectl create -f postgresql-deployment.yaml
kubectl create -f postgresql-service.yaml
If you are interested, you can log on to the pod and check for yourself that the databases indeed exist:
$ kubectl get pods
NAME                                     READY     STATUS    RESTARTS   AGE
postgresql-deployment-68d99bbdd5-tgg9r   1/1       Running   0          1m
$ kubectl exec -it postgresql-deployment-68d99bbdd5-tgg9r bash
bash-4.4# psql -Upostgres
psql (10.3)
Type "help" for help.

postgres=# \l
                                       List of databases
    Name    |    Owner     | Encoding |  Collate   |   Ctype    |       Access privileges
------------+--------------+----------+------------+------------+-------------------------------
 hibernate  | hibuser      | UTF8     | en_US.utf8 | en_US.utf8 | =Tc/hibuser                  +
            |              |          |            |            | hibuser=CTc/hibuser
 jackrabbit | jcr_user     | UTF8     | en_US.utf8 | en_US.utf8 | =Tc/jcr_user                 +
            |              |          |            |            | jcr_user=CTc/jcr_user
 postgres   | postgres     | UTF8     | en_US.utf8 | en_US.utf8 |
 quartz     | pentaho_user | UTF8     | en_US.utf8 | en_US.utf8 | =Tc/pentaho_user             +
            |              |          |            |            | pentaho_user=CTc/pentaho_user
Kubernetes: Pentaho Server
The Load Balancer
In a simple setup, you can just use a service configured as a load balancer:
apiVersion: v1
kind: Service
metadata:
  name: pentaho-server-service
  labels:
    app: pentaho-server
    zone: dev
spec:
  type: LoadBalancer
  # externalTrafficPolicy: Cluster
  ports:
  - port: 8080
  # make sure client connects to same pod
  sessionAffinity: ClientIP
  selector:
    app: pentaho-server
Note: We also define a
sessionAffinityof typeClientIP. This will make sure that the client always connects to the same node.
For a more advanced setup, you could add an Ingress object as the main entry point and have it redirect to the service. This additionally would provide HTTPS and sticky session support. We will not cover this here.
Pentaho Server
We will store the configuration templates and instructions we prepared earlier in ConfigMap objects. ConfigMap objects are very convenient, as their contents can be made available to the containers via attached volumes:
# fetch config files from etc directory
kubectl create configmap pentaho-server-config-etc-conf.d \
  --from-file=/home/dsteiner/git/code-examples/docker-images/pentaho-server/etc/confd/conf.d

kubectl create configmap pentaho-server-config-etc-templates \
  --from-file=/home/dsteiner/git/code-examples/docker-images/pentaho-server/etc/confd/templates
Let’s make sure that the files got actually loaded into the ConfigMap:
$ kubectl get configmaps
NAME                                  DATA      AGE
init-databases.sh                     1         15m
pentaho-server-config-etc-conf.d      9         33s
pentaho-server-config-etc-templates   9         30s
As you can see, 9 files got successfully added to our ConfigMaps.
Let’s take a look at the Deployment definition for the Pentaho Server app (some details omitted for brevity):
apiVersion: extensions/v1beta1
kind: Deployment
metadata:
  name: pentaho-deployment
spec:
  replicas: 2
  minReadySeconds: 20
  strategy:
    type: RollingUpdate
    rollingUpdate:
        maxUnavailable: 1
        maxSurge: 1
  template:
    metadata:
      labels:
        app: pentaho-server
        zone: dev
        version: v1
    spec:
      containers:
      - name: pentaho-server
        image: diethardsteiner/pentaho-server:beta-0.0.1
        env:
          - name: HIBERNATE_DB_ENGINE
            value: "postgresql"
          - name: HIBERNATE_DB_TYPE_CFG
            value: "postgresql.hibernate.cfg.xml"
          - name: HIBERNATE_JDBC_DRIVER
            value: "org.postgresql.Driver"
          - name: HIBERNATE_JDBC_URL
            value: "jdbc:postgresql://backenddb:5432/hibernate"
          - name: HIBERNATE_JDBC_USERNAME
            value: "hibuser"
          - name: HIBERNATE_JDBC_PASSWORD
            valueFrom:
              secretKeyRef:
                name: backenddb
                key: pentaho_hibernate_password
         ... and many many more ...
        ports:
        - containerPort: 8080
          protocol: TCP
        resources:
          requests:
            memory: "4Gi"
            cpu: "2"
        volumeMounts:
        - name: config-volume-etc-confd
          mountPath: /etc/confd/conf.d
        - name: config-volume-etc-templates
          mountPath: /etc/confd/templates
        ...
      volumes:
        - name: config-volume-etc-confd
          configMap:
            name: pentaho-server-config-etc-conf.d
        - name: config-volume-etc-templates
          configMap:
            name: pentaho-server-config-etc-templates
This will provision two pods/containers with the Pentaho Server app. Configuration templates and instructions will be sourced from the attached volumes config-volume-*, which contain the contents of the ConfigMaps.
kubectl apply -f pentaho-server-service.yaml
kubectl apply -f pentaho-server-deployment.yaml
The cluster is full functional now. We can scale the pentaho server apps if traffic increases by simply changing the number of replicas (this process can also be automated). Another big benefit is that if at some point we want to upgrade to a later version of Pentaho Server, we can easily do this with a rolling update without service downtime (well, as long as there no changes to the backend database structure, in which case can still go for a parallel upgrade with a minimum amount of downtime). Point is, that this upgrade process will be effortless - and even if something goes wrong, we can easily roll back.
Problems and Solutions
After PUC Login: Repeated Login Prompts
Symptom: Once user logs on to the PUC, the home page starts loading and several login prompts show up. If you submit your credentials, another prompt shows up - it’s an indefinite loop.
Solution: If you exposed the Pentaho Server only via a Service (and not an additional Ingress object with sticky sessions), you can add sessionAffinity: ClientIP to the specs. This will make sure that the client always connects to the same node.
Improvements
Backend Database: PostgreSQL Deployment
Readiness Probe
While the container is functional, that in itself does not mean that the database is ready. So any attempt by our Pentaho Server to contact the DB might fail because the databases e.g. have not yet been created. Thankfully Kubernetes provides a feature called Readiness Probe, which allows you to run a check and only if this check passes the app will be marked as available.
The snippet below shows how we can run a simple SELECT 1 statement on the jackrabbit database to make sure it is available. The reason why we run a SELECT 1 here instead of SELECT * FROM [TABLE] LIMIT 1 (or so) is because at this stage no tables quite possibly exist: They only get created once Pentaho Server intialises.
readinessProbe:
  exec:
    command: ["psql", "-w", "-U", "postgres", "-d", "jackrabbit", "-c", "SELECT 1"]
  initialDelaySeconds: 15
  timeoutSeconds: 2
Liveness Probe
This probe will kick in after the readyness probe and check that the app is running correctly. Again, the check can be defined by you in various ways. If the check fails, Kubernetes will restart the container.
livenessProbe:
  exec:
    command: ["psql", "-w", "-U", "postgres", "-d", "jackrabbit", "-c", "SELECT 1"]
  initialDelaySeconds: 45
  timeoutSeconds: 2
Pentaho Server Deployment
InitContainer
With our original setup you might get an error message in PUC like this one:
undefinedapi/mantle/isAuthenticated is invalid or violates the same-origin security restriction
When you check the logs of the Pentaho Servers, you might see that one instance is fine, but the other instance show an error like this:
2018-11-04 14:25:59,419 ERROR [org.apache.jackrabbit.core.DefaultSecurityManager] Failed to instantiate AccessManager (org.apache.jackrabbit.core.security.DefaultAccessManager)
javax.jcr.InvalidItemStateException: Could not find child ed22d35f-e1d4-4b7d-a21c-5f1b38518d2f of node 3e9386a3-91b7-45fb-9fb7-61f87694df8f

2018-11-04 14:25:59,436 ERROR [org.apache.jackrabbit.core.security.authorization.acl.EntryCollector] Failed to process access control modifications
javax.jcr.RepositoryException: Failed to instantiate AccessManager (org.apache.jackrabbit.core.security.DefaultAccessManager)
It could be that this Pentaho Server instance was created while the PostgreSQL DB was still being initalised. So how do we tell the pentaho server deployment to wait for the postgresql db to be completely initialised? Enter the InitContainer: You can have one or more InitContainers, which will be executed sequentially, and have any dependencies checked within them.
The snippet below shows how you can use the pg_isready utility to check if our backend PostgreSQL database is indeed ready:
spec:
  # make sure backend db is ready
  initContainers:
  - name: check-db-ready
    image: postgres:9.6.5
    command: ['sh', '-c',
      'until pg_isready -h backenddb -d jackrabbit -p 5432;
      do echo waiting for database; sleep 2; done;']
Note: Remember that for the PostgreSQL deployment we also configured a readiness probe. You might wonder why this is not sufficient: If the Pentaho Server talks to the PostgreSQL service and a not ready message gets returned, this might just make the Pentaho Server fail. This is indeed what I experienced. So by adding an initContainer, we have a check on the Pentaho Server side as well if the backend db is ready.