While CDE dashboard can be displayed within the Pentaho User Console (the web interface), quite often the requirement is to embed the dashboard within an extrernal site. Luckily these days this is fairly easy to accomplish: We will have a look at how to achieve this using an extremely basic example.
Pentaho Server C-Tools Config Changes
First off we have to change <pentaho-server-dir>/pentaho-solutions/system/pentaho-cdf-dd/settings.xml to allow cross-domain requests:
<allow-cross-domain-resources>true</allow-cross-domain-resources>
Add this just after the first <settings> tag.
Apply the same change for <pentaho-server-dir>/pentaho-solutions/system/pentaho-cdf/settings.xml.
Restart the server.
Create CDE Dashboard
Create your CDE dashboard as usual if you don’t have one already.
Configuring the MyCompany WebApp
We will create an extremely simple web app, which will allow us to embed the dashboard we created earlier on:
$ cd <pentaho-server-root>
$ mkdir -p tomcat/webapps/mycompany/scripts
If requirejs (the minified version) is not already part of your web app, download it from here and copy it into the scripts folder.
Create an index.html file and save it inside the mycompany folder.
The most basic skeleton looks like this (read inline comments):
<html>
  <head>
  <meta http-equiv="content-type" content="text/html" charset="utf-8">
    <title>Demo of embedded CDE content</title>
    <!-- CHANGE HERE IF REQUIRED -->
    <script src="scripts/require.js"></script>
    <!-- CHANGE HERE IF REQUIRED -->
    <script type="text/javascript" src="http://localhost:8080/pentaho/plugin/pentaho-cdf-dd/api/renderer/cde-embed.js"></script>

    <script type="text/javascript">
      require(
        // define the location of the dashboard
        //  CHANGE HERE IF REQUIRED
        ['dash!/public/embedded/demo.wcdf']
        // Demo is just a sample argument name, can be anything
        , function(Demo){
            // define div id where the dashboard should be rendered
            var demoDash = new Demo("myExternalDiv");
            demoDash.render();
          }
      )
    </script>

  </head>
  <body>
    <h1>Demo of embedded CDE content</h1>
    <!--
    Below is our placeholder - this is where we want to embed the CDE dashboard
    Note that this div id gets referenced above in the
    JavaScript `new Demo("myExternalDiv")`
    -->
    <div id="myExternalDiv"></div>
  </body>
</html>
As you can see, embedding CDE Dashboards is quite straight forward.
An extremely simple example:

Adding the JavaScript resources
Embedding CDE Dashboards was one of the main reasons why RequireJS support was introduced a while back in CDE (around Pentaho Server version 5). First of all dashboard objects shouldn’t polute the global space (avoiding conflicts with variable names that are in common with your custom scripts) and secondly only resources required to render that particular dashboard should be downloaded, not all of them. We will go through an extremely simple example here.
Note: When you create a new CDE Dashboard, in the settings panel the option to use RequireJS is enabled by default.
We follow the RequireJS approach outlined here.
Create you JavaScript file. Make sure it follows the AMD module convention. Simple example:
define(function() {
  return {
    option1: 'Eternal sunshine',
    option2: 'Tropical thunderstorms'
  };
});
In your CDE dashboard, reference it as an external resource (as you usually would do, nothing changes here). The CDE Property Name that you define for the external resource will be the name of the variable accessible in the dashboard context. So in my case I called it mySpecialOptions:

Once you render the dashboard, take a look at the resources in the dev tools of your web browser, and you should see the details in the generatedContents:

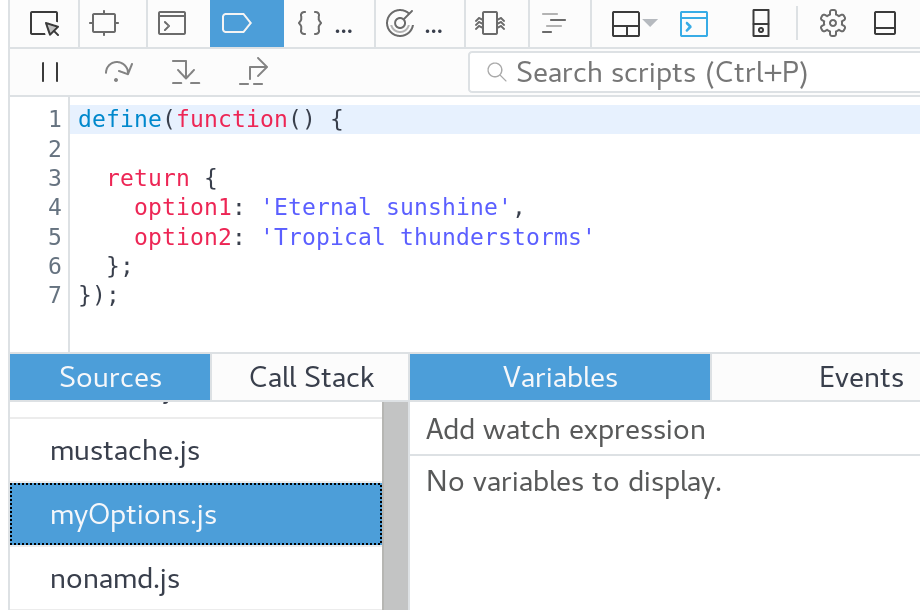
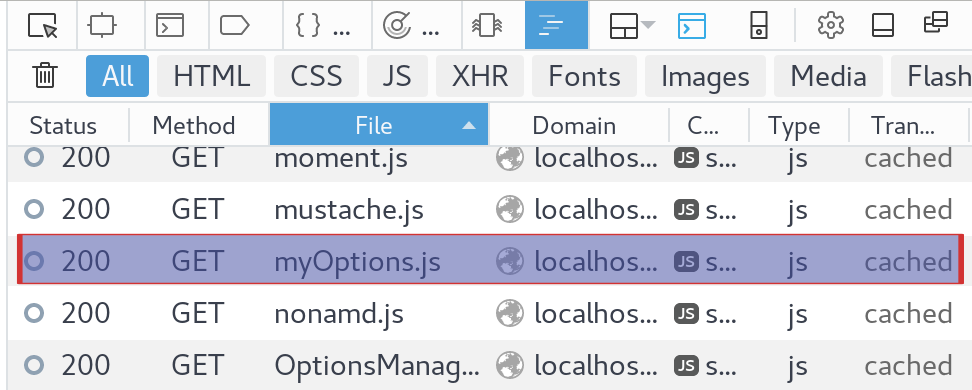
Browser Debugging Tools: I am using Firefox here, but it will be fairly similar in other web browsers. You can get hold of info on your javascript file the following way:
-
Debugger > Sources:
myOptionsshows up there:
-
Network Manager: Scroll down the list to find your file. Clicking on the name reveals more info.

Making use of the functions
Following the example above, where we defined mySpecialOptions as the Dashboard context variable for our Javascript, we can just make use of it like so (example for TextComponent expression):
function(){
  return mySpecialOptions.option1;
}
JavaScript file with dependency on other JavaScript file
So imagine we create a new JavaScript file called myExtendedOptions, which requires some functionality from our other JavaScript file (myOptions). In this case we can reference it like so (here we also reference jquery, although strictly speaking we don’t need it):
define(["cdf/lib/jquery", "cde/resources/public/embedded/scripts/myOptions"], function($, myBaseOptions) {
  return {
    option1: myBaseOptions.option1
    , option2: myBaseOptions.option2
    , option3: 'Light breeze'
    , option4: 'Snow'
  };
});
There are a few things to note here:
- CDE Core Libraries are referenced using this base path:
cdf/lib/. - Your Custom JavaScript Files are referenced using this base path:
cde/resources/ - As function parameters the object variables are passed, in this case
$for JQuery andmyBaseOptionsas reference to themyOptionsscript.
You register this JavaScript file with CDE as an external JavaScript file. I gave it the property name mySpecialExtendedOptions. Now we can reference it like so (using a Text Component again) e.g.:
function(){
  return mySpecialExtendedOptions.option3;
}
Issue: Changes in files are not reflected client-side
This refers to Jira Ticket CDE-848: “In requireJS dashboard I have external js/css files (placed in repository, included as resources in CDE). Changes to those files in most cases are not respected until I clear the browser cache.”
With standard JavaScript file adding a version number like discussed here is a fairly standard approach to circumvent the caching problem.
For RequireJS we can use this approach: Prevent RequireJS from Caching Required Scripts, also take a look at the Require Config Docu.
Ok, based on this we can change our external HTML file (where we embed the content) like so (only relevant section shown):
    <script src="scripts/require.js"></script>
    <!-- prevent caching: start -->
    <script>
      require.config({
        urlArgs: "bust=" + (new Date()).getTime()
      });
    </script>
    <!-- prevent caching: end -->
    <script type="text/javascript" src="http://localhost:8080/pentaho/plugin/pentaho-cdf-dd/api/renderer/cde-embed.js"></script>
Note: You will have to clear the cache once using
CTRL+Rafter implementing these changes, but thereafter no cache-clearing should be necessary any more!
The approach shown above is ideal for developing, when you release your code you want to use a more static approach as we do not want to load all the dependencies each time in the client/web browser, e.g.:
    <script src="scripts/require.js"></script>
    <!-- prevent caching: start -->
    <script>
      require.config({
        urlArgs: "bust=v2"
      });
    </script>
    <!-- prevent caching: end -->
    <script type="text/javascript" src="http://localhost:8080/pentaho/plugin/pentaho-cdf-dd/api/renderer/cde-embed.js"></script>
Naturally you could also have some release script set the version value for you.
If you wanted to add this code snipped directly in CDE, there is currently no way of doing this. You can change the following Pentaho Server system CDF config file:
pentaho-cdf-dd/js/cde-require-js-cfg.js
Just be careful, as this file will be overwritten with each update of CDF, so you should have a deployment process in place which takes care of this problem.
