The the second part of our Kubernetes on Google Cloud Platform series we will be taking a look at how to attach a persistent volume to the pods that run a given web app. The web app in our example will be WebSpoon, but it could be any other one.
Creating the Kubernetes Cluster
I expect that you followed the first article of this series, so I will not create a new project:
# get current configuration details
gcloud info
If you see at the end of the output that the project is still set to kubwebspoon then you are all ready to go:
...
Current Properties:
  [core]
    project: [kubwebspoon]
    ...
If not, set the required configuration details (again this is based on the assumption that you followed the exercise in part 1 of this series):
# set project id
gcloud config set project kubwebspoon
# set compute zone
# list of available zones
# https://cloud.google.com/compute/docs/regions-zones/#available
gcloud config set compute/zone us-west1-a
Next let’s create the cluster:
# create kubernetes engine cluster
# running command again after enabling API
gcloud container clusters create webspoon-cluster \
  --cluster-version=1.9.2-gke.1 \
  --machine-type=n1-standard-2 \
  --num-nodes=3
# get authentication credentials to interact with cluster
gcloud container clusters get-credentials webspoon-cluster
Important: Pick the correct
machine-typeto support the workload we are expecting!
You can find info on the Google Cloud machine types here or alternatively you can run this command:
$ gcloud compute machine-types list
If you want to find out more about the cluster create command, run this:
$ gcloud help container clusters create
Introduction to Volume related Layers
To understand the various layers better that are involved in making a volume available to a specific pod (Kubernetes term for an environment where a container runs in), we’ll first take a high level look at how everything hangs together:
Let’s understand what each layer does:
- Disk request: An admin will request a physical disk/volume to be made available.
- Storage Class: Is a high level abstraction of the storage requirements.
- Persistent Volume (PV): Allocates a given physical volume to the Kubernetes cluster. Can be linked to a Storage Class.
- Persistent Volume Claim (PVC): Creates a contract between a pod and a persistent volume.
- Pod: Runs one or more containers. To scale horizontally usually there are more than one pod. One pod requrest one PVC to access persistent storage.
- Controllers: Manage multiple pods. Controllers have a varying degree of features.
- Deployment: used to deploy stateless applications consisting of several pods.
- StatefulSet: used to deploy stateful applications consisting of several pods.
Here are some deployment scenarios: Our aim is to link pods with a dedicated persistent volume:
- Case 1: Unmanaged pod. All levels created manually.
- Case 2: Unmanaged pod. We either use the default cluster storage class or create our own one and rely on the PVC to automatically create the PV as well as request the physical disk. Pod specified with Volume referencing Persistent Volume Claim (using
volumes.persistentVolumeClaim.ClaimName) - Case 3: StatefulSet with Volume Claim Templates (using
volumeClaimTemplates)
| Layers | Case 1: Pod | Case 2: Pod | Case 3: Stateful Set |
|---|---|---|---|
| Storage Class | Manual | Optional | Auto |
| Disk request | Manual | Auto | Auto |
| Persistent Volume | Manual | Auto | Auto |
| Persistent Volume Claim | Manual | Manual | Auto |
| Controller | Manual | Manual | Manual |
Important: As you can imagine creating pods directly is not meant for scaling applications.

Automatic Storage Allocation
We will start with the easiest option: Making use of Kubernetes automatic storage allocation features. We will also only map one volume to our container.
Pod with PVC
| Layer | Manual Creation | Automatic Creation |
|---|---|---|
| Storage Class | 0 | |
| Disk | X | |
| PV | X | |
| PVC | X | |
| Pod | X |
Note: The storage class can be created manually or some clusters might come pre-configured with a standard storage class. If the latter one meets your requirements, there is no no need to create one manually.
Create a PVC called webspoon-persistent-volume-claim-using-default-storage-class.yaml with following content:
apiVersion: v1
kind: PersistentVolumeClaim
metadata:
  # the name you assign to the claim
  name: webspoon-persistent-volume-claim
spec:
  accessModes:
    # - ReadWriteOnce
    - ReadOnlyMany
  # volumeMode: Filesystem
  resources:
    requests:
      # amount of storage in gigabytes to request for the cluster
      storage: 2Gi
Then run the following command:
kubectl apply -f webspoon-persistent-volume-claim-using-default-storage-class.yaml
Next create the pod definition (name the file webspoon-pod.yaml):
kind: Pod
apiVersion: v1
metadata:
  name: mywebspoon
spec:
  volumes:
  - name: 'webspoon-storage'
    persistentVolumeClaim:
      claimName: 'webspoon-persistent-volume-claim'
  containers:
  - name: 'webspoon'
    image: 'hiromuhota/webspoon:0.8.0.13-full'
    env:
    - name: 'JAVA_OPTS'
      value: '-Xms1024m -Xmx1920m'
    ports:
    - containerPort: 8080
      protocol: 'TCP'
    resources:
      requests:
        cpu: '1'
        memory: '2Gi'
    volumeMounts:
      # has to match the volume name defined further up
    - name: 'webspoon-storage'
      # mount path within the container
      mountPath: '/data'
Then run the following command:
kubectl apply -f webspoon-pod.yaml
Just to satisfy our curiosity, we retrieve some info on Storage Classes, Persistent Volumes, Persistent Volume Claims and Pods:
$ kubectl get storageclass
NAME                 PROVISIONER            AGE
standard (default)   kubernetes.io/gce-pd   8m
$ kubectl get pv
NAME                                       CAPACITY   ACCESS MODES   RECLAIM POLICY   STATUS    CLAIM                                      STORAGECLASS   REASON    AGE
pvc-852bb2c8-1672-11e8-b97b-42010a8a0015   2Gi        ROX            Delete           Bound     default/webspoon-persistent-volume-claim   standard                 6m
$ kubectl get pvc
NAME                               STATUS    VOLUME                                     CAPACITY   ACCESS MODES   STORAGECLASS   AGE
webspoon-persistent-volume-claim   Bound     pvc-852bb2c8-1672-11e8-b97b-42010a8a0015   2Gi        ROX            standard       6m
$ kubectl get pods
NAME             READY     STATUS              RESTARTS   AGE
mywebspoon       1/1       Running             0          13m
Note: It might take some time until the container within the pod is ready. Initially
READYwill be shown as0/1, meaning that0out of1containers are ready. Give it a few minutes until the status changes.
As you can see, the PV got automatically created for us since the default standard StorageClassName provided by the Kubernetes cluster gets used. Note that we don’t even mention this StorageClassName in our PVC definition - it is added by Kubernetes automatically.
Ok, so now we have one pod running with one volume attached!
Understanding the Relationship between Pods, PVCs and PVs
Next we want to horizontally scale the setup!
The approach we take now is not what you normally would do - it’s just for learning one of the core concepts: Copy the pod specification that you created previously (call it webspoon-pod-no2.yaml) and adjust it slightly as shown below:
kind: Pod
apiVersion: v1
metadata:
  name: mywebspoon-no2
spec:
  volumes:
  - name: 'webspoon-storage'
    persistentVolumeClaim:
      claimName: 'webspoon-persistent-volume-claim'
  containers:
  - name: 'webspoon-no2'
    image: 'hiromuhota/webspoon:0.8.0.13-full'
    env:
    - name: 'JAVA_OPTS'
      value: '-Xms1024m -Xmx1920m'
    ports:
    - containerPort: 8080
      protocol: 'TCP'
    resources:
      requests:
        cpu: '1'
        memory: '2Gi'
    volumeMounts:
      # has to match the volume name defined further up
    - name: 'webspoon-storage'
      # mount path within the container
      mountPath: '/data'
Create the pod now:
kubectl apply -f webspoon-pod-no2.yaml
You will realise that even after several minutes the container in this new pod is not becoming available:
$ kubectl get pods
NAME             READY     STATUS              RESTARTS   AGE
mywebspoon       1/1       Running             0          22m
mywebspoon-no2   0/1       ContainerCreating   0          10m
It’s time now to understand why:
In the Web Console, when you inspect the pod’s events, you might see a message like this one:
FailedMount:
AttachVolume.Attach failed for volume "pvc-852bb2c8-1672-11e8-b97b-42010a8a0015" : googleapi: Error 400: The disk resource 'projects/kubwebspoon/zones/us-west1-a/disks/gke-webspoon-cluster-3-pvc-852bb2c8-1672-11e8-b97b-42010a8a0015' is already being used by 'projects/kubwebspoon/zones/us-west1-a/instances/gke-webspoon-cluster-default-pool-67e6373e-0lqg'
It is important to understand the relationships:
- A given pod has to be linked to a unique PVC.
- A given PVC has to linked to unique PV.
- A given PV has to be linked to a unique disk (in the case of GCP persistent volume in write once mode)
Since we explicitly mention the PVC in the spec of the two pods, we get the error shown above! Had we created two PVCs, we wouln’t be in this trouble now.
Important: This shows that the same PVC cannot be reused! This is important to understand. When we create a bit later on a
StatefulSet- an easier approach to scale stateful apps horizontally - we cannot just reference the volume via a claim but have to create a volume claim template as well, which will make sure that each pod gets a unique PVC and a unique PV!
With these learnings in mind we can proceed and create a StatefulSet in a bit to scale horizontally.
At this point you might also wonder what storage type are we actually using? Let’s inspect the StorageClass:
$ kubectl describe storageclass standard
Name:            standard
IsDefaultClass:  Yes
Annotations:     storageclass.beta.kubernetes.io/is-default-class=true
Provisioner:     kubernetes.io/gce-pd
Parameters:      type=pd-standard
ReclaimPolicy:   Delete
Events:          <none>
Pay attention to Provisioner: It tells us that the standard storage class is set up to use the Google Cloud Engine Persistent Storage. What kind of storage is this?
From the Google docu: “Persistent disks are located independently from your virtual machine instances, so you can detach or move persistent disks to keep your data even after you delete your instances. Persistent disk performance scales automatically with size, so you can resize your existing persistent disks or add more persistent disks to an instance to meet your performance and storage space requirements.”
Scaling horizontally with a StatefulSet
| Layer | Manual Creation | Automatic Creation |
|---|---|---|
| Storage Class | 0 | |
| Disk | X | |
| PV | X | |
| PVC | X | |
| StatefulSet with volumeClaimTemplates | X |
Note: Some Kubernetes clusters are already pre-configured with a standard storage class. If this one meets your requirements, there is no need to create one manually.
Sources:
The StatefulSet controller is used to manage stateful applications. Unlike with the Deployment controller that we used in part 1 of this blog series, the StatefulSet controller maintains a sticky identity for each pod, so these pods are not interchangeable (although the have the same spec).
We will use the declaritive approach to configure the StatefulSet:
You will be happy to hear that this is a very easy approach: No volumes have to be created upfront by the administrator, the user does neither have to create a persistent volume definition nor a persistent volume claim definition.
The only definitions we still have to create is the service as well as the statefulSet defintion. The one configuration detail that makes this magic happening is volumeClaimTemplates, which has to be added to the statefulSet definition. Note that this is only available for StatefulSet, not for Deployment.
Create a new file called webspoon-stateful-set-with-volume-claim-templates.yaml with following content:
apiVersion: 'apps/v1beta1'
kind: 'StatefulSet'
metadata:
  name: 'webspoon-stateful-set'
spec:
  selector:
      matchLabels:
        # has to match .spec.template.metadata.labels
        app: 'webspoon-server'
  # reference back to the service name we created earlier on
  serviceName: 'webspoon-service'
  replicas: 2
  template:
    metadata:
      labels:
        # has to match .spec.selector.matchLabels
        app: 'webspoon-server'
        version: 'v1'
        zone: 'dev'
    spec:
      terminationGracePeriodSeconds: 30
      # volumes:
      # - name: 'webspoon-storage'
      #   persistentVolumeClaim:
      #     claimName: 'webspoon-persistent-volume-claim'
      containers:
      - name: 'webspoon'
        image: 'hiromuhota/webspoon:0.8.0.13-full'
        env:
        - name: 'JAVA_OPTS'
          value: '-Xms1024m -Xmx1920m'
        ports:
        - containerPort: 8080
          protocol: 'TCP'
        resources:
          requests:
            cpu: '1'
            memory: '2Gi'
        volumeMounts:
          # has to match the volume name defined further up
        # - name: 'webspoon-storage'
        - name: 'webspoon-persistent-volume-claim'
          # mount path within the container
          mountPath: '/data'
  volumeClaimTemplates:
  - metadata:
      name: 'webspoon-persistent-volume-claim'
    spec:
      accessModes:
        - 'ReadOnlyMany'
      storageClassName: webspoon-storage-class
      resources:
        requests:
          storage: '2Gi'
Note: The service
webspoon-service, which is referenced in the spec above, should be really created upfront, but we ignore this minor detail for now.
The important bit here is that we use a volumeClaimTemplates as opposed to a volume with a claim. The volumeClaimTemplates will make sure that for each pod a unique PVC is automatically generated. And in turn each unique PVC requests a unique PV which in turn requests a unique disk.
Note: When you use
volumeClaimTemplatesyou neither have to create aPersistentVolumeClaimdefinition nor aPersitentVolumesdefinition. Everything gets automatically created.
Run the following command the create the stateful set:
kubectl apply -f webspoon-stateful-set-with-volume-claim-templates.yaml
We can retrieve some info to better understand what happened after requesting the StatefulSet:
$ kubectl get pods
NAME                      READY     STATUS    RESTARTS   AGE
webspoon-stateful-set-0   1/1       Running   0          14m
webspoon-stateful-set-1   1/1       Running   0          13m
$ kubectl get pvc
NAME                                                       STATUS    VOLUME                                     CAPACITY   ACCESS MODES   STORAGECLASS             AGE
webspoon-persistent-volume-claim-webspoon-stateful-set-0   Bound     pvc-2620d7e0-1677-11e8-b97b-42010a8a0015   2Gi        ROX            webspoon-storage-class   21m
webspoon-persistent-volume-claim-webspoon-stateful-set-1   Bound     pvc-64cb1dda-1678-11e8-b97b-42010a8a0015   2Gi        ROX            webspoon-storage-class   12m
$ kubectl get pv
NAME                                       CAPACITY   ACCESS MODES   RECLAIM POLICY   STATUS    CLAIM                                                              STORAGECLASS             REASON    AGE
pvc-2620d7e0-1677-11e8-b97b-42010a8a0015   2Gi        ROX            Delete           Bound     default/webspoon-persistent-volume-claim-webspoon-stateful-set-0   webspoon-storage-class             14m
pvc-64cb1dda-1678-11e8-b97b-42010a8a0015   2Gi        ROX            Delete           Bound     default/webspoon-persistent-volume-claim-webspoon-stateful-set-1   webspoon-storage-class             12m
You can also retrieve similar info from the web console. The status of the Stateful Set:

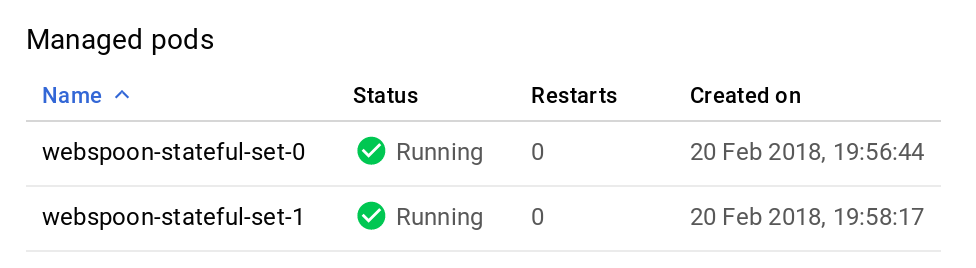
The status of the Pods: Note how the stateful set name is used as the base name of the pod and an ID is added.
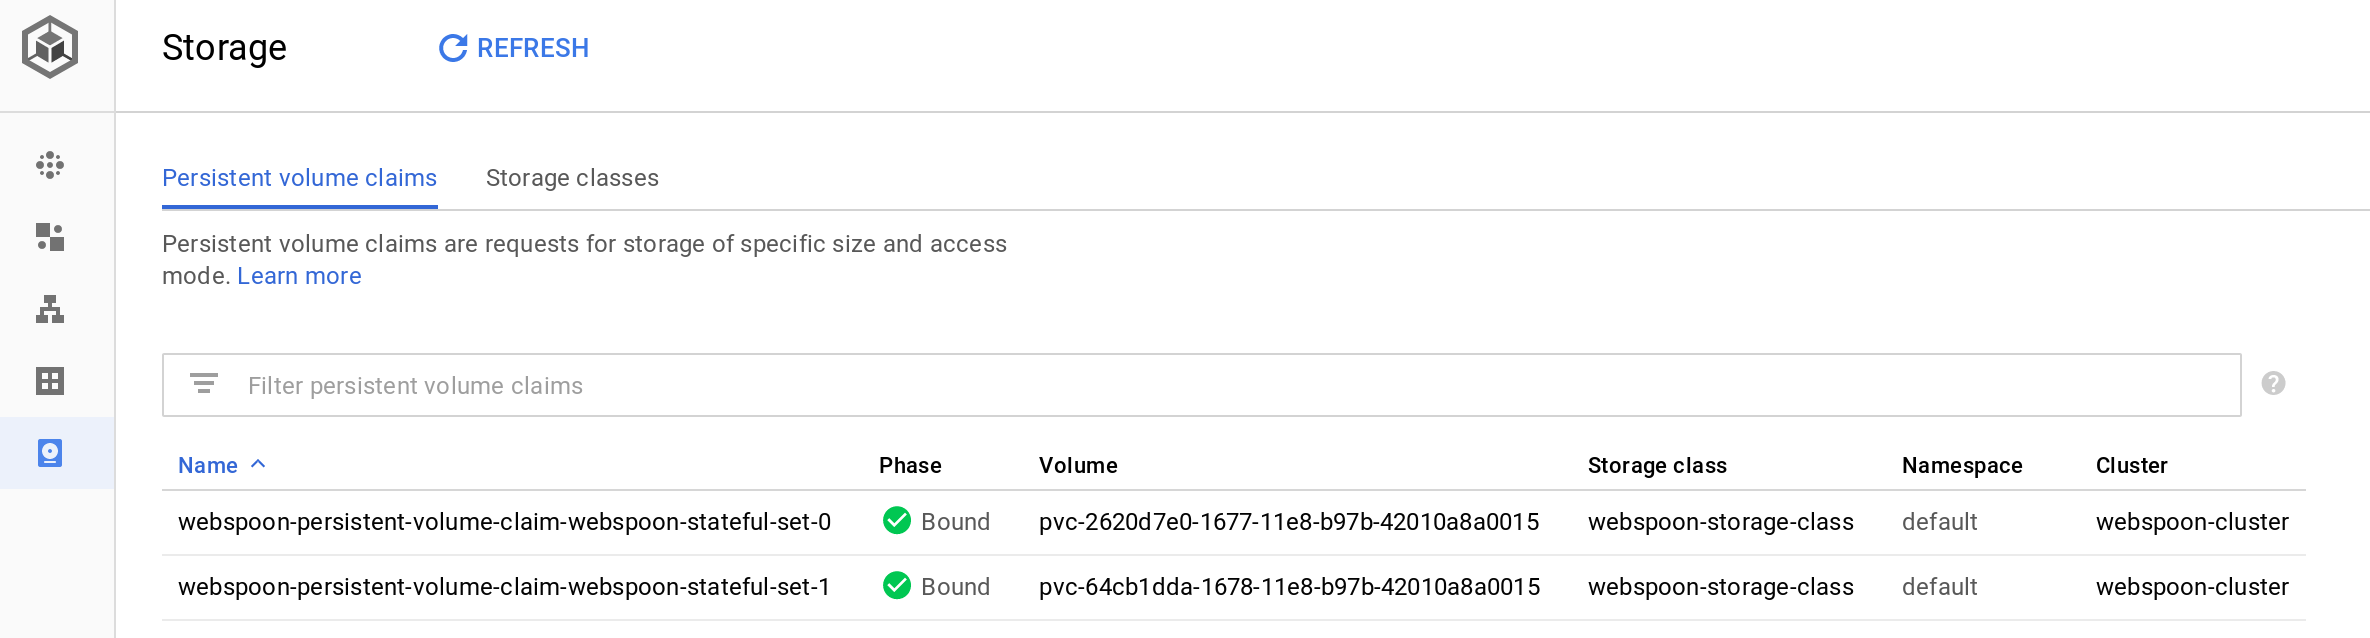
The status of the PVCs: Note how the name of the volumeClaimTemplates is used as the base name of the PVC and an ID is added as a suffix to make it unique:
Note: I recommend checking the generated definition of the pods. You will notice that the
VolumeClaimTemplategot replaced with avolumessection and theclaimNamepoints to a very specific/unique auto-genreated claim, e.g.:
  volumes:
  - name: webspoon-persistent-volume-claim
    persistentVolumeClaim:
      claimName: webspoon-persistent-volume-claim-webspoon-stateful-set-0
Mapping Container Volume Mounts to Volumes
One pod only for testing
| Layer | Manual Creation | Automatic Creation |
|---|---|---|
| Storage Class | 0 | |
| Disk | X | |
| PV | X | |
| PVC | X | |
| Pod | X |
Note: Before following the next excerise, delete any stateful sets and PVCs via the web console. The following yaml files are located within the
with-volume-mountsfolder in the project directory.
While the setup so far works, it is not ideal: We currently just mount the volume to the /data directory within the the container. To verify this you could log on to the container (this described towards the end of this article).
We have to understand which directories of our app we actually want to have persisted! In the case of webspoon these are the following directories:
/root/.kettle/root/.pentaho
These directories can be specified via containers.volumeMounts.
First we will create one single pod to make sure our setup is working before scaling it out. We will create a dedicated storage class (we’ll reuse the same one as we created previously), two PVCs (one for the .kettle and one for the .pentaho directory) and a pod specification.
We start of with the storage class definition:
kind: StorageClass
apiVersion: storage.k8s.io/v1
metadata:
  name: webspoon-storage-class
provisioner: kubernetes.io/gce-pd
parameters:
  type: pd-standard
  zone: us-west1-a
  # zones: us-central1-a, us-central1-b
The PVC for the Kettle volume:
apiVersion: v1
kind: PersistentVolumeClaim
metadata:
  # the name you assign to the claim
  name: webspoon-persistent-volume-claim-kettle
spec:
  # refer back to the storage class defined in the persistent volume def
  storageClassName: webspoon-storage-class
  accessModes:
    - ReadWriteOnce
  # volumeMode: Filesystem
  resources:
    requests:
      # amount of storage in gigabytes to request for the cluster
      storage: 1Gi
The PVC for the Pentaho volume:
apiVersion: v1
kind: PersistentVolumeClaim
metadata:
  # the name you assign to the claim
  name: webspoon-persistent-volume-claim-pentaho
spec:
  # refer back to the storage class defined in the persistent volume def
  storageClassName: webspoon-storage-class
  accessModes:
    - ReadWriteOnce
    # - ReadOnlyMany
  # volumeMode: Filesystem
  resources:
    requests:
      # amount of storage in gigabytes to request for the cluster
      storage: 1Gi
And finally the pod definition:
kind: Pod
apiVersion: v1
metadata:
  name: mywebspoon
spec:
  volumes:
  - name: 'kettle-config-volume'
    persistentVolumeClaim:
      claimName: 'webspoon-persistent-volume-claim-kettle'
  - name: 'pentaho-config-volume'
    persistentVolumeClaim:
      claimName: 'webspoon-persistent-volume-claim-pentaho'
  containers:
  - name: 'webspoon'
    image: 'hiromuhota/webspoon:0.8.0.13-full'
    volumeMounts:
    - name: kettle-config-volume
      mountPath: /root/.kettle
    - name: pentaho-config-volume
      mountPath: /root/.pentaho
    env:
    - name: 'JAVA_OPTS'
      value: '-Xms1024m -Xmx1920m'
    ports:
    - containerPort: 8080
      protocol: 'TCP'
    resources:
      requests:
        cpu: '1'
        memory: '2Gi'
Let’s apply these declarations:
kubectl apply -f webspoon-storage-class.yaml
kubectl apply -f webspoon-persistent-volume-claim-kettle.yaml
kubectl apply -f webspoon-persistent-volume-claim-pentaho.yaml
kubectl apply -f webspoon-pod.yaml
Give it a few minutes until the container is ready. Then we can log into the container like shown below and check if the volumes got mapped:
$ kubectl get pods
NAME         READY     STATUS    RESTARTS   AGE
mywebspoon   1/1       Running   0          6m
$ kubectl exec -it mywebspoon -- /bin/bash
root@mywebspoon:/usr/local/tomcat# mount | grep kettle
/dev/sdb on /root/.kettle type ext4 (rw,relatime,data=ordered)
root@mywebspoon:/usr/local/tomcat# mount | grep pentaho
/dev/sdc on /root/.pentaho type ext4 (rw,relatime,data=ordered)
As you can see, the volumes got correctly mounted. If you wanted to have a minimal setup, you could already expose this one pod and make it accessible to the external world.
Stateful Sets
| Layer | Manual Creation | Automatic Creation |
|---|---|---|
| Storage Class | 0 | |
| Disk | X | |
| PV | X | |
| PVC | X | |
| StatefulSet with volumeClaimTemplates | X |
We will go a bit further and create a Stateful Set to scale the setup.
Let’s clear the way:
$ kubectl get pods
NAME         READY     STATUS    RESTARTS   AGE
mywebspoon   1/1       Running   0          45m
$ kubectl delete pod mywebspoon
pod "mywebspoon" deleted
$ kubectl get pvc
NAME                                       STATUS    VOLUME                                     CAPACITY   ACCESS MODES   STORAGECLASS             AGE
webspoon-persistent-volume-claim-kettle    Bound     pvc-b19c4627-1813-11e8-8f19-42010a8a01d9   1Gi        RWO            webspoon-storage-class   47m
webspoon-persistent-volume-claim-pentaho   Bound     pvc-bd011b5e-1813-11e8-8f19-42010a8a01d9   1Gi        RWO            webspoon-storage-class   47m
$ kubectl delete pvc webspoon-persistent-volume-claim-kettle webspoon-persistent-volume-claim-pentaho
persistentvolumeclaim "webspoon-persistent-volume-claim-kettle" deleted
persistentvolumeclaim "webspoon-persistent-volume-claim-pentaho" deleted
We only need a dedicated storage class (which we reuse from the previous section) and a stateful set declartion.
Now we only have to create the definition for the stateful set:
apiVersion: 'apps/v1beta1'
kind: 'StatefulSet'
metadata:
  name: 'webspoon-stateful-set'
spec:
  selector:
      matchLabels:
        # has to match .spec.template.metadata.labels
        app: 'webspoon-server'
  # reference back to the service name we created earlier on
  serviceName: 'webspoon-service'
  replicas: 2
  template:
    metadata:
      labels:
        # has to match .spec.selector.matchLabels
        app: 'webspoon-server'
        version: 'v1'
        zone: 'dev'
    spec:
      terminationGracePeriodSeconds: 30
      containers:
      - name: 'webspoon'
        image: 'hiromuhota/webspoon:0.8.0.13-full'
        volumeMounts:
        # has to match name in volume claim templates
        - name: 'webspoon-persistent-volume-claim-kettle'
          mountPath: /root/.kettle
        # has to match name in volume claim templates
        - name: 'webspoon-persistent-volume-claim-pentaho'
          mountPath: /root/.pentaho
        env:
        - name: 'JAVA_OPTS'
          value: '-Xms1024m -Xmx1920m'
        ports:
        - containerPort: 8080
          protocol: 'TCP'
        resources:
          requests:
            cpu: '1'
            memory: '2Gi'
  volumeClaimTemplates:
  - metadata:
      name: 'webspoon-persistent-volume-claim-kettle'
    spec:
      accessModes:
        - 'ReadWriteOnce'
      storageClassName: 'webspoon-storage-class'
      resources:
        requests:
          storage: '1Gi'
  - metadata:
      name: 'webspoon-persistent-volume-claim-pentaho'
    spec:
      accessModes:
        - 'ReadWriteOnce'
      storageClassName: 'webspoon-storage-class'
      resources:
        requests:
          storage: '1Gi'
Note how the volumeMounts section changed to accomodate the two PVCs.
Let’s apply the declarations:
kubectl apply -f webspoon-storage-class.yaml
kubectl apply -f webspoon-stateful-set-with-volume-claim-templates.yaml
Note: While it is an interesting exercise to create a stateful set, it is always worth questioning if your app is really stateful. In the case of Webspoon you could argue strongly against it. Ideally you’d want a shared network drive to store the files or a central database repository. Currently GCP does not seem to offer a shared network drive with the Kubernetes service.
Exposing the app: Creating a Load Balancer
In order to access our app from the outside world, we will set up a load balancer. This is a single entrypoint which will distribute the workload to the available pods. Should the IP address of a given pod every change (e.g. one dies and it get rescheduled somewhere else), Kubernetes will automatically take care of making the load balancer aware of these changes. Also we can easily add or removed pods - the load balancer (or the service to be precise) will be automatically made aware of these changes.
We create a load balancer via a Service definition. Create a new file called webspoon-service.yaml with following content:
apiVersion: v1
kind: Service
metadata:
  name: webspoon-service
  labels:
    # must be some of the labels used for
    # spec.template.metadata.labels in the StatefulSet
    app: webspoon-server
    zone: dev
spec:
  externalTrafficPolicy: Cluster
  ports:
  - nodePort: 30702
    port: 8080
    protocol: TCP
    targetPort: 8080
  selector:
    app: webspoon-server
  sessionAffinity: None
  type: LoadBalancer
Apply the config:
kubectl apply -f webspoon-service.yaml
Note: The Kubernetes API is fast evolving and there might be changes in future to it. In case this happens, there is the command
kubectl convert -f webspoon-stateful-set.yamlto “upgrade” the spec.
To get the entrypoint IP address run:
$ kubectl get service
NAME               TYPE           CLUSTER-IP      EXTERNAL-IP      PORT(S)          AGE
kubernetes         ClusterIP      10.55.240.1     <none>           443/TCP          1h
webspoon-service   LoadBalancer   10.55.242.149   35.199.186.251   8080:30702/TCP   2m
In my case Webspoon was available on:
http://35.199.186.251:8080/spoon/spoon
Manual Storage Allocation
Important: This approach is not scalable. We cover this here for background info only.
| Layer | Manual Creation | Automatic Creation |
|---|---|---|
| Storage Class | 0 | |
| Disk | X | |
| PV | X | |
| PVC | X | |
| Pod | X |
Create the volume
You create a persistent volume like so:
gcloud compute disks create [DISK_NAME] \
  --image-family [IMAGEFAMILY] \
  --image-project [IMAGEPROJECT] \
  --type [TYPE] \
  --size [SIZE]
To find out more about this command, run:
gcloud help compute disks create
There are two disk types available: pd-ssd or pd-standard. The last one is sufficient for our purpose: storing PDI jobs and transformations. The volume has to be specified as multiples of GB or TB - it can’t be less than 10 GB. Let’s run following command now:
# create persistent volume
gcloud compute disks create webspoon-volume \
  --image-family centos-7 \
  --image-project=centos-cloud \
  --type pd-standard \
  --size 10GB
Create a Storage Class
Strictly speaking, for the manual approach, you do not have to create a StorageClass, however, it will make the process a little bit easier to understand/follow through as it explicitly links the PV to the PVC.
Create a new file called webspoon-storage-class.yaml with following content:
kind: StorageClass
apiVersion: storage.k8s.io/v1
metadata:
  name: webspoon-storage-class
provisioner: kubernetes.io/gce-pd
parameters:
  type: pd-standard
  zone: us-west1-a
  # zones: us-central1-a, us-central1-b
Note: Your Kubernetes cluster might already provide a standard storage class. If it suits your purpose, you can use this one and don’t have to create an additional one.
Assign the volume to our cluster
The next step is the create a PersistentVolume resource, which allocates the volume to our cluster.
Create a new file called webspoon-persistent-volume.yaml with following content:
apiVersion: v1
kind: PersistentVolume
metadata:
  # name that you assign to the persistent volume
  name: webspoon-persistent-volume
spec:
  # this storage class has to be referenced in the
  # persistent storage claim later on
  # so that pv and pvc are linked together
  storageClassName: webspoon-storage-class
  # storage capacity in gigabytes
  capacity:
    storage: 10Gi
  accessModes:
    # - ReadWriteOnces
    - ReadOnlyMany
  gcePersistentDisk:
    # name of the persistent disk in the environment
    # has to be the name you specified before when
    # running the gcloud compute disks create command
    pdName: webspoon-volume
    # file system type of the volume
    fsType: ext4
Important: The above definition defines the
StorageClassnamedwebspoon-storage-classfor thePersistentVolume, which will be used to bindPersistentVolumeClaimrequests to thisPersistentVolumelater on.
Add volume to cluster:
kubectl apply -f webspoon-persistent-volume.yaml
We can check the status of the volume like so:
$ kubectl get pv webspoon-persistent-volume
NAME                         CAPACITY   ACCESS MODES   RECLAIM POLICY   STATUS      CLAIM     STORAGECLASS   REASON    AGE
webspoon-persistent-volume   10Gi       ROX            Retain           Available             standard                 14s
The volume is marked as available and there is currently no claim for it.
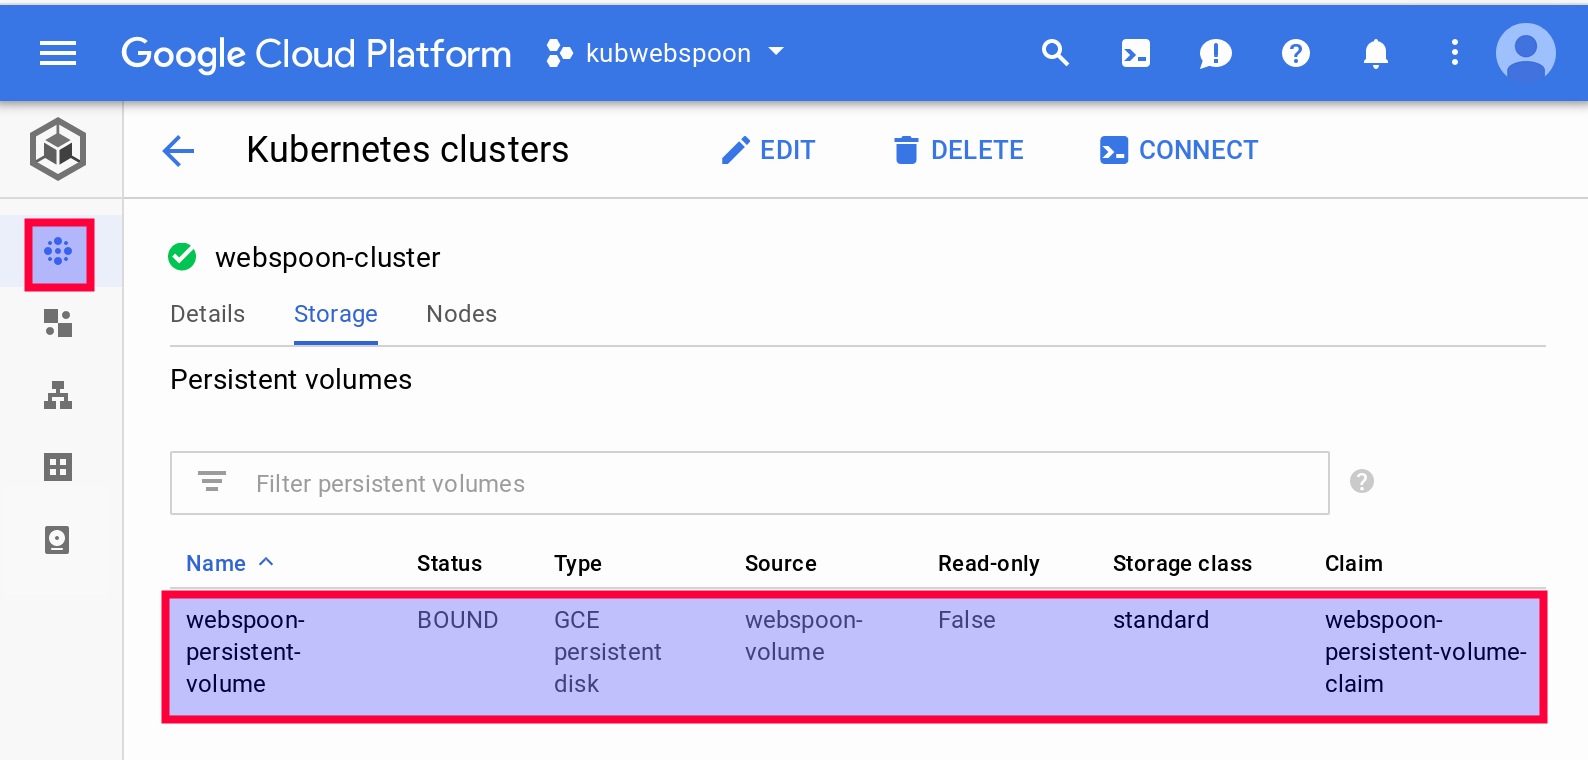
You can get pretty much the same info via the Web UI when you dive into Storage tab wihtin the Cluster section:

Note: Strictly speaking this step is not really required. You could make use of the dynamic allocation strategy as well. If there is no explicite volume defined for the cluster when the
PersistentVolumeClaimis raised (see next step), then Kubernetes will try to find a volume that matches the claim.
Claim the volume
Now that the volume is available in our cluster, this resource can be allocated via a PersistentVolumeClaim.
Create a new file called webspoon-persistent-volume-claim.yaml with following content:
apiVersion: v1
kind: PersistentVolumeClaim
metadata:
  # the name you assign to the claim
  name: webspoon-persistent-volume-claim
spec:
  # refer back to the storage class defined in the persistent volume def
  storageClassName: webspoon-storage-class
  # if you didn't specify a storage class in the persistent volume def
  # use this:
  # storageClassName: ''
  accessModes:
    # - ReadWriteOnce
    - ReadOnlyMany
  # volumeMode: Filesystem
  resources:
    requests:
      # amount of storage in gigabytes to request for the cluster
      storage: 2Gi
Note: If you don’t specify a
storageClassNamefor the PVC, Kubernetes will default it tostandard, which in turn will trigger an automatic generation of a PV defintion. This one will then trigger the alloaction of the new volume to the cluster. If you want to prevent this automatic behaviour, setstorageClassNameto blank (as instorageClassName='') if you didn’t specify a dedicated storage class in the PV definition. Another option is to mentioned the same storage class in the PVC that you specified in the PV.
Apply the config:
kubectl apply -f webspoon-persistent-volume-claim.yaml
Verify that the PersistentVolume is bound to the claim:
$ kubectl get pv webspoon-persistent-volume
NAME                         CAPACITY   ACCESS MODES   RECLAIM POLICY   STATUS    CLAIM                                      STORAGECLASS   REASON    AGE
webspoon-persistent-volume   10Gi       RWO            Retain           Bound     default/webspoon-persistent-volume-claim   standard                 4m
Important: In the previous output you have the check that
STATUSis set toBOUND! Otherwise a persistent volume got dynamically provisioned and bound to the persistent volume claim.
You can also find out via the command line which volume got bound to the persistent volume claim (pvc):
# Find out which persistent volume the claim is referencing
$ $ kubectl get pvc webspoon-persistent-volume-claim
NAME                               STATUS    VOLUME                       CAPACITY   ACCESS MODES   STORAGECLASS   AGE
webspoon-persistent-volume-claim   Bound     webspoon-persistent-volume   10Gi       RWO            standard       5m
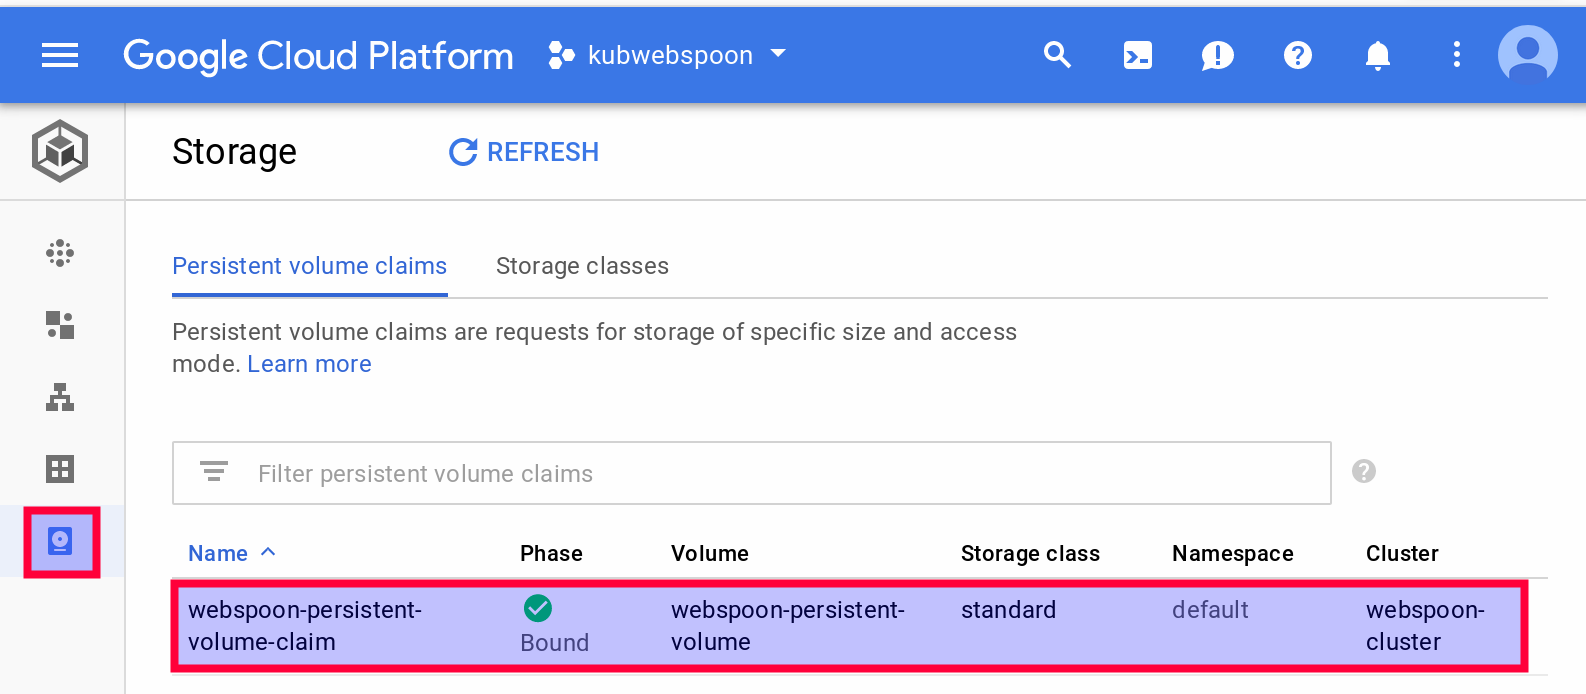
Again, via the WebUI you can get similar info via the Storage tab wihtin the Cluster section:
And details on the claim can be retrieved via the Volume section:
Pod
We want to get one pod running:
Create a file called webspoon-pod.yaml with following content:
kind: Pod
apiVersion: v1
metadata:
  name: mywebspoon
spec:
  volumes:
  - name: 'webspoon-storage'
    persistentVolumeClaim:
      claimName: 'webspoon-persistent-volume-claim'
  containers:
  - name: 'webspoon'
    image: 'hiromuhota/webspoon:0.8.0.13-full'
    env:
    - name: 'JAVA_OPTS'
      value: '-Xms1024m -Xmx1920m'
    ports:
    - containerPort: 8080
      protocol: 'TCP'
    resources:
      requests:
        cpu: '1'
        memory: '2Gi'
    volumeMounts:
      # has to match the volume name defined further up
    - name: 'webspoon-storage'
      # mount path within the container
      mountPath: '/data'
Once the app is running, to log onto the container, you can run:
kubectl exec -it mywebspoon -c webspoon -- /bin/bash
We can check that the data directory exists:
# check that the data directory exists
root@mywebspoon:/usr/local/tomcat# ls /data
lost+found
# check that the data directory is a mount point
root@mywebspoon:/usr/local/tomcat# mount | grep data
/dev/sdb on /data type ext4 (rw,relatime,data=ordered)
Using Network Storage
Currently Google Cloud Platform does not seem to offer a network file storage option for their Kubernetes cluster service.
Clean-up
Here are some command suggestions:
## destroy app
# destroy service
kubectl get service
kubectl delete service webspoon-server
# destroy persistent volume claims
kubectl get pvc
kubectl delete pvc webspoon-persistent-volume-claim
# delete stateful set
kubectl get sts
kubectl delete sts webspoon-stateful-set
# delete storage class
kubectl get storageclass
kubectl delete storageclass [STORAGECLASS]
# delete cluster
gcloud container clusters delete webspoon-cluster
# make sure no volumes are still running
gcloud compute disks list
gcloud compute disks delete [DISK-ID]
Important: Make sure that you check on the Web console under Compute Engine > Disks that there are no volumes left after all these actions. If volumes got dynamically provisioned, it can be that they will not deleted automatically.