This article is a follow-up to the previously published article Getting started with Apache Hop on AWS: Part 1. You could read this artilce in isolation, however, it helps to have the overview provided by the first article.
Here we will take a look at how to automatically create the AWS environment using AWS CloudFormation. For anyone new to CloudFormation: This is a fantastic tool which allows you to declare you environment in YAML or JSON syntax (called a template) and then to use a command to create one or many actual environments (called a stack) based on it. And of course this YAML or JSON file can be commited to your git repository and treated just like any other piece of code.
I will not cover the full setup here that I explained in the first article, instead, I will just focus on Apache Hop: We will just create one public subnet. Now the approach outlined here is just one of the ways to follow the infrastracture as code approach. We won’t use Docker here (something I will cover in another article), but we will implement everything as far as possible via CloudFormation. But it doesn’t have to be this way: It might be better to decouple this. Nevertheless, it’s our first stab at automating the process, so let’s get onto our exciting adventure!
Pre-requisits: Have the AWS command line client installed. If that’s not the case, there’s a lot of help online available on how to install it, so please google for it.
Create a dedicated project folder and inside it a file called hop-cloudformation-template.yaml. As the name indicates, this file will be our CloudFormation Template. Open it in your favourite text editor or IDE.
Important: Don’t use tabs to indent - use spaces instead. And make sure you indent the blocks correctly - it does matter! If you are not familiar with YAML, please google for an introduction.
First we start with the boilerplate which just states the template format version we want to use:
AWSTemplateFormatVersion: 2010-09-09
Next we will define the Resources.
Resources
VPC
The first resource we will create is our VPC:
Resources:
  VPC: # <= You can name the resource anything you like (with some restrictions)
    Type: AWS::EC2::VPC
    Properties:
      CidrBlock: '10.1.0.0/16'
      EnableDnsSupport: true
      EnableDnsHostnames: true
      Tags:
      - Key: Name
        Value:  !Join ['-', ["vpc", !Ref "AWS::StackName", !Ref "AWS::Region" ]]
Each resource is defined by a specific type, in this case AWS::EC2::VPC. This is followed by a properties section. The properties vary by resource type, you can consult the AWS Documentation to get an overview. In this example, the properties are fairly self-explanatory, so I won’t go into any detail.
A word on the tags: I am making use of CloudFormation’s intrinsic functions and pseudo parameters to dynamically generate the name value.
Best Practise: It’s best to validate the template each time we add resources.
Using the AWS CLI we will create a new stack called hat-dev based on the template we have so far:
aws cloudformation create-stack --stack-name hat-dev --template-body file://hop-cloudformation-template.yaml
If there are any syntax errors with your template, it will be highlighted at this point.
The next command will run until our new stack is successfully built:
aws cloudformation wait stack-create-complete --stack-name hat-dev
…and when the stack is complete you can use the following to examine it:
aws cloudformation describe-stacks
At this stage you might also want to check the state via the AWS web console, so hop over to the CloudFormation dashboard and choose Stacks from the left hand side menu. You should see our stack:
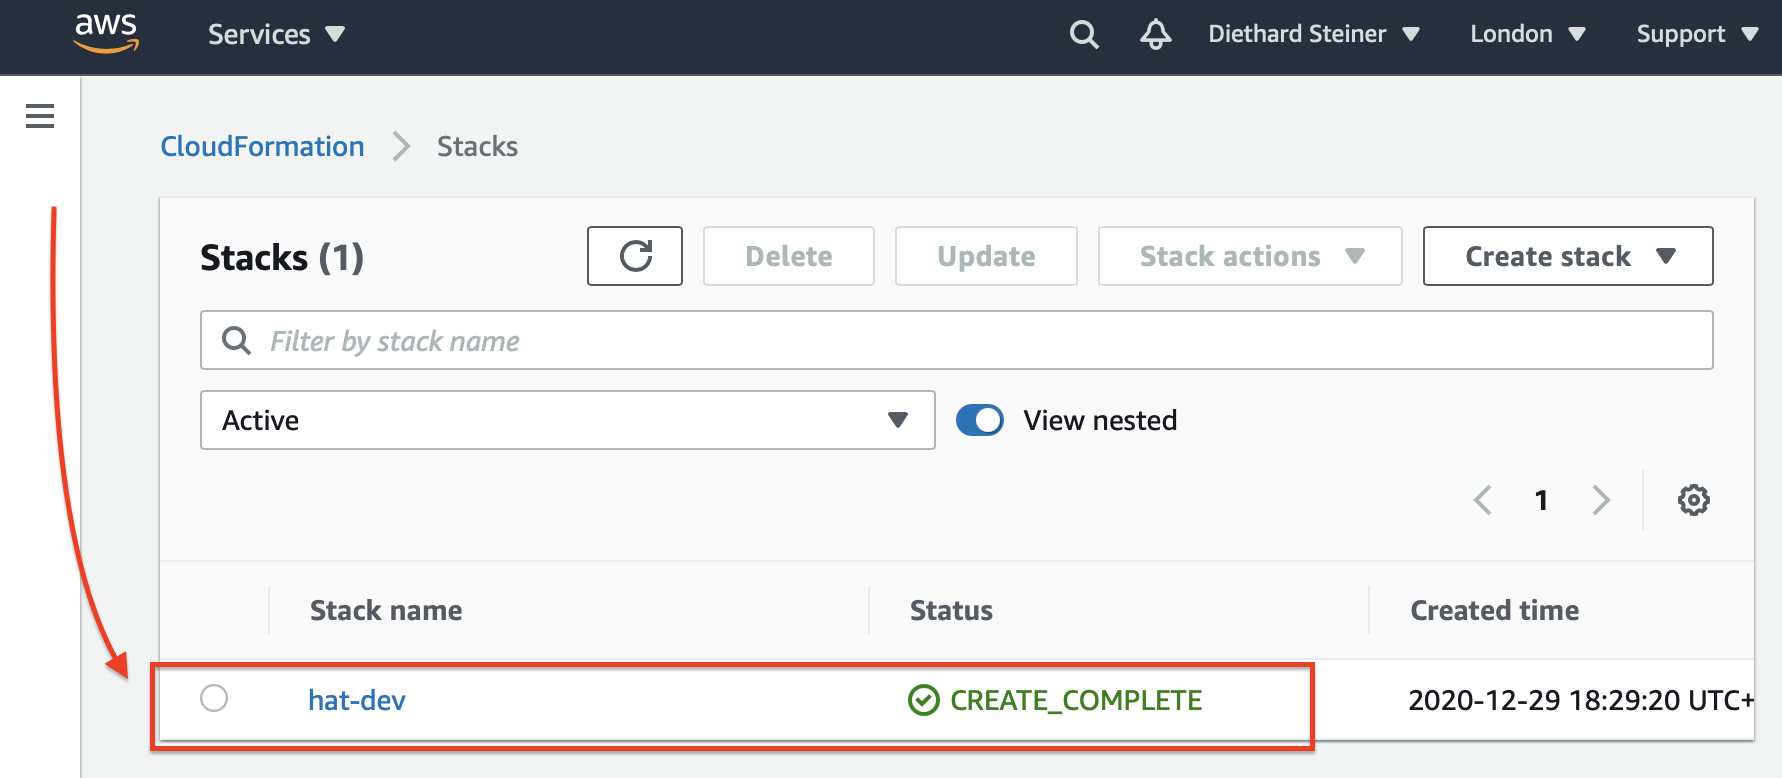
Next click on the stack name, which will bring up the details page:
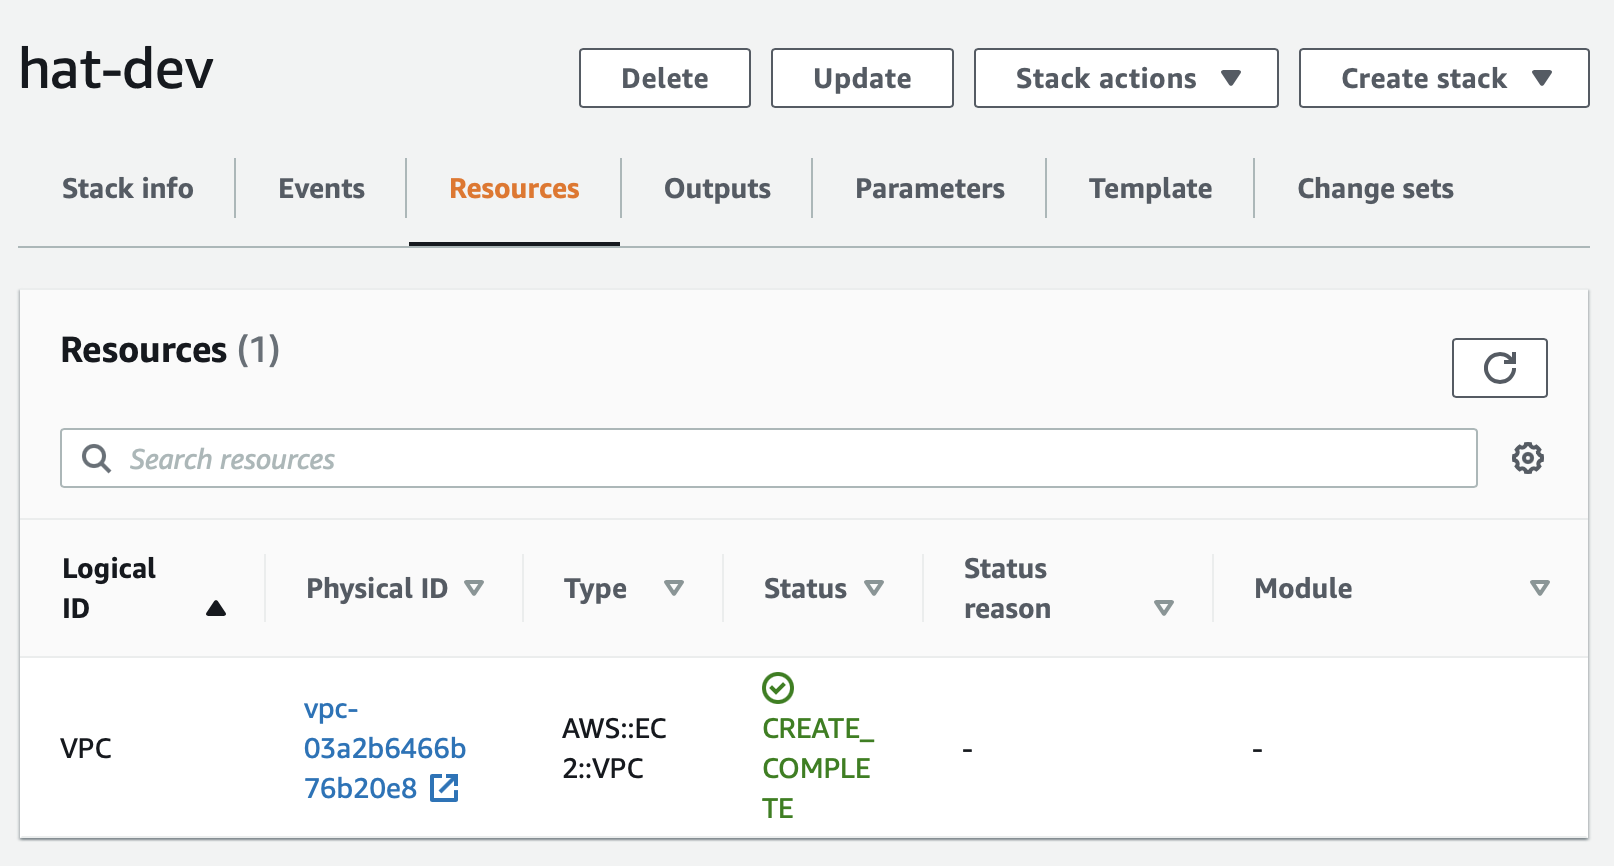
There’s a lot of info available, so familiarise yourself with the various tabs a bit. I’d like to highlight the Resources tab, which will list all the resources that were created for this particular stack. It also provides links to the dedicated resource pages, so in example, if we wanted to see more info about the VPC we just created, we just click on the Physicak ID link:
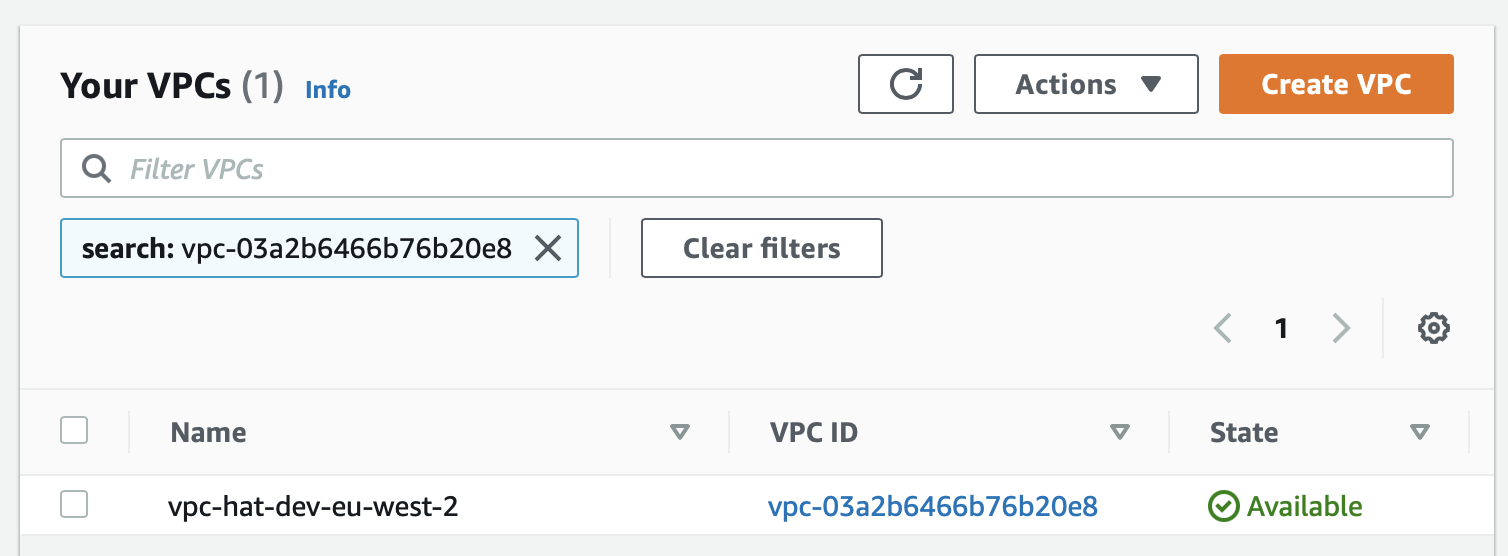
Note here how the VPC name got nicely generated!
You can update the stack with a new version of the template at any point or you can delete the stack if you no longer need it. The commands for these actions are as follows:
To delete the stack run:
aws cloudformation delete-stack --stack-name hat-dev
To update the stack run:
aws cloudformation update-stack --stack-name hat-dev --template-body file://hop-cloudformation-template.yaml
Internet Gateway
Now that we’ve validated that our VPC declaration is correct, let’s progress with creating the Internet Gateway:
  InternetGateway:
    Type: AWS::EC2::InternetGateway
    DependsOn: VPC
    Properties:
      Tags:
      - Key: Name
        Value: !Join ['-', ["igw", !Ref "AWS::StackName", !Ref "AWS::Region" ]]
  VPCGatewayAttachment:
    Type: AWS::EC2::VPCGatewayAttachment
    Properties:
      VpcId: !Ref VPC
      InternetGatewayId: !Ref InternetGateway
Here we create a resource of type AWS::EC2::InternetGateway which depends on the VPC resource - meaning that this resource can only be created once the VPC is in place. We also create a resource of type AWS::EC2::VPCGatewayAttachment so that we can attach the Internate Gateway to the VPC. You will notice the !Ref (Reference) function for the VpcId property which allows us to reference the VPC resouce we created earlier on.
Again, at this stage, run the update command to validate that everything is ok. Keep this habit up … I won’t mention this step again moving forward.
Subnet
Next, let’s create the public subnet:
  PublicSubnetA:
    Type: AWS::EC2::Subnet
    Properties:
      VpcId: !Ref VPC
      CidrBlock: '10.1.1.0/24'
      # pick the first AZ in the AZ list of this region
      AvailabilityZone: !Select [ 0, !GetAZs ]
      Tags:
      - Key: Name
        Value: !Join ['-', ["sn", !Ref "AWS::StackName", !Ref "AWS::Region", "public" ]]
We define a resource of type AWS::EC2::Subnet and link it to our VPC. We also define the CIDR Block for the subnet. Of note here is how we dynamically define the AZ: We use a CloudFormation function (!GetAZs) to retrieve a list of available AZs and then pick the first one.
Route Table
Next let’s add the public route table (type AWS::EC2::RouteTable) and a public route (type AWS::EC2::Route):
  PublicRouteTable:
    Type: AWS::EC2::RouteTable
    Properties:
      VpcId: !Ref VPC
      Tags:
      - Key: Name
        Value: !Join ['-', ["rt", !Ref "AWS::StackName", !Ref "AWS::Region", "public" ]]
  PublicRoute:
    Type: AWS::EC2::Route
    DependsOn: VPCGatewayAttachment
    Properties:
      RouteTableId: !Ref PublicRouteTable
      DestinationCidrBlock: '0.0.0.0/0'
      GatewayId: !Ref InternetGateway
There isn’t anything surprsing here: We link the route table to our VPC and the route to the Internet Gateway we created earlier on. Of note here is that we define that the route depends on the VPC Gateway Attachment being in place.
The next step is to link the route table to the subnet:
  PublicSubnetARouteTableAssociation:
    Type: AWS::EC2::SubnetRouteTableAssociation
    Properties:
      SubnetId: !Ref PublicSubnetA
      RouteTableId: !Ref PublicRouteTable
Security Group
And then it’s time to create a dedicated security group for the EC2 instance we will run later on (on which Apache Hop will reside):
  HopSecurityGroup:
    Type: 'AWS::EC2::SecurityGroup'
    Properties:
      VpcId: !Ref VPC
      GroupName: !Join ['-', ["secgroup", !Ref "AWS::StackName", !Ref "AWS::Region", "hop" ]]
      GroupDescription: 'Allow access from SSH, HTTP and HTTPS traffic'
      SecurityGroupIngress:
        - IpProtocol: tcp
          FromPort: 80
          ToPort: 80
          CidrIp: 0.0.0.0/0
        - IpProtocol: tcp
          FromPort: 443
          ToPort: 443
          CidrIp: 0.0.0.0/0
        - IpProtocol: tcp
          FromPort: 22
          ToPort: 22
          CidrIp: 0.0.0.0/0
Again no surprises here.
Creating the IAM Role
The AWS console hides a lot of the complexity when creating IAM roles. With CloudFormation a more in-depth knowledge is required of how an IAM service role is actually set up.
Just a recap from the first article in this series on what we are trying to achieve here: We want to allow any application running on our EC2 instance to access the S3 bucket we created. (In the first article we also granted permissions to Redshift, which we will not cover here)
It consists of three parts:
- Definition of the role with a trust policy. This enables a service (e.g.) to perform actions on your behalf.
- The policy itself, which grants permissions (actions on resources) to the role.
- And finally the Instance Profile, which links the role to the EC2 instance.
The next few sections will go through each of them. I tried to add a few comments to the YAML so that it is fairly self-explantory.
The Role with the Trust Policy
We create an IAM role which will allow the EC2 service to assume the role on our account:
  HopRole:
    Type: AWS::IAM::Role
    Properties:
      AssumeRolePolicyDocument:
        Version: '2012-10-17'
        Statement:
        # Allow or deny permission
        - Effect: Allow
          # who can assume the role
          Principal:
            Service:
            - ec2.amazonaws.com
          # actions that are allowed or denied
          Action:
          - sts:AssumeRole
      # path to the role
      Path: "/"
Since you’ve been following best practice now and testing every new resource we added to the definition, there is a slight adjustment required to the command that we are running:
aws cloudformation update-stack --stack-name hat-dev --template-body file://hop-cloudformation-template.yaml --capabilities CAPABILITY_IAM
Because we are changing permissions now, we have to explicitly acknowledge this by adding the --capabilities flag.
The Policy
Next we have to define what kind of permissions we’d like to assign to the role we just created. This is done via an IAM Policy:
  # Define allowed actions: S3 list, get, put, delete
  # A policy associates a policy document with one or more IAM roles
  HopRolePolicies:
    Type: AWS::IAM::Policy
    Properties:
      PolicyName: root
      PolicyDocument:
        Version: '2012-10-17'
        Statement:
        # Allow list action on bucket level
        - Effect: Allow
          Action: ['s3:ListBucket']
          Resource: !GetAtt S3LandingBucket.Arn
        # Allow get, put and delete object on object level
        - Effect: Allow
          Action: ['s3:ListBucket','s3:GetObject','s3:PutObject','s3:DeleteObject']
          Resource: !Join ['', [!GetAtt S3LandingBucket.Arn, '/*']]
      Roles:
      - !Ref HopRole
Note how in the end we attache the role HopRole to this policy. In regards to the Resource, we utilise a simple function (!GetAtt) to dynamically retrieve the bucket ARN of the S3 bucket we generated earlier on.
The Instance Profile
To attach an IAM Role to an EC2 instance, we also require an Instance Profile. Note that you can only link one IAM role to an EC2 instance.
  HopInstanceProfile:
    Type: AWS::IAM::InstanceProfile
    Properties:
      Path: "/"
      Roles:
      - !Ref HopRole
This is a rather simple definition. The Path property is not really required here since it defaults to /. Again note how we reference HopRole in the last line.
By now you might appreciate how the AWS console abstracts all the complexity and creates a few of these artefacts automatically for you under the hood. In any case, these are good new learnings that you can further build on.
We’ve got everything in place now to create the definition for our EC2 instance.
EC2 Instance
We will define a similar EC2 instance as we did in the first article. But we will go a bit further: In our CloudFormation template we can also define instructions that should be executed once the instance is available. In our case these instructions will be around installing Apache Hop and its dependencies. This is done in the UserData section:
  HopInstance:
    Type: AWS::EC2::Instance
    DependsOn: PublicRoute
    Properties:
      ImageId: 'ami-08b993f76f42c3e2f' # image id only valid for region eu-west-2
      InstanceType: t2.small
      # the instance profile we want to use
      IamInstanceProfile: !Ref HopInstanceProfile
      NetworkInterfaces:
      - DeviceIndex: '0'
        # the subnet we want the instance to reside in
        SubnetId: !Ref PublicSubnetA
        AssociatePublicIpAddress: true
        # the security group we want to link to the instance
        GroupSet: [!Ref HopSecurityGroup]
      # the key we want to use to connect to the instance
      KeyName: 'pdi-s3-upload-test'
      Tags:
      - Key: Name
        Value: !Join ['-', ['instance', !Ref 'AWS::StackName', !Ref 'AWS::Region', 'hop' ]]
      # the startup script
      UserData:
        Fn::Base64: !Sub |
          #!/bin/bash
          sudo amazon-linux-extras install java-openjdk11
          cd /home/ec2-user
          wget -O hop.zip https://artifactory.project-hop.org/artifactory/hop-snapshots-local/org/hop/hop-assemblies-client/0.40-SNAPSHOT/hop-assemblies-client-0.40-20201028.102851-81.zip
          unzip hop.zip
          cd hop/lib
          wget https://s3.amazonaws.com/redshift-downloads/drivers/jdbc/1.2.43.1067/RedshiftJDBC4-no-awssdk-1.2.43.1067.jar
          chown -R ec2-user:ec2-user /home/ec2-user/hop
          # tell cloudformation we are finished
          /opt/aws/bin/cfn-signal -e 0 --resource HopInstance --stack ${AWS::StackName} --region ${AWS::Region}
    # Instruction to CloudFormation that this HopInstance is only complete if we get 1 signal back within 5 minutes.
    CreationPolicy:
      ResourceSignal:
        Count: 1
        Timeout: PT5M
As you can see we define the AMI image id (this is specific to one region), the instance type, the IAM instance profile and the key that we want to use to log to the instance. The startup script section (UserData) is also fairly straight forward. This approach comes in handy e.g. if there’s no Docker image available yet for the packages you are using. And in the final part we provide instruction to CloudFormation to wait 5 minutes after the creation of the instance for the signal of completion (this relies on the last command in the UserData section).
Wrap-up
Let’s make sure everything is working correctly. In the AWS web console check the details of your stack.
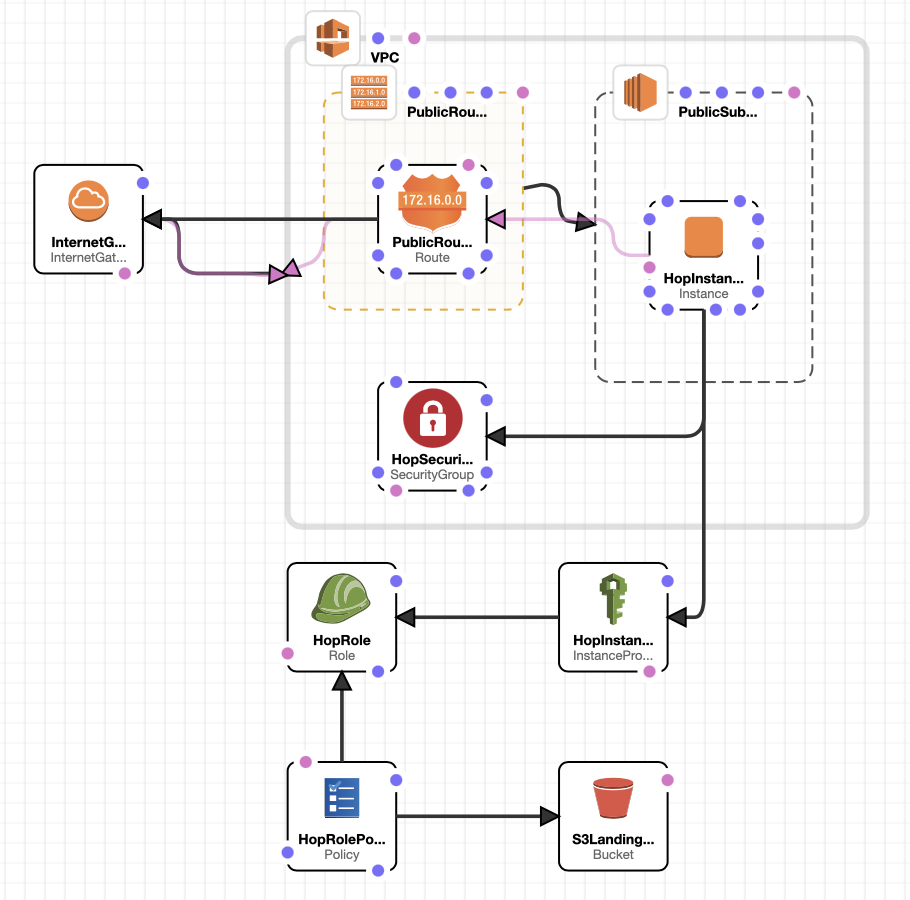
Your stack should have following resources now:
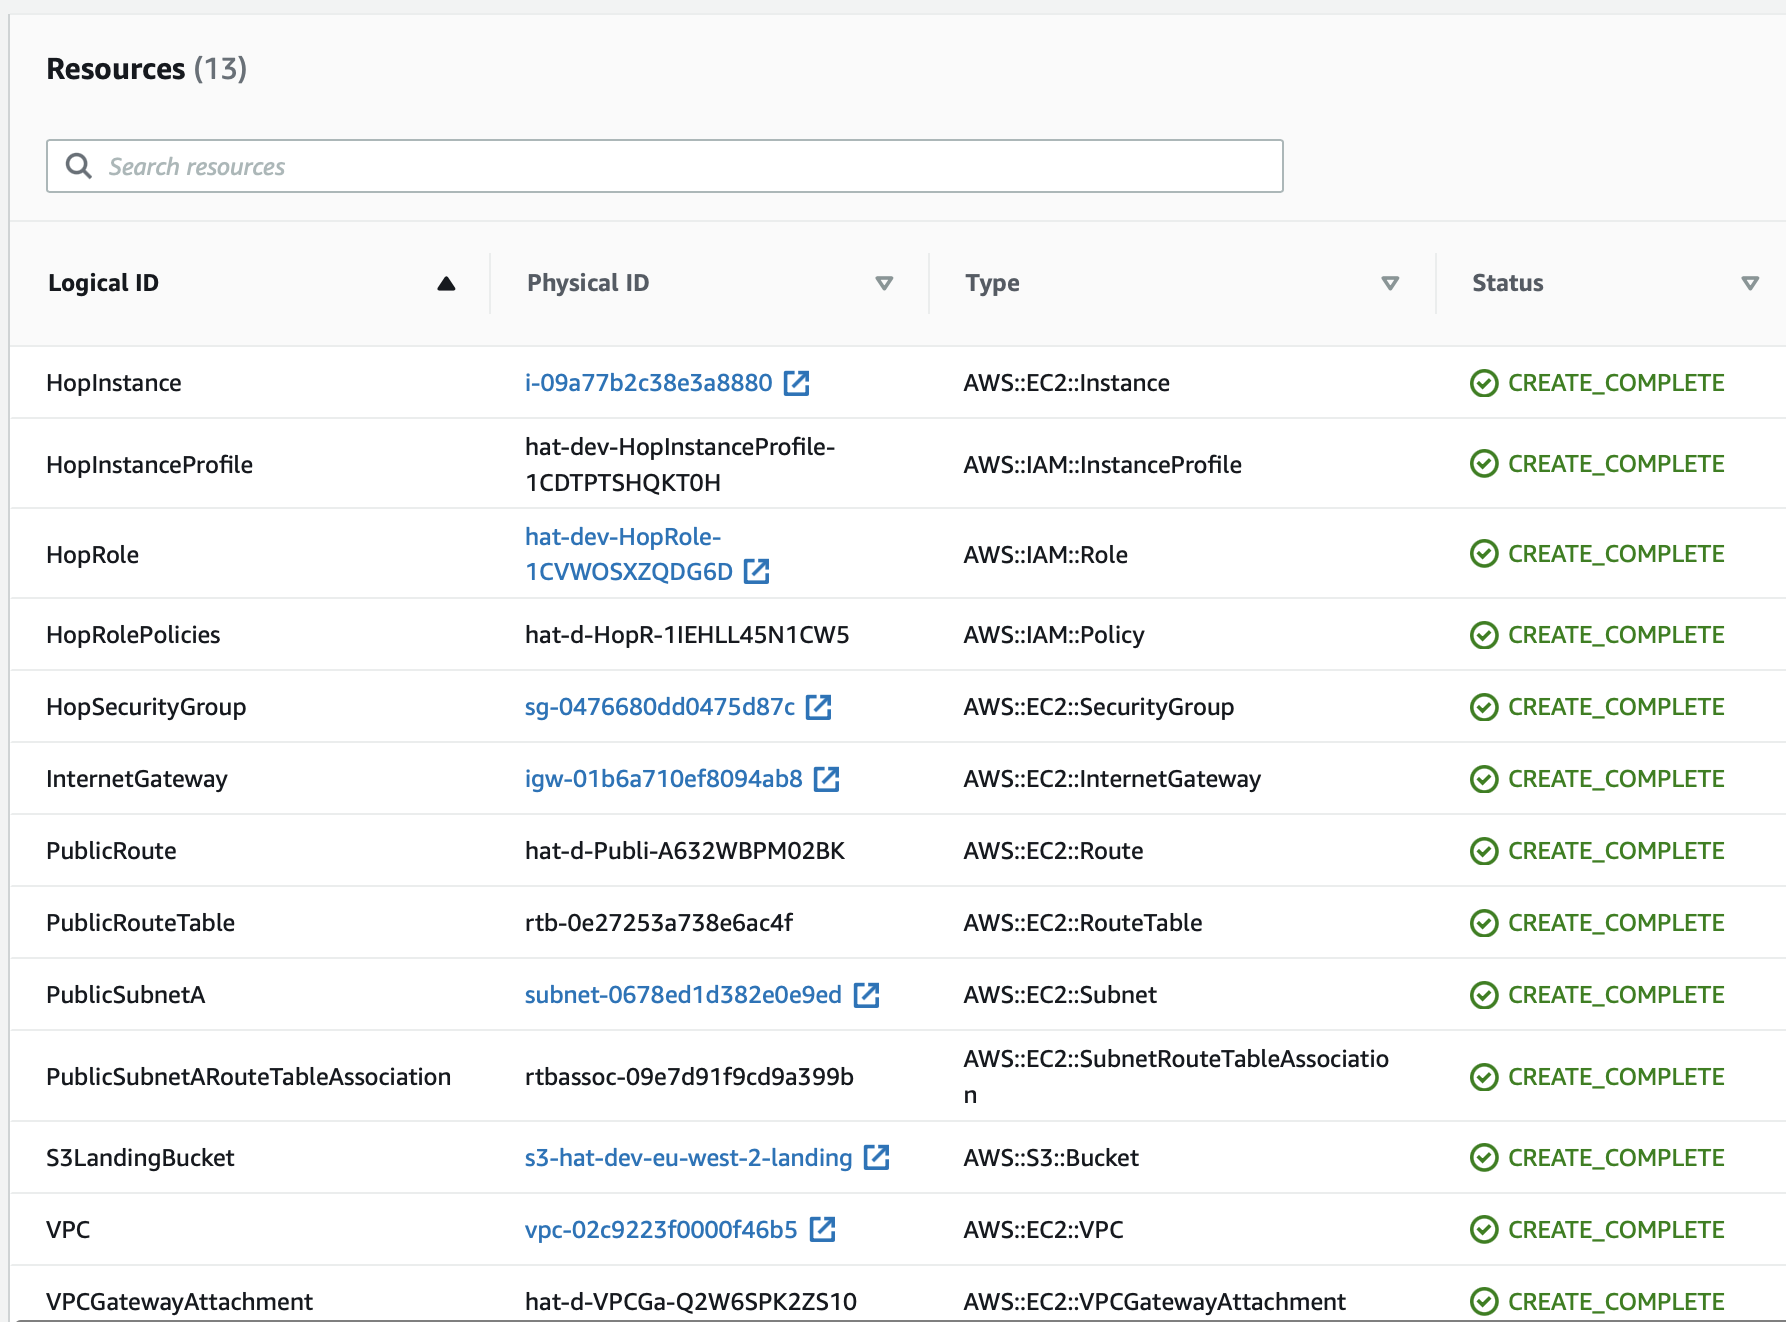
Next I’d recommend you log on to the EC2 instance and check that you can access the S3 bucket from there. Also try to upload and download a file.
We’ve got a fairly nice environment now to run Apache Hop in. I’ll leave it to you to add the Redshift specification that we covered in the first article.
Going further
By now you should have good understanding of AWS CloudFormation.
In regards to the template, we could go further and create parameters for:
- AWS instance type
- Hop download link
- etc
I hope by now you see the advantage of using AWS CloudFormation. If you’d like to learn more about CloudFormation, I’d like to recommend these two excellent articles: