In this artilce I will provide a quick walkthrough on how to utilise Apache Hop on AWS ECS (Elastic Container Services) and AWS Batch. You can think of AWS Batch as a specialisted service on top of AWS ECS. The examples provided here are all very minimal - they will cover just the bare basics, but should give you a starting point to explore these AWS services further.
We will be using the Docker image from my last article Apache Hop: Customising the Docker Image. If you don’t have time to read this article, here is the Dockerfile:
FROM apache/incubator-hop:0.70-SNAPSHOT
ENV GIT_REPO_URI=
# example value: https://github.com/diethardsteiner/apache-hop-minimal-project.git
ENV GIT_REPO_NAME=
# example value: apache-hop-minimal-project
USER root
RUN apk update \
  && apk add --no-cache git
# copy custom entrypoint extension shell script
COPY --chown=hop:hop ./resources/clone-git-repo.sh /home/hop/clone-git-repo.sh
USER hop
To build the image run (this assumes you saved the file as custom.Dockerfile):
docker build . -f custom.Dockerfile -t ds/custom-hop:latest
Pushing our image to AWS ECR
Resources:
Prerequisites: Follow these instructions.
Let’s register our ECR registry with Docker CLI (adjust to your requirements):
AWS_REGION=eu-west-2
AWS_ACCOUNT_ID=xxxxxxxxx
aws ecr get-login-password --region ${AWS_REGION} | docker login --username AWS --password-stdin ${AWS_ACCOUNT_ID}.dkr.ecr.${AWS_REGION}.amazonaws.com
If you get an error like this one:
Could not connect to the endpoint URL: "https://api.ecr.eu-west.amazonaws.com/"
Error: Cannot perform an interactive login from a non TTY device
… it’s very likely you are not using the correct region code.
Next create an ECR repository to hold your images:
AWS_ECR_REPO=hop-demo
aws ecr create-repository \
    --repository-name ${AWS_ECR_REPO} \
    --image-scanning-configuration scanOnPush=true \
    --region ${AWS_REGION}
Now we are ready to push our image to the ECR registry using the Docker CLI:
# get the tag of the image you want to push
docker images
# tag the image to push to our repo
LOCAL_IMAGE_TAG=ds/custom-hop:latest
docker tag ${LOCAL_IMAGE_TAG} ${AWS_ACCOUNT_ID}.dkr.ecr.${AWS_REGION}.amazonaws.com/${AWS_ECR_REPO}:latest
# push the image
docker push ${AWS_ACCOUNT_ID}.dkr.ecr.${AWS_REGION}.amazonaws.com/${AWS_ECR_REPO}:latest
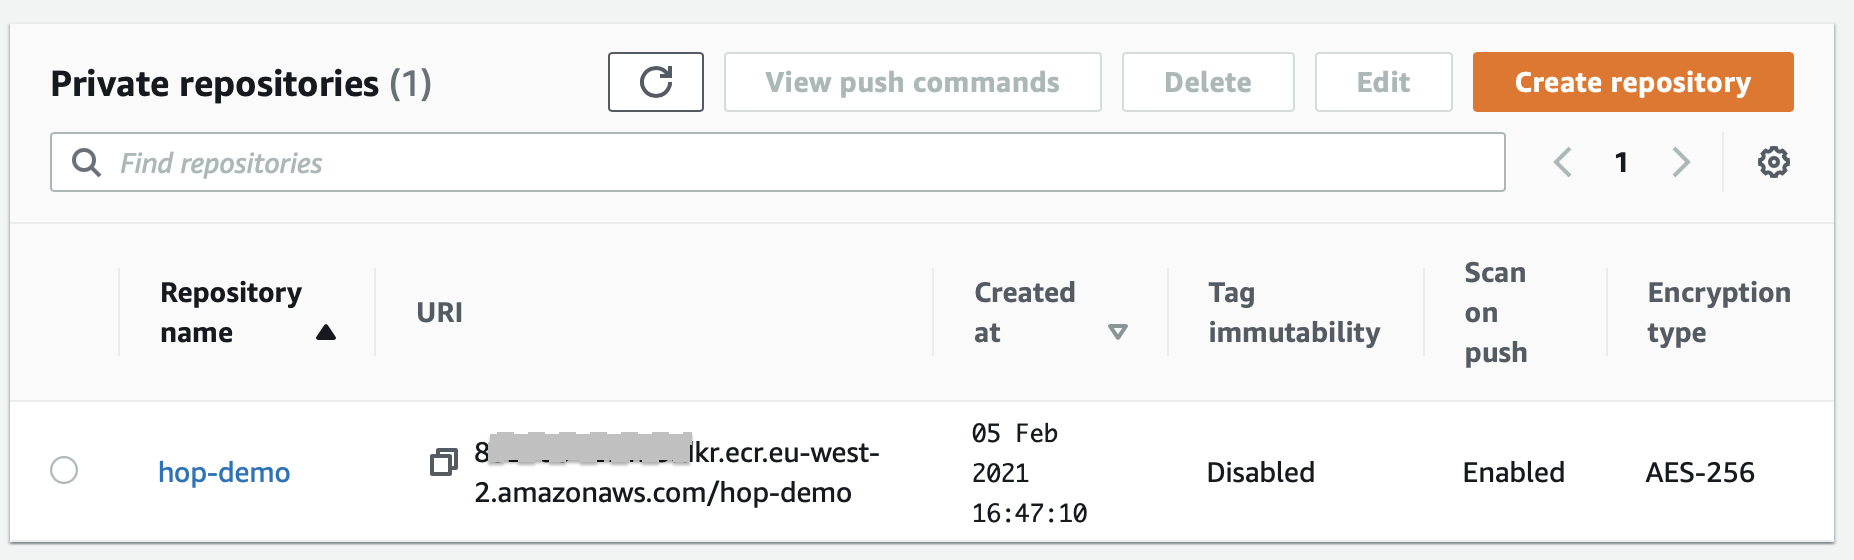
Once the image is pushed, log on to the AWS web console and navigate to the ECR repositories page:
AWS ECS (Elastic Container Services)
Next let’s navigate to the Amazon ECS Clusters page.
- Click on Create Cluster. We will leave most settings on their default. This is our first trial, so we don’t want to over-complicate the situation.
- As template pick the Networking only … Powered by AWS Fargate option and then click Next step.
- On the Configure cluster page define the cluster name (e.g.
hop-demo), tick Create VPC and finally tick Enable Container Insights. Then launch the cluster.
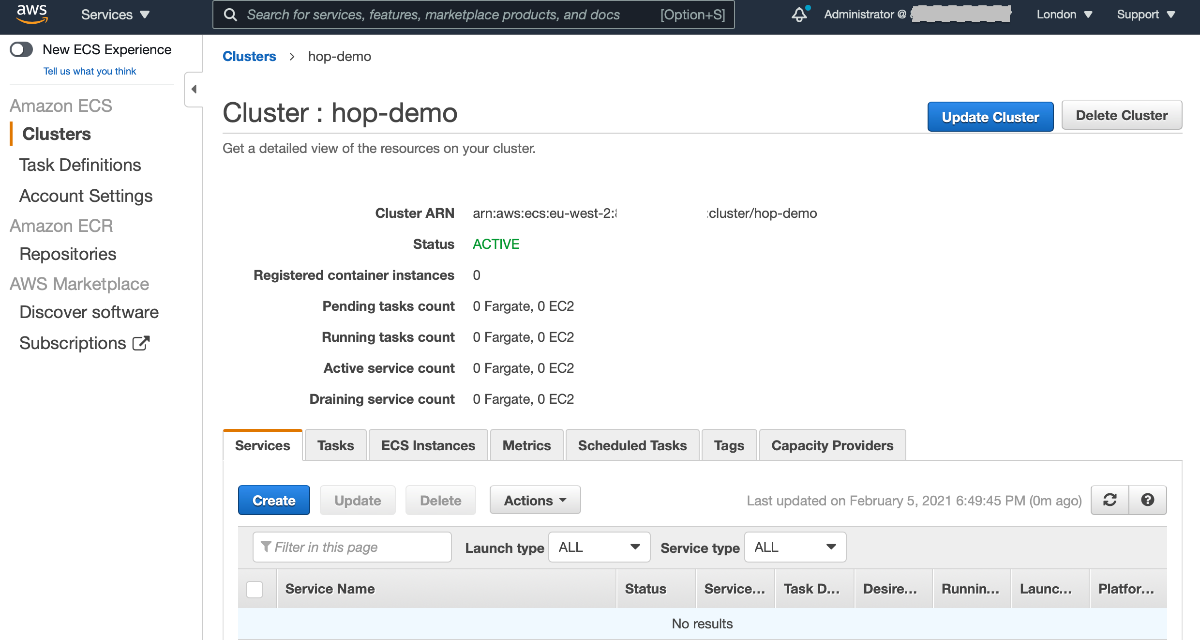
AWS is doing quite a lot of work in the background for us: Setting up a dedicated VPC with subnets across several availability zones, configuring an internet gateway etc etc. Once the provisioning finished, click on View Cluster:
From the left hand side menu choose Task Definitions and then click on Create new Task Definition:
- On the first screen pick Fargate for launch type compatibility.
- On the Configure task and container definitions screen. Provide a task name, set the Task memory to 4GB and Task CPU to 2 vCPU. This is also the stage where you can add an IAM’s role that has access to all the services that your container requires (for our super simple example this is not necessary). Then click on Add container.
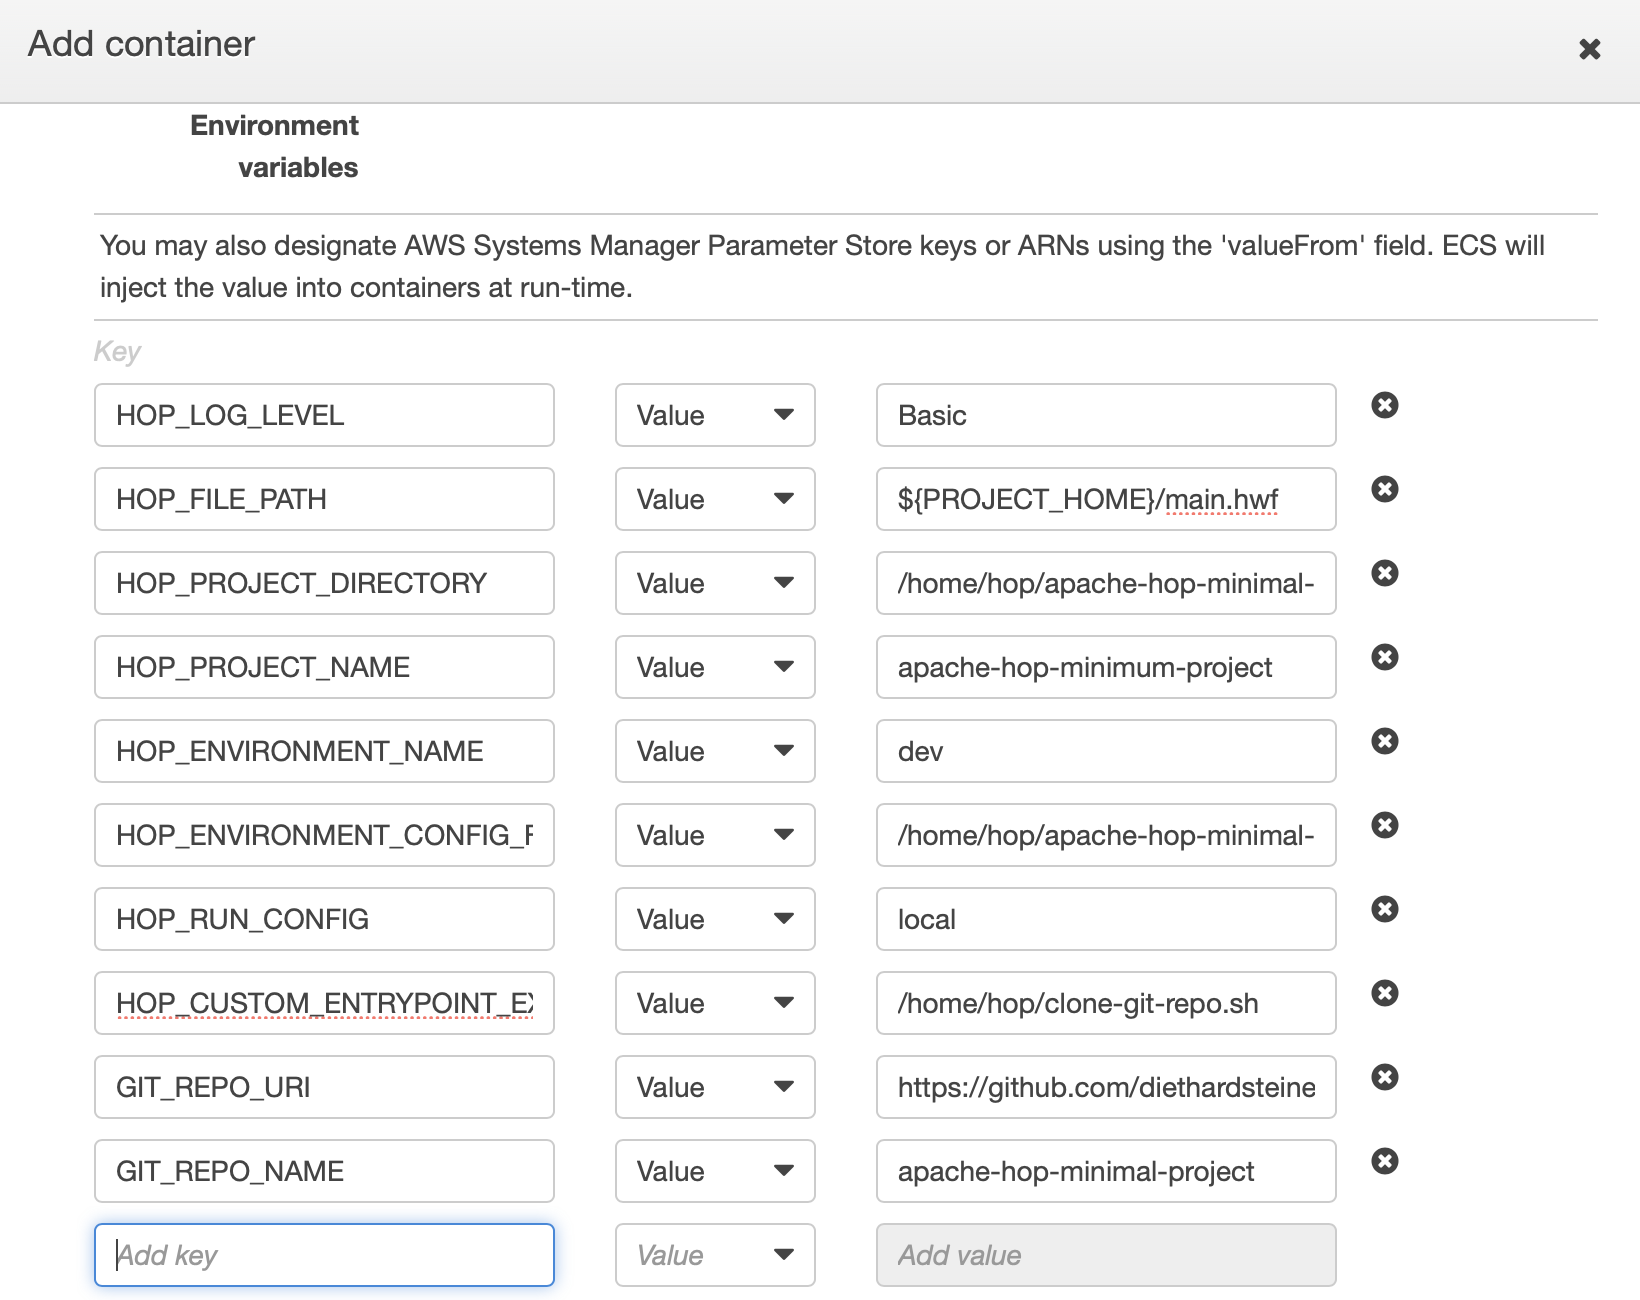
- On the Add container screen fill out all the mandatory details. You can get the Image URI from the ECR registry page. We leave a lot of fields empty - the section that is of interest is the Environment variables one: Here we will set the same environment variables that we previously set on the command line (the values can be adjusted later on when we run the task). Add all these variables (alternatively you could also reference an Environment file). Finally click Create Task.
- On the Task Definition page click on Actions and choose Run task. Set Launch type to Fargate. Pick one subnet and leave everything on default. Finally click Create task.
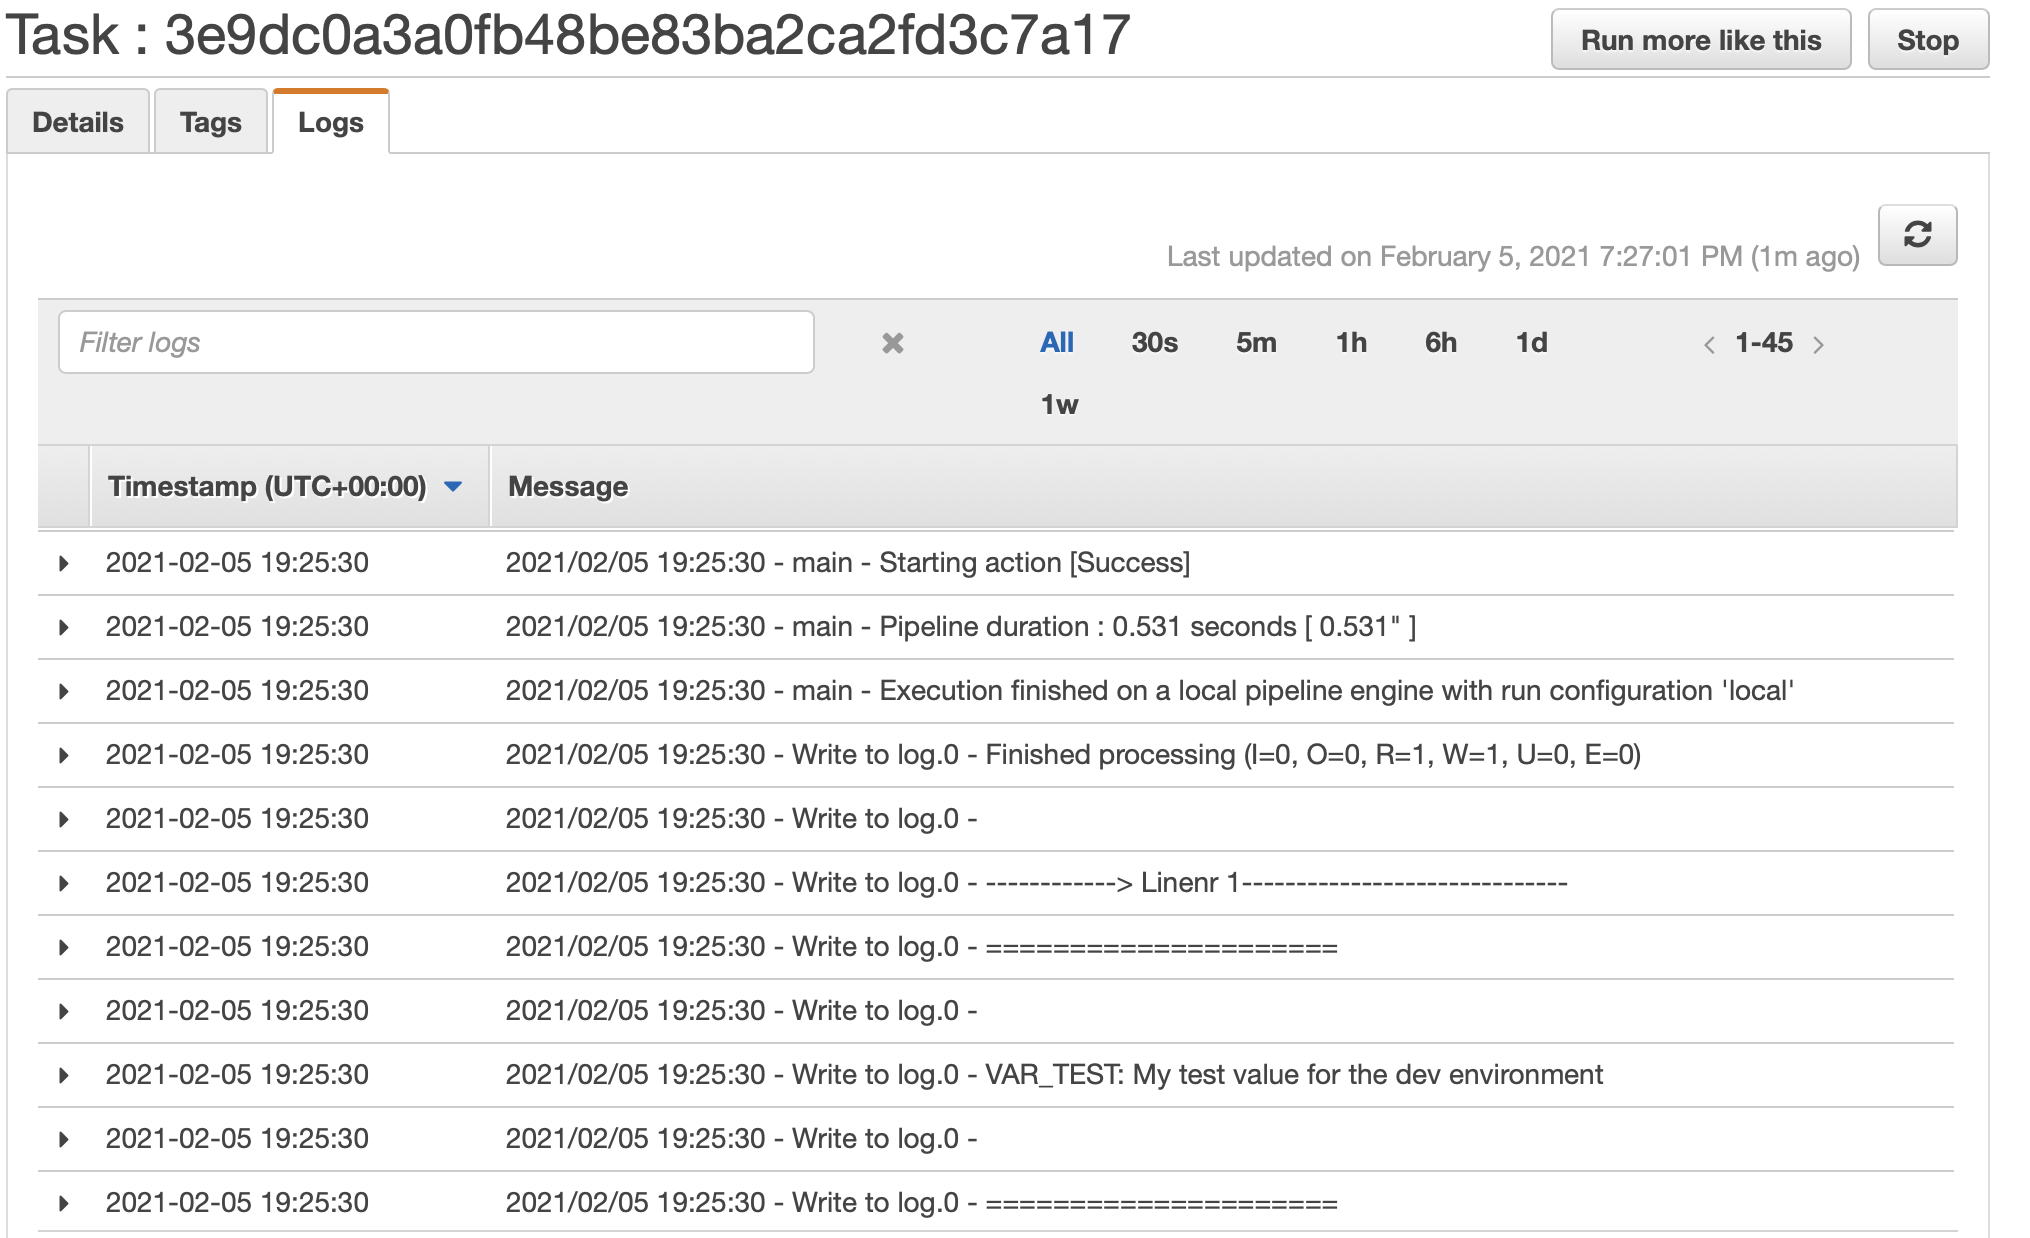
- You are back on the Cluster page now. Click on the Task id and once on the Task page click on the Logs tab. You might have to click on the Refresh button a few times to get the most recent log entries until our Hop process finishes.
Congrats: You managed to get your first Hop container running on AWS!
We could schedule this job via CloudWatch Events (more info here), however, let’s take a look at AWS Batch next, which is more suited for this purpose.
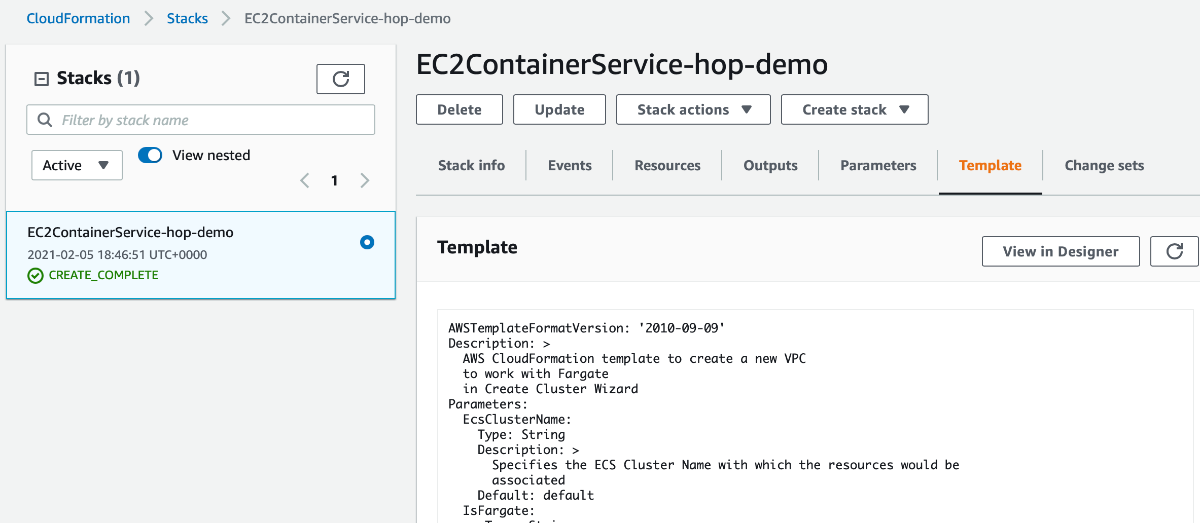
One other noteworth point to mention is that in the background AWS created a CloudFormation Stack called something like EC2ContainerService-hop-demo for you, and if you jump over to the CloudFormation page you can even select this stack and then under the template tab retrieve the full definition. This is pretty neat! If you ever wanted to automate the setup, you’d be all sorted:
Don’t forget to delete all the AWS resources you created before moving on (to save costs).
AWS Batch
Resources:
While we can run our Hop workload via ECS, AWS Batch might be the more suitable AWS service in the majority of cases, providing you with extra options for handling your workload (e.g. job queues). It provides features similar to batch schedulers like Berlin Scheduler or Slurm . ECS seems to be more geared towards running services (long running processes like web servers).
AWS Batch concepts:
- compute environments: You can define either a cluster of EC2 instances or pick Fargate, their serverless compute offering, which allows you to fully focus on your batch job.
- The job queue: processes your jobs. It is linked to one or more compute environments. E.g. You can link to an env consisting of standard EC2 instances and for peak times you could link it to a second env consisting of spot instances (cheaper, but can be terminated at any point, usually within 2 min).
- job definition: This is where you define which Docker image you want to use and define all related settings.
- job: This is the actual execution of a job definition: The job will be submitted to the job queue and then run on the compute environment once resources become available.
Navigate to the AWS Batch page and choose Compute Environments left hand side panel, then click Create: Provide a name (e.g. hop-demo-env) and set the Maximum vCPUs to 4 (to make sure we are not running any high costs) and leave everything else on the default. Finally click Create compute environment. We picked Fargate for our environment: This is AWS’s serverless compute offering - we can focus on our batch jobs and AWS will do the rest for us.
Next choose Job queues from the left hand side panel, then click Create: Define the job queue name (e.g. hop-demo-queue) and under Connected compute environments pick the environment we just created. Finally click Create.
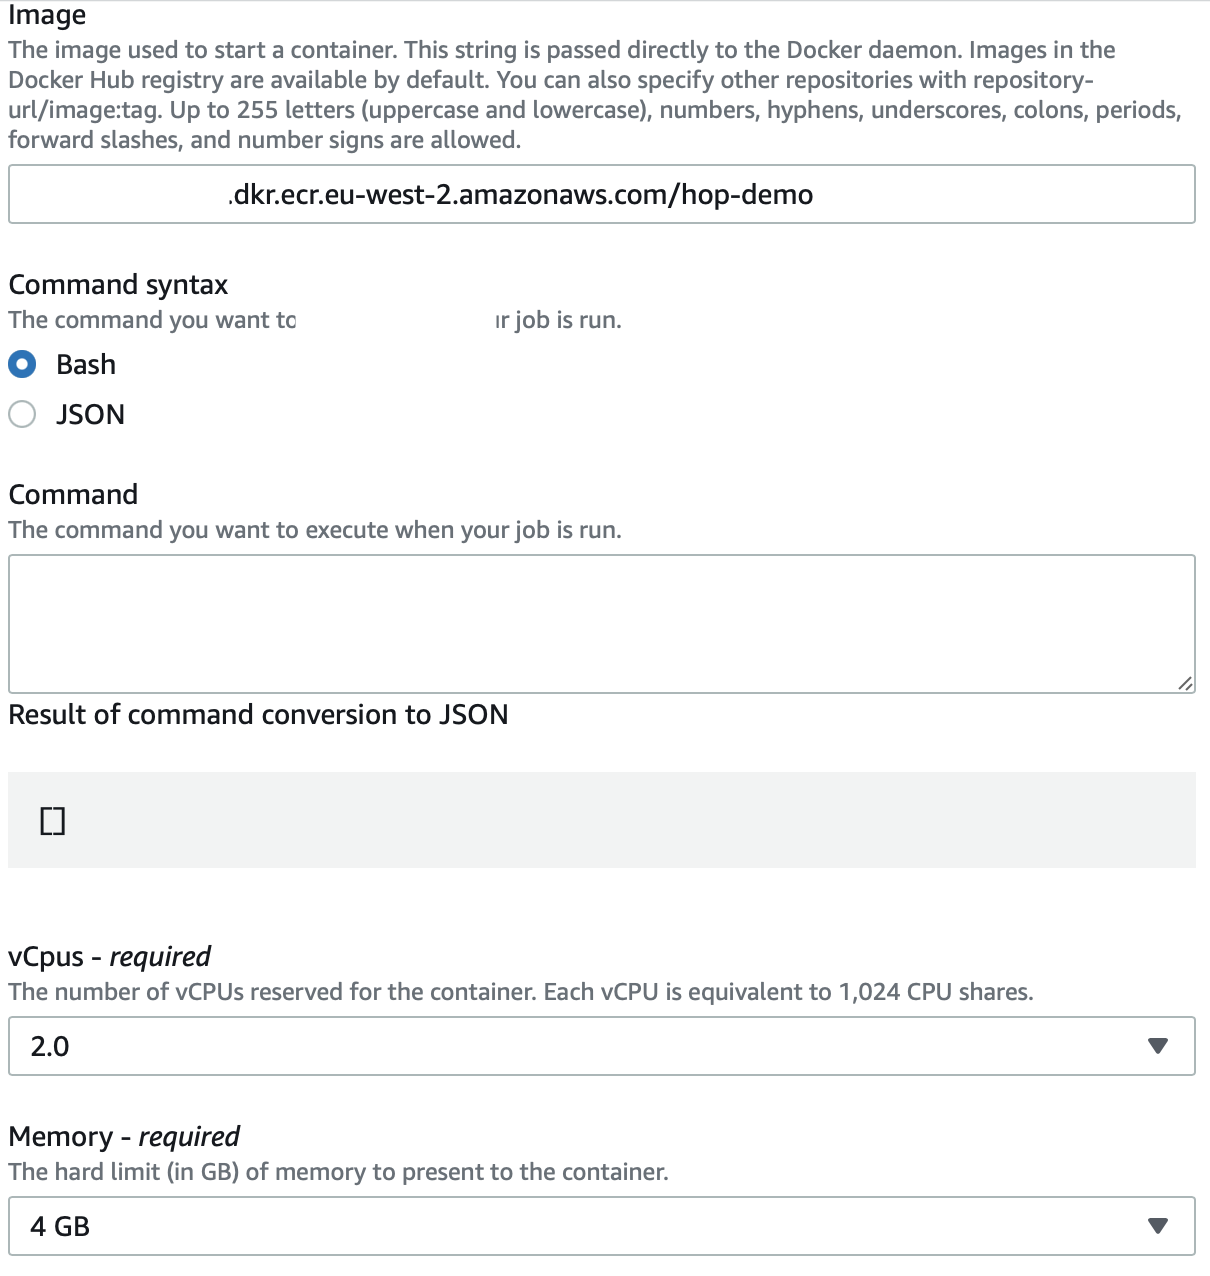
Next choose Job definition from the left hand side panel, then click Create: Again provide a name (e.g. hop-demo-job). You could define a retry strategy if the job fails, but this is not necessary in our case. Under Container properties, specify our image, remove the pre-populated command, set vCpus to 2.0 and Memory to 4GB.
Define as Execution role ecsTaskExecutionRole.
Also enable the public IP address, since we are pulling our code from GitHub.
Expand the Additional configuration section.
Next add all the Environment variables (NOT the parameters section):
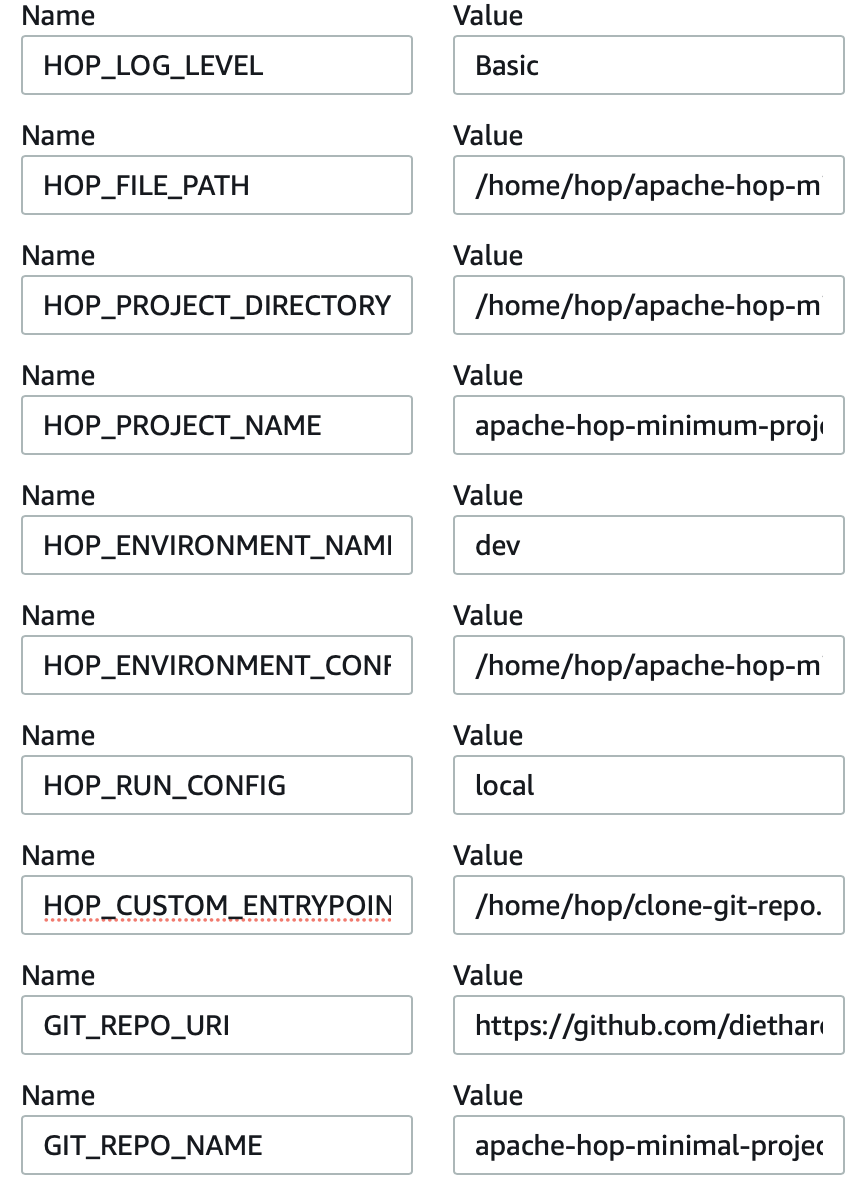
Note: The environment variable values can be overwritten on the job level (the actual execution instructions).
Finally click Create.
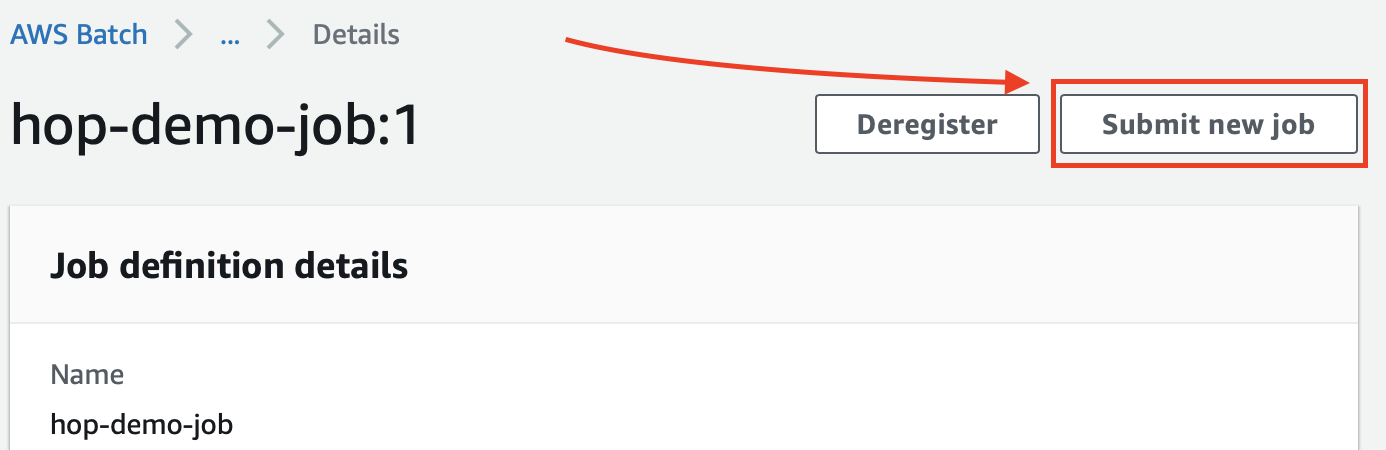
On the Job definitions page, click on the name of our job, which will bring up the Job Details page: Here you have to option to submit the job. Click on Submit new job:
On the Submit new job page define a name for the job, pick the job definition and job queue we just created.
Note: If there is no value in the Job queue drop-down list, go back and edit the Job queue. Make sure you tick the compute environment (there is a small selection box on the left hand side of the row for the environment) and then save again.
Leave everything else as is and then click Submit.
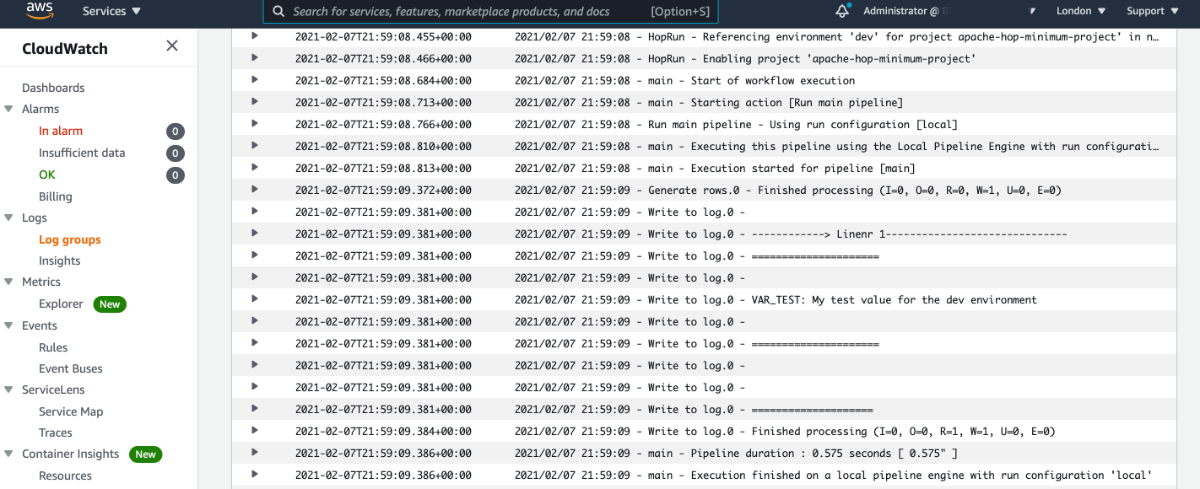
Once finished, try to inspect the CloudWatch logs to understand if the workflow really finised successfully.
Info: If you go to the ECS console, you’ll also notice that the job definition we just created within the AWS Batch console shows up there under Task Definitions. Also you’ll notice that there’s an additional cluster now.
Scheduling
CloudWatch Events help scheduling AWS batch jobs:
- A change to an AWS resource can trigger an AWS batch job.
- Set a cron or rate expression to trigger an AWS batch job.
See also:
So this leads the way to quite some interesting options: E.g. We could have an AWS Batch job triggered by a new file arriving in our S3 bucket.
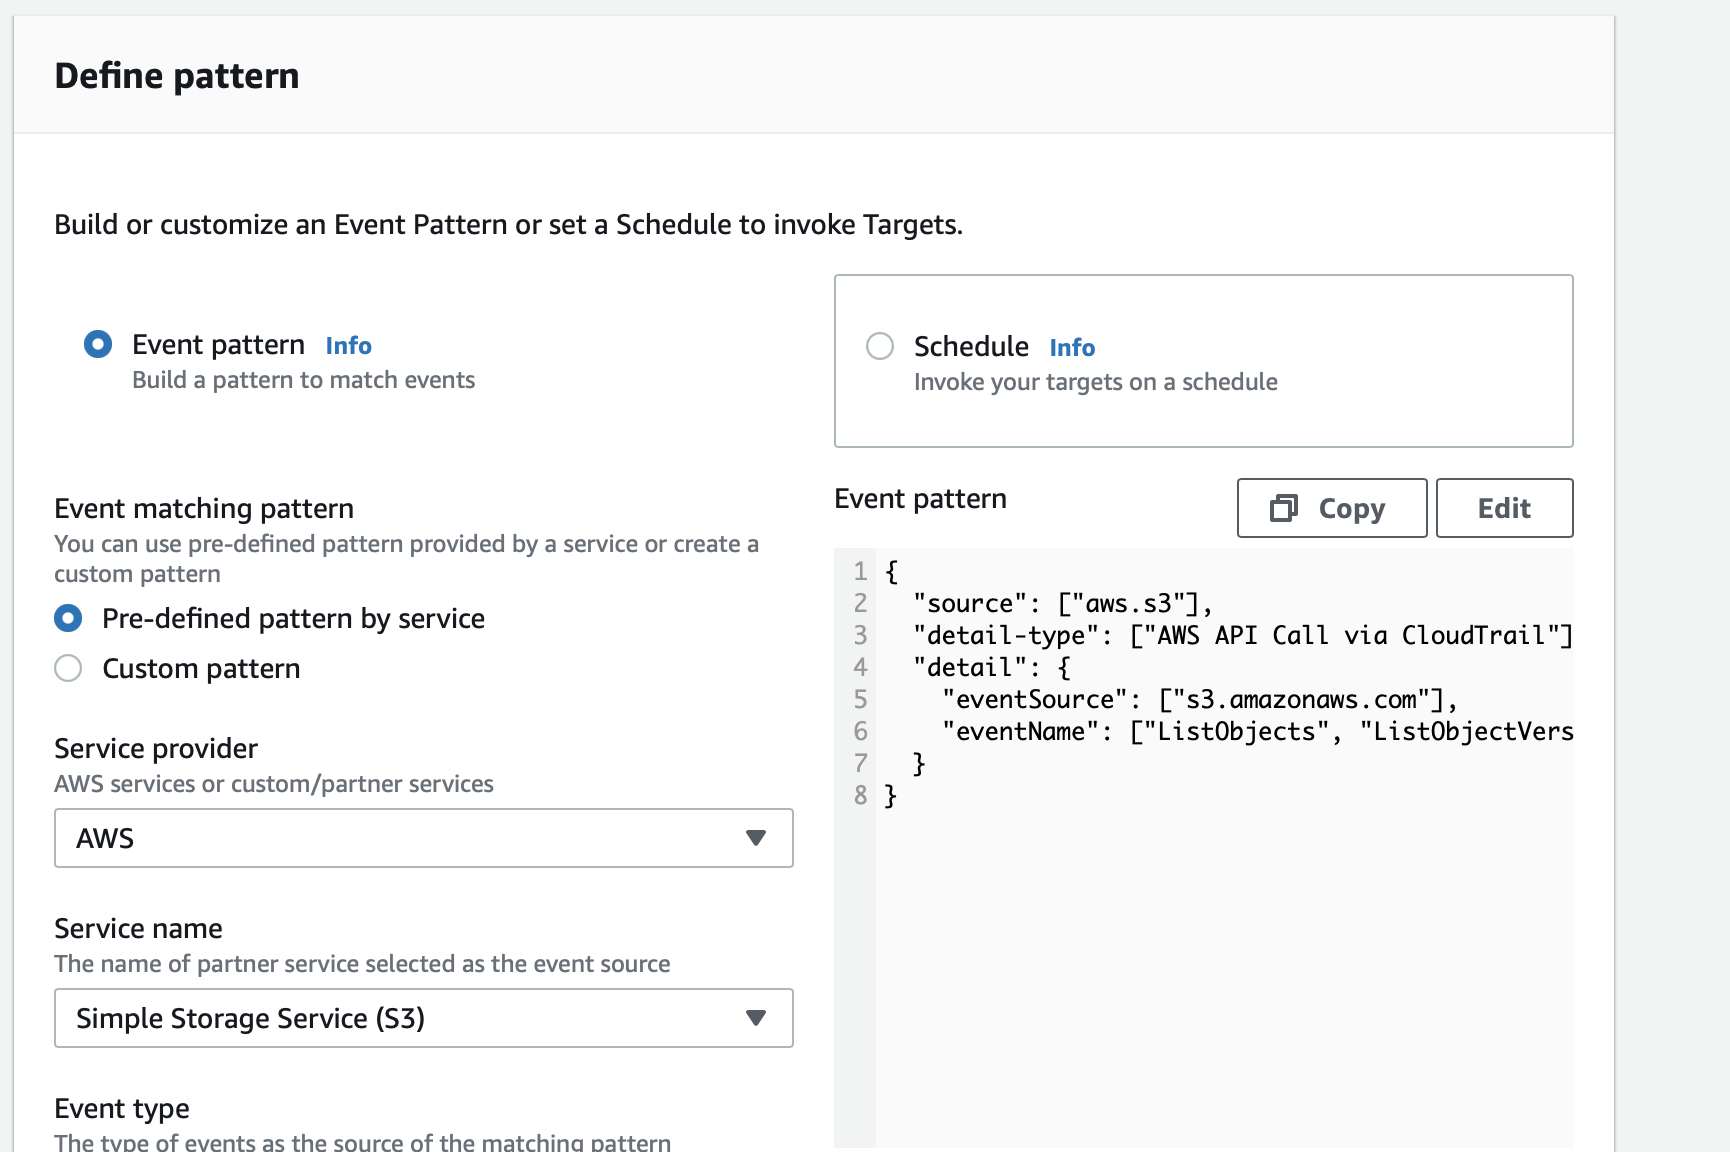
These days AWS recommends using AWS EventBridge instead of CloudWatch Events. You can think of EventBridge as a successor to CloudWatch Events with better features.
Example EventBridge Rule Definition Dialog:
Exploring this topic in depth is out-of-scope for this article. My aim here was to give you some ideas and you can take it further if you want.