In this article we will take a look how we can build an automated data ingestion solution by utilising several AWS services: The aim is to trigger an Apache Hop process once a new file is uploaded to our S3 bucket. The Hop process in question will read all the data from the file. In real life scenarios you’d further manipulate the data and output it to services like AWS Redshift or so, but since we’ve only got limited time to go through this tutorial, I’ll shortcut the process to just writing the data to the log (just as a proof that it’s actually doing something).
Our solution will use the following AWS services:
- S3: The famous object store.
- CloudTrail: Listens to AWS API requests (events) and logs them.
- EventBridge: Allows you to define rules that listen to certain events and trigger an action.
- Batch: Service to run batch workloads.
- ECR: Elastic Container Registry
How it all hangs together: We will use ECR to store our customer Hop image. We will define a job on AWS Batch that references this Hop image. We will create a dedicated S3 bucket to store our input files. Then we will configure CloudTrail to log any file uploads that happen on this bucket (the events). We will define a rule on EventBridge that “listens” to the CloudTrail log (the events) and triggers our AWS Batch job, which will run a Hop pipeline that processes the file from S3.
Elastic Container Registry (ECR)
This artilce builds on the previously published article Apache Hop: AWS ECS and AWS Batch. To follow this tutorial here, build the customised Docker image mentioned there and upload it to ECR (there’s no need to read the rest of the article).
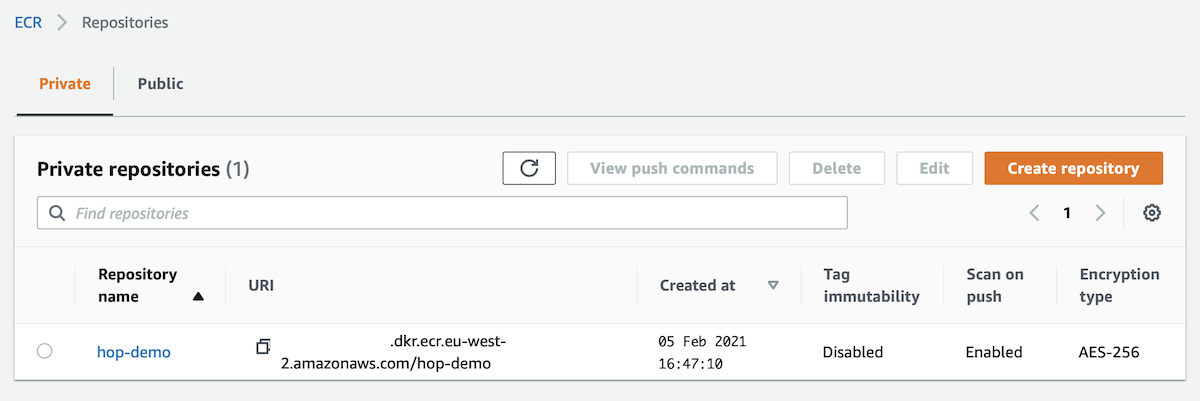
So your customised Hop image should be available on ECR. Go to the ECR console to make sure to is available:
The Hop Data Pipeline
The custom Docker image you just created will pull my minimal Hop demo project. For this tutorial we will be using this super simple pipeline:
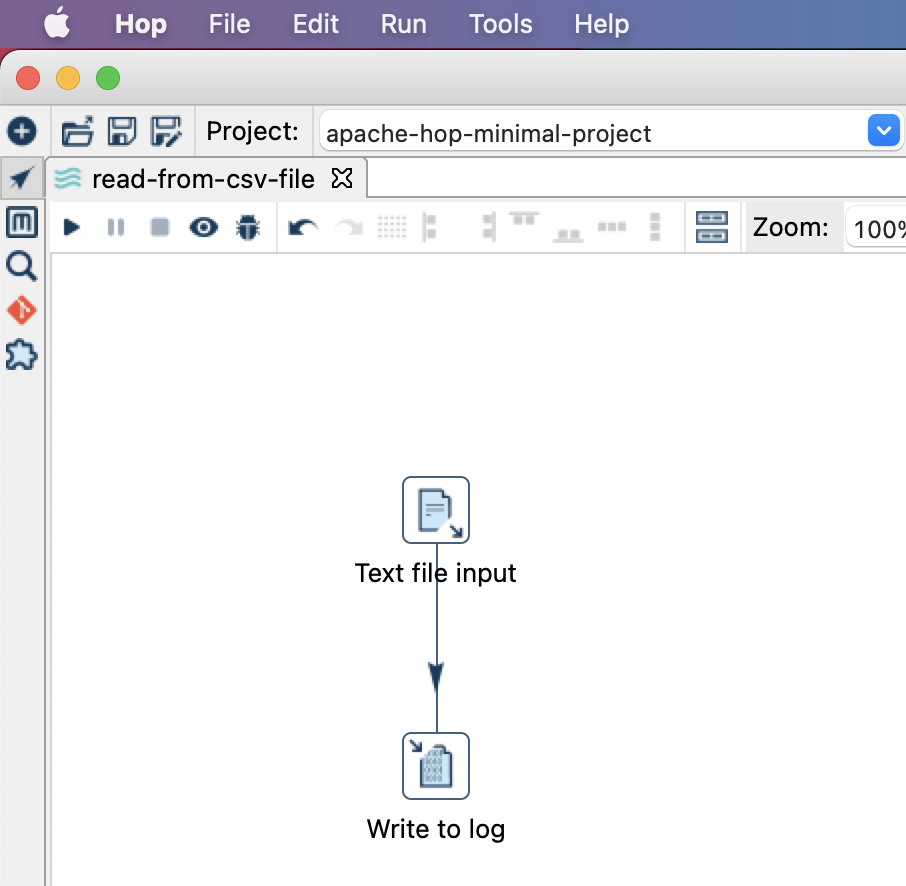
This pipeline reads a comma separated file from ${PARAM_CSV_FILE_PATH} and writes the first 20 lines out to the log. Since files can be read by Apache Hop via the VFS (virtual file system), the file could be on disk, on S3 or any other cloud vendor’s object storage, all we would have to change to read the file is the path and nothing else. This is pretty neat.
Create S3 Bucket
Next let’s create a dedicated S3 bucket. Hop over to the S3 console and click on Create Bucket. Provide a unique name (I called mine hop-demo-bucket) and leave everything else as is. Click Create Bucket.

Let’s prepare the sample input data:
echo "2020-12-25,23030" > /tmp/sales.csv
echo "2020-12-26,24089" >> /tmp/sales.csv
echo "2020-12-27,29231" >> /tmp/sales.csv
Upload to S3 (example):
aws s3 cp /tmp/sales.csv s3://hop-demo-bucket/in/sales.csv
IAM
Our container requires permissions to access all the AWS services that we want to use (see also AWS Batch execution IAM role).
Let’s create a dedicated role:
- Go to the AWS IAM console and click on Roles.
- Click Create Role.
- On the Select type of trusted entity page select Elastic Container Service and then under Select your use case select Elastic Container Service Task. Click Next.
- On the Attach permissions policies screen search for S3 and pick the
AmazonS3ReadOnlyAccesspolicy. - Click Next twice and on the Create role screen provide a name for the role, e.g.
hop-demo-s3-read-access. Then click Create role.
AWS Batch
Jump to the AWS Batch Console and choose Compute Environments on the left hand side panel, then click Create: Provide a name (e.g. hop-demo-env) and set the Maximum vCPUs to 4 (to make sure we are not running any high costs) and leave everything else on the default. Finally click Create compute environment. We picked Fargate for our environment: This is AWS’s serverless compute offering - we can focus on our batch jobs and AWS will do the rest for us.
Next choose Job queues from the left hand side panel, then click Create: Define the job queue name (e.g. hop-demo-queue) and under Connected compute environments pick the environment we just created. Finally click Create.
Next choose Job definition from the left hand side panel, then click Create:
- Again provide a name (e.g.
hop-read-csv). - You could define a retry strategy if the job fails, but this is not necessary in our case.
-
Under Container properties:
-
Specify our image: You can get the Image URI from the ECR registry page.
-
Remove the pre-populated command
-
Set vCpus to
2.0and Memory to4GB.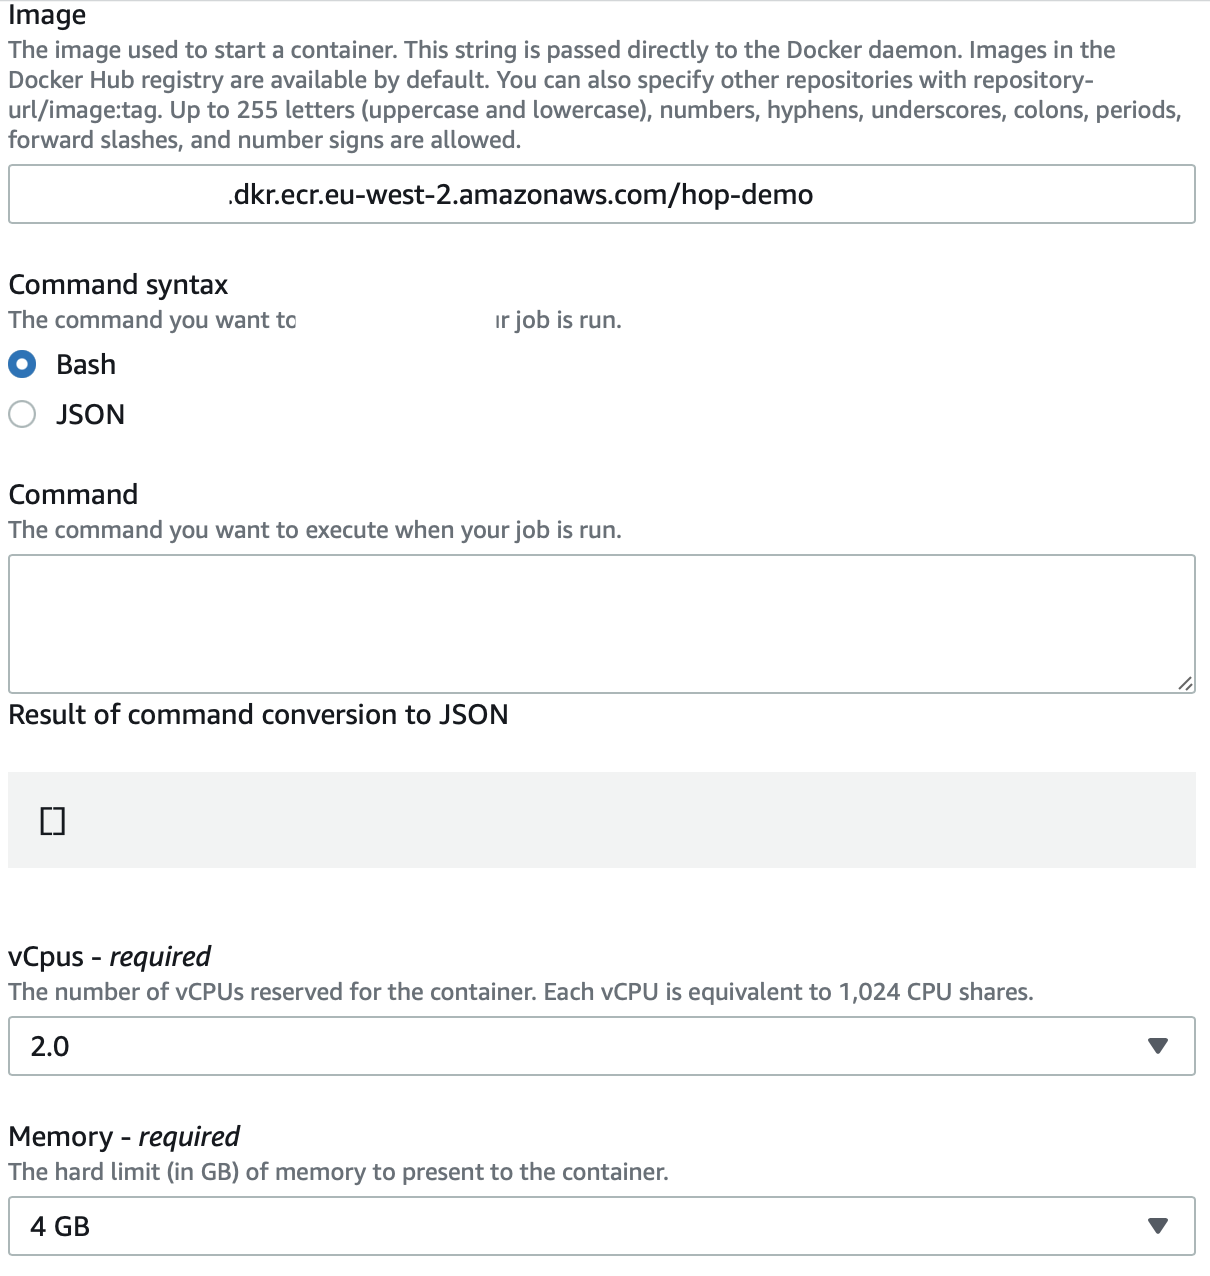
-
Define as Execution role
ecsTaskExecutionRole. -
Also enable the public IP address, since we are pulling our code from GitHub.
-
Expand the Additional configuration section.
-
Job role: Here we define the IAM Role that grant the container permissions to all the required AWS services. Pick the IAM role we created earlier on:
hop-demo-s3-read-access. -
Next add all the Environment variables (NOT the parameters section):
-
| Name | Value |
|---|---|
HOP_ENVIRONMENT_NAME |
dev |
HOP_RUN_CONFIG |
local |
HOP_ENVIRONMENT_CONFIG_FILE_NAME_PATHS |
/home/hop/apache-hop-minimal-project/dev-config.json |
HOP_RUN_PARAMETERS |
PARAM_CSV_FILE_PATH=s3://hop-demo-bucket/in/sales.csv |
HOP_FILE_PATH |
${PROJECT_HOME}/read-from-csv-file.hpl |
HOP_PROJECT_DIRECTORY |
/home/hop/apache-hop-minimal-project |
HOP_LOG_LEVEL |
Basic |
GIT_REPO_NAME |
apache-hop-minimal-project |
HOP_PROJECT_NAME |
apache-hop-minimum-project |
HOP_CUSTOM_ENTRYPOINT_EXTENSION_SHELL_FILE_PATH |
/home/hop/clone-git-repo.sh |
GIT_REPO_URI |
https://github.com/diethardsteiner/apache-hop-minimal-project.git |
Finally click Create.
Before we go any further, let’s make sure that our container can actually run and process the CSV file. On the top right hand side of the Job definitions page (of hop-read-csv:1) click on the Submit new job button.
On the Submit new job screen provide a name of the job and pick the Job queue we created earlier on:
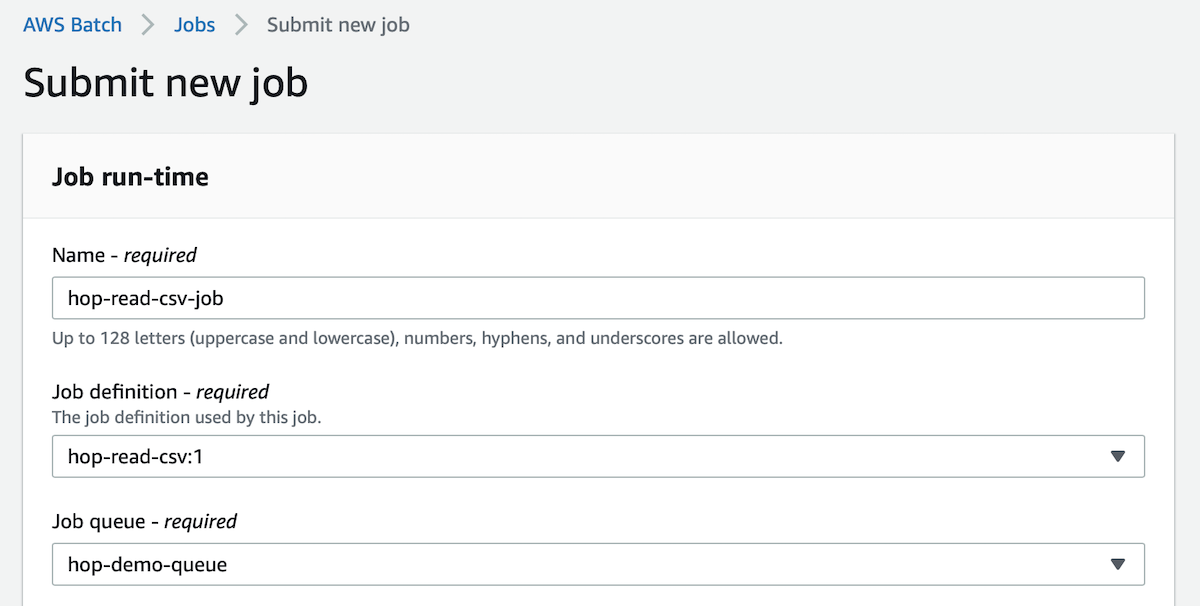
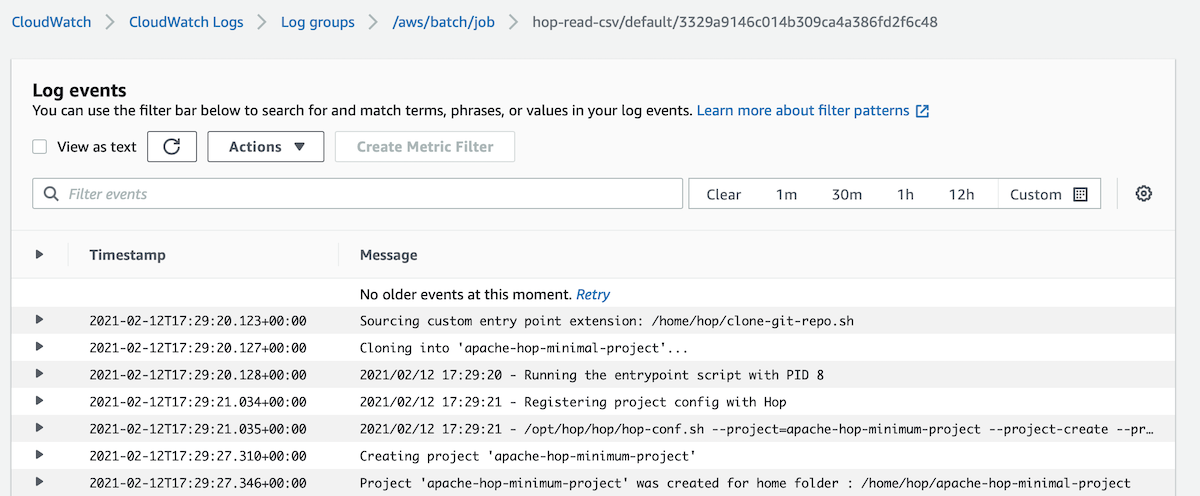
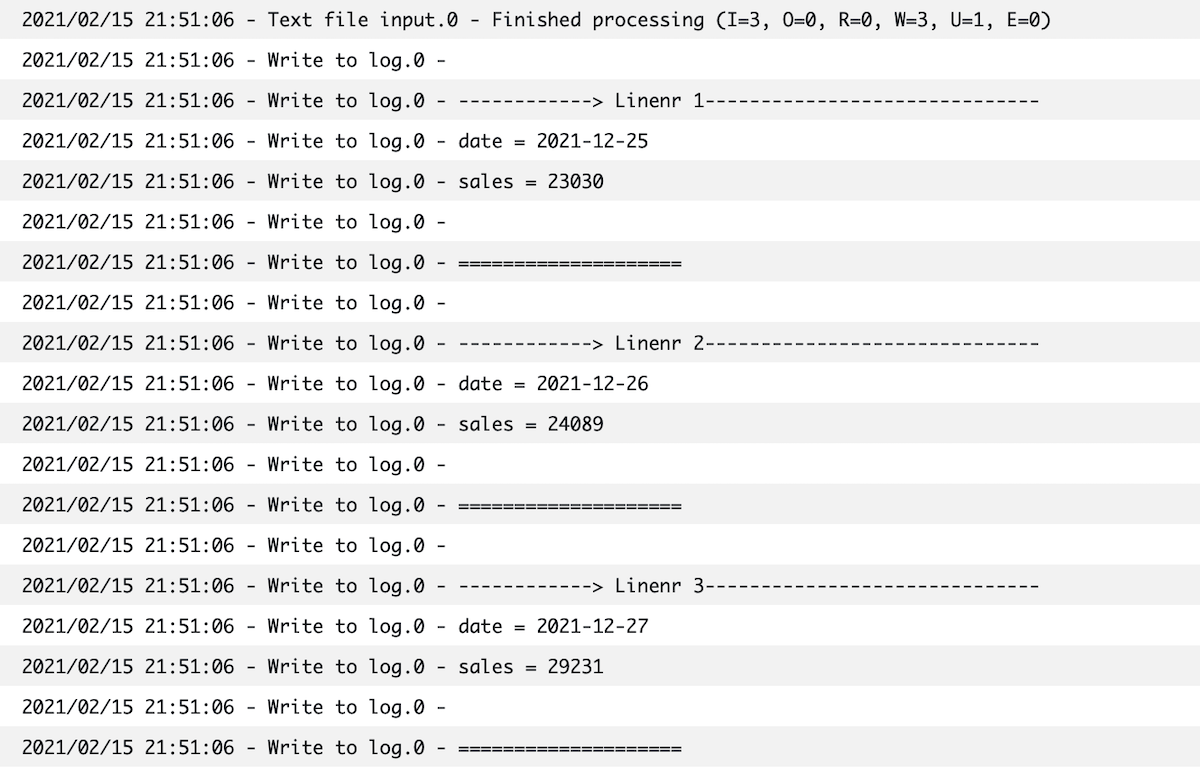
Leave everything else as is and submit the job. There should be a small notification that the job was submitted - click on the View Details button. You might have to refresh the Details page after a while so that you can see the exectuion results at the bottom of the page under Job attempts. Click on the link listed below Log stream name to get to the actual log. This log should contain a section like this:
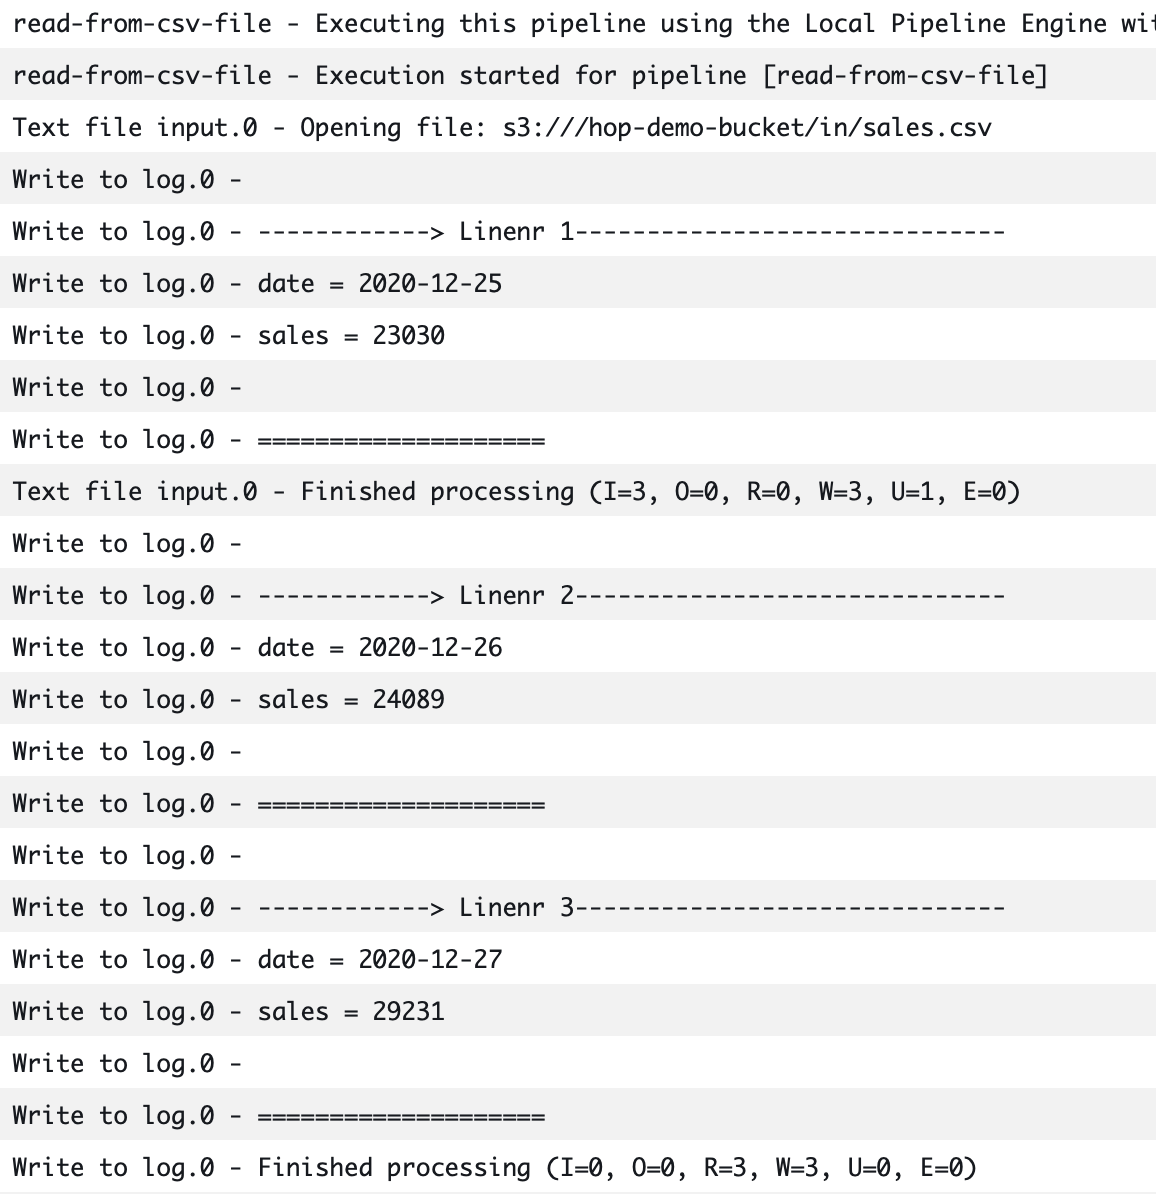
This indicates that the Hop pipeline successfully read the data from the CSV file on S3.
Now we can move on to the next stage of our little project!
CloudTrail
The next step is going to be quite interesting: We will configure a process that triggers our Hop pipeline once a new file gets added to our S3 bucket. But before we can define this via a EventBridge Rule, we have to set up a CloudTrail Trail to capture the API calls and related events and write them to a log in a chosen S3 bucket.
Note: CloudTrail writes the event to log files every 5 minutes (see also here). However, the events are forwarded to EventBridge in real-time. So when you study events in CloudTrail > Event history just be patient a bit, since it will take up to 5 minutes for the events to show up (since they are read from the log file on S3).
Go to the CloudTrail Console and choose Trails from the left hand side panel. Then click on Create Trail.
Define a Trail name, e.g. hop-demo-bucket-file-upload.
Further down enable CloudWatch
Provide a AWS KMS alias.
Provide an IAM Role name: CloudTrailRoleForCloudWatch_hop-demo-bucket-file-upload
On the next page Choose log events:
- Untick Managed events.
- Tick Data events.
- Further down, in the Data Events section, untick Read and Write for All current and future S3 buckets.
- Click the Browse button and choose the
hop-demo-bucket. - Click Next and on the following screen Create Trail.
Now CloudTrail will collect any data events/activities that happen on our hop-demo-bucket and store this log into a dedicated S3 bucket.
Amazon EventBridge
Next we will configure Amazon EventBridge to trigger our AWS Batch job pn S3 putObeject events:
Go to the EventBridge Console and click on the Create rule button.
On the Create rule page provide a name for the rule (e.g. trigger-hop-pipeline-on-S3-file-upload).
As pattern pick the Event pattern.
Then choose Pre-defined pattern by service.
As Service provider pick AWS.
As Service name pick Simple Storage Service (S3).
As Event type pick Object Level Operations.
Pay attention to this note that would have come up:
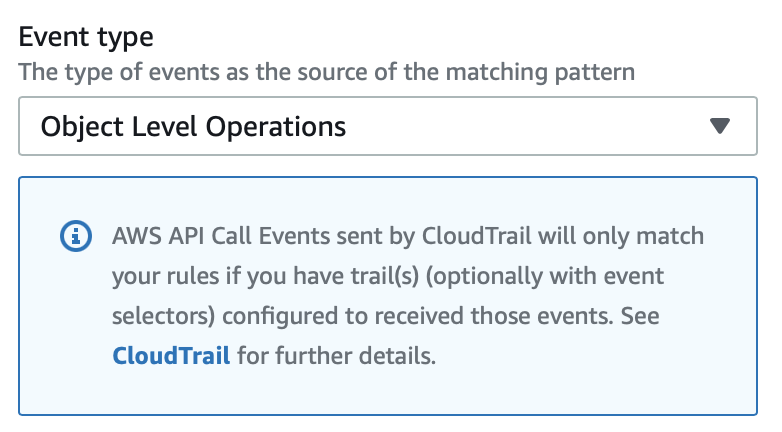
Note: For some events CloudBridge relies on an existing CloudTrail Trail. It would be nice if AWS would automate the setup of the trail in case it doesn’t exist yet since via this screen we provide all the info that’s really necessary for the trail to be set up. Also at feels a little bit like a disconnect here: EventBridge is not telling you wheter there’s already a trail configured or not.
Choose Specific operation(s) and pick PutObject.
Choose Specific bucket(s) by name and set it to: hop-demo-bucket.
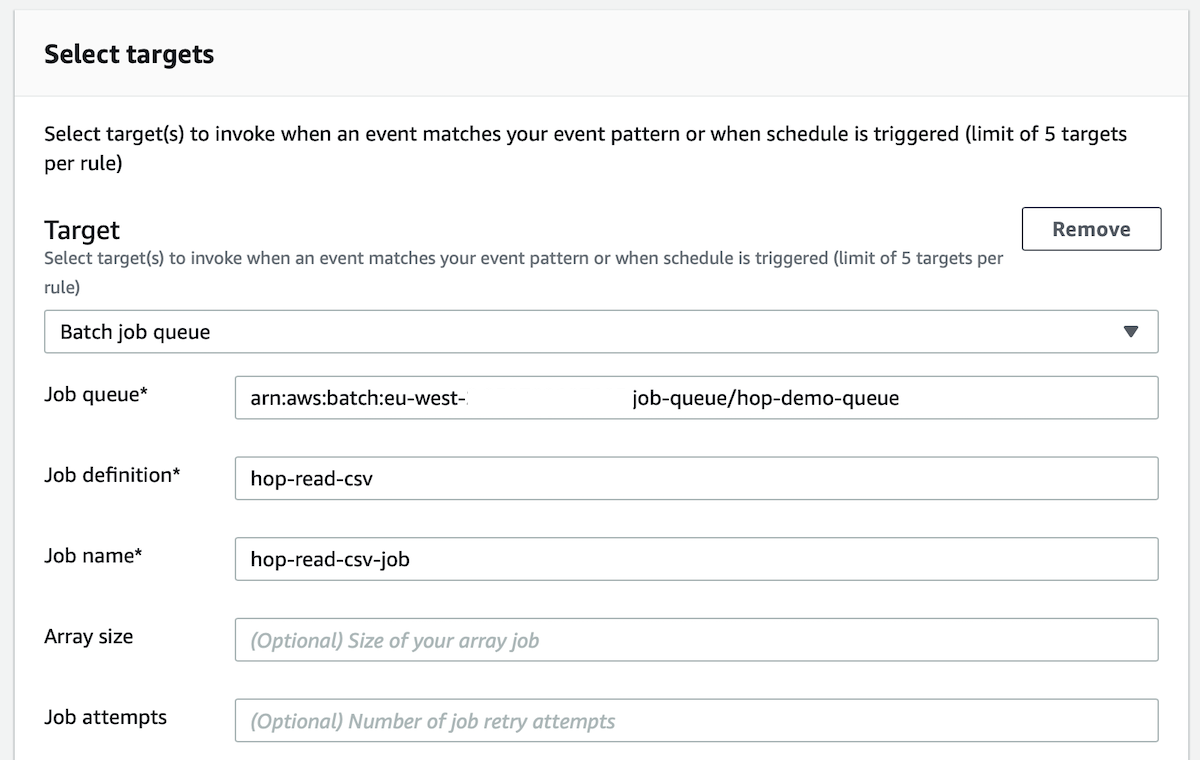
Further down, as target select Batch job queue.
Set the job queue to the ARN of the job queue we created earlier. To get the ARN, just go back to the job queue details page.
Set definition definition to hop-read-csv.
Set job name to hop-read-csv-job.
Expand Configure input.
Tick Input transformer. This is where we can extract values from the S3 event message and pass it on as parameters to our AWS batch job:
- In the input path section you can extract values from the S3 event message using the JSON path notation.
- And in the input template you can reference the extracted values (via arrow brackets). This is the template that is used to send a message to the target.
In the first text-box, the Input path text-box, specify:
{"S3BucketValue":"$.detail.requestParameters.bucketName","S3KeyValue":"$.detail.requestParameters.key"}
Here we extract the S3 bucket name and key of our file from the S3 event message.
In the second text-box, the Input template text-box, we specify just this:
{
  "ContainerOverrides": {
    "Environment": [
      {
        "Name": "HOP_S3_BUCKET",
        "Value": <S3BucketValue>
      },
      {
        "Name": "HOP_S3_KEY",
        "Value": <S3KeyValue>
      }
    ]
  }
}
Here we use ContainerOverrides to define new OS level environment variables, so that later on our Hop process can fetch the bucket name and key from these environment variables.
For more info see Transforming Target Input.
Finally click Create.
Tip: How to test the JSON Path
When you create the rule, there is Test event pattern option. Expand it and then select Use sample event provided by AWS. This will provide you with a sample event message. Copy it:

Paste the sample event message into JSON Path Online Evaluator and test your JSON Path there:

Adjusting the AWS Job Definition and Hop process
Next we have to think how we can have our Hop pipeline pick up these environment variables. In fact it will not possible to do this with the existing pipeline since they have to be sourced beforehand. We will opt for a method that will allow maximum flexibility: We will create a separate pipeline called set-s3-vars.hpl that will source the values of these environment variables:
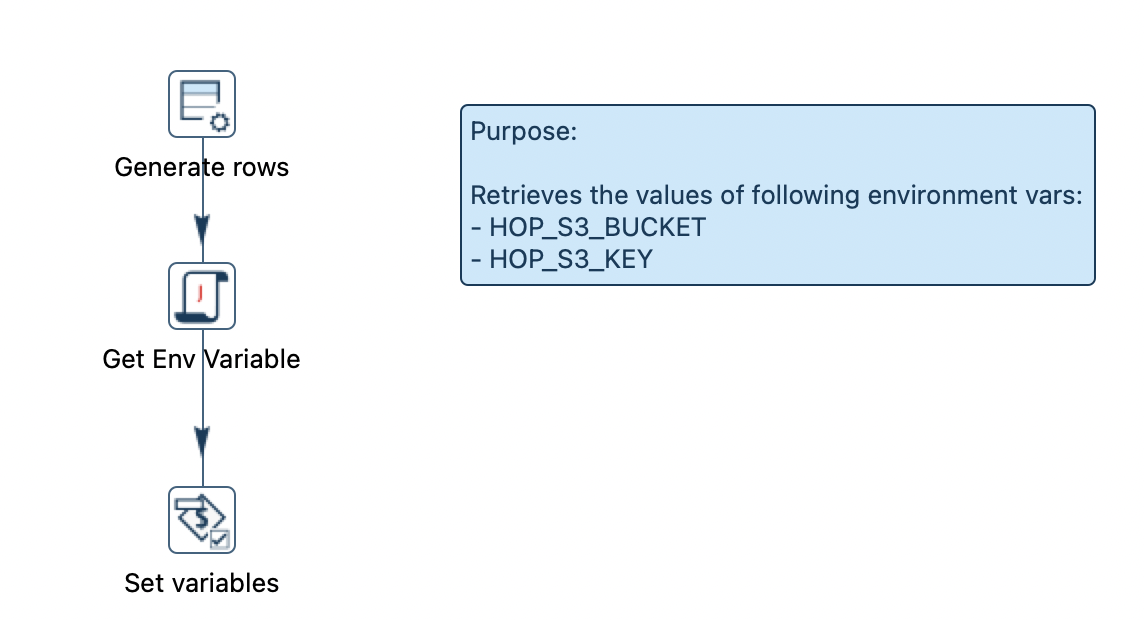
We use a User Defined Java Expression to source the values of these environment variables here and a Set variables transform to set these variables within the Hop context.
We also create a Hop workflow called read-file-from-s3.hwf to orchestrate our whole process:
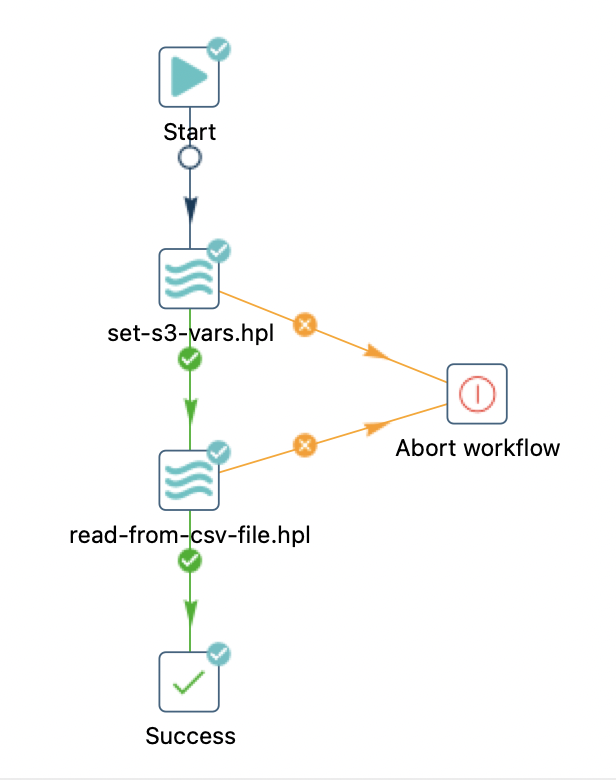
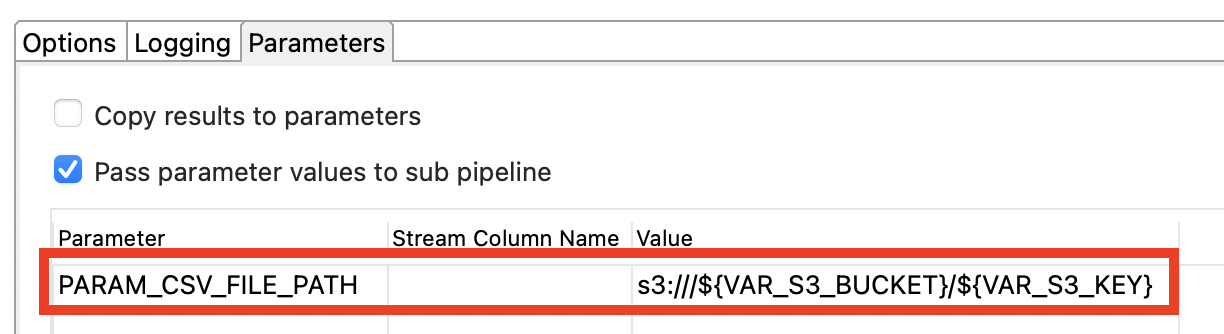
We run set-s3-vars.hpl first and then read-from-csv-file.hpl. There’s one import bit here: In the second pipeline action we create the value for the parameter that’s required by read-from-csv-file.hpl:
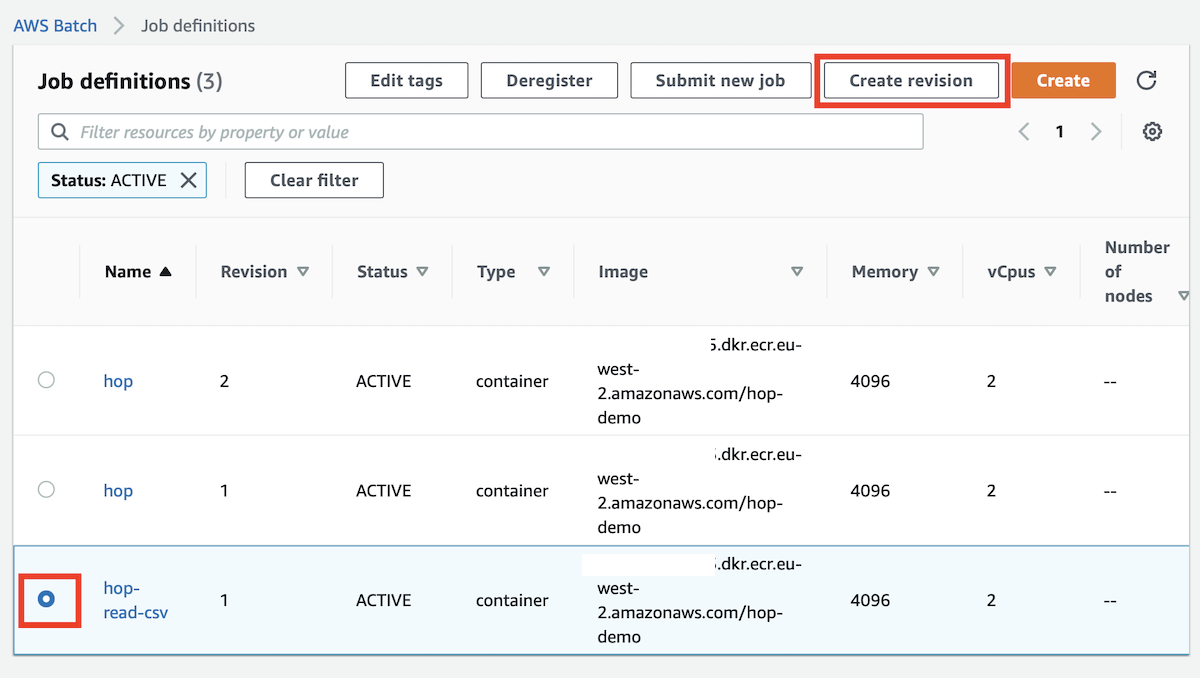
Next adjust the AWS Batch Job definition.
Go to AWS Batch > Job Definitions. Click the checkbox at the beginning of the row where our job definition is displayed and then click on Create revision on top of the table:
On the Create job definition page expand the Additional Configuration section and change the following:
- Set
HOP_FILE_PATHtoread-file-from-s3.hwf. - Remove the value of
HOP_RUN_PARAMETERS. We don’t have to pass anything here any more. Save the changes.
Testing our Solution
Create a new input file:
echo "2021-12-25,23030" > /tmp/sales2.csv
echo "2021-12-26,24089" >> /tmp/sales2.csv
echo "2021-12-27,29231" >> /tmp/sales2.csv
aws s3 cp /tmp/sales2.csv s3://hop-demo-bucket/sales28.csv
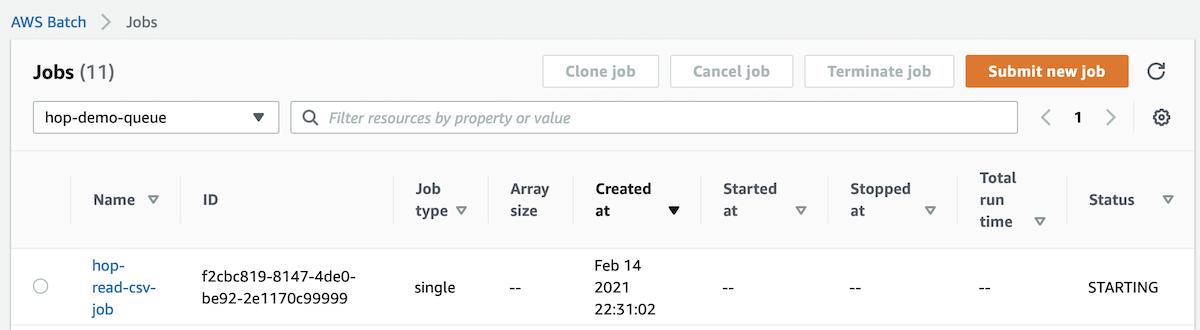
Go to the AWS Batch > Jobs page and pick our job queue:

Observe the Status of your job: It might just be STARTING.
Click on the job name to get to the details page.
Check that our environment variables are correctly populated:
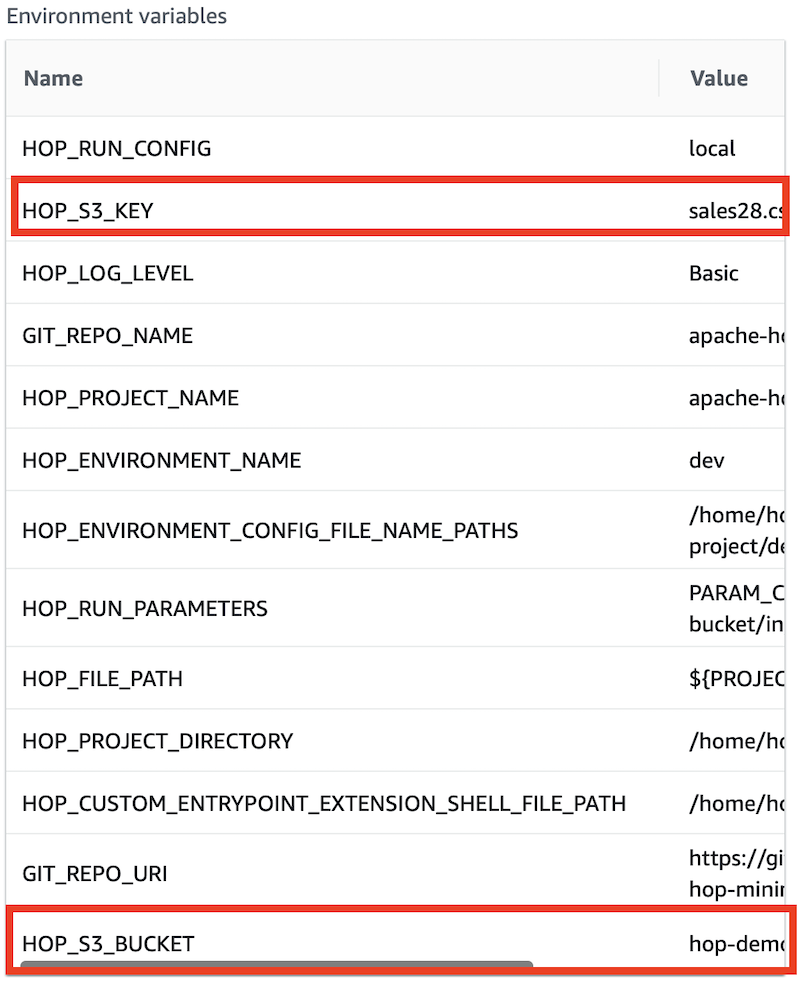
And then check the log (you might have to refresh the page if your job only started): Under Job Attempts expand the Attempt #1 section and click on the Log stream name link.
Remember that our pipeline logs the data it read - check that it is the correct data:
Troubleshooting
You might be very lucky if the whole setup works smoothly the first time round! It takes some time to figure out where to find the relevant info, so I hope the tips below will be benificial to you:
How to check if CloudTrail captured the S3 putObject event
Upload another file to the S3 bucket and then head over to the CloudWatch Console and choose Logs > Log groups. Here you should see the trail we just created via CloudTrail:
Note: Be patient! It might take up to 15 min for your event to show up on CloudTrail!
Option 1: CloudWatch > Logs > Log groups:
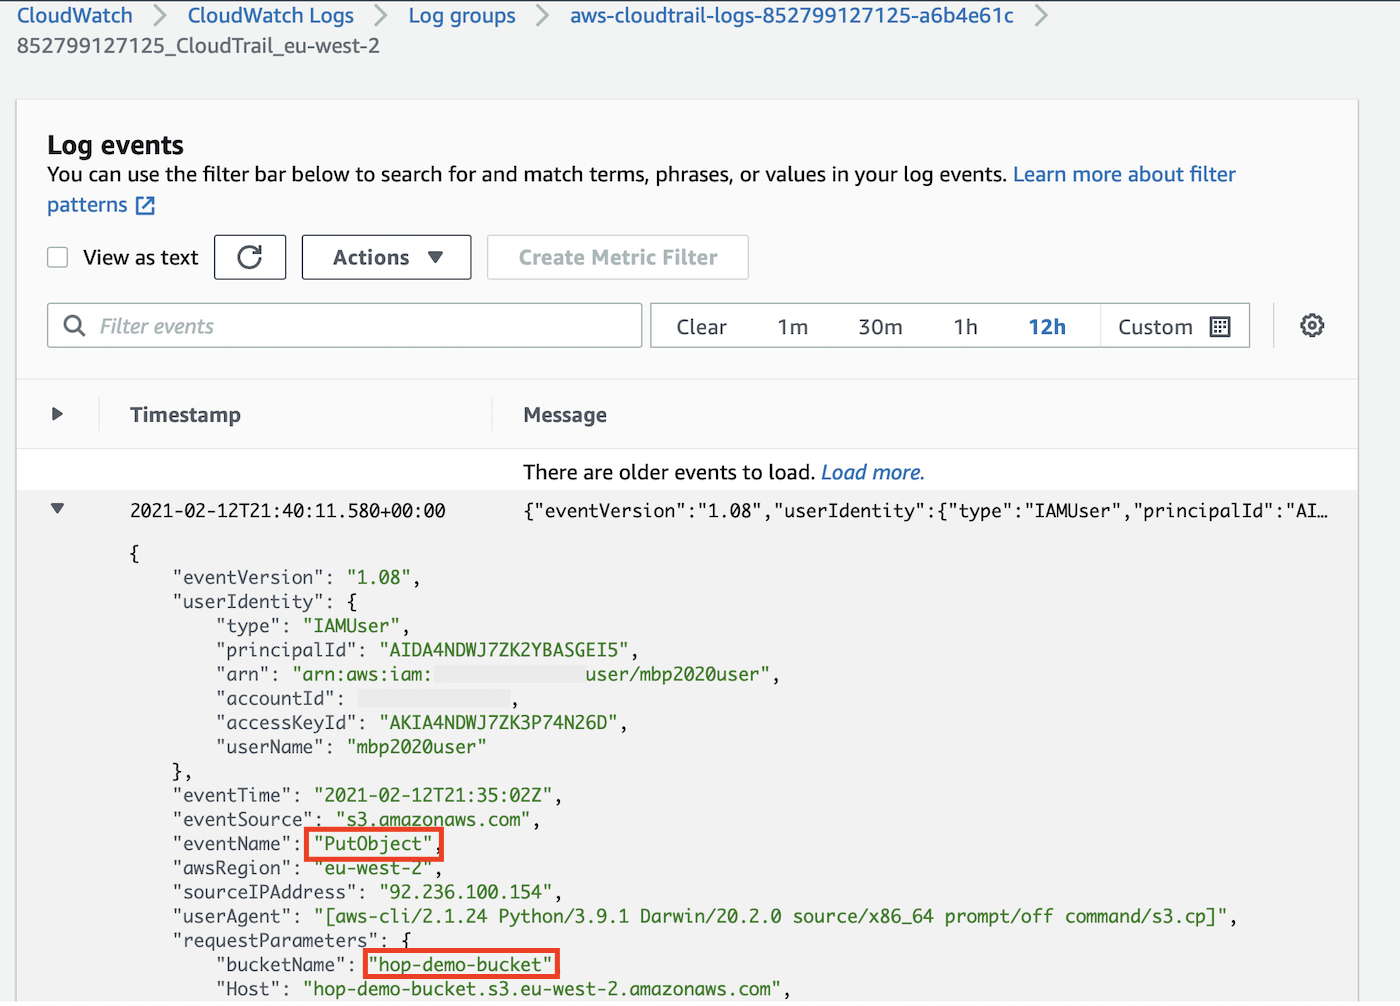
Click on the CloudTrail log we created earlier on and that should bring you to the Log events page:
Option 2: CloudTrail > Event History > Create Athena Table:
Note: You will not be able to see the S3
putObjectrequests via the Event History page directly because this one only displays the Management Events (but not the Data Events).
On the Create a table in Amazon Athena screen you’ll be able to pick the S3 bucket that was created earlier on to store the CloudTrail logs. Make sure you pick this one and then click on Create Table:

If it’s the first time you work with the Athena Query Editor, you will have to configure a query result location. Click on Settings in the top right corner and then define a S3 bucket to store the results to.
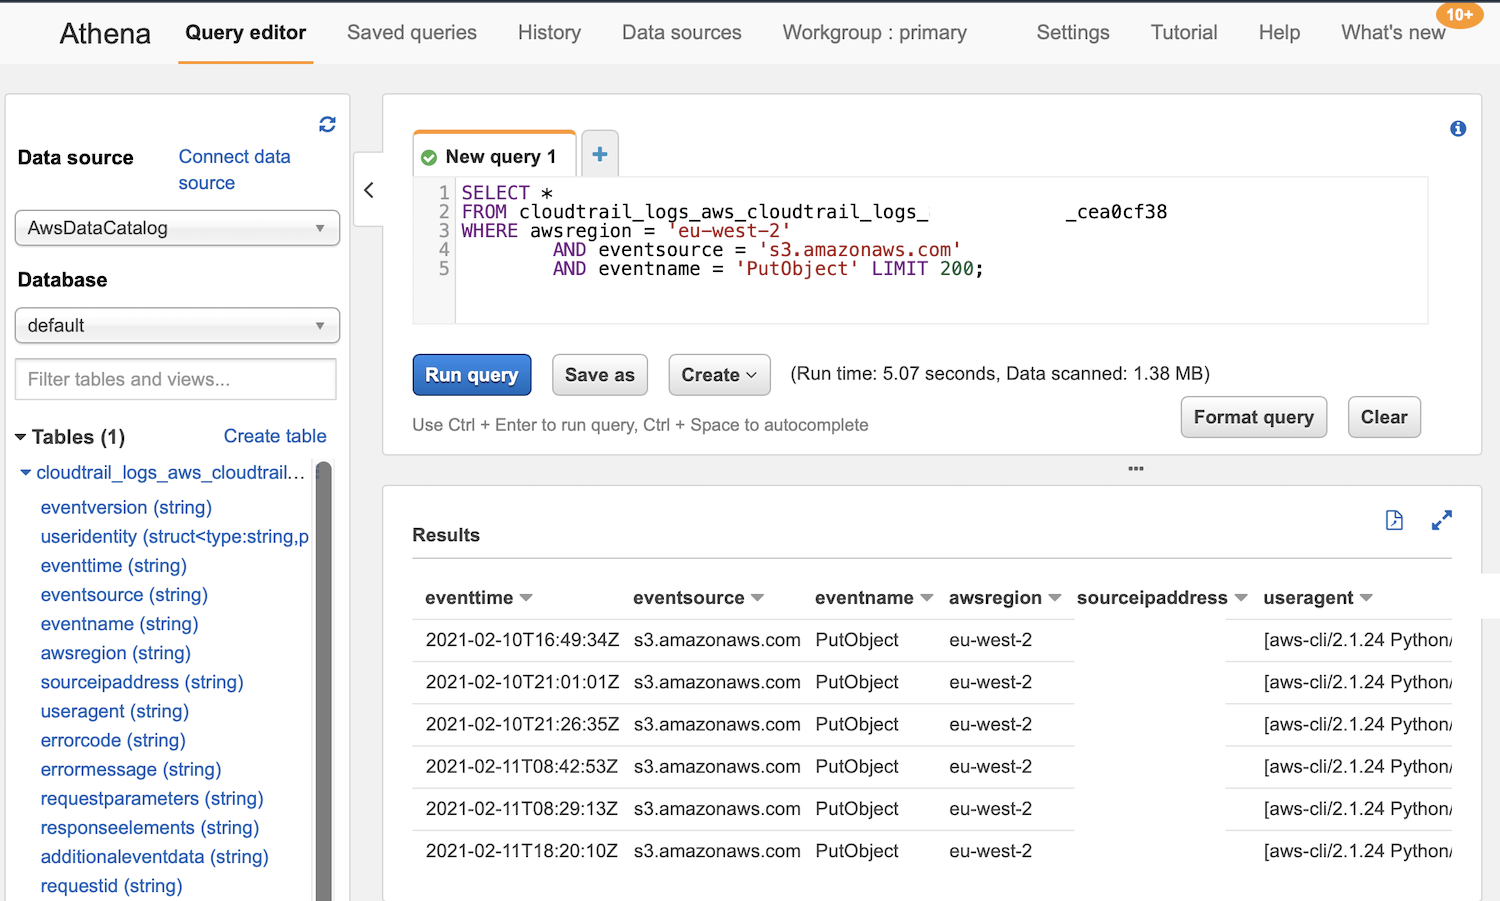
In our example, we want to find the S3 PutObject requests, so you can run a query similar to this one:
SELECT *
FROM cloudtrail_logs_aws_cloudtrail_logs_xxxxxx_cea0cf38
WHERE
  awsregion = 'eu-west-2'
  AND eventsource = 's3.amazonaws.com'
  AND eventname = 'PutObject'
ORDER BY
  eventtime DESC
LIMIT 200
;
Important: CloudTrail writes the events to log files every 5 minutes (see also here). This is also the reason why the event won’t be visible straight away when you query Athena. So be patient!
When did the EventBridge Rule get triggered?
EventBridge > Rules: Click on your role. Then click on Metrics for the rule:
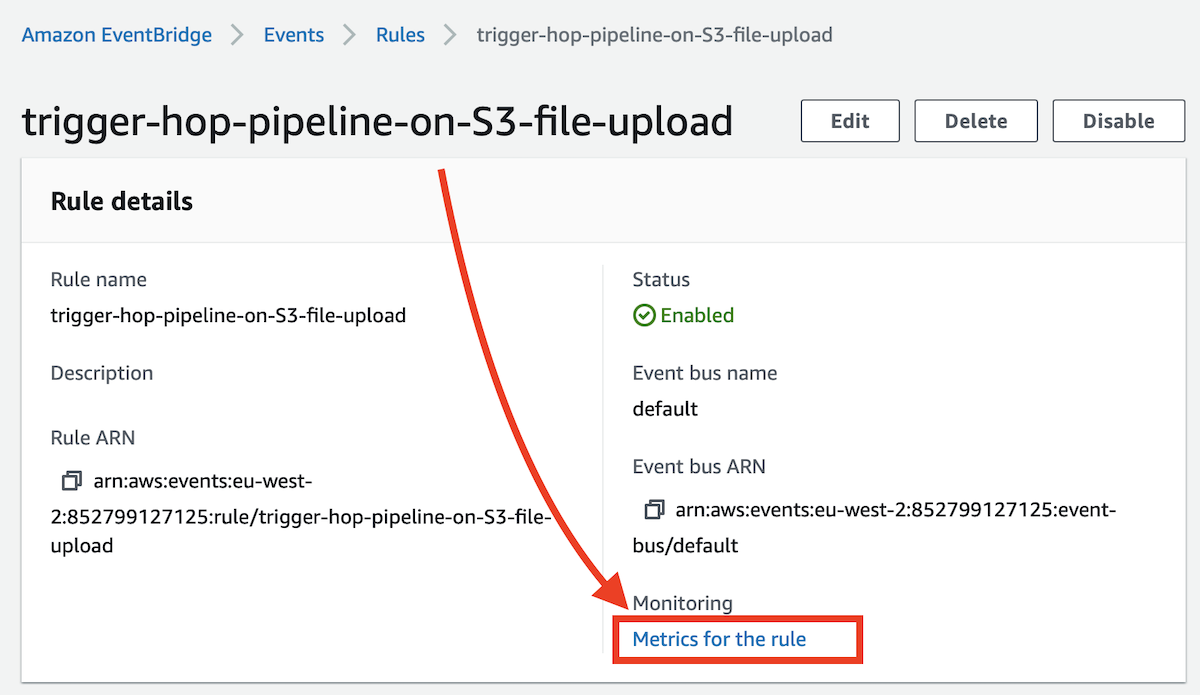
And this will take you to the CloudWatch Metrics page. In the Metrics section click on the downward facing triangle to add the metric to the chart:

Note: By default the chart displays events in 5 min intervals/aggregates, so you won’t see the exact time when you hover over one of the events in the chart. This can be controlled via the Period setting for each of the metrics. 5 minutes is the lowest setting.
It would be nice here to have an option to see the underlying raw event data once you clicked on one event in the chart, but currently this option doesn’t seem to be available.
Additional resources:
- Troubleshooting CloudWatch Events. Especially useful: How can I tell when CloudWatch Events are broken
“The following metrics are reported for the service as a whole:
- Invocations – The number of times that target have been invoked.
- FailedInvocations – The number of times that an invocation of a target failed.
- MatchedEvents – The number of events that matched one or more rules.
- TriggeredRules – The number of rules that have been triggered.”
Source: New CloudWatch Events – Track and Respond to Changes to Your AWS Resources
You will find numerous search results via your favourite search engine on the topic of finding error details for FailedInvocations: The issue being, that there is none - it seems, which is rather frustrating. Often a problem with permissions is stated, but in my case the InputTemplate was wrong:
{"Parameters" : {"S3bucket": <S3BucketValue>}, "ContainerOverrides" : {"environment": ["HOP_S3_BUCKET","Ref::S3bucket"]}}
but it had to be like so:
{
  "Parameters": {
    "S3bucket": <S3BucketValue>
  },
  "ContainerOverrides": {
    "Command": [
      "echo",
      "Ref::S3bucket"
    ],
    "Environment": [
      {
        "Name": "HOP_S3_BUCKET",
        "Value": <S3BucketValue>
      }
    ]
  }
}
Note: The properties seems to be case-sensitive. In the event rule, the properties start with a capital letter, whereas when you look at the
SubmitJobpayload, they start with a lower case letter.
The correct approach I found out via this blog post.
EventBridge does some basic validation, but it doesn’t seem to catch all issues.
How to check if EventBridge submitted the AWS Batch Job
Via CloudTrail
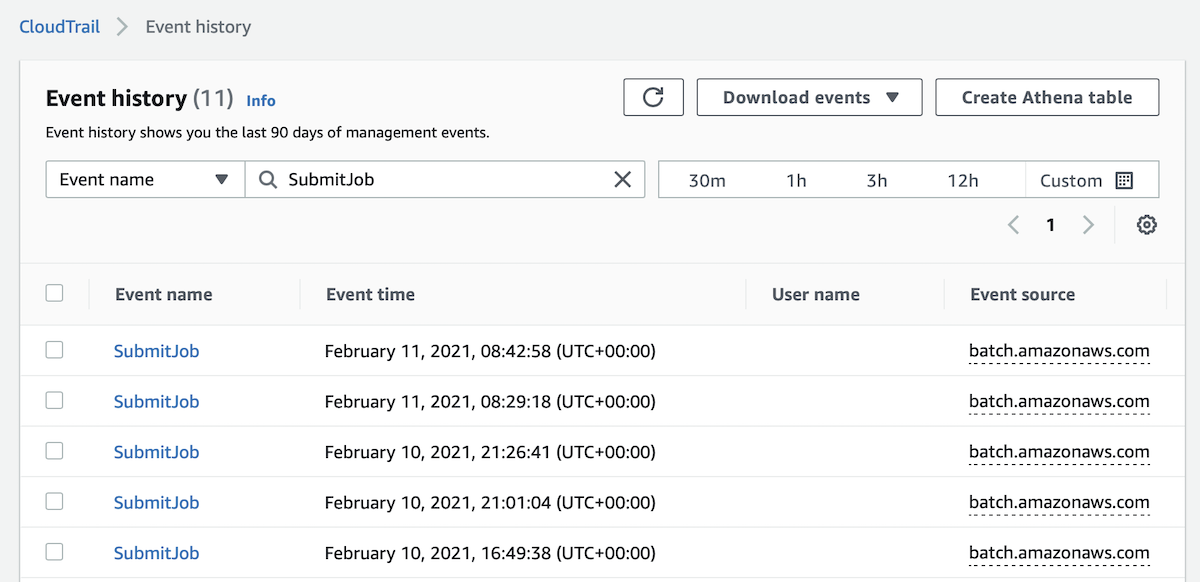
To inspect if your job got kicked off, you can go to CloudTrail as well. AWS Batch by default integrates with CloudTrail, so there’s no additional setup to do. Since this is a Management Event, we can use the Event History page directly to query for the event:
CloudTrail > Event History
Note: Be patient! It takes up to 15 min for CloudTrail to show the event.
There are at least two Event name you can search for:
SubmitJob: adds the job to the job queue.RunTask: the actual execution of the job.
Filter by Event Name: SubmitJob
Click on the SubmitJob link and you’ll get more details. You will see the Event record. Check that it is related to our EventBridge setup and check for potential Error messages:
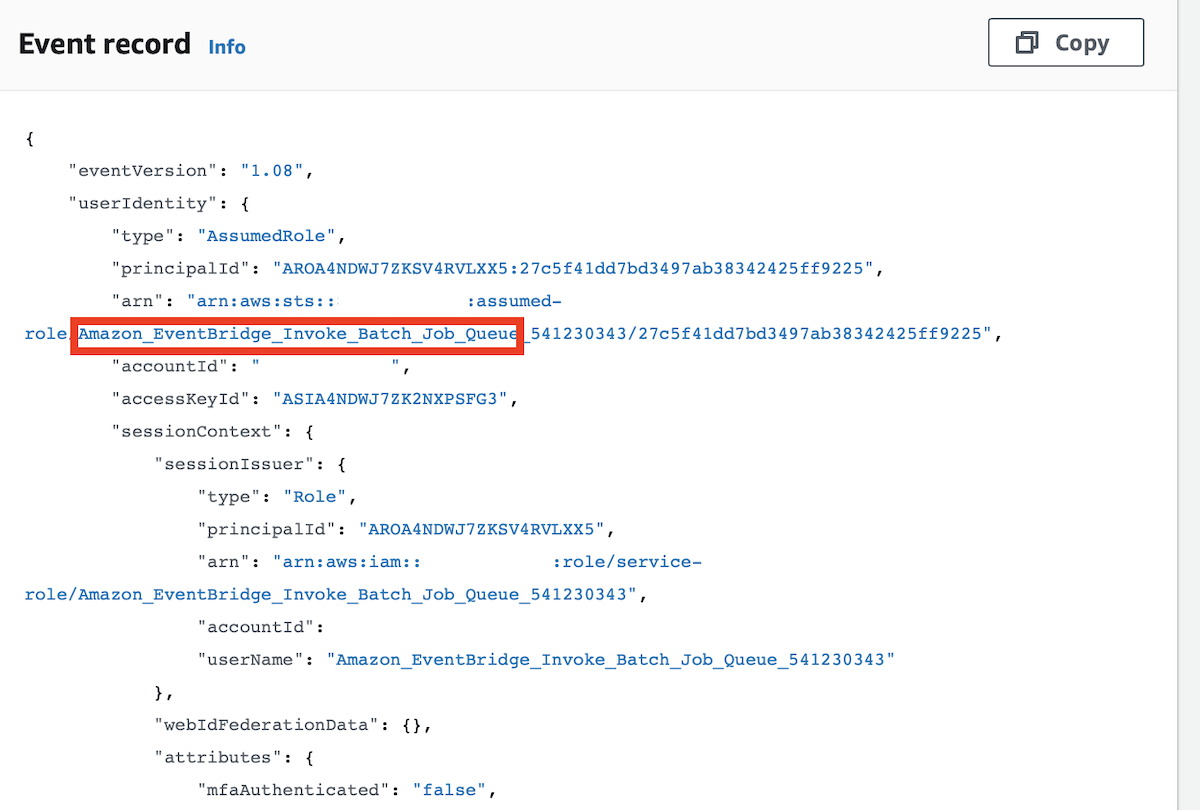
Check for error messages:
Alternatively, if you’ve got CloudTrail also configured to log the Management Events, you can also run a query via the Athena Query client like this:
SELECT *
FROM cloudtrail_logs_aws_cloudtrail_logs_xxxxxx_cea0cf38
WHERE
  awsregion = 'eu-west-2'
  AND eventsource = 'batch.amazonaws.com'
  AND eventname = 'SubmitJob'
LIMIT 200;
Via AWS Batch
AWS Batch > Jobs
Note This info is displayed nearly instantly, so you don’t have to wait for ages like with the CloudTrail approach. What you see via the Jobs page is the equivalent to the
RunTaskevent in CloudTrail.
Click on the job you are interested in:
On the details page you can check for the passed Environment variables and also the Command (if you used this option).
Checking for passed Parameters and Container Overrides
Either check the AWS Batch jobs details (as described in the previous section) or:
This can also be done via CloudTrail > Event History and filtering on Event name equals SubmitJob. Bt note that SubmitJob happens before RunTask. You can check for parameters and container overrides also for RunTasks via CloudTrail, however, CloudTrail has a delay of up to 15 min - luckily the same info is available via AWS Batch > Jobs (as described in the previous section) instantly.
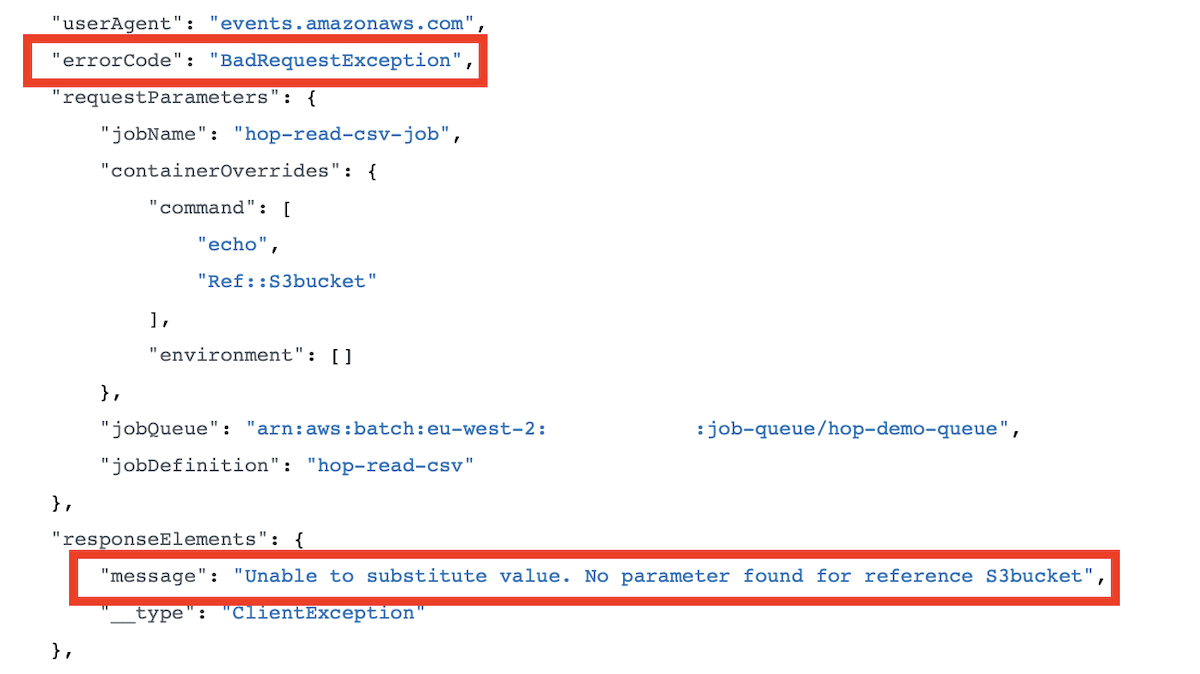
Click on a specific event to retrieve the event message: Fairly at the beginning of the message, just after userAgent you’d expect to see a requestParameters object. Check if containerOverrides and parameters is listed and make sure their content is as expected:
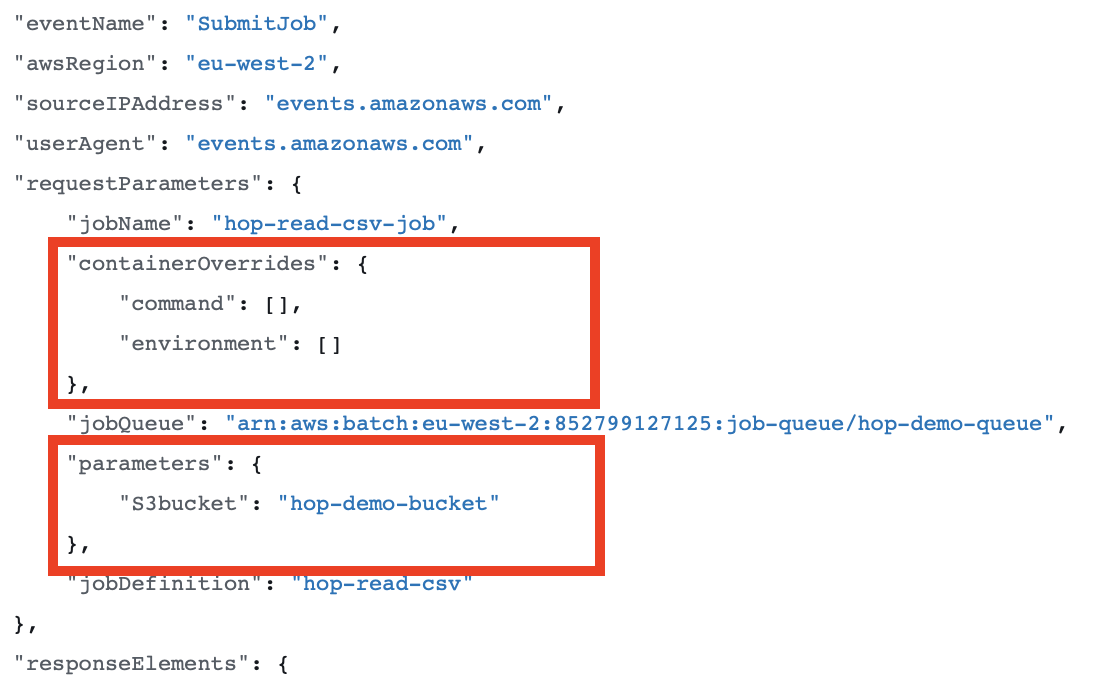
You can e.g. check if the parameter values are correctly set and if the containerOverrides command and environment nodes are correctly populated. In the example above, I was trying to override/add environment variables, but since they were not showing up here, I knew something went wrong, so I could go back to the EventBridge Rule and correct the Input template. (In my case the situation described above actually didn’t cause a failed invocation).
How to check the Hop Process Logs
So far we’ve checked if the S3 PutObject event got captured by CloudTrail and if EventBridge started our AWS Batch Job.
Next let’s check the AWS Batch Job details:
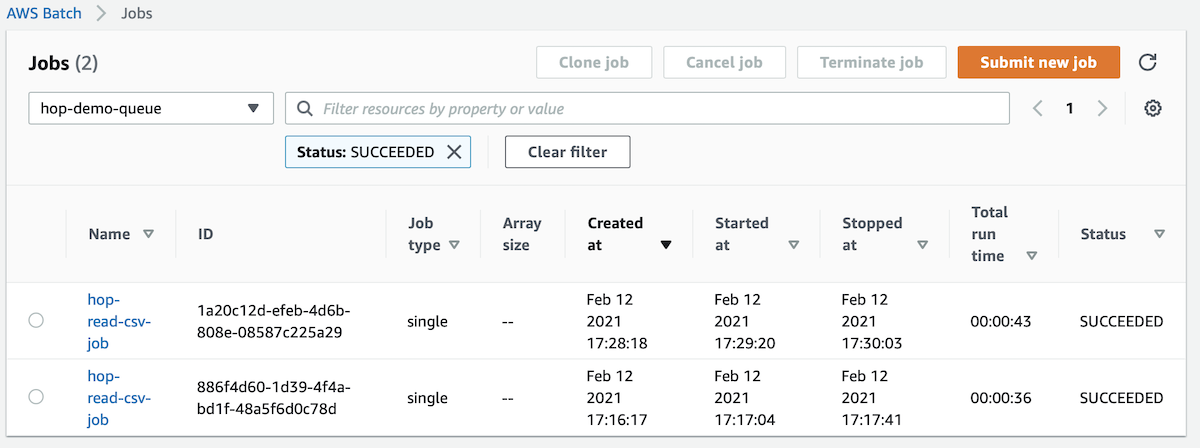
Go to: AWS Batch > Jobs and you should see the jobs that EventBridge kicked off:
Click on the Job name and on the details page on the Log stream name:
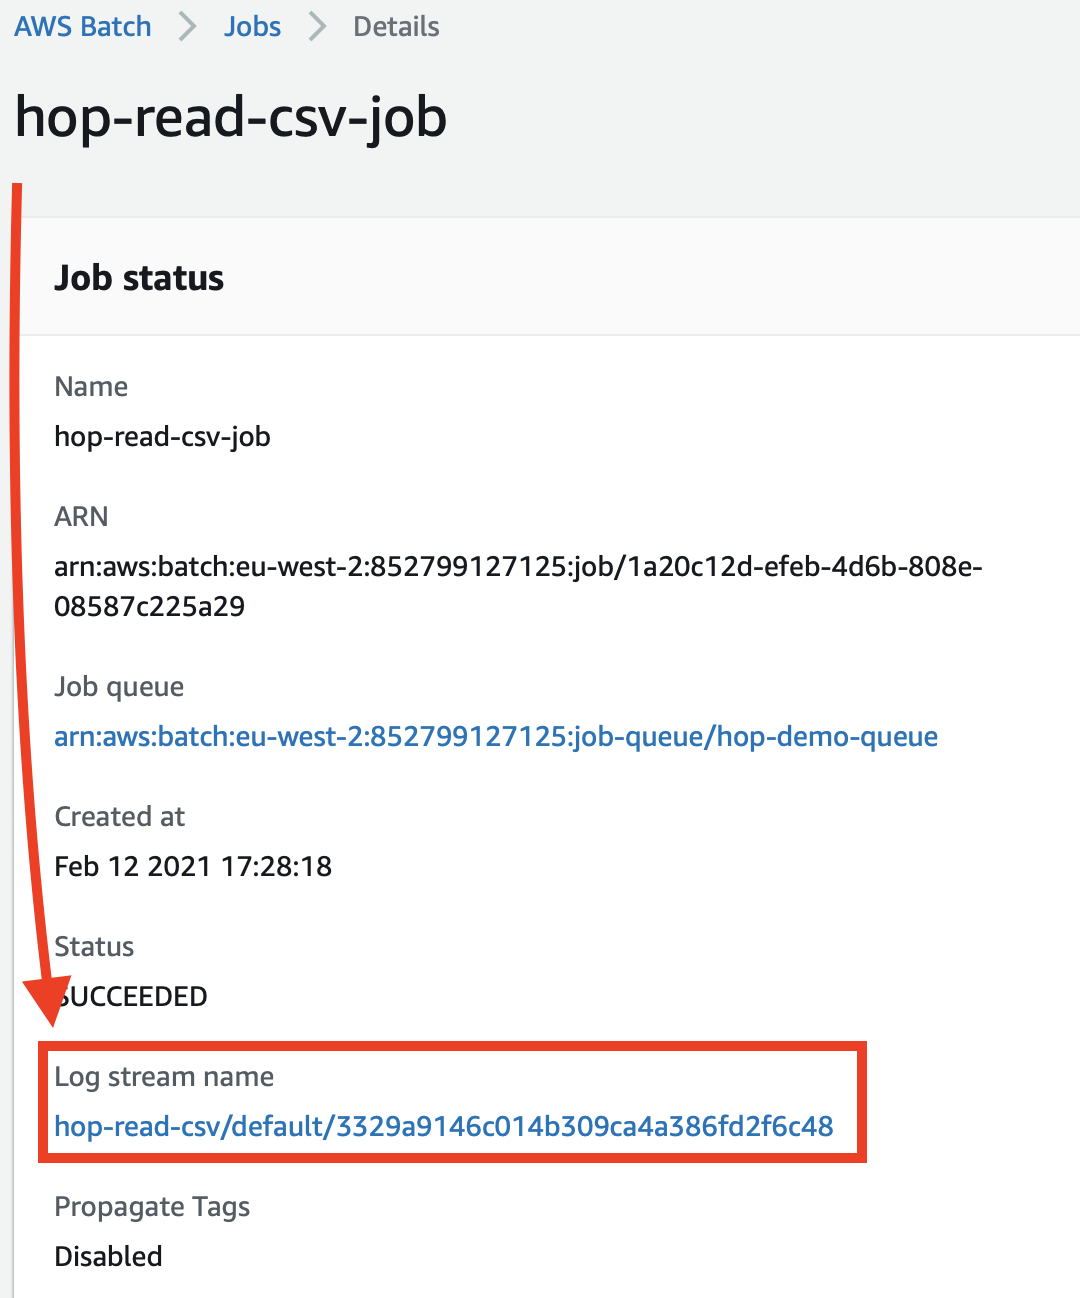
This will bring you right to the CloudWatch log: