The motivation behind this article is to make the Flink Streaming API accessible to people who have only recently started learning Scala or are about the get started with Apache Flink. Hence this article covers quite some setup details. We will only try to get you going with the one basic WordCount example listed on the official API documentation. I also went through the same example at the coding dojo at the recent Apache Flink London Meetup, which was very interesting and I learnt quite some nice tricks from the other participants (and hence they also contributed to this blog post). Note that we will use Scala.
Initial Setup
Before we can actually start coding, there are a few software packages that have to be installed in your local machine:
Java
There are a lot of guides on how to install Java, so I will not cover this here. On my machine I have Oracle Java v8 installed.
Flink
Note: This step is optional as we will download the Flink libraries later on any ways when creating our Scala SBT project. However, in general, installing Flink fully locally will give you a better understanding of project.
After extracting the downloaded file in a convenient folder start local master and slave:
./bin/start-local.sh
Wait a few seconds until startup is complete and then check that the JobManager page is accessible.
You can stop Flink anytime by running:
./bin/stop-local.sh
Just as a quick info: ./bin/flink has four commands:
- run
- info
- list
- cancel
Scala, SBT (Simple Build Tool) and NMap
You should be able to install these packages simply via your package manager (apt-get, dnf, brew etc). If for some reason they are not available, you can download them directly from:
On Fedora I used following commands:
$ scala
$ sbt
If not installed, dnf will kindly ask you if you want to install it.
To install NMap:
sudo dnf install nmap-ncat.x86_64
If you are interested in what NMap is, take a look at this artice: Netcat Basics.
IntelliJ IDEA (Community Edition)
IntelliJ IDEA seems to be the most popular IDE these days, however, you can just use Eclipse or NetBeans as well to create a Scala project.
Download IntelliJ IDEA Community Edition from here.
Copy the tar file to a convenient folder and then extract it, e.g.:
$ tar -xvzf ideaIC-2016.2.4.tar.gz
$ cd idea-IC-162.2032.8
$ ./bin/idea.sh
When starting IDEA for the first time, a Customize IntelliJ IDEA dialog pops up. It helps you to configure IDEA to your requirements. Fairly at the end of the process there a section called Download featured plugins. Make sure you install the Scala plugin!
Setting Up the Project
Simply create project folder called StreamingWordCount in a convenient location. Then create a build.sbt and version.sbt file inside it. These are just standard text files, so you can just use your favourite text edit to create them.
The build.sbt lists all the dependencies:
name := "flink-demo-wordcount"

organization := "org.myfancyorg"

scalaVersion := "2.10.4"

libraryDependencies ++= Seq(
   "org.apache.flink" %% "flink-streaming-scala"  % "1.1.2",
   "org.apache.flink" %% "flink-clients"          % "1.1.2"
)
Make sure you mention the correct Scala version. To check which Scala version is installed on your machine, run the following:
$ scala -version
Next create version.sbt:
version := "0.1-SNAPSHOT"
In the same folder you can just create the WindowWordCount.scala file. We keep the directory structure to the bare minimum, I recommend checking the Getting Started Guide on how to set up the ideal directory structure. This program will count the words coming from a web socket in 5 second windows.
The WordCount.scala should have following content:
import org.apache.flink.streaming.api.scala._
import org.apache.flink.streaming.api.windowing.time.Time

object WindowWordCount {
  def main(args: Array[String]) {

    val env = StreamExecutionEnvironment.getExecutionEnvironment
    val text = env.socketTextStream("localhost", 9999)

    val counts = text.flatMap { _.toLowerCase.split("\\W+") filter { _.nonEmpty } }
      .map { (_, 1) }
      .keyBy(0)
      .timeWindow(Time.seconds(5))
      .sum(1)

    counts.print

    env.execute("Window Stream WordCount")
  }
}
As previously mentioned, this example was taken directly from the Flink Streaming API Documentation. This site offers a good explanation of what the code does. This blog post focuses mainly on the project setup.
Once we compile our code it will be output to the target folder. As we store our code on git, we want to make sure that this folder does not get added to git (version controlled). So just create a .gitignore file with following content inside our WordCount folder:
target/
“Note that this deliberately has a trailing / (to match only directories) and it deliberately has no leading / (to match project/target/ in addition to plain target/).” Source
Next run this command inside the StreamingWordCount folder:
$ sbt
This will start the SBT interactive shell. Once you are ready, you can run:
> compile
… and it will download all the dependencies as well as compile your Scala code.
Note: In case you have to change the
build.sbtfile while the SBT interactive shell is active, you can runreloadinside the shell to reload thebuild.sbtfile.
Your directory should look like this now:
[dsteiner@localhost StreamingWordCount]$ ls -la
total 32
drwxr-xr-x. 4 dsteiner dsteiner 4096 Sep  9 18:59 .
drwxr-xr-x. 3 dsteiner dsteiner 4096 Sep  9 18:43 ..
-rw-r--r--. 1 dsteiner dsteiner  377 Sep  9 18:50 build.sbt
-rw-r--r--. 1 dsteiner dsteiner    8 Sep  9 18:44 .gitignore
drwxrwxr-x. 3 dsteiner dsteiner 4096 Sep  9 18:58 project
drwxrwxr-x. 5 dsteiner dsteiner 4096 Sep  9 18:59 target
-rw-r--r--. 1 dsteiner dsteiner   26 Sep  9 18:44 version.sbt
-rw-r--r--. 1 dsteiner dsteiner  529 Sep  9 18:51 WindowWordCount.scala
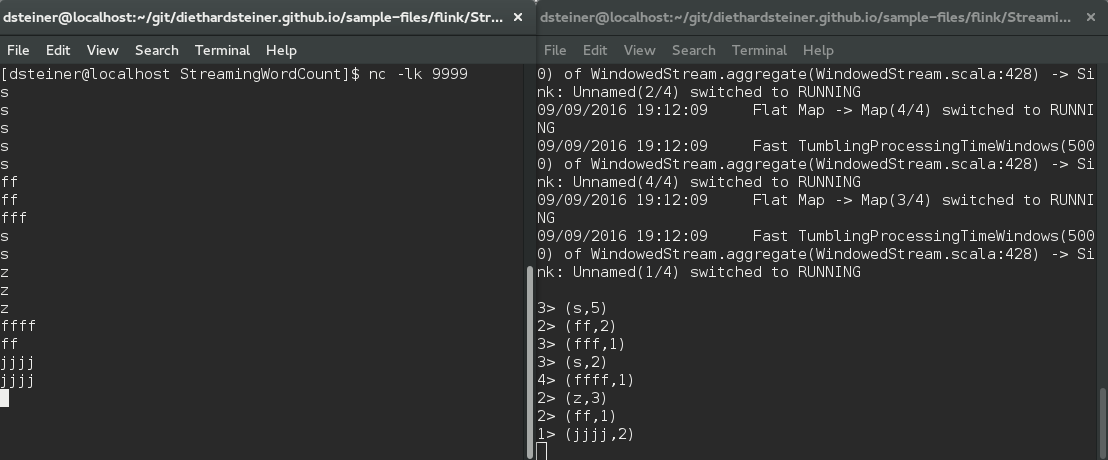
Once the code is successfully compiled, open a new tab (let’s call it InputStream tab) in your terminal and execute this:
$ nc -lk 9999
This will create the input stream for our program.
Next open another terminal window or tab (let’s call it StreamListener tab) and execute this:
$ nc localhost 9999
Type a word into the InputStream tab and hit enter and then take a look at the StreamListener tab and you should see the same word appearing. Repeat the exercise … well you get the idea.
Finally run this in the SBT interactive shell:
> run
Continue typing words into the InputStream tab and you should see a word count appearing in the SBT interactive shell, e.g.:
There are various SBT plugins to support opening the project with your favourite IDE, e.g.:
Taking it Further
IDE - IntelliJ IDEA
Writing code in a text editor is tough and especially tough for newbies. A good IDE helps you a lot on the way of getting familiar with new libraries / APIs by means of auto-completion etc. We will use IntelliJ IDEA here.
Thankfully setting up a SBT Scala project in IntelliJ IDEA is very well documented, so I strongly suggest you take a look at their documentation. Follow the first part of this docu to create a new Scala SBT project.
A few additional notes:
- When setting up the new Scala SBT project you will be asked to specify the Scala and SBT versions. Use these commands if you don’t know them by hard:
$ scala -version
$ sbt --version
- Tick Use auto-import
IDEA will create the full SBT folder structure as well as the required files like build.sbt.
You can accesss a dedicated SBT panel under View > Tool Windows > SBT.
Double click on the build.sbt file and change it to look like this:
name := "WindowWordCount"

version := "1.0"

scalaVersion := "2.10.4"

libraryDependencies ++= Seq(
  "org.apache.flink" %% "flink-streaming-scala"  % "1.1.2",
  "org.apache.flink" %% "flink-clients"          % "1.1.2"
)
Once you save this file IDEA will download the required dependencies.
Right click on the src/main/scala folder and choose New > Scala Class. Click OK. Then replace the content of the newly created file with the code shown below:
import org.apache.flink.streaming.api.scala._
import org.apache.flink.streaming.api.windowing.time.Time

object WindowWordCount {
  def main(args: Array[String]) {

    val env = StreamExecutionEnvironment.getExecutionEnvironment
    val text = env.socketTextStream("localhost", 9999)

    val counts = text.flatMap { _.toLowerCase.split("\\W+") filter { _.nonEmpty } }
      .map { (_, 1) }
      .keyBy(0)
      .timeWindow(Time.seconds(5))
      .sum(1)

    counts.print

    env.execute("Window Stream WordCount")
  }
}
After val text ... add new lew line:
val test = env.
You will realise that one you enter . (dot) IDEA will show you a list of options (methods etc).
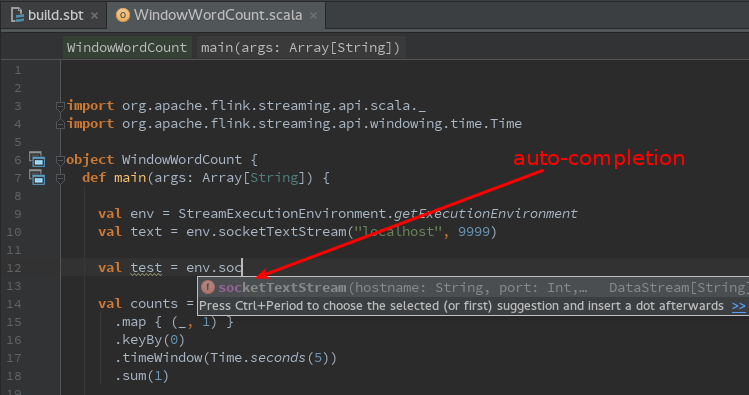
Now remove the line you just added. In the top right hand side corner click on the Make Project button. This will compile your project.
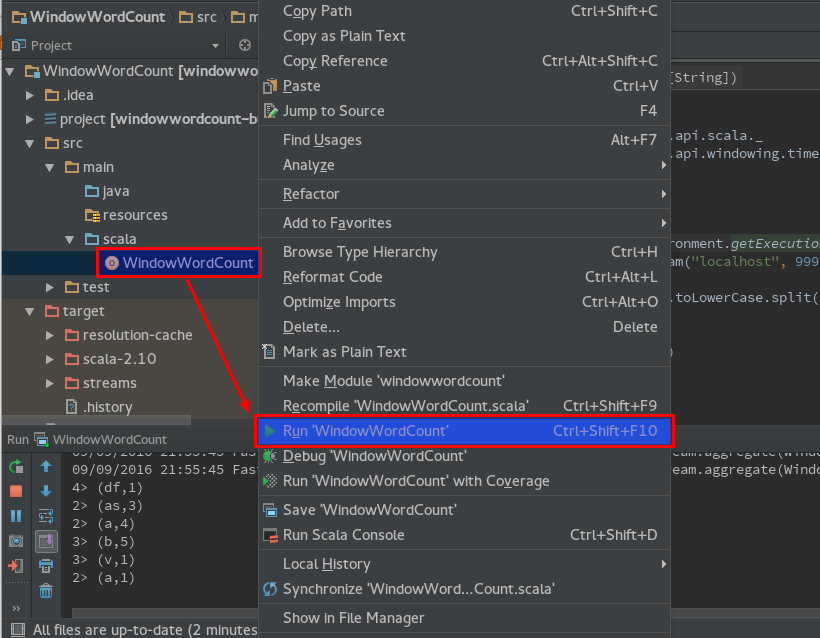
To run the program, simply right click on the WindowWordCounter.scala file and choose Run ‘WindowWordCounter’ from the context menu (make sure that you have nc -lk 9999 still running in your terminal window):
Going Even Further
Ok, so you learnt how to setup a Scala SBT project to run Flink code. Let’s see if we can actually add some functionality by ourselves.
Note: It’s worth checking the Class Documentation.
Just because we are extremely lazy, we create another scala file in the same project and name it WordCumCountFromFile.scala. This time round we will simply try to read in a file from the local filesystme and print out its content (well, that’s the start of a short journey): We can use the readTextFile() function. We keep it simple, we just want to read the file once, so we only specify the file path as the only argument:
import org.apache.flink.streaming.api.scala._

object WordCumCountFromFile {
  def main(args: Array[String]): Unit ={
    val env = StreamExecutionEnvironment.getExecutionEnvironment
    val filePath = "/home/dsteiner/git/diethardsteiner.github.io/sample-files/flink/StreamingWordCount/test.csv"
    val text = env.readTextFile(filePath)

    text.print()

    env.execute("File Reader")
  }
}
StreamExecutionEnvironment is the class which provides the readTextFile function.
The CSV file we are reading in looks like this:
apples,2
oranges,3
apples,5
grapes,5
apples,9
oranges,7
Right click on the file and choose Run. You should see the contents of the file displayed in the inline console. Ok, that’s not very interesting so far, so let’s do something with the data. First let’s split the lines into properly typed fields and store them in a Map. In a bit more detail: The lines from our text file are originally Strings, then when using the split() function each String value gets converted to an Array. While we have managed to separate the values, they are both still of type String. As Array can only store values of one type (e.g. String), we have to use another collection like Map to store our values as String and Int. In the end we want to sum up the count of fruits, so the count has to be of type Int. Note that although we make several changes to the originally sourced data, each result gets stored in a DataStream.
import org.apache.flink.streaming.api.scala._

object WordCumCountFromFile {
  def main(args: Array[String]): Unit ={
    val env = StreamExecutionEnvironment.getExecutionEnvironment
    val filePath = "/home/dsteiner/git/diethardsteiner.github.io/sample-files/flink/StreamingWordCount/test.csv"
    val text = env.readTextFile(filePath)

//    println( "------ " + text.getClass +  " ---------" )

    // explicit type definition not really required in this case

    val data:DataStream[Array[String]] = text.map { x =>
//      println( "------ " + x.getClass +  " ---------" )
      x.split(",")
    }

//    data.print()
//    data.map{ x => println( x(0) + " " + x(1) ) }
//    println( "------ " + data.getClass +  " ---------" )

    // convert Array to String and Int
    val dataTyped:DataStream[(String, Int)] = data.map { x =>
      (x(0), x(1).toInt)
    }

//    dataTyped.print()

    // val sortedData = dataTyped.keyBy(0)

    // create running / cumulative total
    val result = dataTyped.sum(1)

    result.print

    env.execute("File Reader")
  }
}
The output looks like this:
3> (oranges,7)
3> (grapes,5)
2> (apples,5)
2> (apples,7)
3> (oranges,10)
2> (apples,16)
As the key value pairs stream through, Flink keeps track of the cumulative total so far, which is exactly what you can see in the output above.
Let’s adapt the above example for our initial streaming example:
import org.apache.flink.streaming.api.scala._
import org.apache.flink.streaming.api.windowing.time.Time

object WindowWordCumCount {
  def main(args: Array[String]) {

    val env = StreamExecutionEnvironment.getExecutionEnvironment
    val text = env.socketTextStream("localhost", 9999)

    val data:DataStream[Array[String]] = text.map { x =>
      x.split(",")
    }

    // convert Array to String and Int
    val dataTyped:DataStream[(String, Int)] = data.map { x =>
      (x(0), x(1).toInt)
    }

//    dataTyped.print

    val counts = dataTyped
      .keyBy(0)
      .timeWindow(Time.seconds(5))
      .sum(1)

    counts.print

    env.execute("Window Stream Cumulative WordCount")
  }
}
Start nmap again:
$ nc -lk 9999
Let’s paste this into the terminal window:
apples,2
oranges,3
apples,5
You will see that the counts get aggregated in 5 sec intervals.
While these were all very simple and easy examples, mainly intended to get complete newbies started with Flink, you should by now have become curious enough to explore more Flink features.