Where to store you custom Sparkl files
Where to put your CSS, Image and JavaScript files
If you are creating any custom JavaScript,CSS and/or Image files for your Sparkl project, you can store them under <sparkl-plugin-root>/static/custom. Within this directory you find follwing subfolders: css, js and img.
From your dashboard(s), you can reference the file by using the External Resource File. Specify following path:
/pentaho/api/repos/<sparkl-plugin-name>/static/custom/
In example you create your own css file called my.css, which you can store that in:
<sparkl-plugin-root>/static/custom/css/my.css
… and in your CDE dashboard you can reference this file as an External Resource File like this:
/pentaho/api/repos/<sparkl-plugin-name>/static/custom/css/my.css
Template
Creating your own template
The main template cpk.html is located in <sparkl-plugin-root>/resources/styles. When you open this file, you will see placeholders like @HEADER@, @CONTENT@ and @FOOTER@. These placeholds will be replaced by the actual Sparkl content when your plugin is build, so do not remove them.
You can replace the cpk.html with your own template. To start with, just take a copy of this file so that you have it as a reference in case you need it. Open the new file and remove (in example) everything within the <div class="cpkWrapper"> section apart from the content and footer sections and add your own bits and pieces.
Let’s add a simple Bootstrap Navbar:
    <nav class="navbar navbar-default" role="navigation">
      <div class="container-fluid">
        <!-- Brand and toggle get grouped for better mobile display -->
        <div class="navbar-header">
          <button type="button" class="navbar-toggle" data-toggle="collapse" data-target="#bs-example-navbar-collapse-1">
            <span class="sr-only">Toggle navigation</span>
            <span class="icon-bar"></span>
            <span class="icon-bar"></span>
            <span class="icon-bar"></span>
          </button>
          <a class="navbar-brand" href="#">Brand</a>
        </div>

        <!-- Collect the nav links, forms, and other content for toggling -->
        <div class="collapse navbar-collapse" id="bs-example-navbar-collapse-1">
          <ul class="nav navbar-nav">
            <li class="active"><a href="main">Main</a></li>
            <li><a href="config">Admin</a></li>
          </ul>
        </div>
      </div>
    </nav>
Referencing a dashboard: In your navigation your want to link to the dashboards that you created. This is actually very easy to accomplish: Instead of specifying a path, you only have to specify the name (whithout file extension) of the dashboard. In the above example I reference the dashboards main and config.
Note: If you are using Bootstrap for your dashboard as well, there is no need to reference dependencies here as well because they will be automatically included.
If your template has any external dependencies, they can be referenced by using a path similar to the one shown below:
<link rel="icon" type="image/x-icon" href="../../../api/repos/<sparkl-plugin-name>/static/custom/img/test.ico">
<link rel="stylesheet" type="text/css" href="../../../api/repos/<sparkl-plugin-name>/static/custom/css/test.css" />
Note: there is no longer a need for using the absolute path for accessing resources from a CDE dashboard: simply use
${system:/static/custom/css/my.css}. Thanks to Carlos Russo for pointing this out!
Also keep in mind that you can reference any of the JavaScript files and libraries Pentaho CDF makes use of:
<script language="javascript" type="text/javascript" src="../../../../../../content/pentaho-cdf/js/daterangepicker/daterangepicker.jQuery.js"></script>
Or even reference JavaScript files etc. from Pentaho CDE:
<script language="javascript" type="text/javascript" src="../../../../../../plugin/pentaho-cdf-dd/api/resources/get?resource=/js/cdf-dd-base.js"></script>
Applying your template
So now that we have got our template ready, how do we apply it? Templates are applied on a per dashboard basis.
First make sure your refresh the plugin files by clicking the Refresh icon on the Sparkl Editor page.
From the Sparkl Editor page open up one of your dashboards to edit and click on Settings once the new page opens:

At the bottom of the Settings pop-up window you find a Style picker:
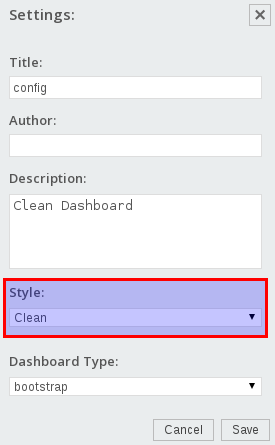
Choose the template we just created and click Save.
Where to store your data
In case your plugin has to persist some config data, the best way to do this currently is to use a folder outside the plugin folder. In example, just create a folder under <biserver>/pentaho-solutions/system.
Sparkl and Kettle
Referencing steps
How to reference a step from a transformation
First read the existing Sparkl docu.
Note: In some scenarios it might be necessary to have more than one output step. You can define several steps to return data to the Sparkl endpoint. Prefix any job entry or step name with upper-case OUTPUT, in example OUTPUTstep1, OUTPUTstep2, but NOT outputStep3.
You can preview the output of your endpoint via your favourite web browser:
http://<server-ip>:<server-port>/pentaho/plugin/<plugin-name>/api/<endpoint-name>?stepName=<step-name>&bypassCache=true
Example result set:
{"resultset":[["SampleData"],["test"]],"queryInfo":{"totalRows":2},"metadata":[{"colIndex":0,"colType":"String","colName":"connectionName"}]}
How to reference a step from a transformation which is called by the Metadata Injector step
Sometimes things get a bit more complex and you want to use the Metadata Injector step to be extremly dynamic.
- Just feed the output of the called (template) transfromation back to this step. This can be configured within the Metadata Injector step settings: Go to the Options tab and specify the Template step to read from. If the output of your template template transformation is dynamic, then do not fill out the Expoect source step output table. Thankfully the Metadata Injector step is clever enough to figure this out on its own.
- Add a Dummy step after the Metadata Injector step and set its name to OUTPUT.
How to reference a step from a job
Note: A job endpoint only accepts one output (in contrast to the transformation endpoint). See this Jira case for more details. Guilherme Raimundo explains: “ If you want something like that [more than one output] you will need to implement it in the logic of your job. One way of doing it is to pass in a query string parameter (e.g. “paramMyParam”) and have your job logic set different results in the job according to the parameter.”
To summarize the concept: In a job you can use as many transformations as necessary. For the transformation which returns the data:
- Use a Copy rows to results step in the end
- Prefix the job entry name with OUTPUT. Note: You do not have to prefix the transformation or job name itself, just the job entry name.
To test the output of your job:
http://<server-ip>:<server-port>/pentaho/plugin/<plugin-name>/api/<endpoint-name>?bypassCache=true
The default output is a summary:
{"result":true,"exitStatus":0,"nrRows":2,"nrErrors":0}
To see the actual data and metadata, request JSON output:
http://<server-ip>:<server-port>/pentaho/plugin/<plugin-name>/api/<endpoint-name>?bypassCache=true&kettleOutput=Json
Sample output:
{"resultset":[[422,"Fred","Oyster"],[334,"Franz","Ferdinand"]],"queryInfo":{"totalRows":2},"metadata":[{"colIndex":0,"colType":"Integer","colName":"id"},{"colIndex":1,"colType":"String","colName":"firstname"},{"colIndex":2,"colType":"String","colName":"lastname"}]}
Currently (2014-08-01), you have to explicitly define the CDE Kettle endpoint output format as Json as well for job endpoints - something you don’t have to do for transformation endpoints. I asked that this behaviour is standardized (see this Jira case).
Consideration with Kettle Output Type
When you add a Kettle endpoint to the Sparkl CDE data sources, the default output type is set to Inferred. This output type has an inconsistent behaviour which you should be aware of:
If the output dataset only contains one value, then the resultset will be like this in example:
SampleData
However, if there is more than one value, the resultset looks like this:
{"metadata":[{"colIndex":0,"colType":"String","colName":"connectionName"}],"queryInfo":{"totalRows":2},"resultset":[["SampleData"],["mysql"]]}
For this reason I strongly suggest that you set the Output Type to Json if the size of your dataset varies. Doing so will return the same structure no matter how many rows and values your resultset holds:
{"metadata":[{"colIndex":0,"colType":"String","colName":"connectionName"}],"queryInfo":{"totalRows":1},"resultset":[["SampleData"]]}
Upgrading the CPK/Sparkl core for your plugin
Once you create a Sparkl plugin, the project folder structure and required base files get created for you automatically. Required libraries are stored in the lib folder.
Sometimes it might be necessary to upgrade to a newer library version (in example when some bugs get fixed or new features become available). To to this, run in the root folder of your plugin following command:
ant resolve
Once the ant script finished, you should see in the log BUILD SUCCESSFUL.
Next restart the server so that you can start using this new library.
Update 2014-08-10: The latest build of Sparkl provides this functionality via the Web UI.
Preparing your plugin for the Marketplace
See Marketplace documentation for details. To get a good understanding of the required information, you can find all existing Marketplace entries here.
Additional points:
Rebase regularly
Make sure you rebase your fork / keep it up-to-date with pentaho-metadata. Add the upstream repo to your local repo, fetch it and then rebase it:
cd marketplace-metadata
git remote add upstream https://github.com/pentaho/marketplace-metadata.git
git fetch upstream
git rebase upstream/master
The last step might result in some merge conflicts. Git provides enough info on the command line to resolve this.
If for some reason your local repo is messed up and you want to start from scratch again, you can clean up your local fork repo and restart it from upstream like this:
git fetch upstream
git checkout master
git reset --hard upstream/master
git push origin master --force
Where to host the plugin files
You can host the plugin files anywhere you want (as long as it is accessible for everyone). Zip your plugin and make sure the original main folder name does not include any version number.
Returning Database Error Messages
In general it would be nice to show any database error message to the end users via the Sparkl plugin UI. This is currently possible to some extend, especially for transformations which write back data using the Table Output or Update steps. These steps support Error Handling and can supply the DB error message. However, the Table Input step currently does not support this functionality (Jira raised).
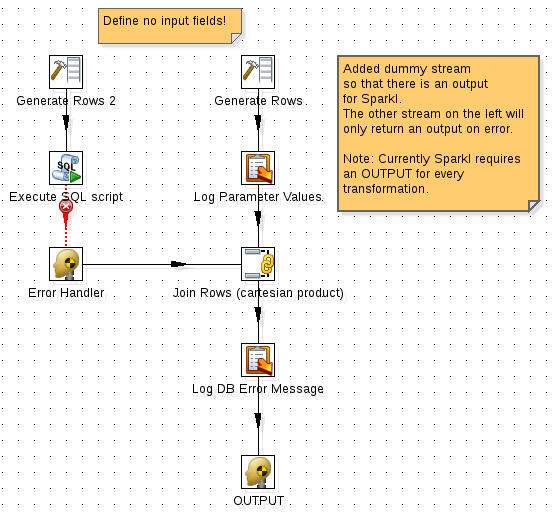
Approach for transformations which do not output any data, we have to make sure that an output is return in any case, even if it is an empty data set. We must define an error handling stream so that the whole transformation does not fail in case of an error.
- Add an additional dummy stream to your transfromation. Use a Generate Rows step with no fields and 1 row defined.
- Add a Dummy step and a Cartesian Join step.
- Connect the database step with the Dummy step and define make sure you set the hop as Error Handling hop.
- Right click on the DB step and choose Define Error Handling …. Define a name for the Error description fieldname, in example db_error_message.
- Connect the Dummy step to the Cartesian Join step.
- Add a Write to Log step and connect the Cartesian Join step to it. Double click on it and make sure the db_error_message field value gets logged.
- Add another Dummy step, rename it to OUTPUT and connect to to the previous step. This must be the only OUTPUT step in your transformation.
- In CDE define this transformation as a new datasource and set the Output Type to Json.
- Add in example a Query Component, specify all the usual settings and then set the **Post Execution function this this:
function(){

    // in case database is down
    if(typeof result_generic_update == 'undefined'){
        alert('Something went wrong! Check JavaScript Console and/or Server Log.');
    }

    // in case database returns error
    else if(result_generic_update.length > 0){
        alert('Something went wrong!!!! The database error message is: "'
        + result_generic_update[0][0]
        + ' In addition check JavaScript Console and/or Server Log.');
    }
}
In this example result_generic_update is the Result Var.
Adding dependent Kettle plugins
In your Sparkl project you might make us of external Kettle plugins, which are not part of the standard biserver distribution. Currently Sparkl does not install them automatically.
A workaround is to include zipped versions of these plugins in a directory within your Sparkl project directory and created a dedicated Kettle job which copies these zip files to the dedicated biserver kettle folder.
Important: It is recommended to include a zipped version of the plugins as Sparkl scans all directories for plugin.xml files. In this case the Kettle plugin plugin.xml files would interfere with the ones from Sparkl. Alternatively you could also rename them.
Executing a Kettle transformation or job on startup
Sometimes your plugin might have to do some work upfront, e.g. create folders, copy files etc. To have the Kettle job execute on startup, go to the job / transformations settings and enable the cpk.executeAtStart parameter. You find this parameter already in the list of predefined but commented parameters: Just remove the hash at the beginning of the name and set its value to true.
Pentaho BA Server REST services
To get an overview of all available REST endpoints for the BA server use this kind of URL:
http://localhost:8080/pentaho/api/application.wadl
This will allow you to understand which kind of REST services Pentaho BA server provides.